Bosch MESE520VCN(00) User guide
- Category
- Juice makers
- Type
- User guide
This manual is also suitable for

使用产品前请仔细阅读本使用说明书,并请妥善保管
立即
在MyBosch上
为您的电器注册,
免费获得以下福利:
bosch-home.cn/
welcome
MESE5...CN
VitaExtract 慢速榨汁机
[zh] 使用说明书
[en] Instruction manual
慢速榨汁机 3
Slow juicer 9


3
zh 主要用途
主要用途
本电器仅供家庭使用。本电器适用于榨取新鲜水果汁或蔬菜汁。本电器
适用于使用冰沙刀盘将冷冻水果或蔬菜制作成冰沙。本电器不得用于
加工其他物品或物质。其他应用需使用制造商许可使用的附件。电器只
能与许可使用的原装部件和附件一同使用。切勿将附件用于其他电器。
仅限在室温及海拔2000米以下的室内使用本电器。
重要安全信息
请仔细阅读并遵守使用说明书并妥善保管,以备将来使用。在将本电器
转让给其他人时附上说明书。若未遵守正确使用电器的说明,制造商对
造成的任何损害概不承担责任。
本电器可供身体、感官、精神障碍或缺乏使用经验和/或使用知识的人使
用,前提是操作时必须有人在场监督并指导他们如何安全地使用本电
器,而且还要让他们了解操作时可能面临的危险。请勿让儿童靠近本电
器和电源线,且不得让儿童操作本电器。严禁儿童将本电器用于嬉戏。儿
童不得对本电器进行清洁和用户保养。
W 有电击和着火危险!
■ 电器必须按照铭牌上的技术规范进行连接和操作。若电源线和/或电
器损坏,请勿使用本电器。电器只能由我们的客户服务部门进行维修
(如更换电源线),以免造成伤害。
■ 切勿将电器连接到定时开关上或遥控插座上。电器开启时必须有人
看 管 !
■ 请勿将电器置于或靠近灼热表面,如灶具。电源线不得接触高温零
件,也不得在锐利边缘上拖拽。
■ 切勿将底座装置浸入水中或者放入洗碗机清洗。请勿使用蒸汽清洁
本电器。请勿以湿手来操作本电器。
■ 每次使用后,无人照看本电器时,在装配、拆卸和清洁之前以及出现
故障时,都必须断开本电器与电源的连接。
W 受伤的危险!
■ 在更换附件或接触运动部件前,必须关掉电源开关并断开电源。电器
刚刚使用完毕后,要等待其停止。
■ 只能操作组装完毕的电器。切勿操作防溅盖未安装、扣紧的电器。
■ 在操作过程中,切勿将手伸进进料口。切勿向进料口中插入任何物体
(如木制汤匙)。只能使用随产品提供的推杆!
■ 双手不得接触旋转部件。电器只能与原装部件和附件一同使用。
W 有窒息危险!
切勿让儿童玩耍包装材料。
W 警告!
建议切勿让电器开启的时间超过加工食材所需的时间。切勿空载运行。
W 重要信息!
每次使用电器后或者已长时间未使用电器,都务必彻底清洁电器。
X“清洁”参见第7页

4
zh 概述
这些操作说明涉及到各种型号。图示页上有不
同型号的概述。
X图 J
概述
请翻开图示页。
X 图 A
1 底座装置/电机单元
a 驱动轴
b 标记G
c 开关(3级)
=开启
y
=关断
{ =反转功能
d 电源线
e LED环*
f 标记E
2 果汁桶
a 驱动轴密封
b 果汁孔
c 果汁密封盖(防漏机构)
d 果肉孔
e 带果肉密封的调节杆和标记È É Ê*
f 果肉密封*
g 标记F
h 刻度
3 带硅刮刀的旋转刷
4 滤网插入件
a 细(黑色)
b 粗(灰色)
c 标记Å
5 冰沙插入件*
a 标记Å
6 榨汁机螺钉
7 推杆
8 防溅盖
a 进料口
b 标记K
9 果汁容器
10 果肉容器
11 清洁刷
12 食谱
*具体取决于机型
感谢您购买新的 Bosch 电器。您可以在我们
的网站上找到更多关于产品的信息。
制造商:
博西家用电器(中国)有限公司
中国江苏省南京市中山路129号中南国际大
厦20、21楼
执行标准:
GB4706.1-2005
家用和类似用途电器的安全,第1部分:通用
要求
GB4706.30-2008
家用和类似用途电器的安全–厨房机械的特
殊要求
全国统一客户服务热线:
4008855888
客户服务电子邮箱:
公司网站:
www.bosch-home.cn
技术数据:
电气连接
(电压–频率)
220 V~
50 Hz
额定功率 150W
尺寸
(高x宽x深)
370 x 150 x 150毫米
内容
主要用途................................................ 3
重要安全信息.......................................... 3
概述....................................................... 4
首次使用前............................................. 5
符号和标志............................................. 5
果肉浓度调节杆/密封............................ 5
准备....................................................... 5
用途....................................................... 6
清洁....................................................... 7
环保型处理............................................. 7
保修....................................................... 7
故障排除................................................ 8

5
zh 首次使用前
准备
W 有受伤危险
应先完成所有使用电器的准备工作,正确组装
所有单独部件并将其装到底座上,方可插入电
源插头。
警告!
切勿将果汁桶放在不带驱动轴密封的底座装
置上。此外,在将密封放在底座装置上之后,确
保密封位置正确。
重要说明:在重新组装前,检查孔是否被果肉
密封完全关闭。
X“果肉浓度调节杆/密封”参见
第5页
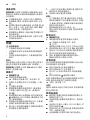
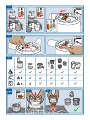
榨果汁的准备工作
X 图像顺序 B
1. 将底座装置放在稳定的水平工作台上。
2. 将果汁桶放在底座装置上。在进行此操作
时,请将果汁桶底座上的安装槽与底座装
置上的相应位置对齐(观察,标记)。果汁桶
必须齐平放置并固定在底座装置顶部。
3. 将旋转刷放在果汁桶中。
4. 将需要的滤网插入件(粗或细)放在旋转
刷中(注意标记)。
重要说明:确保底座上的孔和凹口稳定固定于
果汁桶上相应部件的顶部。滤网插入件不得再
能进一步转动。
5. 将榨汁机螺钉放在滤网中,并按下,直至其
位于驱动轴顶部。
6. 将防溅盖放在顶部(,),沿顺时针方
向(;)尽可能转动。
制作冰沙的准备工作
X 图像顺序 C
1. 将底座装置放在稳定的水平工作台上。
2. 将果汁桶放在底座装置上。在进行此操作
时,请将果汁桶底座上的安装槽与底座装
置上的相应位置对齐(观察,标记)。果汁桶
必须齐平放置并固定在底座装置顶部。
3. 将冰沙插入件放在果汁桶中(注意标记)。
重要说明:确保底座上的孔和凹口稳定固定于
果汁桶上相应部件的顶部。冰沙插入件不得再
能进一步转动。
4. 将榨汁机螺钉放在冰沙插入件中,按下,直
至其位于驱动轴顶部。
5. 将防溅盖放在顶部(,),沿顺时针方
向(;)尽可能转动。
首次使用前
使用新电器之前,必须完全拆除包装并进行清
洁 、检 查 。
警告!
切勿使用已损坏的电器!
■ 从包装中取出底座和所有附件,处理掉所
有包装材料。
■ 检查部件是否齐全,以及是否有明显损
坏。X图 A
■ 在首次使用前要彻底清洁并擦干所有部
件 。 X“清洁”参见第7页
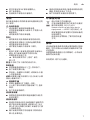
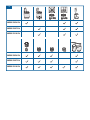
符号和标志
符号 含义
K
安装防溅盖(,)并用螺钉拧
紧(;)。
G
底座装置上用于安装防溅盖和
滤网的标记。
H
滤网的标记。
F
安装果汁桶(.)。
E
底座装置上用于安装果汁桶
的标记。
最大容量如果果汁达到
350ml 标记,结束加工,清空
果汁桶。
È É Ê
*
果汁桶上的调节杆标记*:
清洁、少量果肉、大量果肉。
果肉浓度调节杆 / 密封
X 图 F–带密封调节杆的型号
果肉浓度调节杆可控制果汁的均匀性。
■ 将果肉浓度调节杆移向右侧即可制备出
纤维量丰富的蔬果汁(Ê) 。
■ 将果肉浓度调节杆移向中间即可制备出
纤维量少的蔬果汁(É)。
■ 如需清洁╱冲洗,应将榨汁容器取下、
旋转,并将调节杆移到止动位置,如图所
示(È)。
X图 G – 带密封的型号
果肉密封可确保果汁稳定均匀。
■ 当制作果汁或冰沙时,必须将密封正确定
位在果肉孔中。
■ 如要清洁/冲洗,请取下果汁桶,翻转并拉
出密封。

6
zh 用途
准备食物
重要说明:只能加工成熟的水果和蔬菜。未成
熟或过于成熟的水果会很快堵塞榨汁机螺钉
及其滤网。
■ 去除果核或种子(如李子、桃子、樱桃等)。
■ 去除硬皮/果皮(如西瓜、菠萝、黄瓜、土豆
等)。
■ 带薄皮/果皮的水果和蔬菜(如苹果、梨、胡
萝卜、水萝卜、沙拉、包菜、欧芹、菠菜、葡萄、
草莓、芹菜等)只需清洗即可。
■ 将柑橘类水果剥皮,去除白髓,否则果汁可
能会有苦味。
■ 将大的水果和蔬菜事先切碎,以便可以将
其轻松装进料口。
用途
W 有受伤危险
– 只能操作组装完毕的电器。
– 切勿操作安装不当或没有锁定防溅盖的
电器!
– 切勿将手指伸进进料口。只能使用提供的
推杆!
警 告 !
务必使用冰沙插入件加工冷冻水果。切勿加工
通过冷冻变得非常坚硬的水果(如草莓)。
重要说明:如果果汁达到350ml 标记,请结
束加工,清空果汁桶。
榨果汁
X 图像顺序 D
■ 按照说明准备本电器。
X“榨果汁的准备工作”参见第5页
1. 在果汁孔和果肉孔的下方各放置一个容
器。
2. 打开果汁密封盖。
3. 根据需要将果肉浓度调节杆(具体取决
于机型)滑至中间(É)或一直滑至右
侧(Ê)。
4. 将电源插头插入电源插座。将开关移动至
。电器启动。LED环亮起(具体取决于机
型)。旋转刷旋转。
5. 将准备好的食物添加到进料口中。只能使
用随产品提供的推杆推入食物。
6. 果汁流入到右侧的容器中。榨取后的果肉
将收集在左侧的容器中。
7. 一旦加工完成或果汁容器已满,请将开关
移动至O,等待电器停止。
8. 关闭果汁密封盖,倒空容器。
说明:
– 为了提高果汁的产量,最好在加工开始和
结束阶段都加工含大量果汁的食材(如橙
子、番茄、西瓜等)。坚硬或含有纤维的食材
放在中间阶段加工。
– 将食物装进进料口中,每次一份。
– 填充过度不会加快加工速度,而会导致果
浆桶溢出。
制作冰沙
X 图像顺序 E
1. 本机器应如所述预先准备冰沙嵌件。
X“制备冰沙的准备工作”参见
第27页。
请将接汁杯置于出汁口下方。打开出汁口盖。
2. 将电源插头插上。按下开关ON。本机器启
动运行。LED指示灯环亮起(视机型而定)。
3. 将冷冻过的食材填充到填充轴中。
4. 然后,使用随附的推料棒将食材推入。
制备完成的冰沙将流入杯内。
反转功能
设计反转功能的目的是通过短暂反向运行涡
轮来释放被卡住的食物。
■ 将开关移动至O,等待电器停止。
■ 将开关移动至{并将其按下。
■ 在大约3-5秒后,释放开关,等待电器停
止。
■ 将开关移动至 ,继续榨汁操作。
说明:如果短暂反向运行电器未能释放卡住的
食物,请关断电器,拔下电源进行清理。
X“清洁”参见第7页
注 意 !
请务必使用反向运行功能几秒钟,否则本机器
将无法再开机。
使用电器后
■ 倒空两个容器,然后将其重新放在果汁孔
和果肉孔的下方。
■ 关闭密封盖,将果肉浓度调节杆一直滑至
右侧。
■ 向进料口中倒入少量水(约150毫升),并
将开关移动至 。
■ 在短时间之后,打开密封盖,将果肉浓度调
节杆一直滑至左侧。
■ 让电器减速,在将其关断之前完全停止。

7
zh 清洁
■ 将开关移动至O,等待电器停止。
■ 拔下电源插头。
■ 在使用后立即清洁所有部件。
清洁
每次使用后都必须彻底清洁本电器和用过的
各个部件。
W 电击的危险!
– 清洁电器之前请拔掉电器电源。
– 切勿将底座装置浸入液体中,不得放入洗
碗机清洗。
– 请勿使用蒸汽清洁本电器。
警告!
– 请勿使用任何含酒精或溶剂的清洁剂。
– 请勿使用任何锋利、尖锐或金属的物体。
– 请勿使用砂布或清洁剂。
– 请不要在洗碗机中清洁单个部件。
说明:
– 若加工胡萝卜等食物,塑料部件会被染上
颜色。用几滴食用油即可将其去除。
– 将果肉密封完全打开。
X“果肉浓度调节杆/密封”参见
第5页
图 H中总结了各个部件的清洁方法。
拆卸电器
■ 将防溅盖旋转到标记(,),然后拆下。
■ 拆下装配的果汁桶。
■ 然后逐一拆卸榨汁机螺钉、滤网或冰沙插
入件和旋转刷。
说明:如果果汁桶中有部件卡住(如由于水果
残余),请操作如下。
X 图像顺序 I
1. 将果汁桶翻转,在下面放一块布。
2. 小心按下榨汁机螺钉的驱动轴下方,直至
释放。
3. 拆下所有单独部件。
清洁底座装置
■ 用柔软的湿抹布擦拭底座装置的外侧,然
后将其擦干。
清洁其他部件
■ 用清洁剂溶液、软布/海绵和随产品提供的
刷子清洁滚筒、旋转刷、滤网插入件、冰沙
插入件、榨汁机螺钉和推杆,或者将它们放
入洗碗机清洗。
■ 随产品提供的刷子特别适用于彻底清洁
果汁孔和果肉孔。
■ 用清洁剂溶液和软布/海绵或软刷清洁防
溅盖,然后在自来水下冲洗。
■ 晾干所有部件或使用布将其擦干。
环保型处理
J
请以环保方式处置包装。
对本设备根据有关电气和电子设备报
废的欧洲规定2012/19/EU
(wasteelectricalandelectronic
equipment—WEEE)进行标记。该
规定管理在欧洲范围内对报废设备的
回收和再生。
请 咨 询 专 业 零 售 商 ,了 解 可 用 的 处 置
方式。
保修
该设备的保修条款将由售出国的销售代表来
确定。您可向售出此设备的经销商详细了解
这些条款。
当根据保修条款进行任何索赔时、必须出具
销售凭证或收据。
如有更改、恕不另行通知。

8
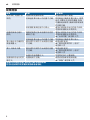
zh 故障排除
故障排除
故障 原因 补救措施
当开启时,电器不会
启动。
电器没有连接到电源。 将电源插头插入插座。
防溅盖在果汁桶上的位置不正确。将防溅盖正确放在果汁桶上。观察
标记。如果无法关闭防溅盖,拆除
并重新组装部件。确保所有单独部
件位置正确。
本机器在使用过程中已停止。 请务必使用反向运行功能几秒钟,
否则本机器将无法再开机。
电器在使用过程中
停机。
榨取的食物过多或电器中存在坚
硬种子/茎。
请务必使用反向运行功能几秒钟,
否则本机器将无法再开机。
X“反转功能”参见第6页
防溅盖在果汁桶上的位置不正确。将防溅盖正确放在果汁桶上。
果汁桶无法正确放在
底座装置上。
果肉调节杆调节不当或密封位置
不正确。
检查设置/密封。
X“果肉浓度调节杆/密封”
参见第5页
果汁太稀或太稠。 果肉调节杆调节不当或密封位置
不正确。
检查设置/密封。
X“果肉浓度调节杆/密封”
参见第5页
电器中的食物量过大。 切勿同时加工过量食物。
电器电机在运行时声
音过大。
电器组装不正确。 按照说明拆卸和组装电器。
X“准备”参见第5页
如果您无法解决问题,务必拨打我们的服务热线!
您可以在说明书的背面找到热线电话号码。

9
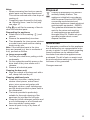
en
Intended use
Intended use
This appliance is intended for domestic use only.
The appliance is suitable for squeezing fresh juice from fruit or
vegetables. The appliance is suitable for making sorbet from frozen
fruit or vegetables when using the sorbet insert piece. The appliance
must not be used for processing other substances or objects.
Additional applications are possible if the accessories approved by
the manufacturer are used. Only use the appliance with approved
genuine parts and accessories. Never use the accessory parts
for other appliances. Only use the appliance indoors at room
temperature and up to 2000 m above sea level.
Important safety information
Read and follow the instruction manual carefully and keep for later
reference! Enclose these instructions when you give this appliance
to someone else. If the instructions for correct use of the appliance
are not observed, the manufacturer’s liability for any resulting
damage will be excluded. This appliance can be used by persons
with reduced physical, sensory or mental capabilities or lack of
experience and/or knowledge if they have been given supervision
or instruction concerning use of the appliance in a safe way and if
they understand the hazards involved. Keep children away from the
appliance and connecting cable and do not allow them to use the
appliance. Children shall not play with the appliance. Cleaning and
user maintenance must not be made by children.
W Risk of electric shock and fire!
■ Connect and operate the appliance only in accordance with the
specifications on the rating plate. Do not use the appliance if the
power cord and/or appliance are damaged. Only our customer
service may repair the appliance, e.g. by replacing a damaged
power cord, in order to avoid hazards.
■ Never connect the appliance to timer switches or remote-
controllable sockets. Never leave the appliance unattended while
it is switched on!
■ Do not place the appliance on or near hot surfaces, e.g. hobs.
The power cord must not come into contact with hot parts or be
pulled across sharp edges.
■ Never immerse the base unit in water or place it in the
dishwasher. Do not steam-clean the appliance. Do not use the
appliance with damp hands.
■ After each use, whenever the appliance is unsupervised, prior to
assembly, prior to disassembly, prior to cleaning and in the event of
an error, the appliance must always be disconnected from the mains.

10
en Important safety information
Congratulations on the purchase of
your new Bosch appliance. You can find
further information about our products
on our website.
Manufacturer:
BSH Home Appliances (China) Co., Ltd.
20/F,21/F, CN International Mansion,
129 Zhongshan Road, Nanjing,
Jiangsu Province, PRC.
Applicable standards:
GB 4706.1-2005
Safety of Household and Similar Electrical
Appliances Part 1: General Requirements
W Risk of injury!
■ Before replacing accessories or additional parts which move
during operation, the appliance must be switched off and
disconnected from the power supply. Immediately after using the
appliance, wait for it to stop.
■ Only operate the appliance in its fully assembled state. Never
operate it without a correctly placed and locked lid!
■ Never reach into the feed chute with your hands during operation.
Do not insert any objects (e.g. wooden spoons) into the feed
chute. Only use the pusher provided!
■ Keep hands clear of rotating parts. Use the appliance only with
genuine parts and accessories.
W Risk of suffocation!
Do not allow children to play with packaging material.
W Caution!
We recommend that the appliance is never switched on for longer
than is necessary to process the ingredients. Do not operate
at no-load.
W Important!
It is essential to clean the appliance thoroughly after each use or
after it has not been used for an extended period. X “Cleaning” see
page 14
GB 4706.30-2008
Safety of Household and Similar Electrical
Appliances – Particular Requirements for
Kitchen Machines
Careline:
4008855888
Service E-mail:
Company website:
www.bosch-home.cn
Technical specifications:
Electrical connection
(voltage – frequency)
220 V~
50 Hz
Power rating 150 W
Dimensions
(H x W x D)
370 x 150 x 150 mm

11
en
Contents
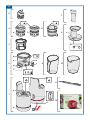
5 Sorbet insert piece*
a Marking Å
6 Juicer screw
7 Pusher
8 Lid
a Feed chute
b Marking K
9 Container for juice
10 Container for fruit pulp
11 Cleaning brush
12 Recipe book
* Depending on the model
Before using for the
first time
Before the new appliance can be used,
it must be fully unpacked, cleaned and
checked.
Caution!
Never operate a damaged appliance!
■ Remove the base unit and all accesso-
ries from the packaging and dispose of
all packing materials.
■ Check that all the parts are present and
examine them for obvious damage.
X Fig. A
■ Thoroughly clean and dry all parts
before using for the first time.
X “Cleaning” see page 14
Contents
Intended use ............................................... 9
Important safety information .......................9
Overview................................................... 11
Before using for the first time.................... 11
Symbols and markings .............................12
Adjusting lever / seal for fruit pulp ............12
Preparation ...............................................12
Use ...........................................................13
Cleaning ...................................................14
Disposal .................................................... 15
Guarantee.................................................15
Troubleshooting ........................................ 16
These operating instructions refer to various
models. An overview of the different models
can be found on the illustrated pages.
X Fig. J
Overview
Please fold out the illustrated pages.
X Fig. A
1 Base unit/motor unit
a Drive shaft
b Marking G
c Switch (3-level)
= On
y
= Off
{
= Reversing function
d Mains cable
e LED-Ring*
f Marking E
2 Juice drum
a Seal for drive shaft
b Aperture for juice
c Sealing cap for juice (drip-stop)
d Aperture for fruit pulp
e Adjusting lever with seal for fruit pulp
and markings È É Ê *
f Seal for fruit pulp*
g Marking F
h Scale
3 Rotating brush with silicon scraper
4 Strainer insert pieces
a Fine (black)
b Coarse (grey)
c Marking Å

12
en Symbols and markings
Symbols and markings
Symbol Meaning
K
Fit the lid (,) and screw
on securely (;).
G
Marking on the base unit for
fitting the lid and for the insert
pieces.
H
Marking on the insert pieces.
F
Fit juice drum (.).
E
Marking on the base unit for
fitting the juice drum.
Max. capacity. If the juice
reaches the 350 ml marking,
finish processing and empty
the juice drum.
È É Ê
*
Markings on the juice drum
for the adjusting lever *:
cleaning, little fruit pulp, lot of
fruit pulp.
Adjusting lever /
seal for fruit pulp
X Fig. F – Models with adjusting lever
for seal
The consistency of the juice can be
controlled using the adjusting lever for fruit
pulp.
■ For juice with a lot of fruit pulp, slide the
lever to the right (Ê).
■ For juice with less fruit pulp, slide the
lever towards the centre (É).
■ To clean/rinse out, remove the juice
drum, turn over and slide the lever to the
stop as shown (È).
X Fig. G – Models with seal
The seal for fruit pulp ensures that the juice
has a constant consistency.
■ When making juice or sorbet, the seal
must sit correctly in the aperture for fruit
pulp.
■ To clean/rinse out, remove the juice
drum, turn over and pull out the seal.
Preparation
W Risk of injury
Do not insert the mains plug until all
preparations for working with the appliance
are complete and all individual parts are
assembled correctly and connected to the
base unit.
Caution!
Never place the juice drum onto the base
unit without the seal for the drive shaft.
Ensure that the seal also sits correctly after
placing it onto the base unit.
Important: Before re-assembling, check
that the aperture is completely closed by
the seal for fruit pulp. X “Adjusting lever /
seal for fruit pulp” see page 12
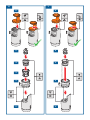
Preparing to squeeze juice
X Image sequence B
1. Place the base unit onto a stable and
level work surface.
2. Place the juice drum onto the base
unit. When doing so, align the recesses
on the base of the juice drum with the
counterparts on the base unit (observe
. markings). The juice drum must sit
flush and firmly on top of the base unit.
3. Place the rotating brush into the juice
drum.
4. Place the desired strainer insert piece
(coarse or fine) into the rotating brush
(observe markings .).
Important: Ensure that the aperture and
the notches on the base sit firmly on top of
their counterparts on the juice drum. The
strainer insert piece must not be able to turn
any further.
5. Place the juicer screw into the strainer
and press down until it sits on top of the
drive shaft.
6. Place the lid on top (,) and turn
it as far as possible in a clockwise
direction (;).

13
en
Use
Preparing to make sorbet
X Image sequence C
1. Place the base unit onto a stable and
level work surface.
2. Place the juice drum onto the base
unit. When doing so, align the recesses
on the base of the juice drum with the
counterparts on the base unit (observe
. markings). The juice drum must sit
flush and firmly on top of the base unit.
3. Place the sorbet insert piece in the juice
drum (observe markings .).
Important: Ensure that the aperture and
the notches on the base sit firmly on top of
their counterparts on the juice drum. The
sorbet insert piece must not be able to turn
any further.
4. Place the juicer screw into the sorbet
insert piece and press down until it sits
on top of the drive shaft.
5. Place the lid on top (,) and turn
it as far as possible in a clockwise
direction (;).
Preparing food
Important: Only process ripe fruit and
vegetables. Unripe or over-ripe fruit will very
quickly clog the juicer screw and its strainer.
■ Remove stones or seeds (e.g. for
plums, peaches, cherries etc.).
■ Remove hard peel/skin (e.g. for melons,
pineapples, cucumbers, potatoes etc.).
■ Fruits and vegetables with thin peel/skin
(e.g. apples, pears, carrots, radishes,
salad, cabbages, parsley, spinach,
grapes, strawberries, celery etc.) only
need to be washed.
■ Peel citrus fruits and remove the white
pith, as the juice may taste bitter
otherwise.
■ Chop up large fruits and vegetables
beforehand so they fit into the feed
chute without having to force them in.
Use
W Risk of injury
– Only operate the appliance in its fully
assembled state.
– Never operate it without a correctly
placed and locked lid.
– Do not reach into the feed chute with your
fingers. Use the supplied pusher only!
Caution!
Always use the sorbet insert piece to process
frozen fruits. Do not process fruit that gets
very hard by freezing (eg. strawberries).
Important: If the juice reaches the 350 ml
marking, finish processing and empty the
juice drum.
Squeezing juice
X Image sequence D
■ Prepare the appliance as described.
X “Preparing to squeeze juice” see
page 12
1. Place one container under each of the
apertures for juice and fruit pulp.
2. Open the sealing cap for the juice.
3. Slide the adjusting lever for fruit pulp
(depending on the model) as wished
either towards the centre (É) or all the
way to the right (Ê).
4. Plug the mains plug into the mains.
Move the switch to . The appli-
ance starts. The LED ring lights up
( depending on the model). The rotating
brush rotates.
5. Add the prepared food to the feed chute.
Only use the pusher provided to push
the food further.
6. The juice flows into the right-hand con-
tainer. The squeezed fruit pulp will be
collected in the left-hand container.
7. Once the processing is complete or the
juice container is full, move the switch
to O and wait for the appliance to come
to a stop.
8. Close the sealing cap for the juice and
empty the container.

14
en Cleaning
Notes:
– To improve the amount of juice pro-
duced, preferably process ingredients
containing lots of juice at the beginning
and end of processing (e.g. oranges,
tomatoes, watermelon, etc.). Process
hard or fibrous Ingredients in-between.
– Fill the food into the feed chute one
portion at a time.
– Stuffing it in excessively does not
accelerate the processing and leads to
the drum overflowing.
Making sorbet
X Image sequence E
1. Prepare the appliance as described with
the sorbet insert piece. X “Preparing to
make sorbet” see page 13
Place a container under the aperture for
the juice. Open the sealing cap for the
juice.
2. Plug the mains plug into the mains.
Move the switch to . The appli-
ance starts. The LED ring lights up
( depending on the model).
3. Add the frozen food to the feed chute.
4. Only use the pusher provided to push
the food further. The sorbet produced
will be collected in the container.
Reversing function
The reversing function is designed to
release food that has got stuck by briefly
running the worm gear in reverse.
■ Move the switch to O and wait for the
appliance to come to a stop.
■ Move the switch to { and keep it
pressed.
■ After approx. 3-5 seconds, release the
switch and wait for the appliance to
come to a stop.
■ Move the switch to and continue with
the juicing.
Note: If food that has got stuck is not
released by briefly putting the appliance into
reverse, switch the appliance off, unplug it
and clean it. X “Cleaning” see page 14
Warning!
The reversing function must be used for
several seconds or it will no longer be pos-
sible to switch on the appliance.
After using the appliance
■ Empty both containers and then place
them under the apertures for juice and
fruit pulp again.
■ Close the sealing cap and slide the
adjusting lever for the fruit pulp all the
way to the right.
■ Pour a little water (approx. 150 ml) into
the feed chute and move the switch
to .
■ After a short time, open the sealing cap
and slide the adjusting lever for fruit pulp
all the way to the left.
■ Let the appliance slow down and stop
completely before switching it off.
■ Move the switch to O and wait for the
appliance to come to a stop.
■ Disconnect the mains plug.
■ Clean all parts immediately after use.
Cleaning
The appliance and the individual parts used
must be thoroughly cleaned after each use.
W Risk of electric shock!
– Unplug the appliance before cleaning it.
– Never immerse the base unit in liquids
and do not clean in the dishwasher.
– Do not steam-clean the appliance.
Caution!
– Do not use any cleaning agents
containing alcohol or spirits.
– Do not use any sharp, pointed or metal
objects.
– Do not use abrasive cloths or cleaning
agents.
– Do not clean the individual parts in the
dishwasher.

15
en
Disposal
Notes:
– When processing food such as carrots,
plastic parts may become discoloured.
This can be removed with a few drops of
cooking oil.
– Completely open the seal for fruit pulp.
X “Adjusting lever / seal for fruit pulp”
see page 12
In Fig. H you will find a summary of how to
clean the individual parts.
Dismantling the appliance
■ Rotate the lid to the marking (,) and
remove.
■ Remove the assembled juice drum.
■ Then dismantle the juicer screw, strainer
or sorbet insert piece and the rotating
brush one by one.
Note: If the individual parts in the juice
drum are jammed (e.g. due to remnants of
fruit), proceed as follows.
X Image sequence I
1. Turn the juice drum over, putting a cloth
underneath.
2. On the underside carefully press on the
drive shaft of the juicer screw until it
releases.
3. Remove all individual parts.
Cleaning the base unit
■ Wipe the outside of the base unit with a
soft, damp cloth and dry off.
Cleaning additional parts
■ Clean the juice drum, rotating brush,
strainer insert pieces, sorbet insert
piece, juicer screw and pusher with
detergent solution, a soft cloth/sponge
and the brush provided or place them in
the dishwasher.
■ The brush provided is particularly
suitable for thorough cleaning of the
apertures for juice and for fruit pulp.
■ Clean the lid with detergent solution and
a soft cloth/sponge or a soft brush and
then rinse under running water.
■ Leave all parts to dry or dry them off
with a cloth.
Disposal
J
Dispose of packaging in an environ-
mentally-friendly manner. This
appliance is labelled in accordance
with European Directive 2012/19/EU
concerning used electrical and
electronic appliances (waste electrical
and electronic equipment – WEEE).
The guideline determines the frame-
work for the return and recycling
of used appliances as applicable
throughout the EU. Please ask your
specialist retailer about current
disposal facilities.
Guarantee
The guarantee conditions for this appliance
are as defi ned by our representative in the
country in which it is sold. Details regarding
these conditions can be obtained from
the dealer from whom the appliance was
purchased. The bill of sale or receipt must
be produced when making any claim under
the terms of this guarantee.
Changes reserved.

16
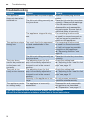
en Troubleshooting
Troubleshooting
Problem Reason Remedy
The appliance
does not start when
switched on.
Appliance has no power supply. Insert the mains plug into the
socket.
The lid is not sitting correctly on
the juice drum.
Place the lid onto the juice drum
correctly. Observe the markings.
If the lid cannot be closed,
disassemble and reassemble
the parts again. Ensure that all
individual parts sit correctly.
The appliance stopped during
use.
The reversing function must
be used for several seconds or
it will no longer be possible to
switch on the appliance.
The appliance stops
during use.
Too much food to be squeezed
or hard seeds/stalks in the
appliance.
The reversing function must
be used for several seconds
or it will no longer be possible
to switch on the appliance.
X “Reversing function” see
page 14
The lid is not sitting correctly on
the juice drum.
Place the lid onto the juice drum
correctly.
The juice drum
cannot be positioned
on the base unit
correctly.
The adjusting lever for fruit
pulp is incorrectly adjusted or
the seal is not in the correct
position.
Check the setting/seal.
X “Adjusting lever / seal for fruit
pulp” see page 12
The juice is too
runny or too viscous.
The adjusting lever for fruit
pulp is incorrectly adjusted or
the seal is not in the correct
position.
Check the setting/seal.
X “Adjusting lever / seal for fruit
pulp” see page 12
Quantity in the appliance is too
large.
Do not process excessive
quantities simultaneously.
The appliance motor
is running loudly.
The appliance is incorrectly
assembled.
Disassemble and reassemble
the appliance as described.
X “Preparation” see page 12
If you are unable to solve the problem, always call the hotline!
You will find the telephone numbers at the back of these instructions.


全国统一客户服务热线:
4008855888
客户服务电子邮箱:
公司网站:
www.bosch-home.cn
立即在MyBosch上为您的电器注册,便可直接获得如下福利:
•
专家级电器使用提示与技巧
• 保修延长选项
•
附件和备件折扣
•
易于获得数字手册和所有电器数据
•
便于享受博世家电服务
注册免费而简单 - 同样针对移动电话
:
www.bosch-home.cn/welcome
针对博世家电的专家级建议,需要博世专家帮助解决问题或维修 。
了解博世支持您的各种方式。
www.bosch-home.com/service
随附的服务目录中列出了所有国家的联系信息。
总经销商:
博西家用电器(中国)有限公司
中国江苏省南京市中山路129号中南国际大厦20、21楼
感谢您购买博世家电!
需要帮助吗?
可以从此处获取。
8001124826
*8001124826*
(980704)

1
3
5*
2
9 10
4
6
8
7
11
12
a
e*
c
d
a b
a
b
b
c a
f
a
h
d
f *
b
c
g
e*
A

B C
1
2
3
4
5
6
1
2
3
4
5
Page is loading ...
Page is loading ...
Page is loading ...
-
 1
1
-
 2
2
-
 3
3
-
 4
4
-
 5
5
-
 6
6
-
 7
7
-
 8
8
-
 9
9
-
 10
10
-
 11
11
-
 12
12
-
 13
13
-
 14
14
-
 15
15
-
 16
16
-
 17
17
-
 18
18
-
 19
19
-
 20
20
-
 21
21
-
 22
22
-
 23
23


Bosch MESE520VCN(00) User guide
- Category
- Juice makers
- Type
- User guide
- This manual is also suitable for
Ask a question and I''ll find the answer in the document
Finding information in a document is now easier with AI