Brandt MW3-245GEPB Owner's manual
- Category
- Microwaves
- Type
- Owner's manual

E
Horno microondas
Guía de instrucciones
F
Four à micro-ondes
Notice d’utilisation
Microwave oven
Instruction manual
P
Forno micra-ondas
Manual de instruções
D
Mikrowellengerät
Gebrauchsanweisung
I
Forno a microonde
Istruzioni per l’uso

2
ESPAGÑOL
Guía de instrucciones ................................ pág 3
FRANÇAIS
Notice d’utilisation ..................................... page 30
ENGLISH
Operating instructions ............................... page 57
PORTUGUÊS
Manual de instruções ................................ pág 84
DEUTCH
Gebrauchsanweisung ................................ Seite 111
ITALIANO
Istruzioni per l’uso ..................................... page 138
E
GB
P
D
I
F
Page is loading ...
Page is loading ...
Page is loading ...
Page is loading ...
Page is loading ...
Page is loading ...

9
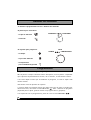
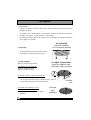
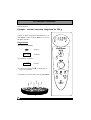
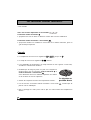
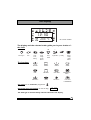
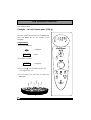
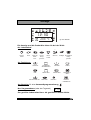
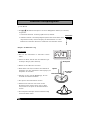
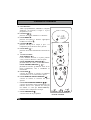
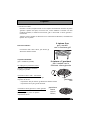
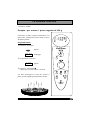
Indicator
El indicador y Ios selectores le ayudan a seleccionar:
Ios alimentos
las funciónes
el peso para una programación automatica.
el tiempo de programación (o el rejol)
Centellea el alimento o la función en curso.
*
*
*
*
*
*
*
* según modelo
liquidos pescado cerdo,
ternera,
pavo
platos
cocinado
s frescos
buey
cordero
hortalizas aves platos
cocinados
congelados
DESCONGEL. COCCIÓN RECALENTAMIENTO COCCIÓN
DUO PARRILLA SUAVE PARRILLA FUERTE MICROONDAS
+ PARRILLA*
GIRAPOLLOS PIZZA CALOR
GIROTORIO*
CALOR GIRATORIO
+ MICROONDAS
12:30
200 °C
1 2 : 0 0

10
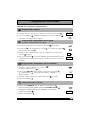
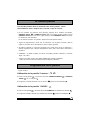
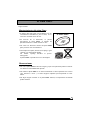
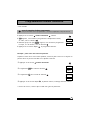
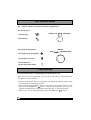
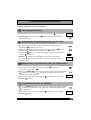
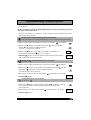
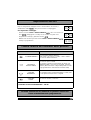
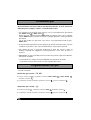
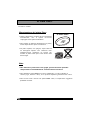
Botones de selección
Se efectúa la programación con los 2 botones de selección:
El primero para seleccionar
- et tipo de alimento
- la función
El segundo para programar:
- et tiempo
- et peso del alimento
- la temperatura
para el modelo EasyCombi
Su aparato está conectado y et reloj está puesto.
Abra la puerta. Coloque et alimento dentro del aparato, cierre la puerta. Compruebe
que la puerta esté perfectamente cerrada ; de lo contrario, no funcionará et horno.
• Una serial triple le indica que ha finalizado et programa, La serial se repite cada
minuto durante
diez minutos hasta la apertura de la puerta.
• Si desea utilizar un recipiente mayor que dicho plato y por Io tanto no podria girar
dentro del homo, seleccione la tecla
PARA PLATO antes o durante un programa
(imposible parar et plato giratorio durante un programa Duo o girapollos).
• De equivocarse en la programación, pulse dos veces la tecla
ANULACION .
ALIMENTOS FUNCIONES
PESO
TIEMPO *TEMPERATURA
Programación
Page is loading ...
Page is loading ...

13
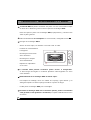
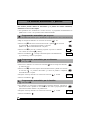
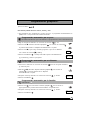
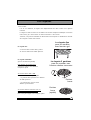
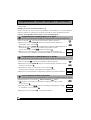
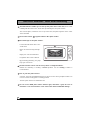
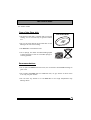
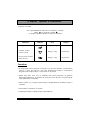
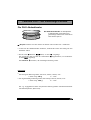
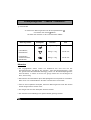
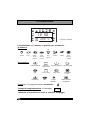
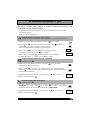
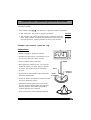
Función DUO: recalentamiento a 2 niveles
Los cubreplatos DUO
Los cubreplatos DUO de efecto de vapor:
2 cubreplatos para recalentar 2 platos
frescos o refrigerados a la vez.
Ejemplo: Recalentamiento de dos platos de ravioli con salsa de tomate = 5 minutos
Tapar ambos platos con Ios cubreplatos, superponerlos y colocarlos en et centro del plato
giratorio.
Pulsar la tecla ,
00 00 :: 00 00
centellea, aparece.
Programe et tiempo con et selector , ej. 5 minutos :
00 55 :: 00 00
aparece.
Pulse la tecla Marcha , arranca recalentamiento a 2 niveles.
De manera general:
Para un alimento homogéneo tal como puré, guisantes, apio, etc...
2 platos de 200 g 3 / 4 minutos
Para un alimento heterogéneo tal como fabadas, carne guisada, ravioli, etc...
2 platos de 300 g 5 / 6 minutos
Los tiempos anteriormente indicados corresponden a los alimentos refrigerados o a
temperatura ambiente (conservas).
réchauffage
cuisson
décongélation
Page is loading ...
Page is loading ...
Page is loading ...
Page is loading ...

18
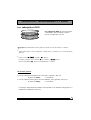
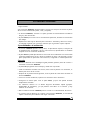
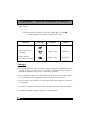
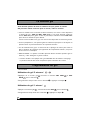
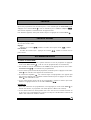
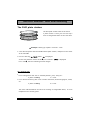
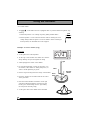
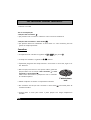
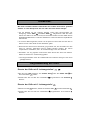
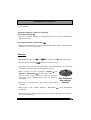
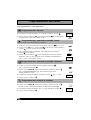
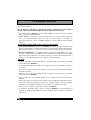
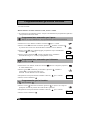
La función GrillPizza*
*según modelo
Ejemplo : calentar una pizza congelada de 350 g
Colocar la pizza congelada directamente en et
plato Pizza, colocar et plato Pizza en et centro
del plato giratorio.
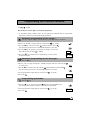
Programación
1
Pulsar la tecla Pizza:
aparece
centellea
2
Programar 7 minutos
aparece
3
Pulsar la tecla marcha , et plato gira, et
horno se enciende.
➤Protegerse las manos para sacar et plato Pizza.
0 0 : 0 0
7 : 0 0
7 : 0 0
2
1
3
Page is loading ...
Page is loading ...
Page is loading ...
Page is loading ...
Page is loading ...
Page is loading ...
Page is loading ...
Page is loading ...
Page is loading ...
Page is loading ...
Page is loading ...
Page is loading ...
Page is loading ...
Page is loading ...
Page is loading ...
Page is loading ...
Page is loading ...

36
L’afficheur
L’afficheur et les sélecteurs vous guident pour choisir:
Ies aliments
las funciónes
le poids pour une programmation automatique
le temps de programmation (ou l’horloge)
L’aliment ou la fonction en cours de sélections clignote.
*
*
*
*
*
*
*
* selon modèle
liquides poissons porc,
veau,
dindonneau
plats
préparés
frais
boeuf
agneau
légumes volaille plats
préparés
surgelés
DÉCONGÉL. MIJOTAGE RÉCHAUFFAGE CUISSON
DUO GRIL DOUX GRIL FORT MICRO-ONDES
+ GRIL*
TOURNEBROCHE* PIZZA* CHALEUR
TOURNANTE*
CHALEUR TOURNANTE
+ MICRO-ONDES
12:30
200 °C
1 2 : 0 0
Page is loading ...
Page is loading ...
Page is loading ...
Page is loading ...
Page is loading ...
Page is loading ...
Page is loading ...
Page is loading ...
Page is loading ...
Page is loading ...
Page is loading ...
Page is loading ...
Page is loading ...
Page is loading ...
Page is loading ...
Page is loading ...
Page is loading ...
Page is loading ...
Page is loading ...
Page is loading ...

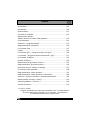
57
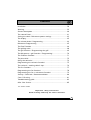
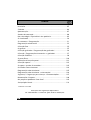
Contents
GB
Installation .................................................................................... 58
Warning........................................................................................ 59
General description....................................................................... 60
The control Panel.......................................................................... 61
Setting the clock / Microwave power settings................................ 62
The display.................................................................................... 63
The selector knob / Programming ................................................. 64
Microwave Programming ............................................................. 65
The Duo Fonction......................................................................... 66
The grilling racks* ......................................................................... 68
The grill function / Programming the grill*.................................... 69
The Microwave + grill function / Programming*............................ 70
The GrillPizza function* ................................................................. 71
The pizza dish* ............................................................................. 73
Using the rotisserie*...................................................................... 74
Programming the rotisserie function*............................................ 75
The rotisserie - cooking table & tips* ............................................. 76
The fan functions* ........................................................................ 77
Programming the fan function* .................................................... 78
Programming the fan + microwave function* ............................... 79
Security / Child lock / Recommendations....................................... 80
Care & Cleaning............................................................................ 81
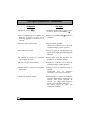
Troubleshooting guide.................................................................. 82
After Sales Service...........................................................................83
*for certain models
Important safety instructions.
Read carefully and keep for future reference.

58
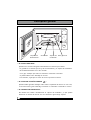
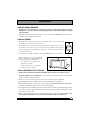
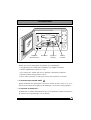
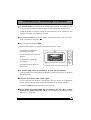
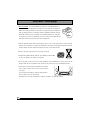
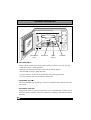
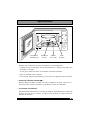
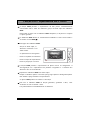
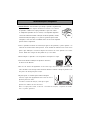
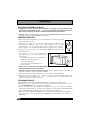
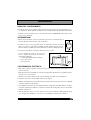
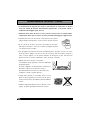
Installation
Leave sufficient space around the oven :
- 5 cm between the sides of the oven
and any walls or objects
- 14 cm above the oven
- 10 cm behind the oven.
LOCATION
BEFORE CONNECTION
•
The appliance should be installed at a distance of 85 cm above floor.
•
Place the oven on a flat and horizontal surface, away from any source of heat or
steam. To ensure the stability of the microwave oven, the front left foot is
adjustable (5 positions). Turn it to raise or lower the appliance.
•
Make sure that air may circulate freely around the oven.
•
Make sure that nothing obstructs the ventilation louvers at the back of the appliance
•
Make sure the electrical plug will be accessible after installation.
•
Do not use your appliance immediatly (wait approx. 1-2 hours) after transfer from a cold
place to a warm place as condensation may cause a malfunction.
•
Check whether your oven has suffered any damage during transport (deformed door or
door seal, etc.). If you see any signs of damage, contact your dealer before use.
•
Verify the power voltage. If there is a PERMANENT undervoltage (200-210 volts), consult your
electrical installer.
•
Your installation must be protected by a 16 Amp thermal fuse.
•
It is mandatory to use a power point with a ground terminal, connected in accordance with
current safety regulations.
•
In your electrical installation, provide a device that is accessible to the installer, capable of
separating the appliance from the mains power and whose contact opening is at least 3 mm
at all of the poles.
•
If the supply cord is damaged, it must be replaced by the manufacturer, its service agent or
similarly qualified persons in order to avoid a hazard.
ELECTRICAL CONNECTION
5 cm
14 cm
10 cm
5 cm

59
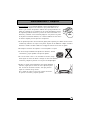
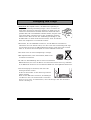
Warning
• Your appliance is designed exclusively for the domestic purposes of defrosting, heating or
cooking foods. The manufacturer bears no responsibility in the case of improper usage.
• Only use ustensils that are suitable for use in microwave ovens.
• To avoid deterioration of your microwave oven, never operate it empty or without the
turntable.
• Never tamper with the lock mechanism of your microwave oven; you could cause damage
requiring repair by an authorised technician.
• When heating food in plastic or paper containers, keep an eye on the oven due to the
possibility of ignition.
• It is not advisable to use metal recipients, forks, spoons, knives, metal ties or staples for
deep-freeze bags.
• The contents of feeding bottles are baby food jars shall be stirred or shaken and the
temperature checked before consumption in order to avoid burns.
• Only allow children to use the oven without supervision when adequate instructions
have been given so that the child is able to use the oven in a safe way and understands
the hazards of improper use.
• Liquids and other foods must not be heated in sealed containers they are liable to explode.
• Eggs in their shell and whole hard-boiled eggs should not be heated in microwave ovens
since they may explode, even after microwave heating has ended.
• Microwave heating of beverages can result in delayed eruptive boiling, therefore care
must be taken when handling the container.
• For small amounts (one sausage, a single croissant, etc.), place a glass of water
alongside the food item.
• Time settings that are too long may dry out and burn the food. To avoid such incidents,
never use the same cooking times as those recommended for traditional ovens.
• If smoke is observed, switch off or unplug the appliance and keep the door closed in
order to stifle any flames.
• In order to evacuate moisture, your appliance is fitted with a delayed ventilation
function. Depending on the applied cooking mode (solo/grill/combination), the oven
ventilation will continue to operate after the cooking end.

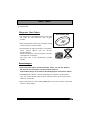
60
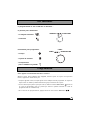
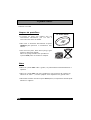
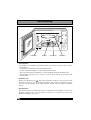
General description
Drive shaftIdentification
label
Wheel
upport
Turntable
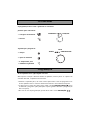
THE TURNTABLE :
ensures equal cooking of food throughout with no need to stir or turn the dish.
- It may be used as a cooking platter.
- Rotation is controlied by the drive shaft and the wheel support.
- The turntable revoives in both directions.
- If it does not turn, verify that all components are properly positioned.
- For easy removal, wells are provided on either side.
TURNTABLE OFF :
stops the turntable from revolving in order to use platters which require the entire
oven space.
THE WHEEL SUPPORT:
Do flot try tu rotate trie rouer ring manuairy, as you could damage the drive system.
If it does not turn smoothly, make sure that there is nothing in the well beneath the
turntable.

61
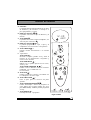
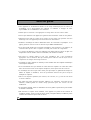
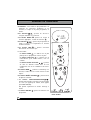
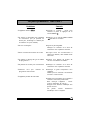
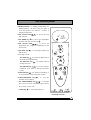
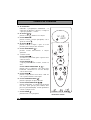
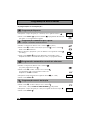
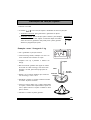
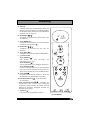
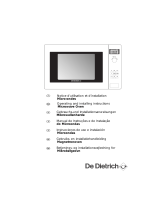
The control panel
*according to model
1 2 : 3 0
200°C
A
C
B
D
E
F
G
H
I
J
A Display window : to simplify programming, the
display indicates : the time of day, the types of
food and functions, the minutes / seconds or
weight programmed.
B The selector knob : to choose the food
type function.
C The MODE key
M: to choose the appropriate
function, with the selector knob .
D The selector knob : to choose the
programme time, weight or temperature for the
fan function.
E The GRILL key *: to directly programme the
grill function.
F
*according to model :
The PIZZA key
*
:use with the pizza dish for
all dough-based preparations.
The “Rôtisserie” key
*
: use with the spit for
poultry and roasts.
The HOT AIR key
*
: to cook as if with a
traditional oven, with or without microwave
power
G LThe DUO key : For dual level reheating; to
be used with the steam effect plate stackers.
H STOP-TURNTABLE key : to stop the
turntable from revolving.
I The PAUSE/CANCEL key : to interrupt
(press once) or cancel a programme (press twice).
Also used to set the clock
J START key : to start all programmes.

62
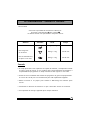
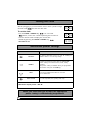
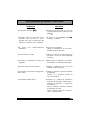
Setting the clock
Microwave power settings
DEFROST
POWER SETTING
APPLICATION
SIMMER
HEAT
HIGH COOK
Microwave output power : 900 W
00:00
12:00
00:00
After first plugging in your microwave oven or after a power outage,
the dock reads
00 00 :: 00 00
and the two dots flash.
To set the dock
- Press the PAUSE / CANCEL key for 5 seconds.
“
0000::0000
” flashes, and a tone sounds requesting the hour be set.
- Turn the selector knob to dispiay the correct time.
- Validate by pressing the PAUSE / CANCEL key .
Your dock is set.
To defrost all frozen food or to top off cooking of
delicate dishes or to cook very siowly.
To finish programmes begun with the HIGH COOK
power setting, for instance beans, lentils, ordairy
products.
(This power setting is available when you programme
the function using the mode
M key.)
To heat up all liquids and ail fresh or frozen
pre-cooked dishes.
To cook vegetables, fish, poultry and soup.
When you select the type of food, the appropriate
power setting is automatically programmed.

63
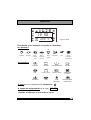
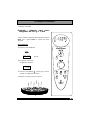
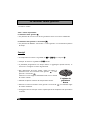
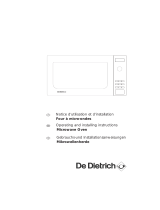
The display
The display and the selector knobs guide you in your choice of :
the food
The functions
the weight for an automatic programme
the length of the programme (or time of day)
The food type or function being selected will flash in the display.
*
*
*
*
*
*
*
* for certain models
beverages fish pork,
veal,
turkey
fresh
ready-
made
dishes
beef,
lamb
vegetables poultry frozen,
ready-
made
dishes
DEFROST SIMMER REHEAT COOK
DUO LOW GRILL HIGH GRILL MICROWAVE +
GRILL*
ROTISSERIE* PIZZA*
FAN HEAT*
FAN HEAT
+ MICROWAVE*
12:30
200 °C
1 2 : 0 0

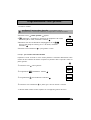
64
The selector knobs
The 2 selector knobs are used for the various programmes:
The first to select :
- the food type
- The function
the second to programme :
- the length of the programme
- the weight of the food
- the temperature
for the Easycombi model
FOOD TYPE FUNCTION
WEIGHT
TIME *TEMPERATURE
Programming
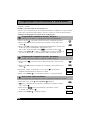
Your microwave oven is now plugged in and the clock is set.
Open the door. Set the dish inside, close the door. If the door is nor properly shut,
the appliance will not operate.
• 3 beeps announce the end of a programme. The beeps are repeated every minute
for 10 minutes until you open the door.
• If you think there is insufficient space for the dish to turn freeiy inside the oven„
press the
STOP TURNABLE key before or during the programme. (you may not
stop the turntable during a programme using the Duo or rotisserie function).
• If there is an error in the programming, press the
CANCEL key twice.

65
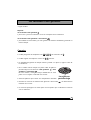
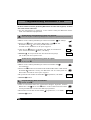
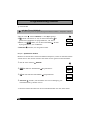
Microwave programming
Available programmes:
T
Set the desired programme length (ex. 2 minutes) with the selector knob .
T
Press start . The maximum power setting is programmed directly
for quick reheating.
T
Choose the food type with the selector knob (ex. fish).
T
Press the M key and choose your function with the selector knob
(ex. cook ) . Press the
M key again.
T
50g blinks; programme the weight of your food item using the selector knob
(ex. 500 g).
T
Press start The appropriate power level is programmed, the adequate pro-
gramme length is displayed automatically (ex: 7 min) and the programme begins.
T
Choose your food type with the selector knob ,
(ex. fresh ready-made dishes ).
T
Press the M key, choose your function with the selector knob (ex.
HEAT
);
the appropriate microwave power setting for that food item is programmed
automatically.
T
Set the desired programme length (ex. 7 min) with the selector knob ,.
T
Press start .
T
Press the MODE M key, choose the desired function with the selector knob .
The SIMMER function is available in this programme.
T
Set the desired programme length (ex: 5 Minutes), with the selector knob .
T
Press start .
Express programming
Automatic programming by weight :
the programme length is calculated automatically.
Automatic programming by food type
Automatic programming by function
1 2 : 0 0
7 : 0 0
500
7 : 0 0
5 : 0 0

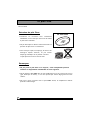
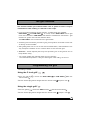
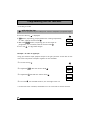
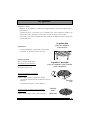
The DUO function enables you to heat up two plates at the saure time, all the while
retaining full flavor due to the steam effect provided by the Duo plate stackers.
Just cover the plates, stack them one on top of the other, and place together on the center
of the turntable.
Use the Duo button together with the Duo plate stackers.
The advantages of the plate stackers:
- Food retains full flavour due to the
steam effect.
- Dishes are heated evenly through-
out.
- Drying out of food is minimized.
- Programme time can de reduced.
- By preventing splattering, they help
keep your oven clean .
The Duo function can be used to heat up fresh or refrigerated dishes.
Neither the defrosting or heating of frozen products nor the cooking of dishes is
recommended.
Care of your Duo plate stackers:
- A sponge, hot water and liquid detergent are all you need to clean your plate stackers. Do
not use a metal scouring pad or scouring powder.
- The Duo plate stackers are dishwasher-safe.
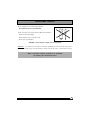
Do not use the DUO plate stackers with the grill, microwave + grill, fan oven or
microwave + fan oven functions as this could cause them irremediable damage .
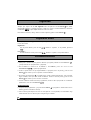
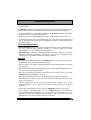
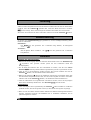
66
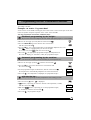
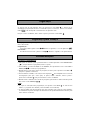
The DUO function : dual level reheating

The DUO plate stackers
The Duo plate stackers with steam action:
2 plate stackers so that you can heat up 2
fresh or refrigerated dishes at the same time.
Example: Heating up 2 plates of ravioli = 5 min
Cover the two plates with the Double Decker plate stackers, and place in the center
of the turntable.
Press the Duo key ,
00 00 :: 00 00
flashes, is displayed.
Set the time with the selector knob , ex. 5 minutes :
00 55 :: 00 00
is displayed.
Press start , the Duo reheating function begins.
As a general rule:
For a homogenous dish such as mashed potatoes, peas, celery etc.:
2 plates of 200 g 3 / 4 min
For a mixed consistency dish such as franks and beans, beef bourguignon, ravioli,
etc.
2 plates of 300 g 5 / 6 min
The times indicated below are based on heating of refrigerated dishes, or room
temperature for canned goods.
67
The DUO function : dual level reheating
réchauffage
cuisson
décongélation

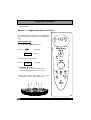
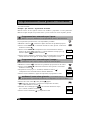
68
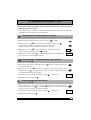
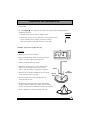
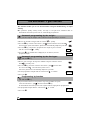
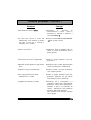
The grilling racks*
*according to model
Make sure that the rack is always well centered on the turntable.
Never use any metal dish with the rack with the microwave, grill + microwave or fan +
microwave functions.
Nevertheless you may heat up food in an aluminium tray if you place a plate between the
tray and the rack.
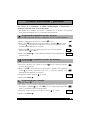
The rack:
to brown low dishes with the grill
or microwave + grill functions
The folding rack (for EasyCombi models):
To fold down the rack:
push in on the protruding hooks
and fold in the stands.
with the Grill or Grill + Microwave functions:
choose the rack level according to the dish you wish to grill
- high position to brown dishes which are rather flat
- low position as required for other dishes.
with the fan or fan + microwave functions:
always set your dishes on the rack folded down
to the low position.
The rack
for models featuring
the grill function
The 2 level rack
for models featuring
the fan function
low
position
(folded)
➡
➡
➨
➥
➥
high
position

69
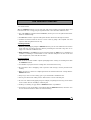
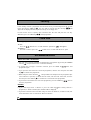
The grill function
Programming the grill
This function enables you to brown dishes such as gratins or meat. It may be
used before or after cooking, as called for in the recipe.
For those models featuring the fan function, 2 grilling levels are available:
HIGH GRILL and LOW GRILL . As a rule, use the HIGH GRILL level to grill
meat and fish and the LOW GRILL level with the simultaneous microwave + grill
function for gratins and to brown delicate dishes.
The HIGH GRILL level is featured on the grill models.
According to the food item you wish to grill, you may either set the dish on the rack
or directiy on the turntable.
After grilling make sure to use an oven mitt to handle dishes, and remember to use
only ovenproof cookware such as ceramic dishes or heat resistant glass.
WARNING : certain exposed parts may heat up during use of the grill. Be sure to
keep children away.
* *On certain models the grill folds down for easy cleaning.
The folded down position is solely for cleaning the oven ceiling, not for use.
*according to model
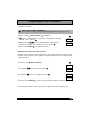
Using the 2 level grill*
T
Press the grill key , choose the HIGH GRILL or LOW GRILL with the
selector knob .
T
Set the desired programme length with the selector knob and press start .
Using the single grill*
T
Press the grill key ,choose the GRILL function with the selector knob .
T
Set the desired programme length with the selector knob, and press start .
Page is loading ...
Page is loading ...
Page is loading ...
Page is loading ...
Page is loading ...
Page is loading ...
Page is loading ...
Page is loading ...
Page is loading ...
Page is loading ...
Page is loading ...
Page is loading ...
Page is loading ...
Page is loading ...
Page is loading ...
Page is loading ...
Page is loading ...
Page is loading ...
Page is loading ...
Page is loading ...
Page is loading ...
Page is loading ...
Page is loading ...
Page is loading ...
Page is loading ...
Page is loading ...
Page is loading ...
Page is loading ...
Page is loading ...
Page is loading ...
Page is loading ...
Page is loading ...
Page is loading ...
Page is loading ...
Page is loading ...
Page is loading ...
Page is loading ...
Page is loading ...
Page is loading ...
Page is loading ...
Page is loading ...
Page is loading ...
Page is loading ...
Page is loading ...
Page is loading ...
Page is loading ...
Page is loading ...
Page is loading ...
Page is loading ...
Page is loading ...
Page is loading ...
Page is loading ...
Page is loading ...
Page is loading ...
Page is loading ...
Page is loading ...
Page is loading ...
Page is loading ...
Page is loading ...
Page is loading ...
Page is loading ...
Page is loading ...
Page is loading ...
Page is loading ...
Page is loading ...
Page is loading ...
Page is loading ...
Page is loading ...
Page is loading ...
Page is loading ...
Page is loading ...
Page is loading ...
Page is loading ...
Page is loading ...
Page is loading ...
Page is loading ...
Page is loading ...
Page is loading ...
Page is loading ...
Page is loading ...
Page is loading ...
Page is loading ...
Page is loading ...
Page is loading ...
Page is loading ...
Page is loading ...
Page is loading ...
Page is loading ...
Page is loading ...
Page is loading ...
Page is loading ...
Page is loading ...
Page is loading ...
Page is loading ...
Page is loading ...
-
 1
1
-
 2
2
-
 3
3
-
 4
4
-
 5
5
-
 6
6
-
 7
7
-
 8
8
-
 9
9
-
 10
10
-
 11
11
-
 12
12
-
 13
13
-
 14
14
-
 15
15
-
 16
16
-
 17
17
-
 18
18
-
 19
19
-
 20
20
-
 21
21
-
 22
22
-
 23
23
-
 24
24
-
 25
25
-
 26
26
-
 27
27
-
 28
28
-
 29
29
-
 30
30
-
 31
31
-
 32
32
-
 33
33
-
 34
34
-
 35
35
-
 36
36
-
 37
37
-
 38
38
-
 39
39
-
 40
40
-
 41
41
-
 42
42
-
 43
43
-
 44
44
-
 45
45
-
 46
46
-
 47
47
-
 48
48
-
 49
49
-
 50
50
-
 51
51
-
 52
52
-
 53
53
-
 54
54
-
 55
55
-
 56
56
-
 57
57
-
 58
58
-
 59
59
-
 60
60
-
 61
61
-
 62
62
-
 63
63
-
 64
64
-
 65
65
-
 66
66
-
 67
67
-
 68
68
-
 69
69
-
 70
70
-
 71
71
-
 72
72
-
 73
73
-
 74
74
-
 75
75
-
 76
76
-
 77
77
-
 78
78
-
 79
79
-
 80
80
-
 81
81
-
 82
82
-
 83
83
-
 84
84
-
 85
85
-
 86
86
-
 87
87
-
 88
88
-
 89
89
-
 90
90
-
 91
91
-
 92
92
-
 93
93
-
 94
94
-
 95
95
-
 96
96
-
 97
97
-
 98
98
-
 99
99
-
 100
100
-
 101
101
-
 102
102
-
 103
103
-
 104
104
-
 105
105
-
 106
106
-
 107
107
-
 108
108
-
 109
109
-
 110
110
-
 111
111
-
 112
112
-
 113
113
-
 114
114
-
 115
115
-
 116
116
-
 117
117
-
 118
118
-
 119
119
-
 120
120
-
 121
121
-
 122
122
-
 123
123
-
 124
124
-
 125
125
-
 126
126
-
 127
127
-
 128
128
-
 129
129
-
 130
130
-
 131
131
-
 132
132
-
 133
133
-
 134
134
-
 135
135
-
 136
136
-
 137
137
-
 138
138
-
 139
139
-
 140
140
-
 141
141
-
 142
142
-
 143
143
-
 144
144
-
 145
145
-
 146
146
-
 147
147
-
 148
148
-
 149
149
-
 150
150
-
 151
151
-
 152
152
-
 153
153
-
 154
154
-
 155
155
-
 156
156
-
 157
157
-
 158
158
-
 159
159
-
 160
160
-
 161
161
-
 162
162
-
 163
163
-
 164
164


Brandt MW3-245GEPB Owner's manual
- Category
- Microwaves
- Type
- Owner's manual
Ask a question and I''ll find the answer in the document
Finding information in a document is now easier with AI
in other languages
- italiano: Brandt MW3-245GEPB Manuale del proprietario
- français: Brandt MW3-245GEPB Le manuel du propriétaire
- español: Brandt MW3-245GEPB El manual del propietario
- Deutsch: Brandt MW3-245GEPB Bedienungsanleitung
- português: Brandt MW3-245GEPB Manual do proprietário
Related papers
-
Groupe Brandt MW4245CEX Owner's manual
-
-
-
-
-
-
-
-
-
Other documents
-
De Dietrich DME729BUK Owner's manual
-
 De Dietrich DME330WE1 Owner's manual
-
De Dietrich DME328XE1 Owner's manual
-
 De Dietrich MN6743E2 Owner's manual
-
 De Dietrich MW6723E1 Owner's manual
-
 De Dietrich MW6723E1 Owner's manual
-
Smeg FM 24 EB Owner's manual
-
De Dietrich MW6516E2 Owner's manual
-
-
Smeg FMC24X-1 User manual


