Page is loading ...

SSL UF8
www.solidstatelogic.com
SSL UF8
User Guide

Visit SSL at:
www.solidstatelogic.com
© Solid State Logic
All rights reserved under International and Pan-American Copyright Conventions.
SSL
®
and Solid State Logic
®
are registered trademarks of Solid State Logic.
SSL UF8™ is a trademark of Solid State Logic.
All other product names and trademarks are the property of their respective owners and are hereby acknowledged.
Pro Tools
®
is a registered trademark of Avid
®
.
Live™ is a trademark of Ableton
®
AG.
Logic Pro
®
and Logic
®
are registered trademarks of Apple
®
Inc.
Studio One
®
is a registered trademark of Presonus
®
Audio Electronics Inc.
Cubase™ and Nuendo™ are trademarks of Steinberg
®
Media Technologies GmbH.
Mackie
®
is a registered trademark of LOUD Technologies
®
Inc.
BOSS
®
is a registered trademark of Roland
®
Corporation.
No part of this publication may be reproduced in any form or by any means, whether mechanical or electronic, without the
written permission of Solid State Logic, Begbroke, OX5 1RU, England.
As research and development is a continual process, Solid State Logic reserves the right to change the features and
specifications described herein without notice or obligation.
Solid State Logic cannot be held responsible for any loss or damage arising directly or indirectly from any error or omission in
this manual.
PLEASE READ ALL INSTRUCTIONS, PAY SPECIAL HEED TO SAFETY WARNINGS.
E&OE
Revision 1.5 - January 2021

Contents
SSL UF8 User Guide
Table of Contents
Overview 5
What is SSL UF8? 5
Features 5
Using This User Guide Effectively 5
Safety Notices 5
Get-Started 6
Unpacking 6
Fitting The Stands (Optional) 6
Rack Mount Kit 7
UF8 Physical Specification 7
Connecting Your UF8 Hardware 8
Downloading SSL 360° Software 9
Installing SSL 360° Software 9
System Requirements 11
Registering Your UF8 11
UF8 YouTube Tutorials 11
Keyboard Identify (Mac Only) 10
UF8 Hardware Layout 12
Front Panel 12
Connector Panel 15
SSL 360° Software Overview 16
Overview & Home Page 16
UF8 Page 18
DAW Communication 21
SSL V-MIDI Ports 21
DAW Protocols 21
Pro Tools with UF8 - Tutorial 22
SSL 360° Setup 22
Pro Tools Setup 22
LCD Layout 23
Tutorial 24
Logic with UF8 - Tutorial 33
SSL 360° Setup 33
Logic Setup 33
LCD Layout 35
Tutorial 36
Cubase/Nuendo with UF8 - Tutorial 44
SSL 360° Setup 44
Cubase Setup 44
LCD Layout 46
Tutorial 47
Ableton Live with UF8 - Tutorial 56
SSL 360° Setup 56
Live Setup 56
LCD Layout 57


Overview
5
SSL UF8 User Guide
Overview
What is SSL UF8?
SSL UF8 is a scalable hardware control surface offering the essential DAW control you need, with room to add USB keyboard
shortcut sequences to suit your own workflow. UF8 features 8 high-quality, motorised touch-sensitive faders accompanied by 8
endless rotary encoders and 8 high-quality colour LCD TFTs for clear visual feedback at all times. A large multi-purpose master
encoder allows navigation of DAW sessions, track scrolling and mouse wheel emulation to give hands-on control of plug-ins.
Signature SSL workflow and ergonomics developed from a 40+ year legacy in production innovation have never been more
accessible.
Features
• 8 x 100 mm high quality, touch-sensitive motorised faders.
• 8 x rotary endless rotary encoders with push.
• 8 x high-resolution colour displays.
• Backlit RGB soft-feel rubber buttons.
• All metal enclosure, finished with a brushed anodised top plate.
• Expandable - Connect up to 4 UF8s to create a 32-channel control surface.
• Works out of the box with the following major DAWs: Pro Tools, Logic, Cubase, Nuendo, Studio One, Ableton Live.
• Up to 3 different DAWs can be connected simultaneously and switched between using the Layer keys.
• DAW communication via HUI for Pro Tools. SSL software provides further workflow enhancements with the addition of features
such as Channel and Plug-in Modes.
• DAW communication via MCP/MCU for Logic, Cubase, Nuendo, Studio One and Ableton Live.
• A large multi-purpose notched encoder allows for DAW timeline navigation, track banking and mouse wheel emulation for
even more hands-on control.
• Customisable user keys ready to assign your favourite DAW commands or keyboard shortcuts.
• 2 x assignable foot-switch inputs.
• Included stands allow for 6 different elevation angles. Or, use without stands.
• Optional 19” 6U rackmount kit available.
• Connects to your computer via hi-speed USB – no need to deal with computer networks or ethernet cables.
• Powered by the SSL 360° Software application.
Using This User Guide Effectively
This User Guide will take you through the process of getting up-and-running with your UF8 control surface. The Get-Started section
will guide you through unboxing, attaching the stands and installing SSL 360°, the intelligent software command centre that drives
UF8. This section also provides information on registering your UF8 surface, which will allow you access to any additional software
that your UF8 purchase provides.
The Hardware Layout section provides an overview of the UF8 surface, to help familiarise yourself with the names of controls
and how they are laid out. SSL 360° Software Overview provides detail on the SSL 360° software and what functionality you can
expect from it. DAW Communication provides the essential technical information on how UF8 (via SSL 360°) communicates with
your DAW and last but not least, the DAW Tutorials sections provide you with the configuration steps you need to take inside your
DAW to connect UF8, whilst also guiding you through how UF8 interacts with your chosen DAW.
Safety Notices
Please read the Important Safety Notices at the end of this User Guide before use.

Get-Started
6
SSL UF8 User Guide
Get-Started
Unpacking
The unit has been carefully packed and inside the box you will find the following items in addition to your UF8 control surface:
Fitting The Stands (Optional)
UF8 has been designed to be used with or without the included screw-in stands, depending on your preference. Attaching the
included screw-in stands has the added benefit of angling the unit towards you. Three different fixing positions (the holes are
arranged in pairs) allow you to choose an angle that is best for your setup. Use 2 screws per stand. Please be careful not to over-
tighten to avoid stripping the screw threads. For those with a torque measuring device, tighten to 0.5 Nm.
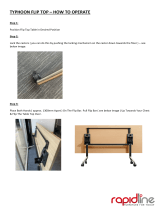
Additional Elevation Angles
If you need a steeper angle of elevation, you can rotate the stands and fix them to the chassis using the shorter side. This gives
you three additional angle options to choose from.
1. Unscrew the rubber feet and move to the other end 2. Rotate the stands so that the short side fixes to the chassis
12 volts, 5 A Power Supply
and IEC Cable
1.5 m C to C USB Cable 1.5 m C to A USB Cable
2 x Stands
1 x Hex Key
4 x Screws

Get-Started
7
SSL UF8 User Guide
Rack Mount Kit
A 19" in rack mount kit is available for purchase separately should you wish to rack mount your UF8. When rack-mounted, UF8
occupies 6U of space.
Attaching the rack mount ears
The kit contains a set of metal racking ears and 12 screws, which should be secured to the chassis using the lower 3 screw holes at
the top and bottom of each side (6 in total per side), as pictured below. Please be careful not to over-tighten to avoid stripping
the screw threads.
UF8 Physical Specification
Dimensions
17” x 10.5” x 2.4” / 431 x 266 x 62.7 mm (Width x Depth X Height)
Weight
Unboxed - 2.9 kg / 6.4 lbs
Boxed - 5.0 kg / 11.02 lbs

Get-Started
8
SSL UF8 User Guide
C to C / C to A
USB Cable
Power Supply
UF8 Connector Panel
1st UF8 2nd UF8
C to A USB Cable
Connecting Your UF8 Hardware
1. Connect the included power supply to the DC socket on the connector panel.
2. Connect one of the included USB cables from your computer to the USB socket.
USB Cables
Please use one of the provided USB cables ('C' to 'C' or 'C' to 'A') to connect UF8 to your computer. The type of USB port you
have available on your computer will determine which of the two included cables you should use. Newer computers may have 'C'
ports, whereas older computers may have 'A'. Please ensure that you are connecting to the port labelled USB on UF8, which is a
'C' type connection.
Connecting Multiple UF8s
If you are using more than one UF8, you can use the THRU port (USB 'A' type) to link communication across multiple units. This
means that only one USB port is required at your computer.
Theoretically, you can chain 4 UF8s together in the way described above. However, by doing so you may exceed the number of
hub tiers permitted by your PC/Mac computer. As such, you may need to connect your 3rd/4th UF8 unit directly to another USB
port on your computer. The same applies regarding the use of USB hubs; the 3rd/4th UF8(s) may need to be plugged directly into
a different USB port on your computer.
Tip: The THRU port can also be used to plug in USB dongles that are often required for DAW software.
How Many UF8s Can I Use?
A maximum of 4 UF8s can be used to create a 32-channel control surface.

Get-Started
9
SSL UF8 User Guide
Downloading SSL 360° Software
UF8 requires the SSL 360° software to be installed on your computer in order to function. SSL 360° is the brains behind your
UF8 control surface. Once you have connected your UF8 hardware to your computer as described on the previous page, please
download SSL 360° from the SSL website.
1. Go to www.solidstatelogic.com/support/downloads
2. Select UF8 from Products drop-down list.
3. Download the SSL 360° software for your Mac or PC.
Installing SSL 360° Software
System Requirements
Computer operating systems and hardware are constantly changing. Please search for 'UF8 Compatibility' in our online FAQs to
check if your system is currently supported.
Mac
1. Locate the downloaded SSL 360°.dmg on your
computer.
2. Double-click to open the .dmg.
3. Double-click to run the SSL 360°.pkg.
4. Proceed with the installation, following the on-screen
instructions.
Windows
1. Locate the downloaded SSL 360°.exe on your
computer.
2. Double-click to run the SSL 360°.exe.
3. Proceed with the installation, following the on-screen
instructions.

Get-Started
10
SSL UF8 User Guide
Keyboard Identify (Mac Only)
One of the special features of UF8 is its ability to trigger keyboard command sequences of your favourite DAW shortcuts. These
are assigned using the SSL 360° software and this is covered later in this User Guide.
When you first plug in your UF8, Mac OS will present the above 'Keyboard Setup Assistant' window because Mac OS wants you
to identfy which region (Europe, America or Japan) this, as yet unidentified, keyboard is from. If you connected your UF8 to your
computer before installing SSL 360° software, you need to close this setup assistant because SSL 360° needs to be installed
on your computer in order to continue through this setup process. To make the Keyboard Setup Assistant appear again once
SSL 360° is installed, do the following: Open up Mac's 'System Preferences' > Go to 'Keyboard' > Click 'Change Keyboard Type'
(please note, your UF8 must be connected to your computer via a USB cable) and click 'Continue'.
• When presented with 'Identifying Your Keyboard' and you are being asked to 'Press the key immediately to the right of the Shift
Key', at this point, press and hold the 360° key on UF8 for 3 seconds until the key lights orange.
• This will move you through to the final step of the process, where you can choose the appropriate option (Europe, America or
Japan) for your region and then click 'Done'.
STEP 1: Go to System Preferences and
click 'Keyboard'.
STEP 4: When presented with the message 'Press the key immediately to the
right of the Shift Key', press and hold the 360° key on UF8 for 3 seconds until it
lights orange.
STEP 5: Select your region and click
'Done'.
STEP 2: Click 'Change Keyboard Type' STEP 3: Click 'Continue'.

Get-Started
11
SSL UF8 User Guide
Registering Your UF8
Register your UF8 for the best possible experience and to gain access to any additional software in your SSL user account.
To register your product, head to www.solidstatelogic.com/get-started and follow the on-screen instructions. During the
registration process, you’ll need to input the serial number of your unit. This can be found on the label on the base of your unit.
Please note: Xs are used to demonstrate the format of the serial number. The actual serial number will contain a mixture of letters
and numbers.
Once you have completed registration and logged-in, all of your software content will be available in your user area. You can return
to this area at any time by logging back into your SSL account at www.solidstatelogic.com/login should you wish to download
the software another time.
UF8 YouTube Tutorials
The SSL YouTube channel hosts in-depth tutorials on how to setup and use UF8 with your DAW.

Product Overview & Features
12
SSL UF8 User Guide
UF8 Hardware Layout
Front Panel
This section will help familiarise yourself with the front panel controls of the UF8 surface. It is intended to be an overview, rather
than a comprehensive explanation of each function or mode. For more detail on the integration of features with each DAW, please
refer to the DAW Tutorials sections of this User Guide.
1 - LAYER Keys 1-3
Control of up to 3 DAWs can be configured and switched between using these keys on the UF8 surface.
2 - QUICK Keys 1-3
User-assignable keys that can be mapped to any of the available HUI/MCU commands in SSL 360°, or alternatively any keyboard
shortcut sequence of your choosing.
3 - 360° Key
Opens/minimises the SSL 360° software on your computer screen.
4 - 8 x Soft Keys
A line of 8 soft keys allow access to various V-POT parameters or, up to 40 user-assignable keys per UF8. The label for the function
of each key is displayed in the top section of the LCD below.
5- SOFT KEYS
Determines the operating mode of the 8 top-row soft keys. Keys labelled 1-5 provide access to User Banks 1-5. V-POT puts the
top-row soft keys into V-POT mode. See DAW tutorial sections for more information.
10
11
1 2
3
4
5
7
6
8 9
1312
14
15
19
20
17
18
16

Product Overview & Features
13
SSL UF8 User Guide
6 - 8 x colour LCD TFTs provide visual feedback including metering, track names, V-POT readouts, track record-arm states and
more.
7 - 8 x V-POTS
"V-Pot" is short for "virtual pot" and these are used to control various DAW parameters including Pan position, Send levels and
Plug-in parameters.
8 - PAN Key
Assigns the DAW's Pan controls to the V-Pots.
9- FINE / SHIFT Key
For most DAWs, this key either engages a FINE mode of control for the parameter currently assigned to the V-Pots, or it acts as a
Shift Key. The function of this key varies between DAWs.
10 - SELECTION MODE Keys
Determines the behaviour of the SEL (Select) keys. These Selection Mode keys also perform secondary functions in Pro Tools and
Logic when pressed and held, and are used in combination with the SOLO, CUT and SEL keys.
11 - SEND / PLUGIN 1-8 Keys
The behaviour of these keys varies for each DAW. Please see the relevant DAW Tutorial section for more information.
12 - PLUGIN Key
The behaviour of the PLUGIN key varies for each DAW. Please see the relevant DAW Tutorial section for more information.
13 - CHANNEL Key
The behaviour of the CHANNEL key varies for each DAW. Please see the relevant DAW Tutorial section for more information.
14 - PAGE < and > Keys
The behaviour of the PAGE < > keys varies for each DAW. Please see the relevant DAW Tutorial section for more information.
15 - FLIP Key
FLIP is used to assign the current V-Pot parameter to the fader and can be used for tasks such as riding send levels.
16 - SOLO, CUT, SEL and 100 mm Motorised Faders
The most common controls found in all DAWs. Please note that the function of the SEL keys depends on the currently active
SELECTION MODE.
17 - Large Notched CHANNEL Encoder
The large encoder can function in several different modes:
• Standard Mode - Push the encoder itself to return to CHANNEL mode. Moving the encoder will bank DAW tracks one at a time.
• NAV Mode - 'Nav' is short for Navigation. In this mode, the encoder allows you to move the playhead cursor along your DAW
timeline.
• NUDGE Mode - This mode is only supported by Pro Tools. It allows you to use the encoder to move selected audio regions
by the currently set Nudge value.
• FOCUS Mode - This mode turns the operation of the large encoder into a mouse wheel scroll emulation and is great for
controlling plug-ins. Simply hover your computer mouse over the desired control and turn the encoder. The sensitivity of this
mode will be determined by your computer's mouse scroll sensitivity settings.

Product Overview & Features
14
SSL UF8 User Guide
18 - BANK < > Keys
These keys allow you to bank through the tracks in your DAW, bringing them onto your UF8 control surface(s). Banking works in
groups of 8/16/24/32, depending on the DAW and the number of UF8s you have connected.
19 - AUTOMATION Keys
These keys provide access to the various automation modes available in each DAW. Please note that when working in Pro Tools,
the SELECTION MODE must be in AUTO before these keys become active.
20 - Navigation Arrows and Mode Key
These keys perform various functions including DAW timeline zooming and important tasks such as selection of plug-in slots (Logic
only). Please refer to the DAW Tutorials section for more information.
"Nice to meet you, where you been? I could show you incredible things." - Taylor Swift, Blank Space.

Product Overview & Features
15
SSL UF8 User Guide
Connector Panel
The recessed section hosts UF8's connectors.
USB - 'C' Type Connector
Connect one of the included USB cables from your computer to the USB port on UF8. This handles all of the communication
between your DAW and UF8, via the SSL 360° software application.
THRU - 'A' Type Connector
The THRU connector can be used to chain multiple UF8s together, without needing to plug each unit into your computer or a hub
individually. It can also be used to plug in USB dongles.
DC Connector
Use the included DC Power Supply to provide power for your UF8.
FS1 & FS2 - 1/4" Jack Connectors
These allow for the connection of foot-switches, which can be used to trigger DAW commands or user-assigned keyboard shortcut
sequences.
UF8 has been tested with popular foot-switches such as the BOSS FS-6 (other brands are available), whose foot-switch behaviour
(or polarity as it is often referred to), is a 'normally closed' switch. In some cases, these foot-switches offer the ability to change
the polarity.
Please use a foot-switch designed for 'normally closed' operation and also, to ensure full compatibility use a momentary action
foot-switch, or choose a foot-switch that can be set to momentary. This will ensure correct operation with assigned DAW commands.

Product Overview & Features
16
SSL UF8 User Guide
SSL 360° Software Overview
Overview & Home Page
SSL 360° software is not only the 'brains' behind the UF8 control surface, it is also the command centre from which new versions
of software and firmware can be downloaded for your 360° compatible device.
The HOME screen:
1 - Menu Toolbar
This toolbar allows you to navigate through the various pages of SSL 360°.
2 - Software Version Number & Update Software Button
This area displays the version number of SSL 360° that is running on your computer. When software updates become available,
the Update Software button (pictured above) will appear. Click this to download and update your software.
3 - Connected Units
This area shows any UF8s that are connected to your computer, along with their respective serial numbers. Please allow 10-15
seconds for units to be discovered once they are plugged in.
1
2
3
4
5
6

Product Overview & Features
17
SSL UF8 User Guide
Identify & Drag To Re-Order
Usefully, there is a built-in feature that allows you to identify each UF8 control surface and re-order if appropriate. Clicking your
mouse down on the image of each connected UF8 will temporarily override that unit's LCDs to display the SSL UF8 logo. If your
UF8s are not arranged in the order you want, you can simply drag and drop on-screen to re-arrange.
Clicking the mouse down on a connected UF8 image will cause all the displays on that particular UF8 to momentarily
show the SSL UF8 logo, helping you identify each UF8 control surface.
4 - Firmware Updates Area
If a firmware update becomes available for your UF8 unit, then an Update Firmware button will appear below each unit. Click on
the button to start the firmware update process, being sure to not disconnect the power or USB cable(s) whilst it is in progress.
5 - EXPORT REPORT
Should you encounter any issues with your UF8 or SSL 360° software, you may be asked by a support agent to use the EXPORT
REPORT feature. This feature generates a text file containing the essential information about your computer system and UF8(s),
alongside technical log files relating to SSL 360° activity, which may help to diagnose any issues. When you click EXPORT
REPORT, you'll be asked to choose a destination on your computer to export the generated .zip file to, which you can then forward
onto the support agent.
6 - SSL Socials
The bar at the bottom has quick links to the SSL website, Support section and SSL Socials.
This space is intentionally almost entirely blank... it's a tradition.

Product Overview & Features
18
SSL UF8 User Guide
UF8 Page
The UF8 page can be selected from the menu toolbar on the left-hand side and is where you configure UF8 to work with your
DAW(s). It is also the place where you can customise any of the user-assignable keys. Customised DAW profiles can then be saved
and loaded as .xml files should you need to work on another computer with SSL 360° installed.
1 - LAYER Tabs
UF8 can be configured for 3 different DAWs simultaneously, with each DAW occupying what is called a 'Layer'. If you only use one
DAW, then it is likely you'll only need one layer. If using multiple DAWs, simply click in the LAYER 2 or LAYER 3 tabs to configure
as appropriate.
2 - DAW Profile Selection
Use the drop-down list to select your DAW for the chosen layer.
3 - PORT INFO
Clicking on PORT INFO provides some basic instructions on how to configure your SSL V-MIDI ports correctly (useful as a
reminder). If you are configuring UF8 for the first time, please refer to the more detailed explanations found at the start of each
DAW Tutorial section as the PORT INFO does not cover every detail.
4- REVERT
Allows you to revert this Layer to the factory-shipped DAW profile.
5 - DAW Command/Keyboard Shortcut Assignments
Clicking on the pen symbol will allow you to change the assignment of any of the user-assignable keys. See the next page for
more information.
1
2
3
4
5 6
7

Product Overview & Features
19
SSL UF8 User Guide
6 - Short Label
Using your computer keyboard, you can type the label that you wish to appear on the UF8 LCD just below the User Key.
7 - Profile Name and SAVE/LOAD/SAVE AS Buttons
Allows you to save your customised DAW profiles as an .xml file to your computer or any connected hard-drives. The name of the
currently active profile is shown above these buttons. If you have made any changes to the saved profile, then an asterisk (*) is
appended to indicate this.
Built-in Auto-Saving Feature
Changes you make to the software are automatically stored in the background, so you don't need to worry about remembering to
save each time you change something in SSL 360° software.
User-Assignable Keys
A number of keys on UF8 are user-assignable and can be changed from their factory shipped assignments. Each UF8 unit has
the following user-assignable keys:
5 x banks of 8 Top-Row Soft Keys, accessed by SOFT KEY buttons 1-5 in the top-right of UF8.
3 x QUICK Keys
2 x Foot-switches
All of these keys can have either DAW commands or keyboard
shortcut sequences assigned to them.
Assigning DAW Commands
Clicking on the pen symbol for any user-assignable key will bring
up a pop-up window, from which DAW command can be selected
using the radio buttons on the left-hand side. To assign a different
DAW command to the button in question, simply select one from
the list of available HUI/MCU commands. The SHORT LABEL text
field allows you to enter the label you want to appear on the LCD to
accompany this command. The list of available commands depends
on the selected DAW.
Assigning Keyboard Shortcut Sequences
If you would like to assign a keyboard shortcut sequence, select
the Keyboard command option. Once selected, simply click your
mouse cursor into the area that says 'Type your commands here...'
and use your keyboard to enter the desired key press or sequence.
Should you make a mistake and need to start again, you can use the
CLEAR button. The SHORT LABEL text field allows you to enter the
label you want to appear on the LCD to accompany this keyboard
shortcut sequence.
ADVANCED Setup Options
Transport Master
If you are running multiple DAWs that are linked using MIDI timecode,
then you can designate 1 of the 3 DAW profile layers to be transport
master. This means that the transport keys will always trigger from the
DAW assigned as Transport Master, even if your UF8 is controlling a
different DAW Layer.

Product Overview & Features
20
SSL UF8 User Guide
ADVANCED Setup Options - HUI
The following tick-box options are presented for Pro Tools profile selections only:
Always Fine Pan - Enabling this option will automatically change the operation of the V-Pots to FINE mode when controlling pans.
This will also cause the Pan position to be displayed on the LCD whilst being turned.
Always Fine Sends - Enabling this option will automatically change the operation of the V-Pots to FINE mode when controlling
Sends. This will also cause the Send level to be displayed on the LCD whilst being turned.
Show Auto State - Enabling this option will display an indication of the Pro Tools automation state (READ/WRITE/TRIM) per channel,
just above the DAW metering on the LCD at all times. If TRIM is engaged, the indication will flash between TRIM and READ or
TRIM and WRITE.
"I wish I was blank, I wish I was blank, I wish I could thank, I wish I was blank" - Blank, The Smashing Pumpkins.
/