
HB937, HB935, HB933

2
1
Page is loading ...

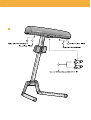
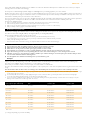
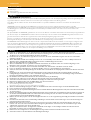
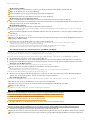
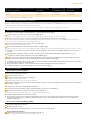
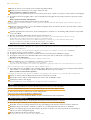
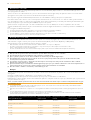
General description (fig. 1)
A Tanning lamps
B Infrared lamps
C Protective goggles (type number HB072; service number 4822 690 80147)
Introduction
The INNERGIZE
With the INNERGIZE you can suntan and take a relax session in the comfort of your own home, while enjoying a pleasant scent and/or
listening to relaxing nature sounds (HB937 and HB935 only).
Function ◊ (HB937 only) allows you to warm up the muscles in your legs before sporting activities and to relax your muscles afterwards.
The INNERGIZE is equipped with the unique InfraTan\ system that allows more efficient tanning results.The tanning lamps in the INNERGIZE
are supported by two infrared lamps that stimulate the blood circulation and supply of oxygen for an optimal tanning process. At the same time
the infrared lamps complement the supply of warmth for optimal tanning comfort.
The special UV filters in the INNERGIZE only pass the ultraviolet light of the tanning lamps that is required to get a tan.
The INNERGIZE's infrared lamps not only support the tanning lamps for the efficient InfraTan\ tanning effect, they can also be used separately
at a more intense level for a pleasantly warm infrared relax session.
A timer ensures that each session does not last longer than 45 minutes. Just as with natural sunlight, overexposure must be avoided (see
chapters 'Tanning and your health' and 'Relaxation and your health').
The INNERGIZE is designed for the optimal relaxing sun experience.To enhance this experience, a scent unit has been integrated for use with
specially developed natural fragrances.The INNERGIZE HB937 and HB935 are also equipped with Philips Stereo Active Speakers that allow you
to experience its integrated soft nature ambiance sounds or to listen to the music of your CD/MP3 player or any other audio player.The
INNERGIZE has been designed to optimally recreate natural atmospheres to support a deep relaxation.
Important
◗ Check if the voltage indicated on the appliance corresponds to the mains voltage in your home before you connect the appliance.
◗ If the wall socket used to power the appliance has poor connections, the plug of the appliance will become hot. Make sure you plug the
appliance into a properly connected wall socket.
◗ The appliance must be connected to a circuit that is protected with a 16A standard fuse or a slow-blow automatic fuse.
◗ If the mains cord is damaged, it must be replaced by Philips, a service centre authorised by Philips or similarly qualified persons in order
to avoid a hazard.
◗ Always unplug the appliance after use.
◗ Water and electricity are a dangerous combination! Do not use this appliance in wet surroundings (e.g. in the bathroom or near a
shower or swimming pool).
◗ If you have just been swimming or have just taken a shower, dry yourself thoroughly before using the appliance.
◗ Let the appliance cool down after use for approx. 15 minutes before folding it back into transport position and storing it.
◗ Make sure the vents in the centre and at both ends of the lamp unit housing remain open during use.
◗ The appliance has been fitted with an automatic protection against overheating. If the appliance is insufficiently cooled (e.g. because the
vents are covered), the appliance will switch off automatically. Once the cause of overheating has been removed and the appliance has
cooled down, the appliance will switch on automatically again.
◗ The UV filters become very hot when you use the appliance. Do not touch them.
◗ The appliance contains hinging parts, so be careful not to get your fingers stuck between these parts.
◗ Never use the appliance when a UV filter is damaged, broken or missing.
◗ Never use the appliance when the selector or the timing device is defective.
◗ Keep scent granules out of the reach of children.
- These granules are not edible.
- In case of eye contact, flush immediately with plenty of water.
◗ Do not use the scent cartridge if you are allergic to scent. Consult your doctor in case of doubt.
◗ Make sure children do not play with the appliance.
◗ Do not exceed the recommended session time and the maximum number of tanning hours (see 'Tanning sessions: how often and how
long?').
◗ Do not take a tanning and/or relax session if you have a disease and/or if you use a medication or cosmetics that increase the sensitivity
of your skin. Be extra careful if you are hypersensitive to UV light or IR light. Consult your doctor in case of doubt.
◗ Do not tan a particular part of your body more than once a day.Avoid excessive exposure to natural sunlight on the same day.
◗ Consult your doctor if persistent lumps or sores appear on the skin, or if there are changes in pigmented moles.
◗ The appliance is not to be used by people who get sunburnt without tanning when exposed to the sun, by persons suffering from
sunburn, by children, or by persons who suffer (or have previously suffered) from skin cancer or who are predisposed to skin cancer.
◗ Always wear the protective goggles provided with the appliance while tanning to protect your eyes from excessive doses of visible light,
UV light and IR light (also see the chapter 'Tanning and your health').
◗ Remove creams, lipstick and other cosmetics well in advance of a tanning session.
◗ Do not use any sunscreens or suntan accelerators.
◗ If your skin should feel taut after the tanning session, you may apply a moisturising cream.
◗ To acquire an even tan you should lie directly under the lamp unit.
◗ Do not choose a tanning distance of less than 65 cm.
◗ Only move the appliance when it is in transport position.
◗ Colours may fade under the influence of the sun.The same effect may occur when using this appliance.
◗ Do not expect the appliance to yield better results than the natural sun.
Tanning and your health
The sun supplies various types of energy.Visible light enables us to see, ultraviolet (UV) light gives us a tan and the infrared (IR) light in sunlight
provides the heat in which we like to bask.
ENGLISH4

Just as with natural sunlight, the tanning process will take some time.The first effect will only become visible after a few sessions (see chapter
'Tanning sessions: how often and how long?').
Overexposure to ultraviolet light (natural sunlight or artificial light from your tanning appliance) can cause sunburn.
Besides many other factors, such as overexposure to natural sunlight, incorrect and excessive use of a tanning appliance may increase the risk of
skin and eye problems.The degree to which these effects occur is determined by the nature, intensity and duration of the exposure on the one
hand and the sensitivity of the person involved on the other hand.
The more the skin and the eyes are exposed to UV light, the higher the risk of keratitis, conjunctivitis, damage to the retina, cataracts, premature
skin ageing and the development of skin tumours will be. Some medications and cosmetics increase the sensitivity of the skin.
Therefore it is highly important:
B
that you follow the instructions in chapters 'Important' and 'Tanning sessions: how often and how long?'.
B
that the tanning distance (distance between the UV filters and the body) is 65 cm.
B
that you do not exceed the maximum number of tanning hours per year (i.e. 25 hours or 1500 minutes).
B
that you always wear the goggles provided while tanning.
Relaxation and your health
Warmth has a relaxing effect.Think of what a hot bath or lazing in the sunshine does to you.You can enjoy the same relaxing effect by turning
the selector to the relax setting Ç (HB933), selecting Ç (HB935), or selecting Ç/◊ (HB937).
Bear in mind the following when you have a relax session:
- Avoid getting too hot. Increase the distance between yourself and the lamps, if necessary.
- If your head gets too hot, cover it or move your body so that less heat is emitted towards your head.
- Close your eyes during a relax session.
- Do not let the relax session last too long (see chapter 'Relax sessions: how often and how long?').
Tanning sessions: how often and how long?
◗ Do not take more than one tanning session per day, over a period of five to ten days.
◗ Allow an interval of at least 48 hours between the first and the second session.
◗ After this 5- to 10-day course, we advise you to give your skin a rest for a while.
◗ Approximately one month after a course, your skin will have lost much of its tan.You can then start a new course.
◗ If you want to keep your tan, do not stop tanning after the course, but continue taking one or two tanning sessions a week.
◗ Whether you choose to stop tanning for a while or whether you continue tanning on a lower frequency, do remember that you must
not exceed the maximum number of tanning hours.
◗ For this appliance the maximum is 25 tanning hours (= 1500 minutes) a year.
Example
Suppose you take a 10-day tanning course, with a 10-minute session on the first day and a 25-minute session on the nine following days.
The entire course will then last (1 x 10 minutes) + (9 x 25 minutes) = 235 minutes.
This means you can take 6 of these courses in a year, as 6 x 235 minutes = 1410 minutes.
Of course, the maximum number of tanning hours applies to each separate part or side of the body that is tanned (e.g. the back or front of the
body).
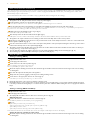
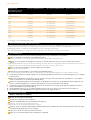
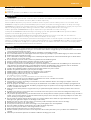
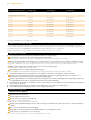
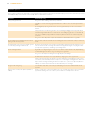
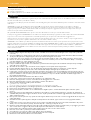
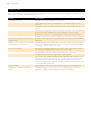
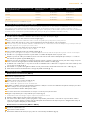
As is shown in the table, the first session of a tanning course should always last 10 minutes, irrespective of the sensitivity of the skin.
B
If you think that the sessions are too long for you (e.g. because your skin feels taut and tender after the session), we advise you to reduce the length
of the sessions by e.g. 5 minutes.
B
For a beautiful all-over tan, turn your body slightly during the session so that the sides of your body are better exposed to the tanning light.
B
If your skin feels slightly taut after tanning, you can apply a moisturising cream.
B
If you use function º (HB937 only), we advise you to extend the tanning sessions by approximately 5 minutes.This does not apply to the first
tanning session, which must not last longer than 10 minutes.
*) or longer, depending on your skin sensitivity.
ENGLISH 5
For persons with less
sensitive skin
10 minutes
30-40 minutes*
30-40 minutes*
30-40 minutes*
30-40 minutes*
30-40 minutes*
30-40 minutes*
30-40 minutes*
30-40 minutes*
30-40 minutes*
For persons with normal
sensitive skin
10 minutes
25-30 minutes
25-30 minutes
25-30 minutes
25-30 minutes
25-30 minutes
25-30 minutes
25-30 minutes
25-30 minutes
25-30 minutes
For persons with very sensitive
skin
10 minutes
15 minutes
15 minutes
15 minutes
15 minutes
15 minutes
15 minutes
15 minutes
15 minutes
15 minutes
Duration of the tanning session for
each separate part of the body
1st session
rest of at least 48 hours
2nd session
3rd session
4th session
5th session
6th session
7th session
8th session
9th session
10th session

Relax sessions: how often and how long?
If you want to pamper your muscles or joints or want to enjoy the relaxing warmth of the INNERGIZE without getting a tan, only switch on the
infrared lamps to get a deep relaxation. If you want to continue enjoying the INNERGIZE's warmth after your tanning session, switch on the
infrared lamps only for a relax session.
You can take infrared relax sessions several times a day (e.g. 30 minutes in the morning and in the evening).
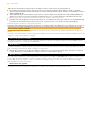
Preparing for use
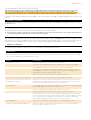
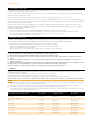
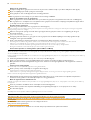
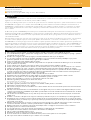
◗ The appliance can be easily moved and stored in transport position (fig. 2).
1 Put the appliance on the floor as shown in the figure (fig. 3).
Make sure there is sufficient room on either side of the appliance to allow the legs to move outwards.
2 Press the dual push button in the handgrip (1) and pull the stand slightly up (2).Then release the push button (fig. 4).
On a smooth floor the legs of the appliance will automatically move outwards. If the floor is not smooth, e.g. a carpeted floor, you may have to
put your foot on one of the legs to allow the other leg to move outwards.
3 Pull the stand up by the handgrip as far as it goes (fig. 5).
The stand will lock into position with a click.
4 Turn the lamp unit in the direction indicated in the figure (fig. 6).
This will require some force at first. Push the lamp unit in the direction indicated until it locks into position with a click.
◗ The appliance can only be switched on for a tanning or relax session if the lamp unit is in the correct position.
5 Push the legs of the appliance under the bed or sofa you intend to lie down on.The lamps for functions º and ◊ are on the marked side
of the appliance (HB937 only) (fig. 7).
6 Press the release buttons in the recesses of the control panel and push the control panel upwards along the stand. Let go of the release
buttons when the lamp unit is at the required height (fig. 8).
◗ The distance between the UV filters and your body must be 65 cm.The distance between the UV filters and the surface on which you
are lying down (e.g. a bed) must be 85 cm (fig. 9).
◗ You can determine whether the appliance has been set to the required height by pulling out the measuring tape (fig. 10).
◗ The measuring tape will automatically rewind if you operate the red tab (fig. 11).
Using the appliance
Tanning or relaxing (HB933)
1 Fully unwind the mains cord.
2 Put the plug in the wall socket.
3 Set the selector to the desired position (fig. 12).
Choose symbol • if you want to tan your body.
Choose symbol Ç if you prefer a relax session.
4 Check the chapters 'Tanning sessions: how often and how long?' and 'Relax sessions: how often and how long?' for the correct tanning
or relaxing time.
5 qLie down directly under the lamp unit of the appliance.
6 Always wear the protective goggles provided if you are taking a tanning session.
7 Set the timer to the appropriate time for the session (fig. 13).
B
It can take a few seconds for the lamps to go on.This is normal.
◗ During the last minute of the session you will hear a beeping sound.
◗ During this minute, you can reset the timer to tan the other side of your body. By doing so, you avoid the 3-minute waiting time which
is necessary to allow the tanning lamps to cool down after they have been switched off.This waiting time does not apply to the infrared
lamps.
Tanning or relaxing (HB935 and HB937)
1 Fully unwind the mains cord.
2 Put the plug in the wall socket.
◗ The display will show all the functions that can be selected by the user (fig. 14).
Adjusting functions
1 Use the ¡™buttons to switch from function to function (fig. 15).
The underlined symbol shows the function you are programming.
2 Choose:
- symbol • if you want to tan your whole body
- symbol º if you want to tan a specific part of your body (HB937 only)
- symbol Ç if you want to relax
- symbol ◊ if you want to warm up your muscles (HB937 only)
Note: In these instructions for use, function • is used as an example of what may be shown on the display.
Setting the time for a tanning or relax session.
1 Check the chapters 'Tanning sessions: how often and how long?' and 'Relax sessions: how often and how long?' for the correct tanning
or relaxing time.
ENGLISH6

2 Set the time of the tanning or relax session by pushing the + button to put the time forward or by pushing the - button to put the time
backward (fig. 16).
Keep the button pressed in to adjust the time more quickly.
3 Lie down directly under the lamp unit of the appliance.
4 Always wear the protective goggles provided if you are taking a tanning session.
5 Switch on the tanning lamps or the infrared lamps by pressing the start button ∞ (fig. 17).
B
It can take a few seconds for the lamps to go on.This is normal.
◗ A blinking dot will appear and the set time will be shown on the display (25 minutes in this case) (fig. 18).
The countdown of the set tanning or relax time will now start.
◗ During the last minute of the session you will hear a beeping sound.
◗ During this minute, you can press the pause/repeat button § to repeat the set time (fig. 19).
The display shows the set time and starts to count down.The beeping stops.
◗ It is also possible to set a new time during the last minute.
By doing this, you can avoid the 3-minute waiting time which is necessary to allow the tanning lamps to cool down after they have been
switched off.
This waiting time does not apply to the infrared lamps.
6 Set a new time by pushing the ¢ or £ buttons.Then push the start button ∞ (fig. 20).
The beeping stops and the time that has just been set starts counting down.
◗ When you do not repeat the session by pressing § or set a new time during the last minute of the session, the countdown continues
and the appliance will automatically switch off as soon as the set time has passed.
Interrupting the tanning or relax session
1 You can interrupt the tanning session by pushing the pause/repeat § button (fig. 21).
The lamps will be switched off, ¶ appears in the display together with the remaining time. For 3 minutes the remaining time will blink. During this
time the lamps cool down.When the blinking has stopped, you can switch the appliance back on again by pushing the ∞ button.The remaining
time will now be counted down.
2 You can interrupt the relax session by pushing the pause/repeat § button (fig. 22).
The lamps will be switched off, P appears in the display together with the remaining time (not blinking).The waiting time does not apply to the
infrared lamps, so you can switch the appliance back on immediately by pushing the ∞ button.The remaining time will be counted down.
Changing the tanning or relax time during a session
1 When you are tanning, you can change the set time by pushing the ∞ button.The lamps will be switched off.Then set a new time by
pushing the ¢£buttons.Wait until the set time has stopped blinking (this will take 3 minutes because the lamps have to cool down
first) and push the ∞ button again (fig. 23).
2 When relaxing Ç, you can change the set time by pushing the ∞ button.The lamps will be switched off.You can set a new time and
switch the appliance back on immediately by pushing the ∞ button.The waiting time does not apply to the infrared lamps (the newly set
time does not blink on the display).
Natural fragrances
During tanning or relaxing you can enjoy your favourite fragrance.You can choose from three different fragrances.
◗ The scent granules have been specially developed for use in this appliance. Do not use other granules.
Filling the cartridge
1 Remove the cap of the cartridge by pulling while applying pressure in the small pressing points (fig. 24).
2 Open the package at the small opening at the top.
3 Fill the cartridge with the content of one whole package of scent granules.
4 Close the cartridge by putting the cap back onto it.You will hear a click.
Placing or removing the cartridge
1 Place the cartridge in the holder. It only fits in one way and locks in place with a click (fig. 25).
◗ To remove the cartridge, place your thumb and index finger on the sides of the cartridge. Remove the cartridge from the holder by
pressing on the disc (fig. 26).
Setting the fragrance level
1 You can set the fragrance level by turning the cartridge (fig. 27).
Turn the cartridge in the direction of the large flower symbol to increase the fragrance level and turn it in the opposite direction to reduce the
fragrance level.
2 When you store the appliance or do not want it to emit a fragrance, turn the cartridge away from the large flower symbol as far as it
goes (fig. 28).
The holes will no longer be visible.
0
3 Replace the granules when the cartridge no longer emits any fragrance. Replacement packages with 3 sachets of scent granules are
available under type number HB080.
◗ Please bear in mind that the fragrance level depends on a number of factors, such as the following:
- Habituation may cause fragrances to be perceived less or not at all, but this is normal.
- When you lie on your belly, the fragrance will be less noticeable than when you are lying on your back.
- Airflows in the room where you use the appliance may also affect the fragrance level.
- Your personal condition may also influence the degree in which you perceive the fragrance.
ENGLISH 7

Stereo Active Speakers & Nature sounds (HB937 and HB935 only)
During tanning or relaxing, you can choose a nature sound that appeals to you and that helps you relax optimally.There are four different nature
sounds to choose from.
You can also listen to your own favourite music by connecting your own audio player (e.g. CD/MP3 or radio) to the INNERGIZE.
◗ You can adjust the volume by pressing the + or - button (fig. 29).
◗ To enhance the spatial quality of the sound, press the Surround button.The indicator light will go on (fig. 30).
◗ To listen to the sounds undisturbed by other background noises, you can use the in-ear headphones that come with the appliance.
Listening to nature sounds
On the dial below the timer buttons you can select four sounds.
1 Press the button below the dial to select a sound (fig. 31).
- The indicator light corresponding to the selected sound goes on.
- Each time you press the button, the next indicator light will go on to indicate that the next sound has been selected.
After you have made your choice, the appliance will play the sound.
◗ Nature sounds are meant to be background sounds.This means that they should not be too dominant.The relaxing effect is optimal
when the sounds are just audible.Avoid high sound levels.
Listening to your own favourite music
To connect your own audio player (e.g. CD/MP3 or radio) to the appliance use the cable with 2 jack plugs supplied with the appliance.
1 Insert one jack plug into the AUX socket on the right side of the control panel.
2 Insert the other jack plug into the headphone socket of your audio player (e.g. CD, MP3 or radio).
3 Select position 'Aux' (fig. 32).
The Philips Stereo Active Speakers will amplify the signal according to your preference.
Cleaning
Always unplug the appliance and let it cool down before you start cleaning it.
Never use abrasive liquids like scouring agents, petrol or acetone to clean the appliance. Do not use scouring pads.
◗ Clean the outside of the appliance with a damp cloth.
Do not let any water run into the appliance.
◗ You can clean the outside of the UV filters with a soft cloth sprinkled with some methylated spirits.
Storage
Let the appliance cool down for 15 minutes before you put it in transport position and store it.
◗ You can store the protective goggles in the storage compartment between the two lamps (fig. 33).
1 Make sure the cord does not get stuck between parts of the appliance when you put the appliance in transport position.
2 Turn the appliance away from the bed or sofa and make sure there is enough space around the appliance to collapse it.
3 Press the two release buttons in the recesses of the control panel and slide the control panel down the stand as far as it goes (fig. 34).
4 Turn the lamp unit in the direction of the arrow (fig. 35).
You will hear a click when the lamp unit locks in vertical position.
5 Pull the stand slightly backwards, then press the dual push button and lower the stand slowly until the lamp unit rests on the floor
between the legs (fig. 36).
6 Wind the cord and fasten it with the Velcro cord wrap strip (fig. 37).
◗ You can store the appliance in a wardrobe or under a bed.
Replacement
The light emitted by the tanning lamps will become less bright in time (i.e. after a few years in case of normal use).When this happens, you will
notice a decrease in the tanning capacity of the appliance.You can solve this problem by setting a slightly longer tanning time or by having the
tanning lamps replaced.
◗ The appliance has a counter that records the operating hours of the tanning lamps (HB937 and HB935 only).
1 Select function •. Set the time to 00 and press the pause/repeat § button at least 2 seconds to make the operating hours appear on
the display.The maximum number of hours that can be displayed is 999.When this value has been reached, the counter will start
counting up from 000 again.
2 The operating hours will disappear from the display as soon as the pause/repeat § button is released.
◗ On the packaging of the tanning lamps there is a symbol indicating that the lamps should be replaced after 750 operating hours.The
appliance will tell you that you need to replace the tanning lamps by showing an œ on the display (HB937 and HB935 only) (fig. 38).
◗ After 750 operating hours, an œ will appear on the left-hand side of the display (HB937 and HB935 only).This means that the tanning
power of the appliance has decreased so much that replacement of the tanning lamps is advisable.
Of course, you can choose to postpone replacement for a while by setting a longer tanning time.
◗ To remove the œ from the display, press the pause/repeat § button, with time indication 00 and function symbol• on the display. Hold
down the pause/repeat button and first press the ¢ button and then the £ button and the œ will disappear from the display (fig. 39).
ENGLISH8

Have the infrared lamps replaced when they stop functioning.
Have the Philips tanning lamps (Cleo HPA Synergy), the Philips infrared lamps 1100W and the UV filters replaced by a service centre
authorised by Philips. Only they have the knowledge and skills required for this job and the original spare parts for the appliance.
The UV filters protect against exposure to undesired UV light. It is therefore important to have a damaged or broken filter replaced right away.
If the mains cord is damaged, it must be replaced by Philips, a service centre authorised by Philips or similarly qualified persons in order to avoid
a hazard.
Ordering scent granules
Scent refill packages containing 3 sachets of scent granules can be obtained under type number HB080 via www.philips.com/shop or via your
INNERGIZE dealer.
Environment
The lamps of the appliance contain substances that can be harmful to the environment.When you discard the lamps, make sure they are not
thrown away with the normal household waste but are handed in at an official collection point.
◗ Do not throw the appliance away with the normal household waste at the end of its life, but hand it in at an official collection point for
recycling. By doing this you will help to preserve the environment (fig. 40).
Guarantee & service
If you need service or information or if you have a problem, please visit the Philips website at www.philips.com or contact the Philips Customer
Care Centre in your country (you will find its phone number in the worldwide guarantee leaflet). If there is no Customer Care Centre in your
country, turn to your local Philips dealer or contact the Service Department of Philips Domestic Appliances and Personal Care BV.
Guarantee restrictions
The tanning lamps and the infrared lamps are not covered by the terms of the international guarantee.
ENGLISH 9
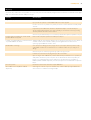
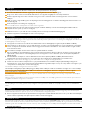
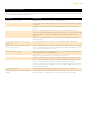
Cause/Solution
Make sure the plug has been properly inserted into the wall socket.
There may be a power failure. Check if the power supply works by connecting another appliance.
The tanning lamps are still too hot to go on. Let them cool down for 3 minutes first.
The appliance was not sufficiently cooled and the overheating protection switched the appliance off
automatically. Remove the cause of overheating (e.g. remove a towel that is blocking one or more
vents).Wait for 10 minutes and switch the appliance back on.
Make sure the lamp unit is in the right position. See chapter 'Preparing for use'.
This is normal, as the top of the control panel is heated up by light from the lamps.
Check the fuse of the circuit to which the tanning appliance is connected.The correct fuse type is a
16A standard fuse or a slow-blow automatic fuse.The fuse may also have blown because you have
switched on too many appliances that are connected to the same circuit.
You are using an extension cord that is too long and/or does not have the correct rating (16A). Consult
your dealer. Our general advice is not to use an extension cord.
Make sure you always follow the tanning schedule suitable for your skin type.
The distance between the lamps and the surface you lie on is larger than prescribed.
When the lamps have been used for a long time, the tanning capacity will decrease.This effect only
becomes noticeable after several years.You can solve this problem by selecting a slightly longer tanning
time or by having the lamps replaced.After 750 operating hours an L will appear on the display
(HB937, HB935 only) telling you that it is advisable to have the lamps replaced.
Read the last part of the section 'Natural fragrances' in the chapter 'Using the appliance'.
If the text 'Err' blinks on the display and an uninterrupted beep sounds, stop using the appliance.
Contact your dealer or a Philips service centre.
Problem
The appliance does not start
The top of the control panel becomes hot during use.
The fuse cuts off the power when you switch on the
tanning appliance or during use.
Poor tanning results
Not enough fragrance.
The display shows 'Err' (HB937 and HB935 only)
Troubleshooting
If problems should arise with this appliance and you are unable to solve them by means of the troubleshooting guide below, please contact the nearest Philips
service centre or the Philips Customer Care Centre in your country.
Page is loading ...
Page is loading ...
Page is loading ...
Page is loading ...
Page is loading ...
Page is loading ...
Page is loading ...
Page is loading ...
Page is loading ...
Page is loading ...
Page is loading ...
Page is loading ...
Page is loading ...
Page is loading ...
Page is loading ...
Page is loading ...

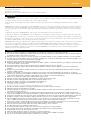
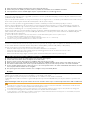
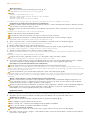
*) of langer, afhankelijk van de gevoeligheid van uw huid.
Relaxsessies: hoe vaak en hoe lang?
Als u uw spieren of gewrichten wilt verwennen of gewoon wilt genieten van de ontspannende warmte van de INNERGIZE zonder bruin te
worden, schakel dan de infraroodlampen in om te zorgen voor diepe ontspanning.Als u na een bruiningssessie nog wat langer wilt genieten van
de weldadige warmte van de INNERGIZE, schakel dan alleen de infraroodlampen in voor een relaxsessie.
U kunt een aantal keren per dag een relaxsessie nemen (bijv. een half uur 's ochtends en 's avonds).
Klaarmaken voor gebruik
◗ In de transportstand kunt u het apparaat gemakkelijk verplaatsen en opbergen (fig. 2).
1 Leg het apparaat op de grond neer op de in de figuur getoonde wijze (fig. 3).
Zorg dat er voldoende ruimte is aan beide zijden van het apparaat zodat de poten naar buiten kunnen bewegen.
2 Druk op de dubbele drukknop in de handgreep (1) en trek het statief een beetje omhoog (2). Laat vervolgens de drukknop los (fig. 4).
Op een gladde vloer zullen de poten van het apparaat automatisch naar buiten schuiven.Als de vloer niet glad is, bijvoorbeeld omdat er tapijt
op ligt, moet u wellicht een voet op een van de poten zetten om ervoor te zorgen dat de andere poot naar buiten kan bewegen.
3 Trek het statief omhoog aan het handvat tot het niet meer verder omhoog kan (fig. 5).
Het statief zal met een klik in deze stand vergrendelen.
4 Draai de lampunit in de in de figuur aangegeven richting (fig. 6).
Dit zal aanvankelijk enige kracht kosten. Druk de lampunit in de aangegeven richting totdat hij met een klik vergrendelt.
◗ Het apparaat kan alleen worden ingeschakeld voor een bruinings- of relaxsessie als de lampunit in de juiste stand staat.
5 Duw de poten van het apparaat onder het bed of de bank waarop u van plan bent te gaan liggen. De lampen voor functies º en ◊
bevinden zich aan de gemerkte zijde van het apparaat (alleen HB937) (fig. 7).
6 Druk de ontgrendelknoppen in de uitsparingen van het bedieningspaneel in en duw het bedieningspaneel omhoog langs het statief. Laat
de ontgrendelknoppen los wanneer de lampunit de gewenste hoogte heeft bereikt (fig. 8).
◗ De afstand tussen de UV-filters en uw lichaam moet 65 cm zijn. De afstand tussen de UV-filters en het oppervlak waarop u ligt (bijv. een
bed) moet 85 cm zijn (fig. 9).
◗ U kunt vaststellen of het apparaat op de juiste hoogte is afgesteld door het meetlint uit te trekken (fig. 10).
◗ Het meetlint zal automatisch opwinden wanneer u het rode lipje bedient (fig. 11).
Gebruik van het apparaat
Bruinen of relaxen (HB933)
1 Wikkel het netsnoer helemaal af.
2 Steek de stekker in het stopcontact.
3 Zet de keuzeknop in de gewenste stand (fig. 12).
Kies • wanneer u uw lichaam wilt bruinen.
Kies Ç wanneer u de voorkeur geeft aan een relaxsessie.
4 Raadpleeg de hoofdstukken 'Bruiningsessies: hoe vaak en hoe lang?' en 'Relaxsessies: hoe vaak en hoe lang?' voor de juiste bruinings- of
relaxtijd.
5 Ga recht onder de lampunit van het apparaat liggen.
6 Draag altijd een van de meegeleverde beschermbrillen wanneer u een bruiningssessie neemt.
7 Stel de timer in op de juiste tijd voor de sessie (fig. 13).
B
Het kan een paar seconden duren voordat de lampen aangaan. Dit is normaal.
NEDERLANDS26
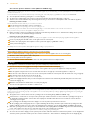
Voor mensen met een minder
gevoelige huid
10 minuten
30-40 minuten*
30-40 minuten*
30-40 minuten*
30-40 minuten*
30-40 minuten*
30-40 minuten*
30-40 minuten*
30-40 minuten*
30-40 minuten*
Voor mensen met een normaal
gevoelige huid
10 minuten
25-30 minuten
25-30 minuten
25-30 minuten
25-30 minuten
25-30 minuten
25-30 minuten
25-30 minuten
25-30 minuten
25-30 minuten
Voor mensen met een zeer
gevoelige huid
10 minuten
15 minuten
15 minuten
15 minuten
15 minuten
15 minuten
15 minuten
15 minuten
15 minuten
15 minuten
Duur van bruiningssessie voor
ieder afzonderlijk lichaamsdeel
1e sessie
onderbreking van ten minste 48 uur
2e sessie
3e sessie
4e sessie
5e sessie
6e sessie
7e sessie
8e sessie
9e sessie
10e sessie
Page is loading ...
Page is loading ...
Page is loading ...
Page is loading ...
Page is loading ...
Page is loading ...
Page is loading ...
Page is loading ...
Page is loading ...
Page is loading ...
Page is loading ...
Page is loading ...
Page is loading ...

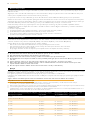
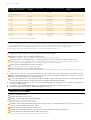
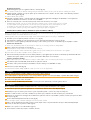
*) o per più tempo, in relazione alla vostra sensibilità.
Sedute rilassanti: Quante volte? per quanto tempo?
Se volete coccolare i vostri muscoli o le vostre articolazioni oppure approfittare del rilassante calore di INNERGIZE senza abbronzarvi,
accendete soltanto le lampade a raggi infrarossi per ottenere un benefico effetto rilassante. Se volete continuare ad approffitare del piacevole
calore di INNERGIZE dopo una seduta abbronzante, non dovrete far altro che accendere le lampade a raggi infrarossi.
Potete sottoporvi alle sedute rilassanti più volte al giorno (ad es. 30 minuti al mattino e alla sera).
Come preparare il solarium
◗ L'apparecchio è facile da spostare e da riporre (nella posizione di trasporto) (fig. 2).
1 Appoggiate il solarium a terra, come indicato nella figura (fig. 3).
Controllate che sia sufficiente spazio ai lati dell'apparecchio per poter aprire le gambe all'esterno.
2 Premete il pulsante posto sull'impugnatura (1) e sollevate leggermente il supporto (2), Poi lasciate andare il pulsante (fig. 4).
Su un pavimento liscio, le gambe dell'apparecchio si sposteranno automaticamente all'esterno. Se il pavimento non è liscio, ad esempio su
moquette o tappeti, dovrete appoggiare il piede su una delle gambe per poter spostare l'altra gamba.
3 Estraete il supporto dall'impugnatura, tirandolo fuori (fig. 5).
Il supporto si bloccherà nella posizione corretta, con un click.
4 Ruotate la lampada nella direzione indicata nella figura (fig. 6).
All'inizio dovrete esercitare una certa forza. Premete la lampada nella direzione indicata fino a quando scatterà nella posizione corretta, con un
click.
◗ L'apparecchio può essere acceso per una seduta abbronzante o una seduta rilassante solo se la lampada si trova in posizione corretta.
5 Spingete le gambe dell'apparecchio sotto il letto o il divano sul quale intendete distendervi. Le lampade per le funzioni º e } si trovano
sul lato contrassegnato dell'apparecchio (solo HB937) (fig. 7).
6 Premete i pulsanti di sgancio posti nelle cavità del pannello di controllo e spingete il pannello di controllo verso l'alto, lungo il supporto.
Lasciate andare i pulsanti di sgancio non appena la lampada avrà raggiunto l'altezza desiderata (fig. 8).
◗ La distanza consigliata fra i filtri UV e il corpo e di 65 cm. La distanza fra i filtri UV e la superficie su cui vi sdraiare (ed.es. un letto) deve
invece essere di 85 cm (fig. 9).
◗ Per stabilire se avete impostato l'altezza giusta, potete usare l'apposito metro fornito con l'apparecchio (fig. 10).
◗ Il metro si riavvolgerà automaticamente utilizzando la linguetta rossa (fig. 11).
Come usare l'apparecchio
Abbronzarsi o rilassarsi (HB933)
1 Srotolate completamente il cavo.
2 Inserite la spina nella presa di corrente.
3 Impostate il selettore sulla posizione desiderata (fig. 12).
Scegliete il simbolo • se volete abbronzare il corpo.
Scegliete il simbolo Ç se preferite una seduta rilassante.
4 Consultate i capitoli "Sedute abbronzanti: quante volte? Per quanto tempo" e "Sedute rilassanti: quante volte? per quanto tempo?" per
conoscere al durata consigliata per le diverse sedute.
5 Sdraiatevi direttamente sotto le lampade dell'apparecchio.
6 Durante le sedute abbronzanti, indossate sempre gli speciali occhiali di protezione forniti con l'apparecchio.
7 Impostate il timer in base alla durata desiderata della sessione (fig. 13).
B
L'accensione delle lampade può richiedere alcuni secondi: è del tutto normale.
ITALIANO40
Per persone con pelle poco
sensibile
10 minuti
30-40 minuti*
30-40 minuti*
30-40 minuti*
30-40 minuti*
30-40 minuti*
30-40 minuti*
30-40 minuti*
30-40 minuti*
30-40 minuti*
Per persone con pelle normale
10 minuti
25-30 minuti
25-30 minuti
25-30 minuti
25-30 minuti
25-30 minuti
25-30 minuti
25-30 minuti
25-30 minuti
25-30 minuti
Per persone con pelle molto
sensibile
10 minuti
15 minuti
15 minuti
15 minuti
15 minuti
15 minuti
15 minuti
15 minuti
15 minuti
15 minuti
Durata della seduta abbronzante
per ciascuna parte del corpo.
1° seduta
intervallo di almeno 48 ore
2° seduta
3° seduta
4° seduta
5° seduta
6° seduta
7° seduta
8° seduta
9° seduta
10° seduta
Page is loading ...
Page is loading ...
Page is loading ...
Page is loading ...
Page is loading ...
Page is loading ...
Page is loading ...
Page is loading ...
Page is loading ...
Page is loading ...
Page is loading ...
Page is loading ...
Page is loading ...

54
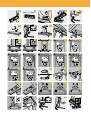
2 3 4 5
6
7 8
85
20
65
9
10 11
12 13
14 15 16
17
18 19 20 21
22 23
1
2
24 25
1
1
2
26
27 28 29 30 31
32 33 34 35 36

55
37 38 39 40

u
4222 002 62771
www.philips.com
-
 1
1
-
 2
2
-
 3
3
-
 4
4
-
 5
5
-
 6
6
-
 7
7
-
 8
8
-
 9
9
-
 10
10
-
 11
11
-
 12
12
-
 13
13
-
 14
14
-
 15
15
-
 16
16
-
 17
17
-
 18
18
-
 19
19
-
 20
20
-
 21
21
-
 22
22
-
 23
23
-
 24
24
-
 25
25
-
 26
26
-
 27
27
-
 28
28
-
 29
29
-
 30
30
-
 31
31
-
 32
32
-
 33
33
-
 34
34
-
 35
35
-
 36
36
-
 37
37
-
 38
38
-
 39
39
-
 40
40
-
 41
41
-
 42
42
-
 43
43
-
 44
44
-
 45
45
-
 46
46
-
 47
47
-
 48
48
-
 49
49
-
 50
50
-
 51
51
-
 52
52
-
 53
53
-
 54
54
-
 55
55
-
 56
56


Ask a question and I''ll find the answer in the document
Finding information in a document is now easier with AI
in other languages
- italiano: Philips HB935/01 Manuale utente
- français: Philips HB935/01 Manuel utilisateur
- español: Philips HB935/01 Manual de usuario
- Deutsch: Philips HB935/01 Benutzerhandbuch
- Nederlands: Philips HB935/01 Handleiding
- português: Philips HB935/01 Manual do usuário
Related papers
-
Philips HB875/01 User manual
-
-
-
-
-
-
-
Philips HB546/01 User manual
-
-
Other documents
-
 SunShower SS_202986_202990 User guide
-
KBL 4800 Operating instructions
-
 Dr. Kern Tancan 8000 Owner's manual
-
 SunFX PRO Series Training manual
-
-
-
WOLFF PerfectSun 26T User manual
-
-
-
 SunShower DELUXE WHITE User manual


