OWNER’S MANUAL
Folding Upright Bike with Pulse
IMPORTANT: Read all instructions carefully before using this product.
Retain this owner’s manual for future reference. The specifications of
this product may vary from this photo, subject to change without notice.
4103.5-122518


1
TABLE OF CONTENTS
SERVICE ------------------------------------------------------------------------ 2
LABEL PLACEMENT --------------------------------------------------------- 3
IMPORTANT SAFETY GUIDELINES ------------------------------------ 4
OVERVIEW DRAWING ------------------------------------------------------ 5
PARTS LIST -------------------------------------------------------------------- 6
HARDWARE & TOOL PACK ------------------------------------------------ 8
ASSEMBLY --------------------------------------------------------------------- 9
CONSOLE FUNCTIONS ---------------------------------------------------- 14
STORAGE ----------------------------------------------------------------------- 17
OPERATIONS & ADJUSTMENTS ---------------------------------------- 18
TRANSPORT ------------------------------------------------------------------ 20
MAINTENANCE & TROUBLESHOOTING ----------------------------- 21
WARRANTY -------------------------------------------------------------------- 22
PARTS REQUEST FORM -------------------------------------------------- 23

2
SERVICE
IMPORTANT: FOR NORTH AMERICA ONLY
For damaged or defective product, questions, replacement parts or any other service
support, please contact our customer service department by the below methods:
For The Best Service, please Email:
service@paradigmhw.com
Response Time: 1-2 Business Days
Emailing us with the information above will be the best method to receive a response during
peak business hours
Website:
www.paradigmhw.com
Toll-Free:
1-844-641-7921
(8:00 AM - 5:00 PM Pacific Standard Time, Monday thru Friday)
Response time may vary via calling
Please have the following information ready when requesting for service:
Your name
Phone number
Model number
Serial number
Part number
Proof of Purchase
For damaged or defective product please contact our customer service before returning to
the store.
Paradigm Health & Wellness, Inc.
1189 Jellick Ave.
City of Industry, CA 91748, USA

3
LABEL PLACEMENT

4
IMPORTANT SAFETY GUIDELINES
Basic precautions should always be followed, including the following safety guidelines
when using this equipment. Read all of the guidelines before using this equipment.
1. Before exercising and to avoid injuring your muscles, it is highly recommended that you perform
warm-up exercises for each muscle group.
2. Make sure all the components are not damaged and are in working order before using. This
equipment should be placed on a stable, flat surface. Using a mat or similar, covering material
on the ground is recommended.
3. Wear proper fitness apparel when using this equipment. Do not wear loose clothing or
accessories that may get caught by any part of the equipment.
4. Make sure all the components are not damaged and are in working order before using.
5. Remember to tighten the pedaling straps. Keep dry. Do not operate the equipment in wet or
moist condition.
6. Do not use the equipment outdoors. This equipment is for household use only.
7. Only perform maintenance or adjustments that are instructed in this manual. Should any
problems arise, discontinue usage of the equipment and consult with our customer service.
8. Only one person should be on the equipment at a time. Keep children and pets away from the
equipment at all times. This equipment is designed for adults only.
9. Be careful to always hold onto the handlebars when you’re mounting and dismounting. Be
careful to have the pedals at their lowest point when stepping off.
10. Hold onto the handlebars and use both the pedals in tandem to ensure a smooth, effective
workout.
11. This product requires a minimum of 6 square feet around for safe operation.
12. If you feel any chest pains, nausea, dizziness, or shortness of breath, you should stop
exercising immediately, and consult your physician before continuing.
13. This equipment is not intended for use by persons with reduced physical, sensory or mental
capabilities, or lack of experience and knowledge, unless they have been given supervision or
instruction concerning use of the equipment by a personal responsible for their safety.
14. DO NOT pedal in reverse.
15. WARNING: CANCER AND REPRODUCTIVE HARM--WWW.P65WARNINGS.CA.GOV.
16. The maximum weight capacity for this product is 400 lbs/181 kgs.
WARNING: Before beginning any exercise program consult your physician. This is
especially important for the people who are over 35 years old or who have pre-existing health
problems.
CAUTION: Read all instructions carefully before operating this product. Retain this
Owner’s Manual for future reference.
!
!

5
OVERVIEW DRAWING

6
PARTS LIST
No.
Description
Qty
No.
Description
Qty
1
Front Frame
1
31
Front Stabilizer Ø50x1.5tx550L
1
2
Rear Frame
1
32
C-ring Ø10
2
3
Rear Stabilizer
1
33
Flat Washer Ø8.2xØ16.8
9
4
Handlebar
1
34
Nylon Nut M8
1
5
Seat Post
1
35
Magnet Bracket
1
6
Seat Cushion
1
36
Washer Ø6.2
2
7
Left Pedal
1
37
Speed Sensor Wire
1
8
Right Pedal
1
38
Flywheel
1
9
Computer
1
39
Belt Wheel with Crank Axle
1
9A
Hand Pulse Sensor wire
2
40
Bearing Bracket A
2
9B
Computer Wire
1
41
Wave Washer
1
10
Wire Plug
1
42
Bearing
4
11
Rear Stabilizer End Cap
2
43
C-ring Ø17
6
12
Seat Post Bushing
1
44
Belt Wheel
1
13
Sensor Wire
1
45
Bearing 6000Z
2
14
Seat Height Adjustment Knob
1
46
Axle Ø12.8x94L
1
15
Tension Cable
1
47
Eyebolt M6
2
16
Oval Wire Plug
3
48
Tension Bracket
2
17
Handlebar Foam Grip
2
49
Support Tube Holder
1
18
Left Cover
1
50
Nylon Nut M6
2
19
Right Cover
1
51
Nut M10
2
20
Top Cover
1
52
Washer Ø10.2xØ25
1
21
Plastic Bushing
6
53
Wave Washer Ø17
1
22
Safety Pin
1
54
Idle Wheel Axle
1
23
Left Crank
1
55
Nylon Nut M10
1
24
Right Crank
1
56
Bearing 6902Z
2
25
Flange Nut
2
57
Axle Ø15.8x94.5L
1
26
Crank Cover
2
58
Hexagon Socket Bolt M8x15
9
27
Round Phillips Head Drilling
Screw M4x20
6
59
Rubber Cushion
1
28
Round Phillips Head Tapping
Screw M4x20
5
60
Washer Ø8.2x Ø25x2.0t
2
29
Hexagon Nut Cap M8
4
61
Flat Phillips Head Screw M6x10
6
30
Curve Washer Ø8.2xØ22.2
4
62
Holder
1

7
PARTS LIST
No.
Description
Qty
No.
Description
Qty
63
Round Phillips Head Screw
M4x10
1
77
Handlebar End Cap Ø25.4
3
64
Plastic Washer
1
78
Front Frame Support Tube End
Cap Ø22.2
2
65
C-ring Ø15
1
79
Hand Pulse Sensor Wire
2
66
Screw M4x10L
3
80
Nut M6
1
67
Rear Frame Support Tube
1
81
Screw M6x15
1
68
Screw M5x15
3
82
Hand Pulse Sensor
2
69
Tension Motor
1
83
Countersunk Phillips Head Cap
Screw M4x20
2
70
Spring
1
84
Left Nylon Nut 9/16 UNC12
1
71
Belt 240J4
1
85
Nut Bushing M10
1
72
Belt 230J3
1
86
Right Nylon Nut 9/16 UNC12
1
73R
Front Stabilizer Right End Cap
1
87
Left Pedal Strap
1
73L
Front Stabilizer Left End Cap
1
88
Right Pedal Strap
1
74
Spring Washer Ø6.2
3
89
Crank Cover
2
75
Screw M5x10
4
90
Adaptor Wire
1
76
Hexagon Socket Bolt M8x43L
1
91
AC Adaptor
1

8
HARDWARE & TOOLS PACK

9
ASSEMBLY
Figure A
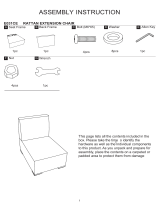
Step 1
1A. Frame Set Up: Extend the Front Frame (1) and the Rear Frame (2). Rest the Rear Frame
Support Tube (67) into the hooked plate on the Front Frame (1). Align the upper pin holes of both
frames. Then insert the Safety Pin (22) into the Front Frame (1) and the Rear Frame (2) to lock
the frames in place. See Figure A.
1B. Front Stabilizer Installation: Attach the Front Stabilizer (31) onto the front curve of the Rear
Frame (2). Secure with two Hexagon Nut Caps (29) and two Curve Washers (30), and then
tighten using the 13-15mm Wrench provided.
1C. Rear Stabilizer Installation: Attach the Rear Stabilizer (3) onto the rear curve of the Front
Frame (1). Secure with two Hexagon Nut Caps (29) and two Curve Washers (30), and then
tighten using the 13-15mm Wrench provided.
HARDWARE PACK
Front Stabilizer (31)
Transport Wheels
TOOL
13,15mm Wrench
1PC
(22) Safety Pin
1 PC
(29) Hexagon Nut Cap
4PCS
(30) Curve Washer
4 PCS

10
ASSEMBLY
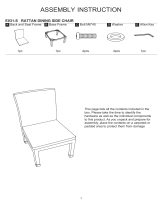
Step 2
Tip: The Cranks, Pedals, Pedal Shafts, and the Pedal Straps are marked “R” for Right and “L” for
Left. Note: Turn the Left Pedal (7) only in a COUNTER-CLOCKWISE direction. Turn the Right
Pedal (8) only in a CLOCKWISE direction. Installing the Pedals (7/8) incorrectly will strip the
threads of the left pedal shaft.
2A Installing the Left Pedal: Remove the Left Nylon Nut (84) from the Left Pedal (7). Insert the
Left Pedal (7) into the threaded hole in the Left Crank (23) in a COUNTER-CLOCKWISE direction
with your hand. Reinstall the Left Nylon Nut (84) onto the protruding shaft of the Left Pedal (7) in a
CLOCKWISE direction. Use the 13,15mm and 19mm Wrenches to simultaneously tighten the
Left Nylon Nut (84) and Left Pedal (7) in the same directions instructed. See Figure B.
2B Installing the Right Pedal: Remove the Right Nylon Nut (86) from the Right Pedal (8). Insert
the Right Pedal (8) into the threaded hole in the Right Crank (24) via the CLOCKWISE direction
with your hand. Reinstall the Right Nylon Nut (86) onto the protruding shaft of the Right Pedal (8)
in a COUNTER-CLOCKWISE direction. Use the 13,15mm and 19mm Wrenches to
simultaneously tighten the Right Nylon Nut (86) and Right Pedal (8) in the same directions
instructed.
TOOLS
19mm Wrench
1PC
13-15mm Wrench
1PC
PRE-INSTALLED HARDWARE
(84) Left
Nylon Nut
1PC
(86) Right
Nylon Nut
1PC
Figure B

11
ASSEMBLY
Step 3
Tip: The Seat Cushion (6) has 2 sets of adjustment holes. It is recommended that users between
5’1” – 5’6” use the holes towards the rear. It is recommended that users between 5’7” to 6’3” use
the holes towards the front.
3A Installing the Seat Cushion to the Seat Post: Align the bolt holes on the underside of the
Seat Cushion (6) with the holes on top of the Seat Post (5). Then attach the Seat Cushion (6) to
the Seat Post (5) with three Flat Washers (33) and three Hexagon Socket Bolts (58). Tighten the
Bolts (58) with the 5mm Allen Wrench with Philips Screwdriver provided.
3B Installing the Seat Post to the Rear Frame: Insert the Seat Post (5) into the Rear Frame (2)
and stop at your desired seat height. Install the Seat Height Adjustment Knob (14) into the
threaded hole on the right side of the Rear Frame (2) by turning it CLOCKWISE, making sure that
the safety pin of the Seat Height Adjustment Knob (14) catches one of the height adjustment
holes of the Seat Post (5).
HARDWARE:
5mm Allen Wrench with
Phillips Screwdriver
TOOL
(14) Seat Height
Adjustment Knob
1 PC
(33) Flat Washer
3PCS
(58) Hexagon
Socket Bolt
3PCS

12
ASSEMBLY
Step 4
Remove four Screws (75) from the Console (9) first.
4A Installing the Handlebar: Place the Handlebar (4) onto the Front Frame (1), Secure the
Handlebar (4) onto the Front Frame (1) with four Flat Washers (33) and four Hexagon Socket
Bolts (58). Tighten the Bolts (58) with the 5mm Allen Wrench with Philips Screwdriver
provided.
4B Connecting the Computer Wire to the Sensor Wire: Connect the Hand Pulse Sensor (9A)
to the Hand Pulse Sensor Wire (79). See Figure C. Connect the Computer Wire (9B) to the
Sensor Wire (13). See Figure D. Attach the Console (9) onto the Handlebar (4) and secure with
four Screws (75) that were previous removed. Tighten the Screws (75) with the 5mm Allen
Wrench with Philips Screwdriver provided.
PRE-INSTALLED HARDWARE
(58) Hexagon Socket Bolt
4PCS
(33) Flat Washer
4PCS
5mm Allen Wrench with
Phillips Screwdriver
1PC
TOOL
Figure C
Figure D

13
ASSEMBLY
Step 5
5A. Power Adaptor Installation – Plug the small end of the AC Adaptor (91) into the Adaptor
Wire (90) at the rear of the Left Cover (18), then plugging in the AC Adaptor (91) into an electrical
outlet.

14
CONSOLE FUNCTIONS
CONSOLE BUTTONS:
Start/Stop Button: Starts and pauses workouts.
Mode Button: Switches displayed workout values:
RPM MPH/KMPH // DIST ODO // CAL WATT
Up Button: Increases the value of the selected workout settings: RESISTANCE, TIME,
DISTANCE, CALORIES, PROGRAMS
Down Button: Decreases the value of the selected workout settings: RESISTANCE,
TIME, DISTANCE, CALORIES, PROGRAMS
Enter Button: Confirms a selection or toggles through: TIME, DISTANCE/ODO,
CALORIES, PROGRAMS
USER Set Up:
The first screen that will appear after you turn on the Console will prompt you to choose between
USER 1 and USER 2.
1. Press ˄ or ˅ to choose between USER 1 and USER 2. After choosing one of the user
profiles press ENTER.
2. Press ˄ or ˅ to choose a gender, see the Male and Female Symbol in the top right corner,
after choosing press ENTER.
3. Press ˄ or ˅ to set a gender, see the Male and Female Symbol in the top right corner, after
choosing press ENTER.
4. Press ˄ or ˅ to set an age, after choosing press ENTER.
5. Press ˄ or ˅ to set an age, after choosing press ENTER.
6. Press ˄ or ˅ to set a height, after choosing press ENTER.
7. Press ˄ or ˅ to set a weight, after choosing press ENTER.
8. Once you go through the set up the display will return to the U1 or U2 screen.
Display Information:
TIME-----------------------------------------------------
00:00-99:00
SPEED -------------------------------------------------
0.0-99.9 MPH / KM
DISTANCE (DIST) -----------------------------------
0.0-999.9 ML
CALORIES (CAL) ------------------------------------
0.0-999.9 CAL
ODOMETER (ODO) ---------------------------------
0-999.9 ML

15
CONSOLE FUNCTIONS
Quick Start:
Pressing START at the user selection screen will take you into a “QUICKSTART” manual workout
using the selected user profile. You can set a consistent resistance level for the entire workout with
the ˄ or ˅ buttons.
Workout Program:
Challenge yourself with one of the 21 preset workout programs.
1. Pressing the MODE button at the user selection screen will take you into the PROGRAM
workout menu using the selected user profile.
2. Use the ˄ or ˅ buttons to scroll through the workout programs.
3. Press the START button to begin a workout with the displayed workout program. The clock
will count up from zero.
Target Workout Goal Program:
Set a goal for yourself when using one of the 21 preset workout programs:
1. Pressing the MODE button at the user selection screen will take you into the PROGRAM
workout menu using the selected user profile.
2. Use the ˄ or ˅ buttons to select a workout program.
3. Pressing the ENTER button will cause the TIME, DISTANCE, or CALORIES display values
to flash.
4. Use the ˄ or ˅ buttons to change the value of the flashing digits.
5. Press the START button to begin a workout using the set target workout goal. The set value
will count down to zero. NOTE: only one target workout goal can be set.
PRE-SET Programs:
P1 (Manual)
P2 P3 P4 P5
P6 P7 P8 P9
P10 P11 P12 P13
P14 P15 P16 P17
P18 P19 P20 P21

16
CONSOLE FUNCTIONS
CONSOLE FEATURES:
CHANGE UNITS OF MEASUREMENT: Pressing and holding ˄ and ˅ for 3 seconds
will reset the console display and will change the units between Metric (kilometers) &
Imperial (miles).
Pressing and holding the START button for 3 seconds will reset the console display.
Shut Off: The Console will go into standby after 4 minutes of inactivity.
Resistance: The Resistance can be adjusted during an active Pre-set Program, but the
adjustment only affects the current column/interval.
+

17
STORAGE
For your convenience, the bike can be folded up for storage.
1. Remove the Safety Pin (22) from the upper pin hole on the Front Frame (1)
2. Fold the Front and Rear frames together.
3. Re-insert the Safety Pin (22) into the lower pin hole on the Front Frame (1) to secure the
Front and Rear Frames (1,2) together.
4. Place the Rear Frame Support Tube (67) into the Support Tube Holder (49).

18
OPERATIONS & ADJUSTMENTS
Adjusting the Seat Height
Loosen the Seat Height Adjustment Knob (14) by turning it counterclockwise. Pull AND hold to
release the pin. While the Knob is being pulled, adjust the Seat Post (5) to the desired height.
Release the Seat Height Adjustment Knob (14) to allow the pin to catch one of the holes along
the Seat Post (5). Then tighten Seat Height Adjustment Knob (14) by turning it clockwise to
secure the seat in place.
NOTE: When adjusting the height of the Seat Post (5), make sure the height of the Seat Post (5)
does not exceed the MAX line on the Seat Post (5).
Seat Height Adjustment Knob (14)
Seat Post (5)
Page is loading ...
Page is loading ...
Page is loading ...
Page is loading ...
Page is loading ...
/