Important
Please read this “User’s Manual”, and “PRECAUTIONS” (separate
volume) carefully to familiarize yourself with safe and eective
usage.
• Refer to the “Setup Guide” for information on the installation /
connection of the monitor.
• For the latest product information including the “User’s Manual”,
refer to our web site :
www.eizoglobal.com
Color Management LCD Monitor
User’s Manual

Location of Caution Statement
This product has been adjusted specically for use in the region to which it was originally shipped. If
operated outside this region, the product may not perform as stated in the specications.
No part of this manual may be reproduced, stored in a retrieval system, or transmitted, in any form or by
any means, electronic, mechanical, or otherwise, without the prior written permission of EIZO Corporation.
EIZO Corporation is under no obligation to hold any submitted material or information condential unless
prior arrangements are made pursuant to EIZO Corporation’s receipt of said information. Although every
eort has been made to ensure that this manual provides up-to-date information, please note that EIZO
monitor specications are subject to change without notice.
2

Notice for this monitor
Aside from general purposes like creating documents, viewing multimedia content, this product is also suited
to applications such as graphics creation and digital photo processing, where accurate color reproduction is
a priority.
This product has been adjusted specically for use in the region to which it was originally shipped. If the
product is used outside the region, it may not operate as specied in the specications.
This product may not be covered by warranty for uses other than those described in this manual.
The specications noted in this manual are only applicable when the following are used:
• Power cords provided with the product
• Signal cables specied by us
Only use optional products manufactured or specied by us with this product.
If you place this product on a lacquer-coated desk, the color may adhere to the bottom of the stand due to
the composition of the rubber. Check the desk surface before use.
It takes about 30 minutes (under our measurement conditions) for the monitor display to stabilize. Please
wait 30 minutes or more after the monitor power has been turned on, and then adjust the monitor.
Monitors should be set to a lower brightness to prevent a loss in the screen quality caused by long-term use
and to maintain stable use.
When the screen image is changed after displaying the same image for extended periods of time, an
afterimage may appear. Use the screen saver or power save function to avoid displaying the same image for
extended periods of time. Depending on the image, an afterimage may appear even if it was displayed for
a short period of time. To remove such a phenomenon, change the image or keep the power turned o for
several hours.
If the monitor displays continuously over a long period of time, dark smudges or burn-in may appear. To
maximize the life of the monitor, we recommend the monitor be turned o periodically.
Periodic cleaning is recommended to keep the monitor looking new and to prolong its operation lifetime (refer
to “Cleaning” (page 4)).
The LCD panel is manufactured using high-precision technology. Although, missing pixels or lit pixels may
appear on the LCD panel, this is not a malfunction. Percentage of eective dots: 99.9994 % or higher.
The backlight of the LCD panel has a xed lifetime. Depending on the usage pattern, such as usage for
long continuous periods, the lifespan of the backlight may run out sooner, requiring replacement. When the
screen becomes dark or begins to icker, please contact your local EIZO representative.
Do not press on the LCD panel or edge of the frame strongly, as this may result in display malfunctions, such
as interference patterns, etc. If pressure is continuously applied to the LCD panel surface, the liquid crystal
may deteriorate or the LCD panel may be damaged. (If the pressure marks remain on the panel, leave the
monitor with a black or white screen. The symptom may disappear.)
Do not scratch or press on the LCD panel with any sharp objects, at this may result in damage to the LCD
panel. Do not attempt to brush with tissues as this may scratch the panel.
When the monitor is cold and brought into a room or the room temperature goes up quickly, dew
condensation may occur on the interior and exterior surfaces of the monitor. In that case, do not turn the
monitor on. Instead wait until the dew condensation disappears, otherwise it may cause some damage to the
monitor.
3
Notice for this monitor

Cleaning
The stains on the cabinet and LCD panel surface can be removed by moistening part of a soft cloth with water.
Attention
• Chemicals such as alcohol and antiseptic solution may cause gloss variation, tarnishing, and fading of the cabinet
or LCD panel, and also quality deterioration of the image.
• Never use thinner, benzine, wax, or abrasive cleaner as they may damage the cabinet or LCD panel surface.
Note
• It is recommended that ScreenCleaner (available as an option) be used to clean the cabinet and LCD panel surface.
To use the monitor comfortably
• An excessively dark or bright screen may aect your eyes. Adjust the brightness of the monitor
according to the environmental conditions.
• Staring at the monitor for a long time tires your eyes. Take a 10-minute rest every hour.
4
Notice for this monitor

5
Contents
Contents
Notice for this monitor ......................................... 3
Cleaning .................................................................... 4
To use the monitor comfortably ............................. 4
Contents ................................................................. 5
Chapter 1 Introduction ....................................... 6
1-1. Features ......................................................... 6
●
User-dened custom key function ................... 6
●
Support for DisplayPort Alt Mode
/ USB
Power Delivery .................................................. 6
●
Support for Color Management
Software “ColorNavigator 7” and Color
Matching Tool for Photo Prints “Quick
Color Match” .................................................... 6
1-2. Controls and Functions ............................... 7
●
Front ................................................................ 7
●
Rear ................................................................. 8
1-3. Supported Resolutions ................................ 9
●
DisplayPort ...................................................... 9
●
HDMI ..............................................................10
●
USB Type-C ...................................................12
1-4. Changing the PC Display Settings.............14
●
Windows 10 ....................................................14
●
Windows 8.1 / Windows 7 ..............................14
●
macOS ...........................................................15
Chapter 2 Basic Adjustments/Settings .......... 16
2-1. Switch Operation Method ...........................16
●
Operation Guide Icons ...................................17
2-2. Switching Input Signals ..............................17
2-3.
Switching the Display Mode (color mode)
...
17
●
Display Modes ................................................18
Chapter 3 Custom Key Settings ...................... 19
3-1. Basic Operation of the Custom Keys ........19
3-2. Assigning a Function to a Custom Key .....19
●
Functions that can be Assigned to
Custom Keys ..................................................21
Chapter 4
Advanced Adjustments/Settings
... 22
4-1. Basic Operation of the Setting Menu ....... 22
4-2. Setting Menu Functions ............................. 24
●
Signal .............................................................24
●
Color .............................................................. 26
●
Screen ........................................................... 29
●
Preferences ................................................... 30
●
Languages .................................................... 32
●
Information .................................................... 32
Chapter 5 Administrator Settings ................... 33
5-1. Basic Operation of the "Administrator
Settings" Menu ............................................ 33
5-2. "Administrator Settings" Menu
Functions ..................................................... 34
Chapter 6 Troubleshooting .............................. 36
6-1. No Picture .................................................... 36
6-2. Imaging Problems ........................................37
6-3. Other Problems ........................................... 38
Chapter 7 Attaching/Detaching the Stand ..... 39
7-1. Removing the Stand ................................... 39
7-2. Attaching the Optional Arm ....................... 40
7-3. Attaching the Original Stand ..................... 40
Chapter 8 Reference ........................................ 41
8-1. Attaching/Detaching the Cable Holder .....41
8-2. Connecting Multiple External Devices ..... 43
8-3. Making Use of the USB Hub Function ...... 44
●
Connection Procedure .................................. 44
8-4. Specications ............................................. 45
●
Accessories ................................................... 46
Appendix .............................................................. 47
Trademark ................................................................47
License .....................................................................47
Information for Radio Interference ...................... 48

6
Chapter 1
Introduction
Chapter 1 Introduction
This chapter describes the features of the monitor and the name of each control.
1-1. Features
●
User-dened custom key function
Work eciency can be improved by assigning frequently used functions to the switches on the front
of the monitor. The functions that can be assigned to custom keys are the following:
- Brightness
- Prev. Color Mode
- Information
See “Chapter 3 Custom Key Settings” (page 19).
●
Support for DisplayPort Alt Mode
/ USB Power Delivery
This product is equipped with a USB Type-C connector and supports video signal transfer
(DisplayPort Alt Mode) and USB device charging (USB Power Delivery).
It supplies a maximum of 60 W of power to a connected notebook PC when used as an external
monitor.
Video signals
Power supply
Note
• To use the charging function, the connected device must be equipped with a USB Type-C connector and
support device charging by using USB Power Delivery. Charging may not be possible depending on the used
external device.
• To use video signal transfer with USB Type-C, the connected device must be equipped with a USB Type-C
connector and support video signal transfer by using USB Type-C.
• Connected devices can be charged even when the monitor is in power saving mode.
●
Support for Color Management Software “ColorNavigator 7” and
Color Matching Tool for Photo Prints “Quick Color Match”
By using this product with the “ColorNavigator 7” or “Quick Color Match” software designed especially
for the ColorEdge series, you can optimize the performance of this monitor and make it even easier
to use.
• ColorNavigator 7
The sensor and ColorNavigator 7 can be used to calibrate the monitor and to create or edit adjustment
targets. The sensor is not included with this product and is available as an optional product.
• Quick Color Match
This software can be used to match the colors of the monitor screen and photo prints with ease. You must
have a printer and retouch software that are compatible with this software.

7
Chapter 1
Introduction
1-2. Controls and Functions
●
Front
21
1. Operation switches Displays menus. Operate the switches according to the operation
guide.
Touch the switch to display its menu.
The switch indicators are lit white when you turn on the power.
2. Power switch Turns the power on or o.
Touch the switch to turn the power on.
The switch indicator is lit when you turn the power on. The indicator
color diers depending on the monitor's operation status.
White : Normal operating mode
Orange : Power saving mode
OFF : Power o

8
Chapter 1
Introduction
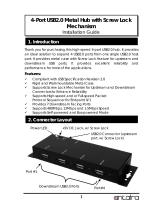
●
Rear
5
7
6
3
109 14
8
15
4
11 12 13
3. Transportation handle This handle is used for transportation.
Attention
• Firmly grasp and hold the monitor by the bottom while grabbing the
handle, and carefully convey the monitor so as not to drop it.
4. Lock button Use this button when removing the stand from the monitor.
5. USB Type-A connector
(USB downstream port)
Connects to a peripheral USB device. Supports USB 3.1 Gen 1. This is
a blue-colored connector.
6. Security lock slot Complies with Kensington's MicroSaver security system.
7. Stand
*1
Adjusts the height and angle (tilt and swivel) of the monitor.
8. Cable holder Covers the monitor cables. For details on attaching the cable holder, see
“8-1. Attaching/Detaching the Cable Holder” (page 41).
9. Main power switch
Turns the main power on or o.
: On, : O
10. Power connector Connects the power cord.
11. HDMI connector Connects to an external device that has HDMI output.
12. DisplayPort connector Connects to an external device that has DisplayPort output.
13. USB Type-C connector
(USB upstream port)
Connects a device that supports USB Type-C.
14. USB Type-B connector
(USB upstream port)
Connects to the USB cable when using software that requires a USB
connection, or when using the USB Hub function. This is a blue-colored
connector.
15. USB Type-A connector
(USB downstream port)
Connects to a peripheral USB device. Supports USB 2.0.
*1 An optional arm (or an optional stand) can be attached by removing the stand section (refer to “7-2.
Attaching the Optional Arm” (page 40)).

9
Chapter 1
Introduction
1-3. Supported Resolutions
The monitor supports the following resolutions.
●
DisplayPort
Resolution Scan
*1
Vertical
Scan
Frequency
Version 1.1
*2
Version 1.2,
Version 1.2 /
YUV
*2
YCbCr
4:4:4
YCbCr
4:2:2
RGB
4:4:4
640 x 480 P 59.940 Hz √ √ 10 / 8 bit 10 / 8 bit 10 / 8 bit
640 x 480 P 60.000 Hz √ √ 10 / 8 bit 10 / 8 bit 10 / 8 bit
720 x 400 P 70.087 Hz √ √ 10 / 8 bit 10 / 8 bit 10 / 8 bit
720 x 480 P 59.940 Hz √ √ 10 / 8 bit 10 / 8 bit 10 / 8 bit
720 x 480 P 59.941 Hz √ √ 10 / 8 bit 10 / 8 bit 10 / 8 bit
720 x 480 P 60.000 Hz √ √ 10 / 8 bit 10 / 8 bit 10 / 8 bit
720 x 576 P 50.000 Hz √ √ 10 / 8 bit 10 / 8 bit 10 / 8 bit
800 x 600 P 60.317 Hz √ √ 10 / 8 bit 10 / 8 bit 10 / 8 bit
1024 x 768 P 60.004 Hz √ √ 10 / 8 bit 10 / 8 bit 10 / 8 bit
1280 x 720 P 50.000 Hz √ √ 10 / 8 bit 10 / 8 bit 10 / 8 bit
1280 x 720 P 59.940 Hz √ √ 10 / 8 bit 10 / 8 bit 10 / 8 bit
1280 x 720 P 60.000 Hz √ √ 10 / 8 bit 10 / 8 bit 10 / 8 bit
1280 x 960 P 60.000 Hz √ √ 10 / 8 bit 10 / 8 bit 10 / 8 bit
1280 x 1024 P 60.020 Hz √ √ 10 / 8 bit 10 / 8 bit 10 / 8 bit
1600 x 1200 P 60.000 Hz √ √ 10 / 8 bit 10 / 8 bit 10 / 8 bit
1680 x 1050 P 59.883 Hz √ √ 10 / 8 bit 10 / 8 bit 10 / 8 bit
1680 x 1050 P 59.954 Hz √ √ 10 / 8 bit 10 / 8 bit 10 / 8 bit
1920 x 1080 P 23.976 Hz √ √ 10 / 8 bit 10 / 8 bit 10 / 8 bit
1920 x 1080 P 24.000 Hz √ √ 10 / 8 bit 10 / 8 bit 10 / 8 bit
1920 x 1080 P 25.000 Hz √ √ 10 / 8 bit 10 / 8 bit 10 / 8 bit
1920 x 1080 P 29.970 Hz √ √ 10 / 8 bit 10 / 8 bit 10 / 8 bit
1920 x 1080 P 30.000 Hz √ √ 10 / 8 bit 10 / 8 bit 10 / 8 bit
1920 x 1080 P 50.000 Hz √ √ 10 / 8 bit 10 / 8 bit 10 / 8 bit
1920 x 1080 I 50.000 Hz √ √ 10 / 8 bit 10 / 8 bit 10 / 8 bit
1920 x 1080 P 59.940 Hz √ √ 10 / 8 bit 10 / 8 bit 10 / 8 bit
1920 x 1080 I 59.940 Hz √ √ 10 / 8 bit 10 / 8 bit 10 / 8 bit
1920 x 1080 P 59.963 Hz √ √ 10 / 8 bit 10 / 8 bit 10 / 8 bit
1920 x 1080 P 60.000 Hz √ √ 10 / 8 bit 10 / 8 bit 10 / 8 bit
1920 x 1080 I 60.000 Hz √ √ 10 / 8 bit 10 / 8 bit 10 / 8 bit
1920 x 1200 P 59.885 Hz √ √ 10 / 8 bit 10 / 8 bit 10 / 8 bit
1920 x 1200 P 59.950 Hz √ √ 10 / 8 bit 10 / 8 bit 10 / 8 bit
2048 x 1080 P 24.000 Hz √ √ 10 / 8 bit 10 / 8 bit 10 / 8 bit
2048 x 1080 P 48.000 Hz √ √ 10 / 8 bit 10 / 8 bit 10 / 8 bit
2048 x 1152 P 60.000 Hz √ √ 10 / 8 bit 10 / 8 bit 10 / 8 bit
2560 x 1080 P 23.976 Hz √ √ 10 / 8 bit 10 / 8 bit 10 / 8 bit
2560 x 1080 P 24.000 Hz √ √ 10 / 8 bit 10 / 8 bit 10 / 8 bit
2560 x 1080 P 25.000 Hz √ √ 10 / 8 bit 10 / 8 bit 10 / 8 bit
2560 x 1080 P 29.970 Hz √ √ 10 / 8 bit 10 / 8 bit 10 / 8 bit
2560 x 1080 P 30.000 Hz √ √ 10 / 8 bit 10 / 8 bit 10 / 8 bit
2560 x 1080 P 50.000 Hz √ √ 10 / 8 bit 10 / 8 bit 10 / 8 bit
2560 x 1080 P 59.940 Hz √ √ 10 / 8 bit 10 / 8 bit 10 / 8 bit
2560 x 1080 P 60.000 Hz √ √ 10 / 8 bit 10 / 8 bit 10 / 8 bit
2560 x 1440 P 29.935 Hz √ √ 10 / 8 bit 10 / 8 bit 10 / 8 bit
2560 x 1440 P 59.951 Hz √ √ 10 / 8 bit 10 / 8 bit 10 / 8 bit
2560 x 1600 P 59.972 Hz √ √ 10 / 8 bit 10 / 8 bit 10 / 8 bit
3840 x 2160
*3
P 23.976 Hz √ √ 10 / 8 bit 10 / 8 bit 10 / 8 bit
3840 x 2160
*3
P 23.999 Hz √ √ 10 / 8 bit 10 / 8 bit 10 / 8 bit

10
Chapter 1
Introduction
Resolution Scan
*1
Vertical
Scan
Frequency
Version 1.1
*2
Version 1.2,
Version 1.2 /
YUV
*2
YCbCr
4:4:4
YCbCr
4:2:2
RGB
4:4:4
3840 x 2160
*3
P 24.000 Hz √ √ 10 / 8 bit 10 / 8 bit 10 / 8 bit
3840 x 2160
*3
P 24.989 Hz √ √ 10 / 8 bit 10 / 8 bit 10 / 8 bit
3840 x 2160
*3
P 25.000 Hz √ √ 10 / 8 bit 10 / 8 bit 10 / 8 bit
3840 x 2160
*3
P 29.970 Hz √ √ 10 / 8 bit 10 / 8 bit 10 / 8 bit
3840 x 2160
*3
P 29.981 Hz √ √ 10 / 8 bit 10 / 8 bit 10 / 8 bit
3840 x 2160
*3
P 30.000 Hz √ √ 10 / 8 bit 10 / 8 bit 10 / 8 bit
3840 x 2160
*3
P 50.000 Hz - √ 8 bit 8 bit 8 bit
3840 x 2160
*3
P 59.940 Hz - √ 8 bit 8 bit 8 bit
3840 x 2160
*3
P 59.997 Hz - √ 10 / 8 bit 10 / 8 bit 10 / 8 bit
3840 x 2160
*3
P 60.000 Hz - √ 8 bit 8 bit 8 bit
*1 P: Progressive, I: Interlace
*2 “Signal Format” (page 35) must be set.
*3 Recommended resolution
●
HDMI
Resolution Scan
*1
Vertical
Scan
Frequency
4K 30Hz
*2
4K 60Hz,
4K 60Hz /
YUV
*2
YCbCr
4:4:4
YCbCr
4:2:2
YCbCr
4:2:0
RGB
4:4:4
640 x 480 P 59.940 Hz √ √
12 / 10 / 8
bit
12 / 10 / 8
bit
-
12 / 10 / 8
bit
640 x 480 P 60.000 Hz √ √
12 / 10 / 8
bit
12 / 10 / 8
bit
-
12 / 10 / 8
bit
720 x 400 P 70.087 Hz √ √
12 / 10 / 8
bit
12 / 10 / 8
bit
-
12 / 10 / 8
bit
720 x 480 P 59.940 Hz √ √
12 / 10 / 8
bit
12 / 10 / 8
bit
-
12 / 10 / 8
bit
720 x 480 I 59.940 Hz √ √
12 / 10 / 8
bit
12 / 10 / 8
bit
-
12 / 10 / 8
bit
720 x 480 P 59.941 Hz √ √
12 / 10 / 8
bit
12 / 10 / 8
bit
-
12 / 10 / 8
bit
720 x 480 P 60.000 Hz √ √
12 / 10 / 8
bit
12 / 10 / 8
bit
-
12 / 10 / 8
bit
720 x 480 I 60.000 Hz √ √
12 / 10 / 8
bit
12 / 10 / 8
bit
-
12 / 10 / 8
bit
720 x 576 P 50.000 Hz √ √
12 / 10 / 8
bit
12 / 10 / 8
bit
-
12 / 10 / 8
bit
720 x 576 I 50.000 Hz √ √
12 / 10 / 8
bit
12 / 10 / 8
bit
-
12 / 10 / 8
bit
800 x 600 P 60.317 Hz √ √
12 / 10 / 8
bit
12 / 10 / 8
bit
-
12 / 10 / 8
bit
1024 x 768 P 60.004 Hz √ √
12 / 10 / 8
bit
12 / 10 / 8
bit
-
12 / 10 / 8
bit
1280 x 720 P 50.000 Hz √ √
12 / 10 / 8
bit
12 / 10 / 8
bit
-
12 / 10 / 8
bit
1280 x 720 P 59.940 Hz √ √
12 / 10 / 8
bit
12 / 10 / 8
bit
-
12 / 10 / 8
bit
1280 x 720 P 60.000 Hz √ √
12 / 10 / 8
bit
12 / 10 / 8
bit
-
12 / 10 / 8
bit
1280 x 960 P 60.000 Hz √ √
12 / 10 / 8
bit
12 / 10 / 8
bit
-
12 / 10 / 8
bit
1280 x 1024 P 60.020 Hz √ √
12 / 10 / 8
bit
12 / 10 / 8
bit
-
12 / 10 / 8
bit
1600 x 1200 P 60.000 Hz √ √
12 / 10 / 8
bit
12 / 10 / 8
bit
-
12 / 10 / 8
bit

11
Chapter 1
Introduction
Resolution Scan
*1
Vertical
Scan
Frequency
4K 30Hz
*2
4K 60Hz,
4K 60Hz /
YUV
*2
YCbCr
4:4:4
YCbCr
4:2:2
YCbCr
4:2:0
RGB
4:4:4
1680 x 1050 P 59.883 Hz √ √
12 / 10 / 8
bit
12 / 10 / 8
bit
-
12 / 10 / 8
bit
1680 x 1050 P 59.954 Hz √ √
12 / 10 / 8
bit
12 / 10 / 8
bit
-
12 / 10 / 8
bit
1920 x 1080 P 23.976 Hz √ √
12 / 10 / 8
bit
12 / 10 / 8
bit
-
12 / 10 / 8
bit
1920 x 1080 P 24.000 Hz √ √
12 / 10 / 8
bit
12 / 10 / 8
bit
-
12 / 10 / 8
bit
1920 x 1080 P 25.000 Hz √ √
12 / 10 / 8
bit
12 / 10 / 8
bit
-
12 / 10 / 8
bit
1920 x 1080 P 29.970 Hz √ √
12 / 10 / 8
bit
12 / 10 / 8
bit
-
12 / 10 / 8
bit
1920 x 1080 P 30.000 Hz √ √
12 / 10 / 8
bit
12 / 10 / 8
bit
-
12 / 10 / 8
bit
1920 x 1080 P 50.000 Hz √ √
12 / 10 / 8
bit
12 / 10 / 8
bit
-
12 / 10 / 8
bit
1920 x 1080 I 50.000 Hz √ √
12 / 10 / 8
bit
12 / 10 / 8
bit
-
12 / 10 / 8
bit
1920 x 1080 P 59.940 Hz √ √
12 / 10 / 8
bit
12 / 10 / 8
bit
-
12 / 10 / 8
bit
1920 x 1080 I 59.940 Hz √ √
12 / 10 / 8
bit
12 / 10 / 8
bit
-
12 / 10 / 8
bit
1920 x 1080 P 59.963 Hz √ √
12 / 10 / 8
bit
12 / 10 / 8
bit
-
12 / 10 / 8
bit
1920 x 1080 P 60.000 Hz √ √
12 / 10 / 8
bit
12 / 10 / 8
bit
-
12 / 10 / 8
bit
1920 x 1080 I 60.000 Hz √ √
12 / 10 / 8
bit
12 / 10 / 8
bit
-
12 / 10 / 8
bit
1920 x 1200 P 59.885 Hz √ √
12 / 10 / 8
bit
12 / 10 / 8
bit
-
12 / 10 / 8
bit
1920 x 1200 P 59.950 Hz √ √
12 / 10 / 8
bit
12 / 10 / 8
bit
-
12 / 10 / 8
bit
2048 x 1080 P 24.000 Hz √ √
12 / 10 / 8
bit
12 / 10 / 8
bit
-
12 / 10 / 8
bit
2048 x 1080 P 48.000 Hz √ √
12 / 10 / 8
bit
12 / 10 / 8
bit
-
12 / 10 / 8
bit
2048 x 1152 P 60.000 Hz √ √
12 / 10 / 8
bit
12 / 10 / 8
bit
-
12 / 10 / 8
bit
2560 x 1080 P 23.976 Hz - √
12 / 10 / 8
bit
12 / 10 / 8
bit
-
12 / 10 / 8
bit
2560 x 1080 P 24.000 Hz - √
12 / 10 / 8
bit
12 / 10 / 8
bit
-
12 / 10 / 8
bit
2560 x 1080 P 25.000 Hz - √
12 / 10 / 8
bit
12 / 10 / 8
bit
-
12 / 10 / 8
bit
2560 x 1080 P 29.970 Hz - √
12 / 10 / 8
bit
12 / 10 / 8
bit
-
12 / 10 / 8
bit
2560 x 1080 P 30.000 Hz - √
12 / 10 / 8
bit
12 / 10 / 8
bit
-
12 / 10 / 8
bit
2560 x 1080 P 50.000 Hz - √
12 / 10 / 8
bit
12 / 10 / 8
bit
-
12 / 10 / 8
bit
2560 x 1080 P 59.940 Hz - √
12 / 10 / 8
bit
12 / 10 / 8
bit
-
12 / 10 / 8
bit
2560 x 1080 P 60.000 Hz - √
12 / 10 / 8
bit
12 / 10 / 8
bit
-
12 / 10 / 8
bit
2560 x 1440 P 29.935 Hz √ √
12 / 10 / 8
bit
12 / 10 / 8
bit
-
12 / 10 / 8
bit

12
Chapter 1
Introduction
Resolution Scan
*1
Vertical
Scan
Frequency
4K 30Hz
*2
4K 60Hz,
4K 60Hz /
YUV
*2
YCbCr
4:4:4
YCbCr
4:2:2
YCbCr
4:2:0
RGB
4:4:4
2560 x 1440 P 59.951 Hz √ - 8 bit
12 / 10 / 8
bit
- 8 bit
2560 x 1600 P 59.972 Hz √ - 8 bit
12 / 10 / 8
bit
- 8 bit
3840 x 2160
*3
P 23.976 Hz √ √
12 / 10 / 8
bit
12 / 10 / 8
bit
-
12 / 10 / 8
bit
3840 x 2160
*3
P 24.000 Hz √ √
12 / 10 / 8
bit
12 / 10 / 8
bit
-
12 / 10 / 8
bit
3840 x 2160
*3
P 25.000 Hz √ √
12 / 10 / 8
bit
12 / 10 / 8
bit
-
12 / 10 / 8
bit
3840 x 2160
*3
P 29.970 Hz √ √
12 / 10 / 8
bit
12 / 10 / 8
bit
-
12 / 10 / 8
bit
3840 x 2160
*3
P 30.000 Hz √ √
12 / 10 / 8
bit
12 / 10 / 8
bit
-
12 / 10 / 8
bit
3840 x 2160
*3
P 50.000 Hz - √ 8 bit
12 / 10 / 8
bit
12 / 10 / 8
bit
8 bit
3840 x 2160
*3
P 59.940 Hz - √ 8 bit
12 / 10 / 8
bit
12 / 10 / 8
bit
8 bit
3840 x 2160
*3
P 60.000 Hz - √ 8 bit
12 / 10 / 8
bit
12 / 10 / 8
bit
8 bit
*1 P: Progressive, I: Interlace
*2 “Signal Format” (page 35) must be set.
*3 Recommended resolution
●
USB Type-C
Resolution Scan
*1
Vertical
Scan
Frequency
4K 30Hz /
USB3.1
*2
4K 60Hz /
USB2.0,
4K 60Hz /
USB2.0 / YUV
*2
YCbCr
4:4:4
YCbCr
4:2:2
640 x 480 P 59.940 Hz √ √ 10 / 8 bit 10 / 8 bit
640 x 480 P 60.000 Hz √ √ 10 / 8 bit 10 / 8 bit
720 x 400 P 70.087 Hz √ √ 10 / 8 bit 10 / 8 bit
720 x 480 P 59.940 Hz √ √ 10 / 8 bit 10 / 8 bit
720 x 480 P 59.941 Hz √ √ 10 / 8 bit 10 / 8 bit
720 x 480 P 60.000 Hz √ √ 10 / 8 bit 10 / 8 bit
720 x 576 P 50.000 Hz √ √ 10 / 8 bit 10 / 8 bit
800 x 600 P 60.317 Hz √ √ 10 / 8 bit 10 / 8 bit
1024 x 768 P 60.004 Hz √ √ 10 / 8 bit 10 / 8 bit
1280 x 720 P 50.000 Hz √ √ 10 / 8 bit 10 / 8 bit
1280 x 720 P 59.940 Hz √ √ 10 / 8 bit 10 / 8 bit
1280 x 720 P 60.000 Hz √ √ 10 / 8 bit 10 / 8 bit
1280 x 960 P 60.000 Hz √ √ 10 / 8 bit 10 / 8 bit
1280 x 1024 P 60.020 Hz √ √ 10 / 8 bit 10 / 8 bit
1600 x 1200 P 60.000 Hz √ √ 10 / 8 bit 10 / 8 bit
1680 x 1050 P 59.883 Hz √ √ 10 / 8 bit 10 / 8 bit
1680 x 1050 P 59.954 Hz √ √ 10 / 8 bit 10 / 8 bit
1920 x 1080 P 23.976 Hz √ √ 10 / 8 bit 10 / 8 bit
1920 x 1080 P 24.000 Hz √ √ 10 / 8 bit 10 / 8 bit
1920 x 1080 P 25.000 Hz √ √ 10 / 8 bit 10 / 8 bit
1920 x 1080 P 29.970 Hz √ √ 10 / 8 bit 10 / 8 bit
1920 x 1080 P 30.000 Hz √ √ 10 / 8 bit 10 / 8 bit
1920 x 1080 P 50.000 Hz √ √ 10 / 8 bit 10 / 8 bit

13
Chapter 1
Introduction
Resolution Scan
*1
Vertical
Scan
Frequency
4K 30Hz /
USB3.1
*2
4K 60Hz /
USB2.0,
4K 60Hz /
USB2.0 / YUV
*2
YCbCr
4:4:4
YCbCr
4:2:2
1920 x 1080 I 50.000 Hz √ √ 10 / 8 bit 10 / 8 bit
1920 x 1080 P 59.940 Hz √ √ 10 / 8 bit 10 / 8 bit
1920 x 1080 I 59.940 Hz √ √ 10 / 8 bit 10 / 8 bit
1920 x 1080 P 59.963 Hz √ √ 10 / 8 bit 10 / 8 bit
1920 x 1080 P 60.000 Hz √ √ 10 / 8 bit 10 / 8 bit
1920 x 1080 I 60.000 Hz √ √ 10 / 8 bit 10 / 8 bit
1920 x 1200 P 59.885 Hz √ √ 10 / 8 bit 10 / 8 bit
1920 x 1200 P 59.950 Hz √ √ 10 / 8 bit 10 / 8 bit
2048 x 1080 P 24.000 Hz √ √ 10 / 8 bit 10 / 8 bit
2048 x 1080 P 48.000 Hz √ √ 10 / 8 bit 10 / 8 bit
2048 x 1152 P 60.000 Hz √ √ 10 / 8 bit 10 / 8 bit
2560 x 1080 P 23.976 Hz √ √ 10 / 8 bit 10 / 8 bit
2560 x 1080 P 24.000 Hz √ √ 10 / 8 bit 10 / 8 bit
2560 x 1080 P 25.000 Hz √ √ 10 / 8 bit 10 / 8 bit
2560 x 1080 P 29.970 Hz √ √ 10 / 8 bit 10 / 8 bit
2560 x 1080 P 30.000 Hz √ √ 10 / 8 bit 10 / 8 bit
2560 x 1080 P 50.000 Hz √ √ 10 / 8 bit 10 / 8 bit
2560 x 1080 P 59.940 Hz √ √ 10 / 8 bit 10 / 8 bit
2560 x 1080 P 60.000 Hz √ √ 10 / 8 bit 10 / 8 bit
2560 x 1440 P 29.935 Hz √ √ 10 / 8 bit 10 / 8 bit
2560 x 1440 P 59.951 Hz √ √ 10 / 8 bit 10 / 8 bit
2560 x 1600 P 59.972 Hz √ √ 10 / 8 bit 10 / 8 bit
3840 x 2160
*3
P 23.976 Hz √ √ 10 / 8 bit 10 / 8 bit
3840 x 2160
*3
P 23.999 Hz √ √ 10 / 8 bit 10 / 8 bit
3840 x 2160
*3
P 24.000 Hz √ √ 10 / 8 bit 10 / 8 bit
3840 x 2160
*3
P 24.989 Hz √ √ 10 / 8 bit 10 / 8 bit
3840 x 2160
*3
P 25.000 Hz √ √ 10 / 8 bit 10 / 8 bit
3840 x 2160
*3
P 29.970 Hz √ √ 10 / 8 bit 10 / 8 bit
3840 x 2160
*3
P 29.981 Hz √ √ 10 / 8 bit 10 / 8 bit
3840 x 2160
*3
P 30.000 Hz √ √ 10 / 8 bit 10 / 8 bit
3840 x 2160
*3
P 50.000 Hz - √ 8 bit 8 bit
3840 x 2160
*3
P 59.940 Hz - √ 8 bit 8 bit
3840 x 2160
*3
P 59.997 Hz - √ 10 / 8 bit 10 / 8 bit
3840 x 2160
*3
P 60.000 Hz - √ 8 bit 8 bit
*1 P: Progressive, I: Interlace
*2 “Signal Format” (page 35) must be set.
*3 Recommended resolution

14
Chapter 1
Introduction
1-4. Changing the PC Display Settings
If the screen is not properly displayed after connecting the monitor to a PC, follow the procedure below to
change the PC display settings.
●
Windows 10
1. Right-click anywhere on the desktop except for on icons to display the menu.
2. From the displayed menu, click "Display settings" to display the "Settings" screen.
3. If there are multiple monitors including the notebook PC screen connected to the computer,
select "Extend these displays" from the "Multiple displays" menu, and click "Keep changes" in the
conrmation screen. After changing the settings, select the monitor from the "Select and arrange
display" menu.
4. By checking the option "Make this my main display" from the "Multiple displays" menu, the display
of the monitor will be corrected.
5. Conrm that the monitor's recommended resolution is set in the "Resolution" menu (the term
(Recommended) should be displayed after the resolution).
6. To change the size of letters and icons, select the preferred magnication level from the scaling (%)
menu.
7. When after changing these settings a message is displayed that prompts you to sign out, sign out
once and then sign in again.
●
Windows 8.1 / Windows 7
* For Windows 8.1, click the "Desktop" tile on the Start Screen to display the desktop.
1. Right-click anywhere on the desktop except for on icons to display the menu.
2. From the displayed menu, click "Screen resolution" to display the settings screen.
3. If there are multiple monitors including the notebook PC screen connected to the computer, select
"Extend these displays" from the "Multiple displays" menu, and click "Apply". In the conrmation
screen, click "Keep changes".
4. Select the monitor from the "Display" menu, check the option "Make this my main display", and
click "Apply". The display of the monitor will be corrected.
5. Conrm that the monitor's recommended resolution is set in the "Resolution" menu (the term
(Recommended) should be displayed after the resolution).
6. To change the size of letters and icons, click "Make text and other items larger or smaller", select
the preferred size from the settings screen, and click "Apply".
7. When after changing settings a message is displayed that prompts you to sign out or log o, sign
out or log o once and then sign in or log on again.

15
Chapter 1
Introduction
●
macOS
1. Select "System Preferences" from the Apple menu.
2. When the "System Preferences" panel is displayed, click "Displays".
3. If there are multiple monitors including the notebook PC screen connected to the computer, open
the "Arrangement" tab and conrm that "Mirror displays" is not selected. If it is selected, clear it.
4. Select the "Display" tab, and conrm that "Default for display" of "Resolution" is selected. If it is not
selected, select it. This sets the correct resolution. Close the "System Preferences" menu. If there
are multiple monitors including the notebook PC screen connected to the computer, change the
settings for each monitor by using "Display".
5. To select a dierent resolution, select "Scaled", select a resolution from the resolution list (displayed
in list or icon format), and close the panel.

16
Chapter 2
Basic Adjustments/Settings
Chapter 2 Basic Adjustments/Settings
This chapter describes the basic functions that can be set by touching the switches on the front of the
monitor.
For advanced adjustment and setting procedures using the Setting menu, see “Chapter 4 Advanced
Adjustments/Settings” (page 22).
2-1. Switch Operation Method
1.
Displaying the operation guide
1. Touch any switch (except ).
The operation guide appears on the screen.
2.
Setting
1. Touch a switch for setting.
The Setting menu appears.
2. Use the switches to adjust/set the selected item, and then select to conrm.
3.
Exiting
1. Select to exit the menu.
Note
• The contents of the guide will dier depending on the selected menu or status.

17
Chapter 2
Basic Adjustments/Settings
●
Operation Guide Icons
Icon Description
Switches the input signal.
Switches the color mode.
Executes the function assigned to Custom Key 1.
Executes the function assigned to Custom Key 2.
Displays the Setting menu.
Returns to the previous screen.
Moves the cursor.
Executes the selected operation.
Turns the monitor's power on or o.
2-2. Switching Input Signals
When a monitor has multiple signal inputs, the signal to display on-screen can be changed.
Touch any switch, select
, and use or to select the input signal you want to display.
2-3. Switching the Display Mode (color mode)
This function allows easy selection of a display mode according to monitor application.
Touch any switch, select , and use or to select the color mode you want to use.

18
Chapter 2
Basic Adjustments/Settings
●
Display Modes
Color Mode Purpose
User Select for conguring color settings according to your preference.
Adobe
®
RGB Suitable for color matching with Adobe
®
RGB compatible peripherals.
sRGB Suitable for color matching with sRGB compatible peripherals.
CAL1
CAL2
CAL3
CAL4
CAL5
CAL6
CAL7
Displays the screen adjusted by ColorNavigator 7.
Note
• Use ColorNavigator 7 to set CAL1 to CAL7. This cannot be changed on
the monitor’s Setting menu.
• CAL2 to CAL7 are disabled in the default settings.
Note
• You can set the color mode for each input signal.
• You can disable specic color mode selections. For more information, see “Mode Skip” (page 31).

19
Chapter 3
Custom Key Settings
Chapter 3 Custom Key Settings
You can assign functions to the custom keys to easily start specied functions.
This chapter describes how to operate the custom keys and how to assign functions to the custom keys.
3-1. Basic Operation of the Custom Keys
1.
Displaying the operation guide
1. Touch any switch (except ).
The operation guide appears.
2.
Execute
1. Select or .
The function assigned to or is executed.
Note
• If you touch a custom key to which no function has been assigned, the menu for assigning a function to that
custom key appears.
3-2. Assigning a Function to a Custom Key
1.
Displaying the operation guide
1. Touch any switch (except ).
The operation guide appears.
2.
Setting
1. Select .
The Setting menu appears.

20
Chapter 3
Custom Key Settings
2. Use to select "Preferences", and then select .
The Preferences menu appears.
3. Use to select "Custom Key", and then select .
The Custom Key menu appears.
4. Use to select the custom key to which you want to assign a function, and then select .
The menu for assigning a function appears.
For more information about these functions, see “Functions that can be Assigned to Custom Keys” (page
21).
5. Use to select the function that you want to assign, and then select .
That function is assigned to the custom key.
3.
Exiting
1. Press several times.
The Setting menu exits.
Page is loading ...
Page is loading ...
Page is loading ...
Page is loading ...
Page is loading ...
Page is loading ...
Page is loading ...
Page is loading ...
Page is loading ...
Page is loading ...
Page is loading ...
Page is loading ...
Page is loading ...
Page is loading ...
Page is loading ...
Page is loading ...
Page is loading ...
Page is loading ...
Page is loading ...
Page is loading ...
Page is loading ...
Page is loading ...
Page is loading ...
Page is loading ...
Page is loading ...
Page is loading ...
Page is loading ...
Page is loading ...
Page is loading ...
/