Groupe Brandt DCM6121XE Owner's manual

Category
Kitchen & houseware accessories
Type
Owner's manual
Instruction booklet
of your range cooker
Range cookers models
DCM671XE, DCV671XE, DCM672XE, DCV672XE,
DCM690XE, DCM691XE, DCM692XE, DCV690XE,
DCM6100XE, DCM6101XE, DCM6102XE, DCV6100XE,
DCM6121XE, DCM6122XE
Thank you for choosing our product. From now on, cooking will always be
pleasantly creative with your new cooker.
We recommend carefully reading all the instructions in this manual, which
includes detailed information about the most suitable conditions for using the
cooker correctly and safely. These instructions also help you to become familiar
with each component.
Useful advice is given for using recipients, utensils, positions of guides and control
settings.
The correct cleaning operations contained in this manual allow you to maintain the
cooker's performance unchanged over time.
The individual sections are set out in order to allow you to become familiar with all
the functions in the cooker. The text is easy to comprehend and is accompanied
with detailed images and simple pictograms.
Reading this manual thoroughly will provide you with the answer to any question
that may arise regarding the correct use of your new cooker.
INSTRUCTIONS FOR THE INSTALLER: for the qualified technician who is in
charge of adequately checking the gas system, installing, commissioning and
testing the appliance.
INSTRUCTIONS FOR THE USER: include suggestions, the description of the
controls and the correct cleaning and maintenance operations for the appliance.
Contents
3
1. General information ______________________________________ 5
1.1 Technical service _________________________________________________________ 5
2. Warnings for safety and use ________________________________ 6
3. Installation______________________________________________ 8
3.1 General warnings _________________________________________________________ 8
3.2 Fitting the front moulding ___________________________________________________ 9
3.3 Fitting the adjustable feet ___________________________________________________ 9
3.4 Electric connection _______________________________________________________ 10
3.5 Power consumption of the vitroceramic hob____________________________________ 12
3.6 Power consumption of the volcanic rock grill ___________________________________ 12
3.7 Ventilation requirements___________________________________________________ 13
3.8 Gas connection__________________________________________________________ 13
3.9 Stability chain ___________________________________________________________ 14
3.10 Gas regulations _________________________________________________________ 15
3.11 Connecting to LPG _______________________________________________________ 15
4. Final operations ________________________________________ 16
4.1 Fixing the free-standing cooking hob _________________________________________ 16
4.2 Levelling the cooker to the floor _____________________________________________ 16
5. Description of controls ___________________________________ 17
5.1 The front panel __________________________________________________________ 17
6. Using the cooking hob ___________________________________ 23
6.1 Switching on the burners __________________________________________________ 23
6.2 Switching off the burners __________________________________________________ 23
7. Using the deep fryer _____________________________________ 24
7.1 Before switching on the deep fryer ___________________________________________ 24
7.2 How to fry ______________________________________________________________ 24
7.3 Indicative frying times _____________________________________________________ 25
7.4 Switching off ____________________________________________________________ 25
8. Using the fry-top / steak grill _______________________________ 26
8.1 Before switching on the fry-top / steak grill _____________________________________ 26
8.2 Switching on ____________________________________________________________ 26
8.3 Energy regulator table ____________________________________________________ 26
8.4 Switching off ____________________________________________________________ 26
9. Using the volcanic rock grill _______________________________ 27
9.1 Before switching on the grill ________________________________________________ 27
9.2 Switching on ____________________________________________________________ 27
9.3 Energy regulator table ____________________________________________________ 28
9.4 Switching off ____________________________________________________________ 28
10. Using the vitroceramic hob _______________________________ 29
10.1 General warnings ________________________________________________________ 29
10.2 Switching on ____________________________________________________________ 29
10.3 Switching off ____________________________________________________________ 29
Contents
4
11. Using the ovens _______________________________________ 30
11.1 General warnings ________________________________________________________ 30
11.2 Drawer and storage compartment ___________________________________________ 30
11.3 Using the electric multifunction oven _________________________________________ 30
11.4 Using the auxiliary oven with natural convection ________________________________ 32
11.5 Using the convection electric oven ___________________________________________ 33
11.6 Using the grill oven with natural convection ____________________________________ 34
12. Cooking suggestions____________________________________ 35
12.1 Suggestions for using the hob burners correctly ________________________________ 35
12.2 Suggestions for using the deep fryer correctly __________________________________ 35
12.3 Suggestions for using the fry-top / steak grill correctly ____________________________ 35
12.4 Suggestions for using the volcanic rock grill correctly ____________________________ 35
12.5 Suggestions for using the vitroceramic hob correctly _____________________________ 36
12.6 Suggestions for using the oven correctly ______________________________________ 36
13. Cleaning and maintenance _______________________________ 39
13.1 Cleaning stainless steel surfaces ____________________________________________ 39
13.2 Cleaning enamelled surfaces _______________________________________________ 39
13.3 Cleaning the knobs and the control panel _____________________________________ 39
13.4 Cleaning the grids and burners _____________________________________________ 39
13.5 Cleaning the igniter plugs and thermocouples __________________________________ 40
13.6 Cleaning the deep fryer ___________________________________________________ 40
13.7 Cleaning the fry-top / steak grill _____________________________________________ 40
13.8 Cleaning the volcanic rock grill ______________________________________________ 41
13.9 Cleaning the vitroceramic hob ______________________________________________ 41
13.10 Cleaning the oven________________________________________________________ 42
13.11 Replacing the oven light bulb _______________________________________________ 42
14. Special maintenance____________________________________ 43
14.1 Removing the oven door __________________________________________________ 43
14.2 Removing the side rack-holder frames________________________________________ 44
14.3 Removing and cleaning the inside oven fan____________________________________ 44
Warnings
5
This user’s manual is an integral part of the product purchased. The user must conserve the manual
correctly so that it is always available for consultation during the use and maintenance of the
product. Keep this user’s manual for future reference. If the product is resold, the manual must be
transferred to any subsequent owner or user of the product.
CLASSES OF APPLIANCES
The cooking appliances described in this operating manual belong to the following installation
classes:
Class 1: non-flush-mounted cooking appliance;
Class 2 – subclass 1: cooking appliance flush-mounted between two
units, made up of a single unit, but which can also be installed so that the
side walls are accessible.
1. General information
This product conforms to the requirements of the following European directives:
73/23/EEC for "Low Voltage".
89/336/EEC for "Electromagnetic Disturbance".
90/396/EEC for "Gas Appliances".
89/109/EEC for "Material in contact with Food".
The above mentioned directives also conform to Machine directive 98/37/EC.
1.1 Technical service
Before leaving the factory, this appliance has been tested and set up by qualified, specialist
personnel, so as to guarantee the best operating results. Each repair or adjustment that may
subsequently be necessary must be carried out with the utmost care and attention. We therefore
recommend always contacting the Dealer where the appliance was purchased or your nearest
Service Centre, specifying the type of problem and the appliance model.
Warnings
6
2. Warnings for safety and use
THIS MANUAL IS AN INTEGRAL PART OF THE APPLIANCE. IT SHOULD BE KEPT IN GOOD CONDITION AND CLOSE
TO THE APPLIANCE FOR THE WHOLE LIFECYCLE OF THE COOKER. WE RECOMMEND READING THIS MANUAL
VERY CAREFULLY BEFORE USING THE COOKER. IN CASE AN ADDITIONAL JETS KIT IS GIVEN AS ACCESSORY
TO THE COOKER, WE RECOMMEND KEEPING AND PRESERVING IT. THE INSTALLATION MUST BE CARRIED OUT
BY QUALIFIED PERSONNEL AND IN COMPLIANCE WITH CURRENT STANDARDS. THIS APPLIANCE IS FOR
DOMESTIC USE AND CONFORMS TO THE EEC DIRECTIVES CURRENTLY IN FORCE. THE APPLIANCE IS BUILT
FOR CARRYING OUT THE FOLLOWING FUNCTION: COOKING AND HEATING FOOD; ANY OTHER USE IS TO BE
CONSIDERED IMPROPER. THE MANUFACTURER DECLINES ANY RESPONSIBILITY SHOULD THE APPLIANCE BE
USED FOR PURPOSES OTHER THAN THOSE INDICATED.
AT THE MOMENT OF PURCHASE, THE USER ASSUMES DIRECT RESPONSIBILITY FOR THE PRODUCT AND MUST
THEREFORE MAKE SURE THAT, WITH NORMAL USE, NO INSTABILITY, DEFORMATION, BREAKAGE OR WEAR
OCCURS OVER TIME THAT WOULD REDUCE PRODUCT SAFETY.
THIS PRODUCT IS DESIGNED AND MANUFACTURED TO OPERATE SAFELY AND DOES NOT POSE ANY DANGERS
TO PEOPLE, ANIMALS, AND OBJECTS.
DO NOT LEAVE ANY PIECES OF THE PACKING UNATTENDED IN THE HOME. SEPARATE THE VARIOUS PACKING
MATERIALS AND DELIVER THEM TO THE NEAREST RECYCLING CENTRE.
THE EARTH CONNECTION IS OBLIGATORY CONFORMING TO THE MODALITIES ENVISAGED BY THE SAFETY
STANDARDS OF THE ELECTRICAL WIRING SYSTEM.
THE PLUG TO BE CONNECTED TO THE POWER SUPPLY CABLE AND THE RELATIVE SOCKET MUST BE THE
SAME TYPE AND MUST COMPLY WITH CURRENT STANDARDS. AFTER INSTALLING THE APPLIANCE MAKE SURE
THAT THE PLUG IS ACCESSIBLE TO ALLOW THE PERIODICAL CHECK-UP.
DO NOT PULL OUT THE PLUG BY PULLING THE CABLE.
SHOULD THE GAS TAPS BE DIFFICULT TO ROTATE, LUBRICATE THEM USING A SPECIFIC PRODUCT FOR HIGH
TEMPERATURES.
CONTACT THE TECHNICAL SERVICE FOR THIS OPERATION.
IMMEDIATELY AFTER INSTALLATION, TEST THE APPLIANCE BRIEFLY BY FOLLOWING THE INSTRUCTIONS
SHOWN BELOW. IN THE EVENT OF A MALFUNCTION, DISCONNECT THE APPLIANCE FROM THE MAINS AND
CONTACT YOUR NEAREST TECHNICAL SERVICE CENTRE.
DO NOT ATTEMPT TO REPAIR THE APPLIANCE.
EACH TIME YOU FINISH USING THE COOKING HOB, ALWAYS CHECK THAT THE CONTROL KNOBS ARE IN "ZERO"
POSITION (OFF).
NEVER PUT INFLAMMABLE OBJECTS INTO THE OVEN: SHOULD IT BE ACCIDENTALLY SWITCHED ON, A FIRE
MAY BREAK OUT. IN THE EVENT OF A FIRE: CLOSE THE MAIN GAS SUPPLY AND CUT OFF THE ELECTRIC
CURRENT. DO NOT THROW WATER ON BURNING OR FRYING OIL. DO NOT STORE INFLAMMABLE OBJECTS OR
AEROSOL CANS NEAR THE APPLIANCE AND DO NOT SPRAY NEAR THE BURNERS WHEN SWITCHED ON. DO
NOT WEAR BAGGY CLOTHES OR ACCESSORIES THAT ARE NOT CLOSE TO THE BODY WHEN THE BURNERS
ARE SWITCHED ON: SERIOUS INJURIES CAN BE CAUSED BY BURNING FABRIC.
Warnings
7
DO NOT REST SAUCEPANS THAT DO NOT HAVE A PERFECTLY SMOOTH, EVEN BASE ON THE COOKING HOB.
DO NOT USE RECIPIENTS OR STEAK GRILLS THAT EXCEED THE OUTER PERIMETER OF THE COOKING HOB.
THE IDENTIFICATION PLATE WITH THE TECHNICAL DATA, SERIAL NUMBER AND THE MARK IS CLEARLY VISIBLE
ON THE BACK OF THE APPLIANCE.
THE PLATE MUST NEVER BE REMOVED.
THE APPLIANCE SHOULD ONLY BE USED BY ADULTS. DO NOT ALLOW CHILDREN TO APPROACH OR PLAY
WITH THE APPLIANCE. NEVER STORE ITEMS THAT CHILDREN MAY ATTEMPT TO REACH ABOVE THE
APPLIANCE. THE HEATING UP OF SOME PARTS OF THE APPLIANCE AND OF THE USED PANS MAY BE A
DANGER, SO DURING FUNCTIONING AND DURING ALL THE TIME NECESSARY FOR THE COOOLING DOWN, TAKE
CARE TO POSITION THE HOT PANS IN A WAY TO PREVENT BURNS OR OVERTURNING. AVOID LEAVING THE
OVEN DOOR OPEN DURING FUNCTIONING OR IMMEDIATELY SOON AFTER THE SWITCHING OFF. AVOID
TOUCHING THE HEATING ELEMENTS INSIDE THE OVEN AND GRILLS AS WELL.
RESTING OR SITTING ON THE OPEN OVEN DOOR, DRAWERS OR STORAGE COMPARTMENT CAN OVERTURN
THE APPLIANCE, AND CONSEQUENTLY CAUSE HARM. THE DRAWERS HAVE A DYNAMIC CAPACITY OF 25 KG.
IF THE COOKER IS SET ON A PEDESTAL, APPROPRIATE MEASURES MUST BE TAKEN TO PREVENT IT FROM
SLIDING OFF THE PEDESTAL.
WHEN THE APPLIANCE IS DECOMMISSIONED, IT MUST BE DISPOSED OF IN A SUITABLE RECYCLING CENTRE.
CUT OFF THE MAINS POWER CORD AFTER UNPLUGGING IT FROM THE WALL OUTLET, AND MAKE SAFE ANY
COMPONENTS WHICH MIGHT BE DANGEROUS FOR CHILDREN (DOORS, ETC.).
THIS APPLIANCE IS MARKED ACCORDING TO THE EUROPEAN DIRECTIVE 2002/96/EC ON WASTE ELECTRICAL
AND ELECTRONIC EQUIPMENT (WEEE).
BY ENSURING THIS PRODUCT IS DISPOSED OF CORRECTLY, YOU WILL HELP PREVENT POTENTIAL NEGATIVE
CONSEQUENCES FOR THE ENVIRONMENT AND HUMAN HEALTH, WHICH COULD OTHERWISE BE CAUSED BY
INAPPROPRIATE WASTE HANDLING OF THIS PRODUCT.
THE SYMBOL
ON THE PRODUCT, OR ON THE DOCUMENTS ACCOMPANYING THE PRODUCT, INDICATES
THAT THIS APPLIANCE MAY NOT BE TREATED AS HOUSEHOLD WASTE. INSTEAD IT SHALL BE HANDED OVER TO
THE APPLICABLE COLLECTION POINT FOR THE RECYCLING OF ELECTRICAL AND ELECTRONIC EQUIPMENT.
DISPOSAL MUST BE CARRIED OUT IN ACCORDANCE WITH LOCAL ENVIRONMENTAL REGULATIONS FOR WASTE
DISPOSAL. FOR MORE DETAILED INFORMATION ABOUT TREATMENT, RECOVERY AND RECYCLING OF THIS
PRODUCT, PLEASE CONTACT YOUR LOCAL CITY OFFICE, YOUR HOUSEHOLD WASTE DISPOSAL SERVICE OR
THE SHOP WHERE YOU PURCHASED THE PRODUCT.
The manufacturer declines any responsibility for damage incurred by persons or objects
that is caused by not following the above guidelines or by tampering with any part of the
appliance or by using non-original spare parts.
Instructions for the installer
8
3. Installation
DIMENSIONS OF THE FREE-STANDING COOKING HOBS
DIMENSIONS OF THE COOKING HOBS
DIMENSIONS OF THE COOKERS
3.1 General warnings
It is the law that a competent person installs all gas appliances. In the UK Corgi gas
installers are approved to work to safe and satisfactory standards. The cooker must be
installed in accordance with BS 6172. Failure to install the cooker correctly could invalidate
the warranty liability claims could and could lead to prosecution.
The manufacturer declines any responsibility for damage incurred by persons, animals or
objects that is caused by not following the above guidelines (cfr. chapter “2. Warnings for
safety and use”).
The technical data is indicated on the plate located on the back of the appliance. The adjustment
conditions are shown on a label applied to the packing and the appliance.
Do not use the oven door handle for handling the appliance, or for removing the appliance
from the packing.
Instructions for the installer
9
3.2 Fitting the front moulding
For the 70 cm model with double oven, a front moulding is included as standard supply to
complete the aesthetic lines of the cooker.
Before turning the cooker over, we recommend removing all the parts that are not stably attached
to it, in particular the cooking hob grids and burners. To lighten the weight of the cooker, the
accessories inside the oven may also be removed, thereby preventing accidental damage during
the overturning operation.
To assemble, proceed as follows:
Tilt the cooker backwards.
Align the moulding A with the mounting position as shown in the illustration.
Apply the moulding until it fits into the mounting position.
Pull the moulding downward so that it hooks onto the 4 pins B (2 for each end) present on the
cooker.
3.3 Fitting the adjustable feet
Before turning the cooker over, we recommend removing all the parts that are not stably attached
to it, in particular the cooking hob grids and burners. To lighten the weight of the cooker, the
accessories inside the oven may also be removed, thereby preventing accidental damage during
the overturning operation.
The cooker is delivered with the feet removed. Before moving and hooking up the cooker, take the
feet from the packing and screw them onto the cooker. This can be done in one of two ways:
A Lifting the cooker off the floor.
B Laying the cooker on its back.
The final regulation of the feet to level the
cooker to the floor will be done after the
gas and electric hook-ups have been
made.
Should it be necessary to drag the cooker, screw the feet in completely and carry out the final
regulation only when the other operations are completed.
Instructions for the installer
10
3.4 Electric connection
Make sure that the voltage and the size of the mains corresponds to the specifications shown on
the plate located on the back of the appliance.
The plate must never be removed.
The plug at the end of the power supply cable and the wall socket must be the same type and must
comply with current electric standards. Check that the mains is adequately earthed. Once the
appliance has been installed make sure that the plug is accessible to allow the periodical check-up.
The power supply cable should conform to BS6004.
Prepare an omni-polar cutoff device on the power supply line of the appliance with a contact
opening distance equal to or more than 3 mm, located in a convenient position near the appliance.
Do not use reducers, adapters or shunts.
Before making the electric connection, make sure of the efficiency of the earthing.
Make sure that the relief valve and the home wiring system are able to withstand the appliance
load.
The yellow/green earth cable must not be subject to cutoffs.
The electric cable must not come into contact with parts whose temperature is more than 50°C
higher than room temperature.
The cooker should be installed in accordance with the latest edition of the IEE regulations.
3.4.1 Electric power cable section
According to the type of power supply, use a cable that conforms to the following table.
Running at 400V3N~ (models connected according to DIAGRAM
"A"): use a pentapolar cable type H05RR-F/H05RN-F (cable
measuring 5 x 2.5 mm
2
).
Running at 230V3~ (models connected according to DIAGRAM
"C" but commutated by the installer according to DIAGRAM
"B"): use a tetrapolar cable type H05RR-F/H05RN-F (cable
measuring 4 x 4 mm
2
).
Running at 230V1N~ (models connected according to DIAGRAM
"C"): up to 2.9 kW use a tripolar cable type H05RR-F/H05RN-F
(cable measuring 3 x 1.5 mm
2
); between 2.9 kW and 5.4 kW use a
tripolar cable type H05RR-F/H05RN-F (cable measuring 3 x 2.5
mm
2
); between 5,4 kW and 7 kW use a tripolar cable type H05RR-
F/H05RN-F (cable measuring 3 x 4 mm
2
); over 7 kW use a tripolar
cable type H05RR-F/H05RN-F (cable measuring 3 x 6 mm
2
).
The end to be connected to the appliance must have the earth wire
(yellow-green) at least 20 mm longer.
The cable type H05RN-F is to be used for the models with fryer,
while cable type H05RR-F for those without fryer.
Instructions for the installer
11
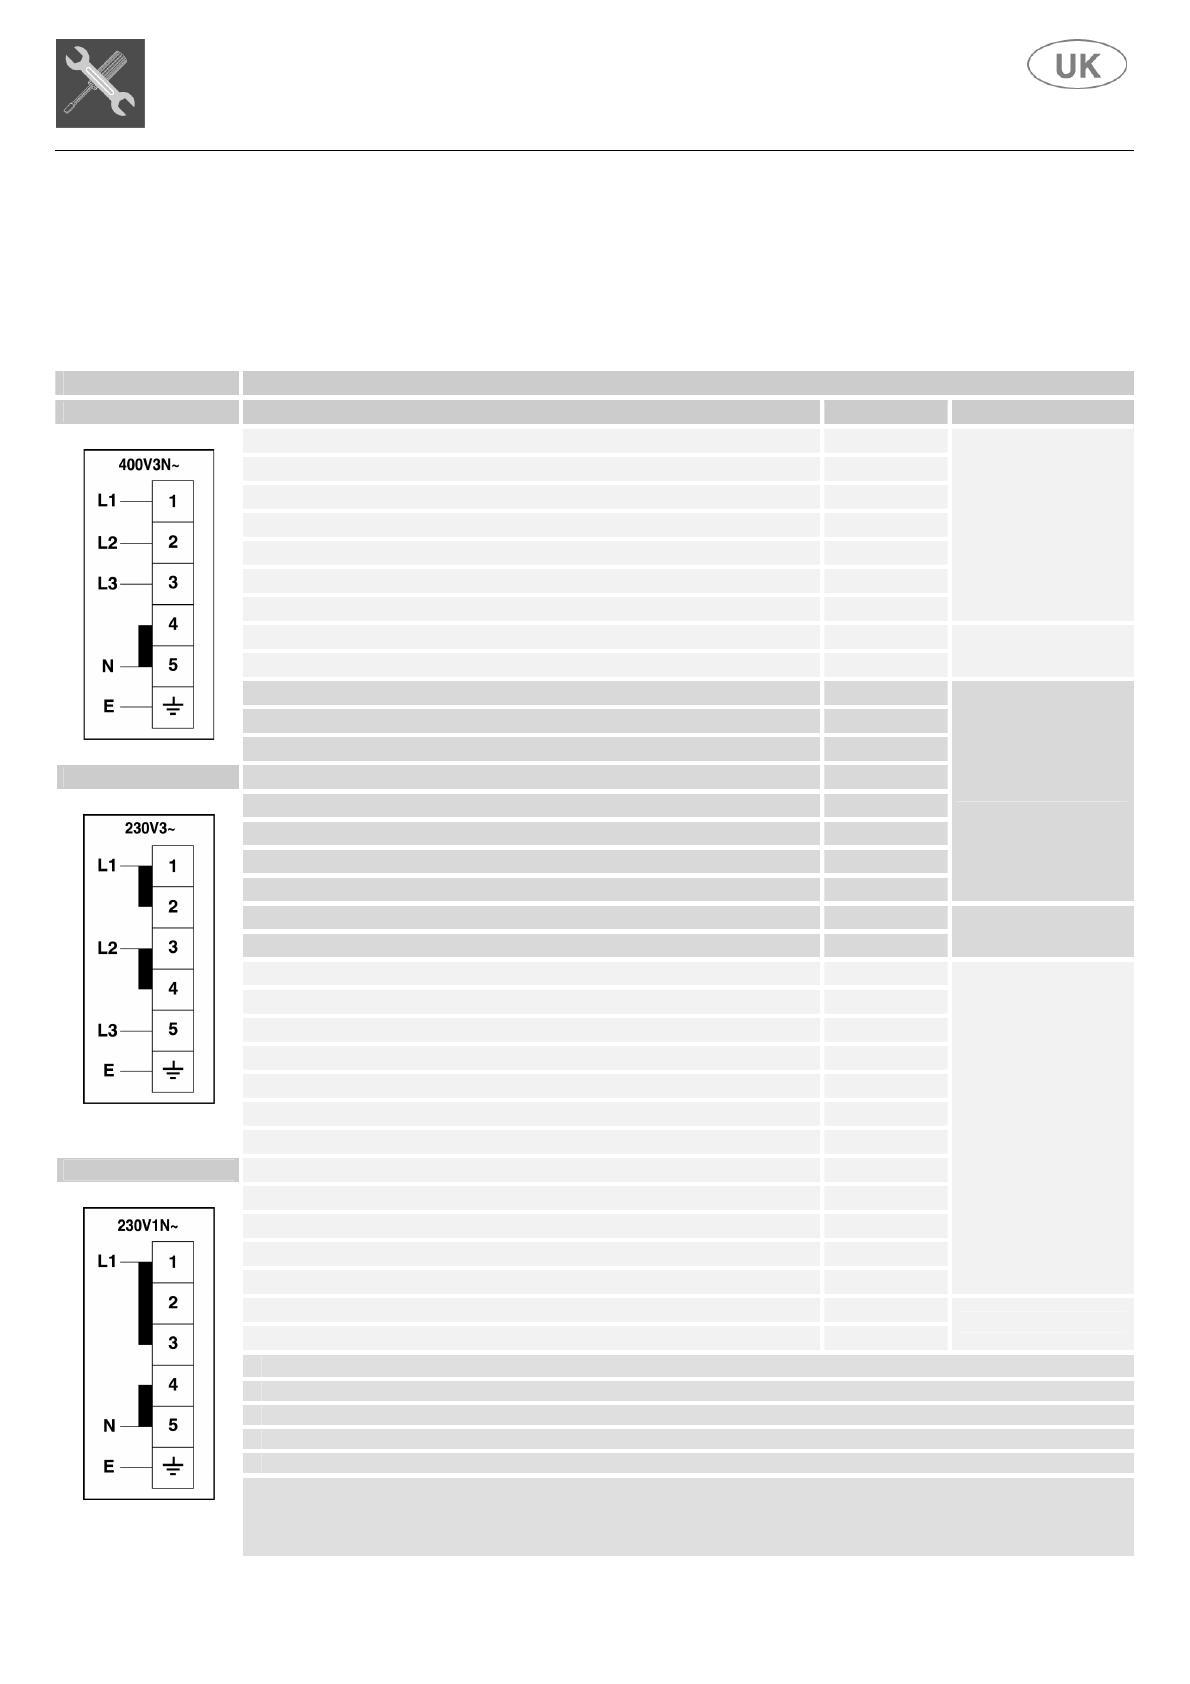
3.4.2 Type of power supply
It is possible to obtain different connections according to the voltage, simply by moving the
unconnected cable ends on the terminal board as shown in the following diagrams.
According to the model, consult the table "C
ONNECTION TO THE TERMINAL BOARD".
DIAGRAM CONNECTION TO THE TERMINAL BOARD
“A MODEL POWER kW POWER SUPPLY
COOKING HOB 4 / 6 / 8 BURNERS 0,006
COOKING HOB 4 / 6 BURNERS + B / T / C 2,4
COOKING HOB 4 / 6 BURNERS + F 2,2
COOKING HOB 4 / 6 BURNERS + G 2,5
COOKING HOB 4 BURNERS + B / T + C 4,8
COOKING HOB 4 BURNERS + B / T + F 4,6
COOKING HOB 4 BURNERS + B / T + G 4,9
DIAGRAM “C”
VITROCERAMIC HOB (4 HEATING ELEMENTS) 7,6
VITROCERAMIC HOB (5 HEATING ELEMENTS) 9,8
DIAGRAM “A”
COOKER 4 BURNERS (1 OVEN) 2,2
COOKER 6 / 8 BURNERS (1 OVEN) 2,9
COOKER 4 / 6 BURNERS (1 OVEN) + B / T / C 5,3
“B”
COOKER 4 / 6 BURNERS (1 OVEN) + F 5,1
COOKER 4 / 6 BURNERS (1 OVEN) + G 5,4
COOKER 4 BURNERS (1 OVEN) + B / T + C 7,7
COOKER 4 BURNERS (1 OVEN) + B / T + F 7,5
COOKER 4 BURNERS (1 OVEN) + B / T + G 7,8
DIAGRAM “C”
COOKER VITROCERAMIC HOB (1 OVEN) (4 HEATING ELEMENTS) 9,8
COOKER VITROCERAMIC HOB (1 OVEN) (5 HEATING ELEMENTS) 12,7
DIAGRAM “A”
COOKER 6 BURNERS (2 OVENS) 3,9
COOKER 8 BURNERS (2 OVENS) 4,6
COOKER 4 BURNERS (2 OVENS) 4,7
COOKER 4 BURNERS (2 OVENS) + B / T / C 6,3
COOKER 4 BURNERS (2 OVENS) + F 6,1
COOKER 4 BURNERS (2 OVENS) + G 6,4
COOKER 6 BURNERS (2 OVENS) + B / T / C 7,0
“C”
COOKER 6 BURNERS (2 OVENS) + F 6,8
COOKER 6 BURNERS (2 OVENS) + G 7,1
COOKER 4 BURNERS (2 OVENS) + B / T + C 9,4
COOKER 4 BURNERS (2 OVENS) + B / T + F 9,2
COOKER 4 BURNERS (2 OVENS) + B / T + G 9,5
DIAGRAM “C”
COOKER VITROCERAMIC HOB (2 OVENS) (5 HEATING ELEMENTS) 13,7
COOKER VITROCERAMIC HOB (2 OVENS) (4 HEATING ELEMENTS) 12,3
DIAGRAM “A”
B = STEAK GRILL
T = FRY-TOP
C = VITROCERAMIC GRIDDLE
F = DEEP FRYER
G = GRILL
MODELS CONNECTED ACCORDING TO DIAGRAM "A" CAN BE COMMUTATED BY THE INSTALLER ACCORDING TO DIAGRAM
"B".
MODELS CONNECTED ACCORDING TO DIAGRAM "C" CAN BE COMMUTATED BY THE INSTALLER ACCORDING TO DIAGRAM
"A".
Instructions for the installer
12
3.4.3 Replacing the electric cable
To replace the electric cable, it is necessary to access the terminal board. It is located on the back
of the appliance, at the top left, as shown in the figure.
To replace the cable, proceed as follows:
open the terminal board box;
unscrew the screw A that locks the cable;
loosen the screw contacts and replace the cable
with one of the same length that corresponds to the
specifications in the table in section “3.4.1 Electric
power cable section”;
the "yellow-green" earth wire must be connected to
the terminal
and must be approximately 20 mm
longer than the line cables;
the neutral "blue" wire must be connected to the
terminal marked with the letter N;
the line wire must be connected to the terminal
marked with the letter L.
3.5 Power consumption of the vitroceramic hob
The vitroceramic hob has different power consumptions depending on the type of heating element
used. The diagram shows the values of the power consumed.
In the envisaged cases, the first numeric value refers to the total power, whereas the value that
follows the symbol "/" refers to the inside diameter, with the exception of the central heating
element, whose value that follows "/" refers to the outer diameter.
3.6 Power consumption of the volcanic rock grill
The volcanic rock grill has a consumption of 2500W. This appliance must therefore be installed
where this power consumption can be ensured in total safety.
Instructions for the installer
13
3.7 Ventilation requirements
The room containing the appliances should have an air supply in accordance with B.S. 5440 part 2.
1. All rooms require an opening window or equivalent, and some rooms will require a permanent
vent as well.
2. For room volumes up to 5m³ an air vent of 100cm² is required.
3. If the room has a door that opens directly to the outside, and the room exceeds 1m³ no air
vent is required.
4. For room volumes between 5m³ and 10m³ an air vent of 50cm² is required.
5. If there are other fuel burning appliances in the same room B.S. 5440 part 2 should be
consulted to determine the air vent requirements.
6. The appliance must not be installed in a bed sitting room of less than 20m or in a bathroom or
shower room.
Windows and permanent vents should therefore not be blocked or removed without first consulting a
Corgi gas installer.
Failure to install appliances correctly is dangerous and could lead to prosecution.
DO NOT install LPG version below ground level. This does not exclude installation into a room, which
equates to a basement on one side of the building, but open to ground level on the opposite side.
3.8 Gas connection
Gas-powered devices for home use, which are not connected to a conduit for the evacuation of
combustion products, must not cause a concentration of carbon monoxide that could pose a health
risk to the persons exposed in relation to the time of exposure.
We recommend checking that the appliance is properly set up for the type of
gas distributed. The threaded ½" gas connection pipe is located at the rear
on the right hand side of the appliance.
The cooker is designed to match the depth of standard 600mm worktops. An adaptor back plate
should, therefore, be fitted within the shaded area shown to allow the cooker to be pushed in fully
and chased to the wall.
Connection to the cooker should be made with an approved appliance flexible connection to
BS 669. A length of 0.9 to 1.25m is recommended. The length of hose chosen should be such that
when the cooker is in situ, the hose does not touch the floor.
The temperature rise of areas at the rear of the cooker that are likely to come in contact with the
flexible hose do not exceed 70°C.
Instructions for the installer
14
3.9 Stability chain
The cooker is fitted with a stability device such as a
proprietary stability chain as shown and firmly secured to the
fabric of the building.
Whatever the position, remember to leave enough room for
the cooker to be pulled out for cleaning and service.
The wall behind the cooker between the hotplate and 450mm above, and across the width of the
cooker, must be an incombustible material such as ceramic wall tiles.
This appliance is designed not to project in front of standard 600mm worktops (excluding handles).
To achieve the best fit the cooker must be pushed against the wall.
As this appliance is very heavy it should be situated on a suitably hard surface as to ensure
servicing and installation is made possible with minimal impact on the floor surface.
Instructions for the installer
15
3.10 Gas regulations
If the cooking appliance is set up for a different type of gas than that available, its injectors must
be replaced, the minimum flow regulated. In order to replace the injectors in the cooking hob, it is
necessary to carry out the following operations:
remove the pan supports;
remove the burners and burner caps (Fig. A);
take out the injector (Fig. B) and replace it with one
suitable for the new type of gas (see "G
ENERAL
INJECTORS TABLE
");
replace the gas label (on the rear of the appliance) with
the new one provided with the injectors kit;
refit all parts by following the disassembly instructions in
reverse order and taking care to position the burner cap
correctly on the burner.
3.10.1 Minimum flow of valved cooking hob taps
Switch on the burner and turn the control knob
towards the minimum flow position ;
remove the knob;
using a screwdriver, adjust the internal screw Z
until the correct low flame is obtained;
refit the knob.
3.10.2 Minimum flow of non-valved cooking hob taps
Switch on the burner and turn the control knob
towards the minimum flow position ;
remove the knob;
insert a small screwdriver into the rod of the tap
and adjust the internal screw Z until the correct
low flame is obtained;
refit the knob.
Unscrew the adjustment screw Z to increase the flow, or tighten it to reduce the flow.
The adjustment is correct when the low flame measures approximately 3 or 4 mm.
When changing quickly from maximum to minimum flow and vice versa make sure that the
flame does not go out.
GENERAL INJECTORS TABLE
POWER Watt CONSUMPTION
TYPE OF GAS
mBar
NOZZLE NO.
BURNERS
POSITION TYPE
MAX. MIN. MAX.
115 RAPID 3000 750 286 l/h
97 SEMI RAPID 1750 480 167 l/h
72 AUXILIARY 1000 330 95 l/h
128 TRIPLE-RING 3300 1300 314 l/h
NATURAL GAS 20
94 FISH KETTLE 1900 750 181 l/h
85 RAPID 3000 750 219 g/h
65 SEMI RAPID 1750 480 128 g/h
50 AUXILIARY 1000 330 73 g/h
93 TRIPLE-RING 3300 1300 241 g/h
LPG
BUTANE
PROPANE
30
28
37
68 FISH KETTLE 1900 750 138 g/h
3.11 Connecting to LPG
Use a pressure regulator and connect to the cylinder in compliance with the guidelines set out in
standards regulations in force.
Instructions for the installer
16
4. Final operations
4.1 Fixing the free-standing cooking hob
Once the gas pipes and electric cables have been connected, the free-standing cooking hob must
be fixed to the support unit using the brackets A provided and the four screws B.
Make sure that the gas pipes and electric cables are not crushed or obstructed.
4.2 Levelling the cooker to the floor
After having made the electrical and gas hook-ups, level the cooker to the
floor using the adjustable feet that were previously screwed onto the bottom
of the cooker.
Should it be necessary to drag the cooker, screw the feet in completely and carry out the final
regulation only when the other operations are completed.
Instructions for the user
17
5. Description of controls
5.1 The front panel
All the commands and controls for the cooking hob and oven are on the front panel.
THE CONTROL PANEL
DESCRIPTION OF HOB BURNER KNOB
The flame is lit by simultaneously pressing and turning the knob anticlockwise to
the low flame symbol .
To regulate the flow of the flame, turn the knob to between the maximum and
minimum settings. Turn off the burner by returning the knob to position .
LAYOUT OF BURNERS – Description of symbols
REAR LEFT
REAR RIGHT
REAR CENTRE LEFT
REAR CENTRE RIGHT
CENTRE FRONT
CENTRE REAR
FRONT CENTRE LEFT
FRONT CENTRE RIGHT
FRONT LEFT
FRONT RIGHT
Instructions for the user
18
DESCRIPTION OF THE DEEP FRYER KNOB
The knob of the thermostat that controls the temperature of the heating
element can be adjusted between and 200°C. There are also two warning
lights: the red light signals the deep fryer is working; the orange light
switches on while the appliance is heating. When the preset temperature is
reached, the orange light switches off. If the temperature of the oil should
decrease while frying, the appliance automatically begins to heat and the
orange light switches on until the temperature set on the thermostat knob is
reached.
DESCRIPTION OF FRY-TOP / STEAK GRILL AND GRILL KNOB
FRY-TOP/STEAK GRILL: is equipped with differentiated heating. The entire
cooking surface can be used, or only one of the two halves, front or rear. The
knobs that regulate the energy individually control the temperature of the two
heating elements. A red light indicates that the appliance is heating.
GRILL: two warning lights give essential information on how the appliance is
working. The orange light switches on to indicate that the appliance is
powered (ON). A red light indicates that the heating element is heating up.
LAYOUT OF HEATING ELEMENTS - Description of symbols
REAR
FRONT
DESCRIPTION OF TIMER KNOB (DEEP FRYER AND GRILL)
A spring-loaded timer with bell makes checking the frying time easier. Turn
the knob all the way clockwise to wind the timer. It is possible to set the
required time up to a maximum of 60 min. The bell rings briefly when the
preset time has elapsed. The timer has no effect on the heating of the deep
fryer or the grill.
DESCRIPTION OF VITROCERAMIC HOB KNOBS
Besides the normal knobs that regulate the energy, the
vitroceramic hob is equipped with knobs for differentiated
heating. Settings from 1 to 11 control the heating of the
internal element, setting the knob to the symbol the
outer element also operates.
LAYOUT OF HEATING ELEMENTS - Description of symbols
REAR LEFT
REAR RIGHT
FRONT LEFT
FRONT RIGHT
CENTRAL
Instructions for the user
19
DESCRIPTION OF ELECTRIC OVEN KNOBS
The electric oven is controlled by two knobs: function
switch knob and thermostat knob. They allow you to
choose the most suitable type of heating for different
cooking requirements, by switching on the heating
elements appropriately and setting the required
temperature (from 50°C to MAX).
The V setting on the thermostat knob operates the oven fan.
Below the oven knobs there are two warning lights: the red light signals the oven is working; the
orange light indicates that the preset temperature has been reached. The orange light switches on
and off to indicate when the heating automatically kicks in to maintain the temperature inside the oven
at the level set on the thermostat knob.
The oven has an internal light. The light is always on while the oven is working: it can be switched
on while the oven is off, for cleaning purposes, by turning the function switch knob to the symbol
DESCRIPTION OF SYMBOLS ON THE FUNCTION SWITCH KNOB
SWITCH ON LIGHT INSIDE OVEN
GRILL-FAN ELEMENT
UPPER AND LOWER
HEATING ELEMENTS
UPPER AND LOWER
HEATING ELEMENTS – FAN
UPPER HEATING ELEMENT
HEATING ELEMENT-CONVECTION
LOWER HEATING ELEMENT
DEFROST
GRILL ELEMENT
DESCRIPTION OF AUXILIARY ELECTRIC OVEN KNOB
Some cooker models are equipped with an auxiliary electric oven with natural
convection, controlled by a single knob. This allows the user to choose the
most suitable type of heating for different cooking requirements, by switching
on the heating elements appropriately and setting the required temperature
(from 60 to MAX). Using the same knob it is also possible to set the functions
described in the table.
Below the auxiliary oven knob there is an orange light, which indicates when the oven has
reached the set temperature. The orange light switches on and off to indicate when the heating
automatically kicks in to maintain the temperature inside the auxiliary oven at the level set on the
control knob.
The auxiliary oven has an internal light. The light is always on while the oven is working: it can be
switched on while the oven is off, for cleaning purposes, by turning the function switch knob to the
symbol
.
DESCRIPTION OF SYMBOLS ON AUXILIARY ELECTRIC OVEN KNOB
SWITCH ON LIGHT INSIDE OVEN
UPPER HEATING ELEMENT
60÷MAX
UPPER AND LOWER
HEATING ELEMENTS
GRILL ELEMENT + SPIT
LOWER HEATING ELEMENT
Instructions for the user
20
DESCRIPTION OF GRILL OVEN KNOB
The electric oven, equipped with function grill with natural convection, is
controlled by a single knob. By positioning the knob appropriately and by
setting the required temperature, both upper and lower heating elements will
switch on. It is possible to set one of the functions described in the table, but
in this case the temperature of the chosen heating element will be
automatically set to the MAX temperature value.
Below the grill oven knob there is an orange light, which indicates when the oven has reached the
set temperature. The orange light switches on and off to indicate when the heating automatically
kicks in to maintain the temperature inside the grill oven at the level set on the control knob.
The grill oven has an internal light. The light is always on while the oven is working: it can be
switched on while the oven is off, for cleaning purposes, by turning the knob to the symbol .
DESCRIPTION OF SYMBOLS
SWITCH ON LIGHT INSIDE OVEN
UPPER HEATING ELEMENT
50÷MAX
UPPER AND LOWER
HEATING ELEMENTS
GRILL ELEMENT
LOWER HEATING ELEMENT
DESCRIPTION OF CONVECTION OVEN KNOB
The convection oven is controlled by a single knob. This allows the user to
choose the most suitable type of heating for different cooking requirements
by setting the required temperature value (from 50°C to MAX).
Turning the knob to the "V" position activates the motorized fan, which aids in the thawing of frozen
foods by recirculating the air inside the oven.
Below the convection oven knob there is an orange light, which indicates when the oven has
reached the set temperature. The orange light switches on and off to indicate when the heating
automatically kicks in to maintain the temperature inside the convection oven at the level set on the
control knob.
The oven has an internal light. The light is always on while the oven is working: it can be switched
on while the oven is off, for cleaning purposes, by turning the knob to the symbol "V".
  • Page 1 1
  • Page 2 2
  • Page 3 3
  • Page 4 4
  • Page 5 5
  • Page 6 6
  • Page 7 7
  • Page 8 8
  • Page 9 9
  • Page 10 10
  • Page 11 11
  • Page 12 12
  • Page 13 13
  • Page 14 14
  • Page 15 15
  • Page 16 16
  • Page 17 17
  • Page 18 18
  • Page 19 19
  • Page 20 20
  • Page 21 21
  • Page 22 22
  • Page 23 23
  • Page 24 24
  • Page 25 25
  • Page 26 26
  • Page 27 27
  • Page 28 28
  • Page 29 29
  • Page 30 30
  • Page 31 31
  • Page 32 32
  • Page 33 33
  • Page 34 34
  • Page 35 35
  • Page 36 36
  • Page 37 37
  • Page 38 38
  • Page 39 39
  • Page 40 40
  • Page 41 41
  • Page 42 42
  • Page 43 43
  • Page 44 44
  • Page 45 45
  • Page 46 46
  • Page 47 47
  • Page 48 48

Groupe Brandt DCM6121XE Owner's manual

Category
Kitchen & houseware accessories
Type
Owner's manual

Ask a question and I''ll find the answer in the document

Finding information in a document is now easier with AI