KitchenAid KCMC155JWH0 Installation guide
- Category
- Ovens
- Type
- Installation guide
This manual is also suitable for
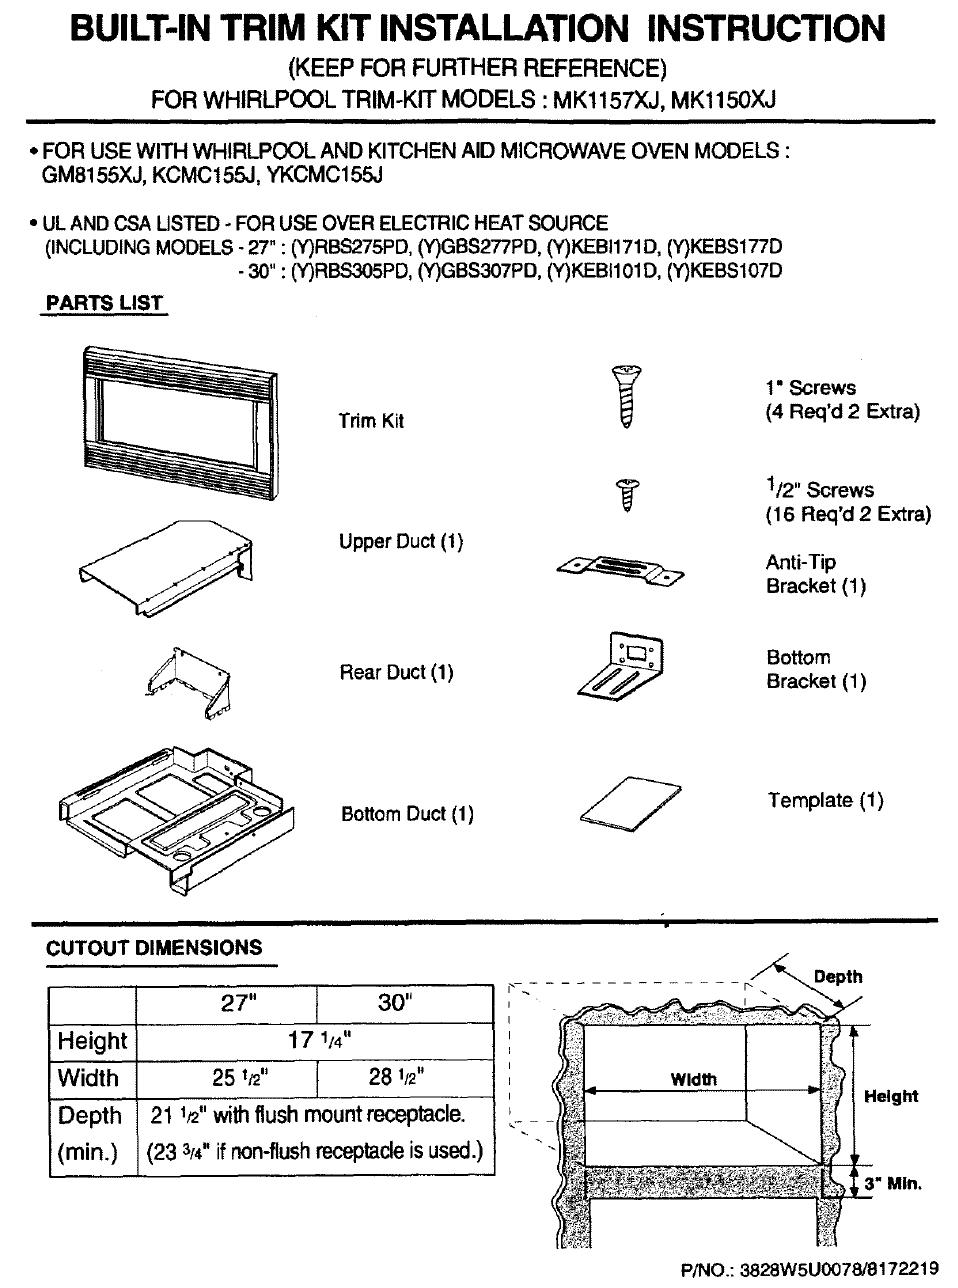
BUILT-IN TRIM KIT INSTALLATION INSTRUCTION
(KEEP FOR FURTHER REFERENCE)
FOR WHIRLPOOL TRIM-KIT MODELS' MK1157XJ, MK1150XJ
i
° FOR USE WITH WHIRLPOOL AND KITCHEN AID MICROWAVE OVEN MODELS :
GM8155XJ, KCMC155J, YKCMC155.1
• UL AND CSA LISTED - FOR USE OVER ELECTRIC HEAT SOURCE
(INCLUDING MODELS-27": (Y)RBS275PD, (Y)GBS277PD, (Y)KEBI171D, (Y)KEBS177D
-30" : (Y)RBS305PD, (Y)GBS307PD, (Y)KEBI101D, (Y)KEBS107D
PARTS LIST
Trim Kit
1• Screws
(4 Req'd 2 Extra)
Upper Duct (1)
Rear Duct (1)
BottomDuct (1)
CUTOUT DIMENSIONS
Height
Width
Depth
(min.)
27" 30"
17 1/4"
25 I_,, 281/2"
21 lr2"with flush mount receptacle.
(23 3/4"ifnon-flushreceptacleisused.)
I
I
I
I
1/2" Screws
(16 Req'd 2 Extra)
Anti-Tip
Bracket (1)
Bottom
Bracket (1)
Template (1)
r__ Depth
Width ;'#:
_ I Height
P/NO.: 3828W5U0078/8172219

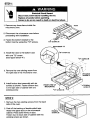
STEP1
Electrical Shock Hazard
Disoonnect power before installing trim kit.
Replace all panels before operating.
Failure to do so can result in death or electrical shock.
1. Remove any loose items inside the
microwave oven.
Front
2. Disconnect the microwave oven before
proceeding with installation.
3. Fasten the bottom bracket to the
bottom duct by using four 1/2" screws.
Rear
1/2" screws (4)
4. Install rear duct to the bottom duct
with one 1/2" screw.
(See figure Detail "A")
5. Remove the one existing screw from
the right side of the microwave oven.
1/2" screws (1)
1/2-screws(4)
" ] /1-
6. Install bottom duct assembly with six
screws as shown. Fasten bottom duct
to the right side of cabinet with one
existing screw.
FRONT VIEW OF
MICROWAVE
i \
1/2" screws (2)
\_ Existing
screw(t)
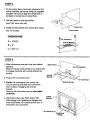
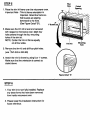
STEP 2
1. Remove the two existing screws from the back
side of the oven.
2. Peel offthe backing of double sided tape.
Attach the upper duct on the microwave
cabinet. Press down firmly on duct.
Fasten duct to back side of cabinet with two
existing screws as shown.
J
Existing
screws(2)

STEP3
1. On the cutout floor, mark hole centers for the
anti-tip brackets as shown using the supplied
template. Be sure to align the center line of
template to center line of cutout floor.
2. Ddll two holes for anti-tip bracket.
(use 7/64" drill or#35 drill)
3. Install anti-tip bracket onto cutout floor using
two 1/2" screws.
Corflor Line
Cutout Floor
DIMENSIONS:
A = 13/16"
B=3"
C -----20 1/16"
_:=1/2" Screws (2)
Anti-Tip erackm
STEP4
1. Slide microwave oven part way into cabinet
ope0ing. _
(Bottom bracket must be fiat to the cutout floor
to engage correctly with anti-tip bracket as
shown)
2. Plug in the microwave oven.
3. Center the microwave oven within the
cut-out opening and slide the microwave
oven in place, engaging the anti-tip
bracket.
(Ensure the microwave oven is accurately
centered)
4. Drill 3 pilot holes (use 7/64" drill or #35
drill) through the 2 positioning flanges and
then install three 1/2" screws at the front of
the bottom duct as shown.
\
\
Cutout
Opening
\
\
\
J
1/2- Screws (3)
Posltlo nlrlg
Range
i

STEP 5
1. Place the trim kit frame over the microwave oven.
Important Note : Trim kit frame orientation is
important. Orient the frame so
that louvers are sloping
downward to the front.
(See Figure Detail "B").
1"Screws(4)
Pilot
Ilole
1
Cutout
Opening
2. Make sure the trim kit is level and centered
with respect to microwave oven. Mark four
hole centers through the four mounting
holes of the trim kit.
NOTE: Center the trim kit frame equally
on all four sides.
3. Remove the trim kit and drillfour pilot holes.
(use 7/64" drill or #35 drill)
4. Attach the trim kit frame by using four 1' screws.
Make sure that the orientation iscorrect as
stated above.
TrimKit
Rgure Detail "B"
STEP6
1. Your trim kit is now fully installed. Replace
any loose items that have been removed
from inside microwave oven.
2. Please keep this installation instruction for
future reference.
-
 1
1
-
 2
2
-
 3
3
-
 4
4


KitchenAid KCMC155JWH0 Installation guide
- Category
- Ovens
- Type
- Installation guide
- This manual is also suitable for
Ask a question and I''ll find the answer in the document
Finding information in a document is now easier with AI
Related papers
Other documents
-
Amana AST2780AW Owner's manual
-
Whirlpool MK1150XJT Installation guide
-
-
Whirlpool MK1190XHT Installation guide
-
Kenmore RE963009 Owner's manual
-
-
Bosch HMB406 Owner's manual
-
-
-
GE LX2060ST Installation guide