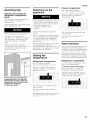
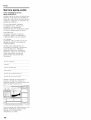
Bosch B26FT80SNS/03 Owner's manual
- Category
- Combi-fridges
- Type
- Owner's manual
This manual is also suitable for
Page is loading ...
Page is loading ...

en-us
en Index
IMPORTANT SAFETY INSTRUCTIONS ....... 4
Congratulations ........................... 5
Disposal information ....................... 5
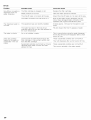
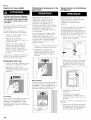
Installation ................................ 6
Installing and connecting the appliance ...... 7
Appliance and installation dimensions ....... 10
Getting to know your appliance ............. 11
Control and display panel .................. 12
Operating tips ............................. 13
Switching on the appliance ................. 13
Setting the temperature .................... 13
Alarm function ............................. 13
Panel lock ................................ 14
Super cooling ............................. 14
Super freezing ............................. 14
quick ice .................................. 14
Water filter symbol ......................... 14
Temperature unit .......................... 15
Refrigerator compartment .................. 15
Vita Fresh compartment .................... 15
Dell drawer ................................ 16
Variable interior design ..................... 16
Freezer compartment ...................... 17
Freezing food ............................. 17
Purchasing and storing deep-frozen food .... 17
Thawing frozen food ....................... 17
Freezer compartment features .............. 18
Ice and water dispenser .................... 18
Water filter ................................ 20
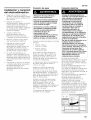
Specification and performance data sheet ... 21
Energy-saving tips ......................... 22
Operating noises .......................... 22
Defrosting ................................. 22
Switching off and disconnecting the appliance 22
Cleaning .................................. 22
LED light .................................. 23
Troubleshooting minor issues ............... 24
Customer service .......................... 27
3

en-us
IMPORTANT SAFETY INSTRUCTIONS
READ AND SAVE THESE INSTRUCTIONS!
Before operating the •
appliance
Please read the operating and
installation instructions carefully!
They contain important information on
how to install, use and maintain the •
appliance.
Keep all documentation for
subsequent use or for the next owner.
Technical safety
Only customer service technicians
may change the power cord and carry
out any other repairs. Improper
installations and repairs may put the
user at considerable risk.
Important information when
using the appliance
• Never use electrical devices inside
the appliance (such as heaters,
electric ice makers, etc.). Risk of
explosion!
• Never use a steam cleaner to
defrost or clean the appliance. The
steam may penetrate electrical
parts and cause a short-circuit or
electric shock.
• Before cleaning, unplug the
appliance or switch off the fuse.
Do not tug on the cord to unplug
the appliance.
• Do not store products in the
appliance that contain flammable
propellants (such as spray cans)
or explosive substances. Risk of
explosion!
Bottles containing a high
percentage of alcohol must be
sealed and stored in an upright
position.
• Do not store bottled or canned
liquids (especially carbonated
drinks) in the freezer compartment.
Bottles and cans may explode!
• Do not stand or support yourself
on the base, drawers or doors or
other parts of the appliance. You
could damage the appliance.
• Keep plastic parts and the door
seals free of oil and grease.
Otherwise, plastic parts and door
seal will become porous.
Never cover or block the
ventilation openings for the
appliance. This forces the
refrigerator to work harder,
increasing its power consumption.
Individuals with physical, sensory
or mental limitations or limited
knowledge about the appliance
must be supervised or must be
provided with more detailed
instructions before using the
appliance.
Do not place popsicles or ice
cubes straight from the freezer
compartment into your mouth. Risk
of low-temperature burns!
• Do not touch frozen surfaces or
food in the freezer with wet hands.
Skin may adhere to these
extremely cold surfaces. Risk of
injury!
• Do not scrape off frost or stuck
frozen food with a knife or pointed
object. You could damage the
appliance.
Children in the household
• Do not allow children to play with
the appliance!
• If the appliance features a lock,
keep the key out of the reach of
children.
General requirements
The appliance is suitable for
• refrigerating food
• freezing food
• making ice
• dispensing drinking water.
This appliance is designed for
household use only.
The appliance is shielded from
interference and voltage peaks.
The refrigerant circuit has been tested
for leaks.
Definitions
This indicates that death or serious
injuries may occur as a result of
not observing this warning.
This indicates that minor to
moderate injuries may occur as a
result of not observing this
warning.
This indicates that damage may
occur as a result of not observing
this warning.
4

Congratulations
By purchasing this new Fridge-freezer,
you have opted for a modern, high
quality household appliance.
This Fridge-freezer is distinguished by
its economical energy consumption.
Each appliance that leaves our factory
is inspected thoroughly to ensure that
it is working properly and is in perfect
condition.
If you have any questions, particularly
with regard to installing and
connecting the appliance, please do
not hesitate to contact our customer
service.
You can visit our Internet site to obtain
more information and view our range
of products.
State of California
Proposition 65 Warnings
Disposal information
_",_Disposal of packaging
The packaging protects the appliance
from damage in transit. All packaging
materials are environmentally friendly
and recyclable.
Please contribute to a better
environment by disposing of
packaging materials in an
environmentally friendly manner.
Please contact your local dealer or
local authority about current disposal
options.
Risk of suffocation from cardboard
boxes and plastic film!
Keep packaging and packaging
components away from children.
en-us
This product contains chemicals
known to the State of Carlifornia to
cause cancer, birth defects or other
reproductive harm.
_"a Disposal of your old
appliance
Old appliances are not worthless junk!
Valuable raw materials can be
reclaimed by recycling old appliances.
Risk of child entrapment!
Children can lock themselves in the
appliance.
Before disposing of the old
refrigerator:
Remove the doors and the freezer
compartment drawer.
Leave the shelves and containers in
place so that children may not
easily climb inside.
Disused appliances:
1. Disconnect the power plug.
2. Cut off the power cord and discard
with the power plug.
Refrigerators contain refrigerants and
their insulation contains gases.
Refrigerant and gases must be
disposed of properly. Ensure that the
tubing of the refrigerant circuit is not
damaged prior to proper disposal.
5

en-us
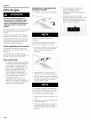
Installation
Transport and installation
The appliance is heavy and must be
secured during transport and
installation.
Risk of injury!
The appliance isvery heavy. It can
fall over and cause serious injuries
during transport and installation. At
least two people are required to
install the appliance safely. Keep
the refrigerator doors closed until
the appliance is upright and level at
the installation location.
Installation location
If a panel or cupboard is installed
above the appliance, ensure to leave
a 13/32 (10 mm) gap so that the
appliance can be pulled out of the
recess if required.
The air heated at the back of the
appliance must be allowed to escape
unhindered.
To ensure that the doors can open all
the way, maintain the lateral minimum
clearances when installing the
appliance in a corner or recess (see
section on "Appliance and installation
dimensions").
If the depth of the adjacent kitchen
equipment exceeds 291/8 (75 cm),
maintain the minimum lateral
clearances in order to utilize the full
door opening angle (see section
"Door opening angle").
Subsurface
Ventilation
Never cover the ventilation openings
on the front base panel or rear cover
_late.
This forces the appliance to work
harder, increasing its power
consumption.
Risk of explosion!
Do not install the appliance near
explosive or flammable
substances.
Do not install the appliance
outdoors.
The installation location should be
dry and should not be exposed to
frost.
The best installation location is a dry,
well ventilated room. The installation
location should neither be exposed to
direct sunlight nor should it be near a
heat source, such as a stove, radiator,
etc. If installation next to a heat source
is unavoidable, use a suitable
insulating plate or observe the
following minimum distances to the
heat source:
• 11/4" (3 cm) to electric or gas
stoves.
• 113/16" (30 cm) to oil or solid fuel
stoves.
If installing the refrigerator next to
another refrigerator/freezer, there
must be a minimum clearance of 1"
(25 mm) between the appliances to
prevent condensation.
The appliance is very heavy.
The floor on which the appliance is
to be installed must be rigid.
Reinforce the floor, if necessary.
Weight of appliance when empty:
Basic model 324 Ib
(147 kg)
6

Installing and
connecting the
appliance
Have a technician install and
connect the appliance according
to the installation instructions in
this manual.
After installing the appliance, wait
at least 8 hours before plugging in
the appliance. The oil in the
compressor may have flowed into
the refrigeration system during
transport.
• Clean the interior of the appliance
before operating it for the first time
(see "Cleaning the appliance").
• Always connect the water before
the power.
In addition to statutory national
regulations, compliance with the
connection requirements of local
electricity and water utility
companies is also required.
Do not remove transport protection
devices from the shelves and
storage compartments until after
the appliance has been installed.
Only a customer service technician
should remove the appliance
doors if this is necessary in order
to bring the appliance through any
household doors.
Water connection
Risk of electric shock and damage
to the appliance!
Disconnect the appliance from the
power source before performing
any work on the water connection.
Only a qualified installation
technician may connect the
appliance to the water supply in
accordance with plumbing and
relevant water utility company
regulations.
Connect the appliance to the water
line:
• Minimum pressure:
14.5 psi(1.0 bar)
• Maximum pressure:
116 psi (8.0 bar)
If the water pressure exceeds 80 psi
(5.5 bar), you must install a pressure
limiting valve. Contact a plumbing
professional if you are uncertain how
to check your water pressure.. The ice
maker will not work if the water
pressure is below 14.5 psi (1.0 bar).
Install a separate shut-off valve for the
water line.
Do not install the shut-off valve behind
the appliance. The shut-off valve
should be placed directly next to the
appliance or in another easily
accessible location.
The taste and smell of the water can
be improved by installing the filter
cartridge included with the appliance.
In this case, observe the separate
connection requirements related to
the filter (see "Water filter").
The water hose has a
3/4 inch connection.
Electrical connection
en-us
Risk of electric shock and fire if
electrical connection is not
installed properly!
Plug into a fixed, grounded 3-prong
outlet only. The outlet must be
installed and grounded according
to code by a qualified electrician. If
necessary, have the installation
inspected by a qualified technician
to ensure it is properly grounded.
Do not use an extension cord or
power strip.
Never connect the appliance to an
electronic energy saver plug (such
as Ecoboy, Sava Plug, etc.) or to
power inverters which convert
direct current (DC) to alternating
current (AC) (such as for solar
equipment, power supplies on
ships, etc.).
The outlet for the appliance must be
located close the appliance and must
be easy to access also after
installation.
Connect the appliance to a properly
installed 115 V/60 Hz AC outlet. The
fuse for the outlet must be rated
between 15 A or 20 A.
If the appliance is to be used in a
country other than the U.S., check the
rating plate to determine if the
specified voltage and current type
correspond to the ratings of your
power supply. If the voltage and
current type do not match, the
appliance must not be operated. The
power cord may only be replaced by
a qualified electrician.
7

en-us
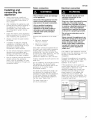
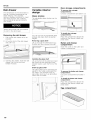
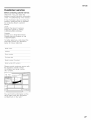
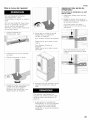
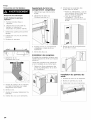
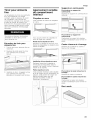
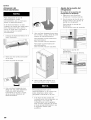
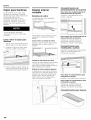
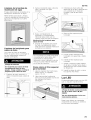
Aligning the appliance
To ensure that the appliance
operates correctly, use a level to
align the appliance.
If the appliance is not level, water
may flow out of the ice maker, ice
cubes may be irregular, or the doors
may not close properly.
Place the appliance in the
designated location.
2. Remove the three screws from the
base panel.
3. Remove the base panel.
iiiii _iI i_i ii_
ii i
4. Use a hexagonal wrench to loosen
the two front feet until they are
firmly planted on the floor and then
align the front of the appliance.
5. Use a hexagonal wrench to turn
the screws and then align the rear
of the appliance.
To raise the rear of the appliance:
Turn the screw clockwise.
To lower the rear of the appliance:
Turn the screw counterclockwise.
6. Use the level to check if the
appliance is level.
To ensure that the appliance does
not move, the front feet must be
firmly planted on the floor.
7. If the height of the refrigerator
compartment doors are uneven or
if the freezer compartment drawer
is slanted after adjusting the level
of the appliance, use the following
method to adjust them.
Adjusting a refrigerator door
If the height of the refrigerator doors
is uneven:
1. Determine which refrigerator door
needs to be raised.
2. Turn the screw nut on the lower
hinge to adjust the refrigerator
door.
To raise a refrigerator door:
Turn the screw counterclockwise.
iiiiiiiiii
To lower a refrigerator door:
Turn the screw clockwise.
8

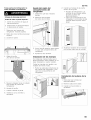
Ifthe refrigerator doors are not
properly aligned:
Risk of electric shock!
Before removing the top panel:
1. Shut off the water supply to the
appliance.
2. Unplug the appliance or switch
off the fuse.
Determine which refrigerator door
needs adjustment.
2. Remove the five screws on the top
panel.
3. Raise the panel.
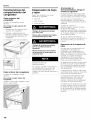
Adjusting the freezer
compartment drawer
1. Determine which side needs
adjustment.
2. Loosen the two screws.
Do not remove the screws!
en-us
2. Insert the door handles into the
guides.
• Refrigerator doors: The handle
screws must face the center of
the appliance.
• Freezer compartment drawer:
The handle screws must face
down.
4. Loosen the screw.
Do not remove the screw!
5. Move the hinge sideways to adjust
the refrigerator door.
6. Tighten the screw.
7. Realign panel.
8. Insert and tighten the five screws.
3. Use the top screw to adjust the
freezer compartment drawer.
4. Tighten the two screws.
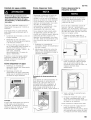
Installing the handles
Do not install the handles until the
appliance is installed in its designated
location and is level.
All handles are the same and are
installed in the same manner.
1. Remove the protective films from
the refrigerator doors and the
freezer compartment drawer.
3. Tighten the handle screws with the
accompanying Allen wrench.
i iii
Installing the base plate
1. Remove the three screws on the
appliance.
2. Mount the base plate.
3. Insert the three screws and
tighten.
9

en-us
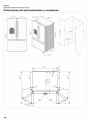
Appliance and installation dimensions
l
co
1727/321 1727/321
355/81
co
o_
(.O
_ i; ¸
91/81
25/81_ 32/81
L
co
LO
co
c-d
-i m=,,
151
r_
25/321
18/821
905
i
LO _ I
9O5
355/81
co
b_
CO
10

en-us
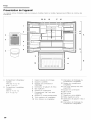
Getting to know your appliance
These operating and installation instructions apply to several models. The illustrations may differ from your particular
model.
20 19 18 17 16
3
4
9
12
10 .........
11
A
m
m
B
A Refrigerator compartment
can be adjusted
between 35 °F (+2 °C)
and 46 °F (+8 °C)
B Freezer compartment
can be adjusted
between 5 °F (-15 °C)
and -7 °F (-22 °C)
1 Butter and cheese compartment 11
2 Can bin 12
3 Control and display panel 13
4 Ice and water dispenser 14
5 Ice storage bin 15
6 Door storage compartment 16
7 Vita Fresh compartment with LED 17
light 18
8 Removable door storage 19
compartment 20
9 Top freezer drawer
10 Bottom freezer drawer
Freezer compartment light switch
Freezer compartment divider
Dell drawer with LED light
Door storage compartment
Egg compartment
Water filter
Adjustable glass shelf
Small glass shelf
Ice maker/Ice cube container
Refrigerator compartment light
switch
11

en-us
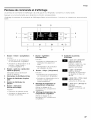
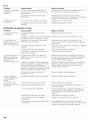
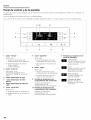
Control and display panel
The control and display panel on the left refrigerator door consists of a touch pad.
Touch the keypad to activate the corresponding function.
The light of the control and display panel goes out after approx. 1 min when no keypad was touched.
1
2
ffeeze_
quic_ ice
11 10 9
0
3
fridge
light/
filter
4
iI
I
8
7
1 "freezer" button
Button for
• adjusting the freezer
compartment temperature
• switching the "Super freeze"
function on/off.
2 "quick ice" button
Quick ice cube production on/off
switch.
3 Water dispenser button
4 Crushed ice dispenser button
5 Ice cube dispenser button
6 "alarm/lock" button
Button for
• switching the warning signal off
• switching panel lock on/off.
7 "light/filter" button
Button for
• switching the ice and water
dispenser light on/off
• reset the filter indicator.
8 "fridge" button
Button for
• adjusting the temperature in the
refrigerator compartment
• switching the "Super cool"
function on/off.
9 Refrigerator compartment
temperature display
Displays the temperature set for
the refrigerator compartment.
10 Freezer compartment
temperature display
Displays the temperature set for
the freezer compartment.
11 Symbols on the display panel
"quick ice"
Appears when the "quick
ice" function is on.
"Light"
Appears when the ice and
water dispenser light is on.
"Water filter"
Displays the status of the
filter cartridge.
"Panel lock"
Appears when the panel
lock is on.
12

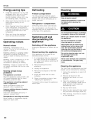
Operating tips
Opening and closing the
refrigerator compartment
doors
The refrigerator compartment doors
can be opened and closed
independently.
The left refrigerator compartment door
has a foldaway door bar.
Risk of damage to the appliance!
The door bar could become
damaged if you attempt to close the
left refrigerator compartment door
when the door bar is not folded
back.
Before closing the refrigerator
compartment doors, make sure that
the door bar is folded at a right
angle to the door.
When closing the left refrigerator
compartment door, the door bar
folds behind the right refrigerator
compartment door, forming a seal
between the refrigerator
compartment doors.
Switching on the
appliance
After installing the appliance, wait at
least 8 hours before plugging in the
appliance. The oil in the compressor
may have flowed into the
refrigeration system during
transport.
Connect the appliance plug to the
outlet.
After the appliance has been plugged
in, the refrigeration process will begin.
The interior light in the refrigerator
compartment switches on when the
door is open.
It will take several hours for the inside
of the appliance to reach the
temperatures set at the factory. Do not
place food in the appliance until these
temperatures are reached.
Setting the
temperature
Refrigerator compartment
(can be adjusted between
35 °F (+2 °C) and 46 °F (+8 °C))
Press the "fridge" button until the
desired refrigerator compartment
temperature is set.
The most recent temperature value
will be stored.
We recommend a setting of 39 °F
(+4 °C).
Perishable foods should not be stored
at temperatures higher than 39 °F
(+4 °C).
en-us
Freezer compartment
(can be adjusted between
5 °F (-15 °C) and -7 °F (-22 °C))
Press the "freezer" button until the
desired freezer compartment
temperature is set.
The most recent temperature value
will be stored.
We recommend a setting of 0 °F
(-18 °C).
Alarm function
The door warning signal sounds if the
temperature inside the appliance is
too high or one of the appliance doors
is open for more than three minutes.
The warning signal will sound three
times and will sound for one minute
each time it is triggered. There will be
a one-minute pause between signals.
Refrigerator compartment
The word "alarm" will appear on the
right on the display panel.
To switch off the warning signal:
Press "alarm/lock" or close the
refrigerator compartment doors.
The word "alarm" will blink on the
display panel until the temperature is
close to the set temperature.
13

en-us
Freezer compartment
The word "alarm" will appear on the
left on the display panel.
To switch off the warning signal:
Press "alarm/lock" or close the
freezer compartment drawer.
The word "alarm" will blink on the
display panel until the temperature is
close to the set temperature.
To switch on super cooling:
Press "fridge" until "super" appears
on the right on the display panel.
quick ice
Use this function to accelerate the
production of ice cubes.
To switch on quick ice:
Press "quick ice".
The "quick ice" symbol appears on
the display panel.
Panel lock
When the panel lock is activated, all of
the buttons on the control and display
panel are locked.
When the panel lock is activated,
use the "alarm/lock" button to
switch off the warning signal.
To switch the panel lock on or off:
Press "alarm/lock" for 2 seconds.
The "Panel lock" symbol appears
when the panel lock is activated.
Super cooling
Super cooling cools the refrigerator
compartment down as low as possible
for approximately 6 hours. The
temperature is then automatically
reset to 39 °F (+4 °C).
Super cooling is particularly
recommended for the following:
• Before placing large quantities of
food in the refrigerator
compartment.
• To cool drinks quickly.
To switch off super cooling:
Press "fridge".
The word "super" disappears on the
display panel. The temperature is
automatically set to 39 °F (+4 °C).
Super freezing
Food should be frozen as quickly as
possible in order to retain their
vitamins, nutritional value, appearance
and flavor.
To 3revent an undesirable rise in
temperature when placing fresh food
in the freezer compartment, switch on
super freezing several hours
beforehand.
As a rule, 4 to 6 hours is adequate.
Allow for a minimum of 24 hours if
planning to use the maximum freezing
capacity.
Smaller quantities of food can be
frozen without super freezing.
To switch on super freezing:
Press "freezer" until "super" appears
on the left on the display panel.
To switch off super freezing:
Press "freezer".
The word "super" disappears on the
display panel. The temperature is
automatically set to 0 °F (-18 °C).
Super freezing switches off
automatically after approximately
2 days.
When the ice cube container is full,
quick ice automatically shuts off after
a few hours.
When quick ice is activated, the
power of the appliance is increased
temporarily. This increases its
energy consumption.
Water filter symbol
The symbol indicates the filter
cartridge's period of use.
Up to two months.
Up to four months.
Up to six months.
After six months,
the symbol flashes.
Replace the filter
cartridge.
When the appliance is turned off, the
water filter symbol is reset.
To reset the water filter symbol after
replacing the filter cartridge:
Press and hold the "light/filter" button
for 3 seconds.
The symbol stops flashing.
14

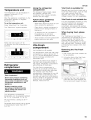
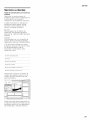
Temperature unit
The temperature can be displayed in
degrees Fahrenheit (°F) or
Celsius (°C).
After the appliance is switched on, the
temperature appears in degrees
Fahrenheit (°F).
To set the temperature unit:
Press "alarm/lock" for 2 seconds.
The "Panel lock" symbol appears.
Press and hold "quick ice" for
15 seconds until the temperature unit
switches.
/. ,/
..........! .....iI
Refrigerator
compartment
Risk of explosion!
Never store products containing
flammable propellants (such as
spray cans) or explosive or easily
combustible substances in the
appliance.
Bottles containing a high
percentage of alcohol must be
tightly sealed and stored in an
upright position.
The refrigerator compartment
temperature can be adjusted between
35 °F (+2 °C) and 46 °F (+8 °C).
We recommend a setting of 39 °F
(+4 °C).
Perishable foods should not be stored
at temperatures higher than 39 °F
(+4 °C).
Using the refrigerator
compartment
For storage of ready meals, cakes
and pastries, canned food,
condensed milk, cheese, spreads,
sauces, dips and eggs.
Follow these guidelines
when storing food:
Allow warm food and drinks to cool
down outside the appliance.
Place food in airtight containers to
prevent it from losing its flavor or
drying out.
To prevent poor air circulation in
the appliance, do not block
ventilation openings with food.
Avoid contact of oil and grease with
plastic parts and door seal.
Vita Fresh
compartment
(not included on all models)
The temperature inside the Vita Fresh
compartment is kept at almost 32 °F
(0 °C). The low temperature provides
optimum storage conditions for
perishable food.
Food can be stored much longer in
the Vita Fresh compartment than in
the regular refrigerator compartment
without losing its freshness.
The Vita Fresh compartment is
covered by a special humidity filter.
The special humidity filter optimizes
the humidity in the Vita Fresh
compartment. Depending on how full
the Vita Fresh compartment is, the
humidity can reach up to 90 percent
which is ideal for all garden and field
products such as vegetables,
lettuces, herbs and fruit.
en-us
Vita Fresh is suitable for:
Basically any food that is fresh and is
to be kept fresh longer, such as meat
and meat products, fresh fish,
seafood, milk, butter, soft cheese,
cottage cheese, fruit and vegetables.
Vita Fresh is not suitable for:
Fruit and vegetables sensitive to cold,
such as tropical fruits, avocados,
papayas, passion fruit, eggplant,
cucumbers, bell peppers as well as
fruit that has to ripen, green tomatoes
and potatoes.
When buying food, please
note:
The "freshness at purchase" is
important for the storage life of your
food. In general, the fresher the
products are when placed in the
Vita Fresh compartments, the longer
they will stay fresh. Therefore, when
purchasing food, always check how
fresh it is.
Removing the Vita Fresh
drawers
1. Pull out the Vita Fresh drawers as
far as possible.
2. Lift up the front of the Vita Fresh
drawers and pull them out.
3. Inserting the Vita Fresh drawers:
Insert the Vita Fresh drawers into
the rail and push toward the back.
15

en-us
Deli drawer
The temperature in the dell drawer is
kept at a constant temperature just
below freezing. This provides
optimum storage conditions for meat
and meat products, fish, seafood,
dairy products as well as hard and
soft cheese.
Never store foods that are sensitive
to cold in the dell drawer.
Removing the dell drawer
1. Pull out the dell drawer as far as
possible.
2. Lift up the front of the dell drawer
and pull it out.
Variable interior
design
Glass shelves
The adjustable glass shelves can be
removed.
You can pull out the adjustable glass
shelves and place them at varying
heights.
Removing a glass shelf
Lift up and pull the shelf toward you.
Unhook and then remove the shelf.
Door storage compartments
To remove door storage
compartments:
Lift door compartment and take it out.
To install door storage
compartments:
Place the compartment above the
bracket at the desired height and
press down.
Butter and cheese
compartment
Raise the cover on the butter and
cheese compartment.
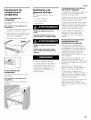
3. Inserting the drawer: Insert the dell
drawer into the rail and push
toward the back.
Installing the glass shelf
Lift up the front of the shelf and insert
the hooks into the openings at the
desired height. Lower the front of the
shelf.
Small top glass shelf
The glass shelf can be removed and
placed in the holder underneath the
ice maker. This provides room to
place taller items such as tall bottles
next to the ice maker.
J
J
To remove the butter and cheese
compartment:
Lift up the compartment and take it
out.
To install the butter and cheese
compartment:
Place the compartment above the
bracket at the desired height and
press down.
Egg compartment
16

Freezer compartment
Risk of explosion!
Never store products containing
flammable propellants (such as
spray cans) or explosive or easily
combustible substances in the
appliance.
The freezer compartment temperature
can be adjusted between 5 °F (-15
°C) and -7 °F (-22 °C).
We recommend a setting of 0 °F
(-18 °C).
Make sure that the freezer
compartment drawer is always kept
closed. The frozen food will thaw if
the freezer compartment drawer is
open. The freezer compartment will
become covered with thick ice. Also:
Energy will be lost due to high
power consumption.
When the freezer compartment door
is closed, low pressure occurs
inside the compartment.
If you cannot reopen the freezer
compartment door right away, wait
two to three minutes until the low
pressure has adjusted itself.
Use the freezer compartment
to
store deep-frozen food
freeze food
make and store ice cubes.
Freezing food
Freeze fresh and undamaged food
only. Separate food to be frozen from
food that is already frozen. Place food
in airtight containers to prevent it from
losing its flavor or drying out.
How to wrap food correctly:
1. Place food in packaging.
2. Press out any air.
3. Seal the packaging.
4. Label the package with the
contents and date.
Items not suitable for wrapping food:
Wrapping paper, greaseproof paper,
cellophane, garbage bags and used
shopping bags.
Items suitable for wrapping food:
Plastic film, polyethylene blown film,
aluminum foil and freezer cans.
These products can be purchased
from your retailer.
Items suitable for sealing wrapped
food:
Rubber bands, plastic clips, string,
cold-resistant adhesive tape or similar
items.
Bags and polyethylene blown film can
be sealed with a film sealer.
Storage life of frozen food
The storage life depends on the type
of food. At a temperature setting of
0 °F (-18 °C):
• Fish, sausage, ready meals and
cakes and pastries:
up to 6 months
• Cheese, poultry and meat:
up to 8 months
• Fruit and vegetables:
up to 12 months.
en-us
Purchasing and
storing deep-frozen
food
Follow these guidelines when
purchasing deep-frozen food:
• Make sure the packaging is not
damaged.
• Check the "sell by" date.
• The temperature of the
supermarket freezer should be
lower than 0 °F (-18 °C). If not,
this shortens the storage life of the
frozen food.
Pick up deep-frozen food last when
shopping. Wrap in newspaper or
place in a cold bag and take
home.
At home, immediately place
deep-frozen food in the freezer
compartment. Use the deep-frozen
food before the "sell by" date.
Thawing frozen food
Risk of poisoning!
Do not refreeze food that is
beginning to thaw or has already
thawed. The food cannot be
refrozen until it has been prepared
(boiled or fried). Do not store these
refrozen products for the maximum
storage period.
Depending on the type of food and its
intended use, frozen food can be
thawed as follows:
• at room temperature
• in the refrigerator
• in an electric oven with/without
fan-assisted hot air
• in the microwave.
17

en-us
Freezer compartment
features
Top freezer drawer
The freezer drawer can be removed.
To remove the top freezer drawer:
1. Pull out the top freezer drawer as
far as possible.
2. Carefully pull out the clips on both
sides and lift up the front of the
freezer drawer.
3. Pull out the freezer drawer.
1 i
Bottom freezer drawer
The freezer drawer can be removed.
To remove the bottom freezer
drawer:
Lift the freezer drawer up and out.
Ice and water
dispenser
The following may be dispensed as
necessary:
• cooled water,
• crushed ice,
• ice cubes.
Risk of injury from broken glass!
Never use fragile receptacles for
dispensing water or ice.
Risk of injury from rotating crusher
blades!
Never reach into the ice cube
dispenser opening.
Risk of damage to the appliance!
Do not place bottles or food in the
ice cube container in order to cool
them quickly. The ice maker may
become blocked and damaged.
When switching on the
appliance, note the following
The ice and water dispenser only
works when the appliance is
connected to the water supply.
After the appliance has been switched
on, it will take 24 hours before the first
batch of ice cubes are ready.
When the appliance is connected, air
bubbles will still be in the lines.
Extract the drinking water and discard
until water can be dispensed without
bubbles. Discard the first five glasses
of water.
When using the ice maker for the first
time, do not use the first 30 to 40 ice
cubes for reasons of hygiene.
Operating the ice maker
Once the freezer compartment has
reached its freezing temperature,
water flows into the ice maker and
freezes into ice cubes. The ice cubes
are automatically discharged into the
ice cube container when they are
ready.
The sides of the ice cubes may
occasionally stick together. They
usually break away from each other
as they move to the dispenser
opening.
Ice making switches off automatically
when the ice cube container is full.
The ice maker can make
approximately 100 ice cubes within
24 hours when ice cubes are
discharged several times during the
day.
As the ice cubes are being made, the
sound of the buzzing water valve, the
water flowing into the ice storage bin
and the falling ice cubes can be
heard.
18

Drinking water quality Dispensing ice
en-us
Disconnecting the ice maker
The water filter included with the
appliance only filters out particles
from the supplied water and does
not filter out bacteria or microbes.
All materials used in the water
dispenser are odorless and tasteless.
If the water has an aftertaste, this may
be caused by:
• Mineral and chlorine content in the
drinking water
• Materials from which the domestic
water line or connection line are
made
Freshness of the drinking water. If
water has not been dispensed for
an extended period of time, the
water may have a "stale" taste.
In this case, dispense
approx. 15 glasses of water and
discard.
The taste and smell of the water can
be improved by installing the included
filter cartridge at the water intake
point.
Dispensing water
1. Hold an appropriate receptacle
under the ice and water dispenser.
2. Keep the water dispenser button
pressed until the desired amount
of water is in the receptacle.
Tip:
The water from the water dispenser is
cooled to a palatable temperature. If
you would like colder water, place ice
cubes in the glass before dispensing
the water.
Keep the ice cube or crushed ice
button pressed and then stop once
the desired amount of ice is in the
receptacle. Ice in the ice cube
dispenser opening may otherwise
overfill the receptacle or block the
ice cube dispenser opening.
If crushed ice was dispensed before
ice cubes are dispensed, some
crushed ice may still be in the ice
cube dispenser opening. The
crushed ice will be dispensed with
the first batch of ice cubes.
1. Hold an appropriate receptacle
under the ice and water dispenser.
2. Keep the ice cube or crushed ice
button pressed until the desired
amount is in the receptacle.
Ice storage bin
The ice storage bin stores a reserve
supply of ice cubes the freezer
compartment. The ice storage bin fits
perfectly into the ice and water
dispenser due to its shape.
Make sure to shut off the water
supply to the appliance a few hours
before disconnecting the ice maker.
If ice cubes will not be dispensed for
more than 1 week (such as due to
vacation), temporarily disconnect the
ice cube maker to prevent the ice
cubes from freezing together.
1. Press the release button and
remove the ice cube container.
2. Press the button for 3 seconds
(led lamp is off) behind the ice
cube container - the ice maker
deactivated.
Is
3. Empty and clean out the ice cube
container.
4. Push the ice cube container all the
way back onto the supports until it
locks into position.
Reactivating the ice maker:
• Press the button for 3 seconds
(led lamp is on) behind the ice
cube container - the ice maker is
activated.
19

en-us
Water filter
Do not use the appliance in places
where the water quality is unsafe or
unknown without taking suitable
disinfection precautions before and
after filtering.
A filter cartridge for filtering particles
can be obtained from customer
service.
The water filter should be replaced
after 6 months at the latest.
After 6 months, the flashing water
filter symbol prompts you to replace
the filter cartridge (see "Water filter
symbol").
Other connection
requirements
Do not install the filter cartridge if the
water pressure exceeds 116 psi
(8.0 bar).
If the water pressure exceeds 80 psi
(5.5 bar), a pressure reducing valve
must be installed.
Important note
• Rinse the water system thoroughly
if the appliance has not been used
for a long period of time, or the
water has an unpleasant taste or
smell. To do this, extract water
from the water dispenser for
several minutes. Replace the filter
cartridge if the unpleasant taste or
smell persists.
The ice maker and water
dispenser can be used without the
filter cartridge. In this case, replace
the water filter with the bypass cap.
Installing and replacing the
filter cartridge
1. Pull out and then lower the cover.
Remove the filter cartridge carefully!
The water system is under low
pressure after use.
2. Carefully turn the filter cartridge
90 ° anti-clockwise e.g. with a
spoon and pull it out.
3. Take the new filter cartridge out of
its packaging and remove the
safety cap.
4. Insert the new filter cartridge and
carefully rotate 90 ° clockwise as
far as it will go e.g. by using a
spoon.
8. Pour out the water in the used filter
cartridge. The filter cartridge can
be disposed of in the household
garbage.
9. Press and hold the "light/filter"
button for 3 seconds. The water
filter symbol is reset. The symbol
stops flashing. The new filter
cartridge is activated.
The filter cartridge must be
tightened by hand so that no leaks
occur and the the appliance is
sufficiently provided with water.
5. Raise the cover up and lock it in
place.
6. Turn on the water supply to the
appliance.
7. Draw about a gallon of water from
the water dispenser. This will
remove air from the water system.
20

en-us
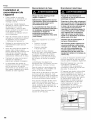
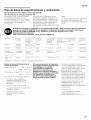
Specification and performance data sheet
For filter model: 9000 077 095 and 9000 077 096
Using replacement cartridge 9000 077 104
The model has been tested by NSF
International in accordance with
ANSI/NSF Standards 42 & 53 and
certified for the reduction of the
substances listed below.
The concentration of the indicated
substances dissolved in the water
entering the system was reduced to a
concentration less than or equal to
the permissible limit for water
discharged from the appliance as
specified in NSF/ANSI 42 and 53.
Note:
Even though the tests were
conducted under standard laboratory
conditions, actual performance may
vary.
The system was tested and certified on model 9000 077 095 and 9000 077 096 by NSF International in
accordance with ANSI/NSF Standard 53 for the reduction of cysts and turbidity, as well as in accordance
with ANSI/NSF Standard 42 for the reduction of the taste and odor of chlorine.
Rated particulate class: I
Rated service life: 739.68 Gallons (2,800 Liters)
Substance Average influent NSF specified Average Average Max NSF NSF test
challenge reduction product water permissible reduction report
concentration in % concentration product water requirements
concentration
Cysts * 122,500 cysts/I Minimum 99.99 < 1 cyst/I N/A _> 99.95 % J-00056513
50,000 cysts/I
Turbidity 10.8 NTU 11 + 1 NTU 98.8 < 0.16 NTU 0.5 NTU 95.5 % J-00058972
Nominal 13,666,666 At least 99.00 143,333 pts/ml N/A _>85 % J-00056506
Particulate pts/ml 10,000
Class I particles/ml
_>0.5 to < 1 tim
2.0 mg/I 97.5 < 0.05 mg/I N/A _> 50 % J-00056501
Chlorine taste
and odor
2.0 mg/I
+10 %
* Based on the use of Cryptosporidium parvum oocysts.
Application guidelines/Water supply
parameters:
Water pressure
Water temperature
30 - 120 psi
(207 - 827 kPa)
33 °F-100 °F
(0.6 °C - 38 °C)
Service flow 0.75 gpm (2.83 Ipm)
• The system is to be installed and
operated according to the
guidelines recommended by the
manufacturer.
• Change the filter every 6 months.
• Rinse new filter thoroughly for
5 minutes.
• More detailed information can be
found on the warranty card.
DO NOT use this product with water
that is microbiologically unsafe or of
unknown quality without adequate
disinfection before or after
connection to the system. Systems
certified for cyst reduction may be
used in disinfected water that may
contain filterable cysts.
The entire system (except the
disposable cartridge) is covered by a
one-year warranty. The disposable
cartridge is covered by warranty for
material and processing defects only.
The service life of the disposable filter
is not under warranty, since the
service life depends on local water
conditions.
More detailed information on spare
part prices is available from your local
appliance dealer or parts supplier.
Manufactured by:
Cuno Engineered Products
1000 Apollo Road
Eagan, MN 55121-2240 U.S.A
21

on-us
Energy-saving tips
• Install the appliance in a dry, well
ventilated room, but not in direct
sunlight and not near a heat
source (radiator, stove, etc.). Use
an insulating plate, if required.
• Allow warm food and drinks to cool
down before placing in the
appliance.
• When thawing frozen food, place it
in the refrigerator compartment.
The low temperature of the frozen
products cools the food in the
refrigerator.
• Open and close the appliance
doors as quickly as possible.
Operating noises
Normal noises
Humming - refrigerating unit is
running. The fan in the circulating air
system is running.
Bubbling, whirring or gurgling noises -
refrigerant is flowing through the
tubing or water is flowing into the ice
maker.
Clicking - motor is switching on or off.
The solenoid valve at the water
connection is opening or closing.
Rumbling - ready ice cubes from the
ice maker are falling into the ice cube
container.
Solving simple noise
problems
The appliance is not level
Align the appliance using a level. Use
the height-adjustable feet or place
something under the feet.
The appliance is touching adjacent
units or appliances
Move the appliance away from
adjacent units or appliances.
Loose or sticking drawers, baskets
or storage areas
Check the removable parts and, if
required, reinsert them.
Receptacles are touching each other
Move bottles or receptacles slightly
away from each other.
Defrosting
Freezer compartment
The fully automatic Nofrost system
ensures that the freezer compartment
remains free of ice. Defrosting is no
longer required.
Refrigerator compartment
Defrosting takes place automatically.
The condensation runs through the
drainage hole into an evaporation pan
at the rear of the appliance.
Switching off and
disconnecting the
appliance
Switching off the appliance
Unplug the appliance or switch off the
fuse.
Disconnecting the appliance
If the appliance is not used for an
extended period of time:
1. It is imperative that you disconnect
the water supply to the appliance
for a few hours before switching off
the appliance.
2. Remove all food from the
appliance.
3. Unplug the appliance.
4. Remove and dispose of the filter
cartridge.
5. Empty and clean the ice cube
container.
6. Clean the appliance interior (see
"Cleaning the appliance").
To prevent odors, leave the appliance
doors open.
Cleaning
Risk of electric shock!
Unplug the appliance or switch off
the fuse before cleaning the
appliance.
To avoid personal injury or damage
to property, observe the following:
Never use a steam cleaner to clean
the appliance.
Do not use abrasive or acidic
cleaning agents or solvents.
Wipe lights and the control and
display panel with a damp cloth
only. Do not let water used for
cleaning drip into the lights or onto
the control and display panel.
Do not let cleaning water run into
the drainage hole in the
evaporation area.
Never clean shelves and containers
in a dishwasher. The parts may
warp.
Cleaning the appliance
The Vita Fresh compartments and dell
drawer can be removed for cleaning.
1. Unplug the appliance or switch off
the fuse.
2. Remove all food from the
appliance and store in a cool
location.
3. Clean the appliance with a soft
cloth, using lukewarm water and a
small amount of pH-balanced
dishwashing liquid.
4. Rub dry when done.
5. Wipe the door seal with clear water
only and then thoroughly wipe dry.
6. After cleaning, reconnect to switch
on the appliance.
22
Page is loading ...
Page is loading ...
Page is loading ...
Page is loading ...
Page is loading ...
Page is loading ...
Page is loading ...
Page is loading ...
Page is loading ...
Page is loading ...
Page is loading ...
Page is loading ...
Page is loading ...
Page is loading ...
Page is loading ...
Page is loading ...
Page is loading ...
Page is loading ...
Page is loading ...
Page is loading ...
Page is loading ...
Page is loading ...
Page is loading ...
Page is loading ...
Page is loading ...
Page is loading ...
Page is loading ...
Page is loading ...
Page is loading ...
Page is loading ...
Page is loading ...
Page is loading ...
Page is loading ...
Page is loading ...
Page is loading ...
Page is loading ...
Page is loading ...
Page is loading ...
Page is loading ...
Page is loading ...
Page is loading ...
Page is loading ...
Page is loading ...
Page is loading ...
Page is loading ...
Page is loading ...
Page is loading ...
Page is loading ...
Page is loading ...
Page is loading ...
Page is loading ...
Page is loading ...
Page is loading ...
Page is loading ...
Page is loading ...
Page is loading ...
-
 1
1
-
 2
2
-
 3
3
-
 4
4
-
 5
5
-
 6
6
-
 7
7
-
 8
8
-
 9
9
-
 10
10
-
 11
11
-
 12
12
-
 13
13
-
 14
14
-
 15
15
-
 16
16
-
 17
17
-
 18
18
-
 19
19
-
 20
20
-
 21
21
-
 22
22
-
 23
23
-
 24
24
-
 25
25
-
 26
26
-
 27
27
-
 28
28
-
 29
29
-
 30
30
-
 31
31
-
 32
32
-
 33
33
-
 34
34
-
 35
35
-
 36
36
-
 37
37
-
 38
38
-
 39
39
-
 40
40
-
 41
41
-
 42
42
-
 43
43
-
 44
44
-
 45
45
-
 46
46
-
 47
47
-
 48
48
-
 49
49
-
 50
50
-
 51
51
-
 52
52
-
 53
53
-
 54
54
-
 55
55
-
 56
56
-
 57
57
-
 58
58
-
 59
59
-
 60
60
-
 61
61
-
 62
62
-
 63
63
-
 64
64
-
 65
65
-
 66
66
-
 67
67
-
 68
68
-
 69
69
-
 70
70
-
 71
71
-
 72
72
-
 73
73
-
 74
74
-
 75
75
-
 76
76
-
 77
77
-
 78
78


Bosch B26FT80SNS/03 Owner's manual
- Category
- Combi-fridges
- Type
- Owner's manual
- This manual is also suitable for
Ask a question and I''ll find the answer in the document
Finding information in a document is now easier with AI
in other languages
Related papers
-
Bosch B20CS30SNS Installation guide
-
Bosch 1101841 User manual
-
-
-
-
-
Bosch B26FT50SNS Owner's manual
-
Bosch KAG93AW30U/01 User guide
-
Bosch KAG93AW30U/01 User manual
-