Maytag MAV7260BWW User manual
- Category
- Washing machines
- Type
- User manual
This manual is also suitable for

MAYFAG
®
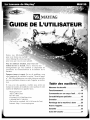
USER'S GUIDE
i
Congratulations on
your purchase of a Maytag
clothes washer! Your satisfaction
is very important to us.
Read this manual for best results. It con-
tains instructions to acquaint you with proper
operating and maintenance procedures.
Save time and money. If something should go wrong,
we suggest consulting the "Before You Call" section. It
is designed to help you solve basic problems before
consulting a servicer.
If you have questions, write us (include your model
and serial numbers and your phone number) or call:
Maytag Services sM
Attn: CAIR <'_Center
P.O. Box 2370
Cleveland, TN 37320-2370
1-800-688-9900 USA
1-800-688-2002 CANADA
1-800-688-2080 USA TTY (for deaf, hearing
impaired, or speech impaired)
(Mon.-Fri., 8am-8pm Eastern Time)
Internet: http://www.maytag.com
Table of
Safety instructions
Operating tips ............. ,i,
Controls at a glance ...........
Special features .................... 7
Care and cleaning .................. 8
Storing the washer ................. 8
Before you call .................. 9-10
Warranty ......................... 11
Guide de I'utilisateur ............... 12
Guia del usuario .................. 24
Form No. Y81912 A Part No. 2206680 @2006 Appliances Sales Co.

Important Safety Instructions
_ ARNING: To reduce the risk of fire, explosion, electric shock, property damage or injury to per-
sons when using the appliance, follow basic safety precautions, including the following:
1. Read all instructions before using the appliance.
2. As with any equipment using electricity and having
moving parts, there are potential hazards. To use this
appliance safely, the operator should become familiar
with the instructions for operation of the appliance and
always exercise care when using it.
3. Do not install or store this appliance where it will be
exposed to the weather.
4. Install and level washer on a floor that can support the
weight.
5. This appliance must be properly grounded. Never plug
the appliance cord into a receptacle which is not
grounded adequately and in accordance with local and
national codes. See installation instructions for ground-
ing this appliance.
6. To avoid the possibility of fire or explosion:
a. Do not wash items that have been previously cleaned
in, washed in, soaked in, or spotted with gasoline,
dry-cleaning solvents, other flammable or explosive
substances as they give off vapors that could ignite or
explode. Hand wash and line dry any items contain-
ing these substances.
Any material on which you have used a cleaning sol-
vent, or which is saturated with flammable liquids or
solids, should not be placed in the washer until all
traces of these liquids or solids and their fumes have
been removed.
.
8.
.
10.
These items include acetone, denatured alcohol,
gasoline, kerosene, some liquid household cleaners,
some spot removers, turpentine, waxes and wax
removers.
b. Do not add gasoline, dry-cleaning solvents, or other
flammable or explosive substances to the wash water.
These substances give off vapors that could ignite or
explode.
c. Under certain conditions, hydrogen gas may be pro-
duced in a hot water system that has not been used
for 2 weeks or more. HYDROGEN GAS IS EXPLO-
SIVE. If the hot water system has not been used for
such a period, before using a washing machine or
combination washer-dryer, turn on all hot water
faucets and let the water flow from each for several
minutes. This will release any accumulated hydro-
gen gas. As the gas is flammable, do not smoke or
use an open flame during this time.
Do not reach into the appliance if the tub or agitator is
moving.
Do not allow children or pets to play on, in, or in front
of the appliance. Close supervision is necessary when
the appliance is used near children and pets.
Do not tamper with controls.
Do not repair or replace any part of the appliance or
attempt any servicing unless specifically recommended
in published user-repair instructions that you under-
stand and have the skills to carry out.
11. Unplug power supply cord before attempting to service
your washer.
12. The agitator should not be removed. If the agitator is
removed, it must be replaced by pushing down com-
pletely and the locking screw tightened before the wash-
er is operated.
13. Store laundry aids and other material in a cool, dry
place where children cannot reach them.
14. Do not wash or dry items that are soiled with vegetable
or cooking oil. These items may contain some oil after
laundering. Due to the remaining oil, the fabric may
smoke or catch fire by itself.
15. Do not use chlorine bleach and ammonia or acids (such
as vinegar or rust remover) in the same wash.
Hazardous fumes can form.
16. Do not machine wash fiberglass materials. Small parti-
cles can stick to fabrics washed in following loads and
cause skin irritation.
17. Before the appliance is removed from service or dis-
carded, remove the door to the washing compartment.
18. Inlet hoses are subject to damage and deterioration over
time. Check the hoses periodically for bulges, kinks,
cuts, wear or leaks and replace them every five years.
What you need to know about
safety instructions
Warning and Important Safety Instructions appearing in this
manual are not meant to cover all possible conditions and sit-
uations that may occur. Common sense, caution, and care
must be exercised when installing, maintaining or operating
appliance.
Always contact your dealer, distributor, service agent, or
manufacturer about problems or conditions you do not
understand.
Recognize safety symbols,
words, labels
WARNING - Hazards or unsafe practices which COULD
result in severe personal injury or death.
CAUTION - Hazards or unsafe practices which COULD
result in minor personal injury.

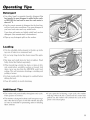
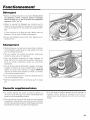
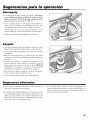
Operating Tips
Detergent
• Use either liquid or granular laundry detergent. For
best results, be sure detergent is added to the wash-
er BEFORE the load and be sure the wash water is
above 65 ° E
• Use the correct amount of detergent for the load size,
soil level and water conditions. Use more detergent if
you have hard water and very soiled loads.
If you have soft water or a lightly soiled load, use less
detergent. (See manufacturer's instructions.)
• Wipe up any detergent spills on the washer.
Loading
• Put dry, unfolded clothes loosely in the tub, up to the
top row of holes for a maximum load.
• Do not wrap large items like sheets around the agita-
tor.
• Mix large and small items for best circulation. Wash
bulky items like blankets separately.
• When laundering wrinkle free items or items of deli-
cate construction, washable woolens or loosely knit
items, never use less than the MEDIUM water level
setting. This will minimize shrinkage, wrinkling and
pulling of seams.
• For best results, add the detergent to washtub before
adding the load.
• Close lid carefully to avoid slamming.
I
Additional Tips
• The washer will pause briefly throughout each cycle.
These pauses are normal.
• This washer is designed so that it will not spin or agi-
tate when the lid is open. It will fill with the lid open
so water is available for pretreating stains or diluting
fabric softener.
• If you open the lid during a spin cycle, the washer
will stop. When the lid is closed and the control dial
pulled out, the washer will continue the cycle at the
point it was interrupted.
2

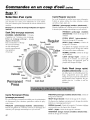
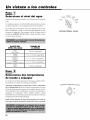
Controls at a Glance
Step _i_
Select Water Level
Determine the selected setting based on clothes load size.
On select models, the infinite control allows you to
select a specific setting or anywhere in between.
It may become necessary, due to bulky fabrics, to adjust
the water level after agitation begins. To adjust the
water level, turn the control to RESET and then back to
the desired setting.
Medium
infinite Water Level
WATER LEVEL SETTING LOAD SIZE
Super 3/4 - Full
Large 1/2 - 3/4 Full
Medium 1/3 - 1/2 Full
Small (select models) 1/4- 1/3 Full
Mini 1/4 Full
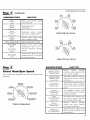
Step _-_
Select Wash/Rinse Temperature
Your washer provides you with a choice of hot, warm
or cold water for washing and cold or warm water for
rinsing.
Automatic Temperature Control (A.T.C.) provides the
optimal wash water temperature for cleaning. On select
models, A.T.C. is controlled by turning a switch on and
off. Other models offer A.T.C. by rotating the
Wash/Rinse temperature control dial.
There may be warm water filling during a cold wash
or hot water during a warm wash. This is normal.
Automatic Temperature Control
On
Off
3

Step _-] (continued)
WASH/RINSE TEMPS
LOAD TYPE
Hot
Cold
Warm
War m
(select models)
War m
Cold
(select models)
Cold
Cold
White and heavily soiled,
color-fast items.
Moderately soiled,
colored items.
Moderately soiled, colored
items; most wrinkle-free items.
Brightly colored, lightly soiled
items; washable woolens.
These settings feature automatic temperature control.
A.T.C. Warm
War m
A.T.C. Warm
Cold
A.T.C. Cold
Cold
Assures warm water wash
temperature above 90 ° F.
Provides optimum cleaning
results.
Assures cold water wash tem-
perature above 65° F to proper-
ly activate detergent.
Controlfeatures varybymodel
A.T.C.
Hot Cold
Cold _ Cold
@
1
Warm _ Warm
Cold• • Cold
A.T.C.
Cold • • Warm
Cold Warm
Wash/Rinse Temp
Wash/Rinse Tem_
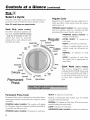
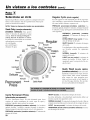
Step _-]
Select Wash/Spin Speed
Your washer has selectable wash and spin speed com-
binations.
Fabric Selection
WASH/SPIN SPEEDS LOAD TYPE
Regular/Whites
Normal/Fast
Cotton/Colors
Medium/Fast
(select models)
Penn. Press
Normal/Slow
Sweaters
Gentle/Fast
(select models)
Rugs
Ex. Gentle/Fast
(select models)
Delicate
Gentle/Slow
Handwash
Ex. Gentle/Slow
Sturdy fabrics needing
maximum water extraction like
jeans, towels, bedding.
Alternating agitation between
fast and slow to care for clothes
with color.
Sturdy fabrics needing a slower
spin speed to reduce wrinkling,
such as dress shirts and dress
pants.
Slow agitation to gently wash
sweaters followed by a fast spin
to remove moisture.
Intermittent slow agitation and
fast spin to remove moisture
from washable throw rugs.
Delicate fabrics needing
slower spin speed because
of clothing construction.
Intermittent slow agitation and
soak to gently wash the most
delicate items.
4

Controls at a Glance (continued)
Step
Select a Cycle
Press the control dial in and turn in either direction to
the desired cycle. Pull the dial out to start the washer.
Note: All wash times are approximate.
Soak Only (select models):
Provides 3 minutes of agitation and
then soak. Avoid extended soaking
- soak for 30 minutes or less. The
control dial must be manually
advanced to a spin setting to spin
and drain the water.
0i
OF .......
Regular Cycle
Regular Cycle is designed to clean underwear, T-
shirts and other cotton sturdy items like towels,
sheets, jeans, etc.
PRESOAK (select models): The washer will agi-
tate for 3 minutes, soak for 6 minutes and then
automatically proceed into the next cycle.
PREWASH (select models): 33
minutes of wash time.
EXTRA HEAVY: 27 minutes of
wash time.
HEAVY: 21 minutes of wash time.
Cottons or regular fabrics may be
washed using the following set-
tings:
NORMAL: 15 minutes of wash
time.
LIGHT: 9 minutes of wash time.
The Light Cycle is appropriate for
most loads.
Press
Quick Wash (select models):
This cycle is designed to refresh
clothing. QUICK WASH should only
be used for small loads with little to
no soil and minimal water level. Use
no more than a teaspoon of deter-
gent.
Permanent Press Cycle
Permanent Press cycle is designed to clean dress shirts,
dress pants, business casual and poly/cotton to reduce
wrinkling.
PRESOAK (select models): The washer will agitate
for 3 minutes, soak for 6 minutes and then automatical-
ly proceed into the next cycle.
PREWASH (select models): 27 minutes of wash time.
HEAVY: 21 minutes of wash time.
Delicate or Permanent Press fabrics may be washed
using the following settings:
NORMAL: 15 minutes of wash time. (This is the recom-
mended setting for most loads.)
LIGHT: 9 minutes of wash time.
HANDWASH (select models): 6 minutes of wash time.
5

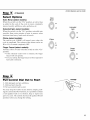
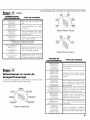
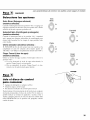
Step _ (ifdesired)
Select Options
Extra Rinse (select models):
When the switch is in the "On" position, an extra rinse
is added to the end of the cycle to more completely
remove laundry additives, suds, perfumes, etc.
Extended Spin (select models):
When the switch is in the "On" position, extended spin
provides three extra minutes of spin to remove more
moisture from heavy loads such as towels.
Chime (select models):
The end-of-cycle CHIME will sound once when the
cycle is completed. The volume of the chime can be on
HI or LO, or turned completely OFF.
Finger Faucet (select models):
Provides a flow of water when the switch is in the "On"
position.
• If the selected water level is reached, the finger
faucet will not operate.
• For your safety, the finger faucet will not operate if
hot wash is selected.
ii ii
Controlfeatures varybymodel
i! ¸
Step
Pull Control Dial Out to Start
• Add detergent and any additives.
• Add load and close lid.
• Pull out control knob to start.
You may stop the washer at any time by simply push-
ing the control dial IN. Therefore, it is possible to obtain
a non-agitated soak or to shorten, skip or repeat any
part of a cycle. The control dial must be pushed IN (off
position) when you change the setting.
6

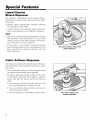
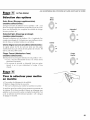
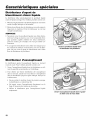
Special Features
Liquid Chlorine
Bleach Dispenser
The dispenser automatically dilutes liquid chlorine
bleach before it reaches your wash load. To use, follow
these steps:
1. Measure liquid chlorine bleach carefully, following
the instructions on the bottle.
2. Add the bleach to the dispenser before adding the
load. Avoid splashing or over-filling the dispenser.
NOTE:
• Never pour undiluted liquid chlorine bleach directly
onto the load or into the wash tub. It is a powerful
chemical and can cause fabric damage, such as tear-
ing or color loss, if not used properly.
• If you prefer to use color-safe, non-chlorine bleach,
pour it into the wash tub with your detergent. Do not
pour non-chlorine, color-safe bleaches into the
bleach dispenser.
Fabric Softener Dispenser
The dispenser automatically releases liquid fabric sof-
tener at the proper time during the cycle. To use, follow
these steps:
1. Pour liquid fabric softener into the dispenser using
the amount recommended on the package.
2. For proper dispensing of fabric softener in the wash-
er, add warm water to the fabric softener in the dis-
penser until the level reaches the fill line. Wipe up
spills.
• Do not stop the washer during the first spin. This
will cause the dispenser to empty too soon.
• Never pour fabric softener directly on the load. It
will leave spots and stains.
• Use the dispenser for liquid fabric softeners only.
Pour liquid chlorine bleach into
bleach dispenser.
Pour fabric softener into
softener dispenser.
7

Care & Cleaning
Turn off the water faucets after finishing the day's
washing. This will shut off the water supply to the
washer and prevent the unlikely possibility of damage
from escaping water.
Use a soft cloth to wipe up all detergent, bleach or other
spills as they occur.
Clean the following as recommended:
Control Panel - clean with a soft, damp cloth and glass
cleaner. Do not use abrasive powders or cleaning
pads.
Cabinet - clean with soap and water.
Fabric Softener Dispenser
1. Pull the dispenser off of the top of the agitator.
2. Soak for one hour in sink or container in hot
water and dishwashing liquid.
3. Hold hands over top and bottom of dispenser and
shake to loosen buildup.
4. Rinse with clean, hot water.
5. Repeat process if necessary.
6. Replace dispenser on agitator.
Do not use dishwashing liquid
inside the washer. Oversudsing can occur.
Interior - hard water deposits may be removed, if
needed, using a recommended cleaner labeled
washer safe.
The interior of the washer should be cleaned periodi-
cally to remove dirt, soil, odor or bacteria residue that
may remain in the washer as a result of washing
clothes. We recommend taking the following steps
every 60 to 120 days to clean and freshen your washer
interior. The frequency with which the washer should
be cleaned and freshened depends on factors such as
usage, the amount of dirt, soil or bacteria being run
through your washer, or the use of cold water.
To clean and freshen the washer interior:
1. Add a measured amount of chlorine bleach to the
bleach dispenser, following package directions
for a normal load.
2. Add 1/4 cup of detergent to the tub.
3. Run the washer through a complete cycle using
hot water and the Super water level setting.
4. Repeat the process if necessary.
Storing the Washer
Washers can be damaged if water is not removed from
hoses and internal components before storage. Prepare
the washer for storage as follows:
Select NORMAL on the REGULAR cycle and add
one cup of bleach OR white vinegar to a full load of
water without clothes. (Do not mix bleach and vine-
gar in the same wash. Hazardous fumes can form.)
Run the washer through a complete cycle.
• Turn the water faucets off and disconnect the inlet
hoses.
Disconnect the washer from the electrical supply and
leave the washer lid open to let air circulate inside
the tub.
If the washer has been stored in below-freezing tem-
peratures, allow time for the washer to thaw out
prior to use.
After storage, select NORMAL on the REGULAR
cycle and run the washer through a complete cycle.
8

Before You Call
Won't Fill
• Plug coM h_to live electrical outlet.
• Check fuse or reset circuit breaker.
• Turn the control dial to proper cycle and pull dial out to start the washer.
• Turn both faucets on fully:
• Straighten h_let hoses.
• Discocu_ect hoses and clean screens. Hose filter screens may be plugged at the faucet.
• The drah_ hose must be elevated at least to the top of the tub.
Won't Agitate
• Make sure the lid is completely closed.
• Turn the control lolob to proper cycle and pull dial out to start the washer.
• Close lid and pull dial out to start the washer. For your safety; washer will not agitate or spin unless the lid is closed.
• The washer is equipped with a lid switch failure detector. If the lid switch should malfunction, the detector will stop
operations for your safety: Call for service.
• Pauses are normal. Wait and see if file washer will start again.
Won't Spin or Drain
• Straighten drah_ hoses. Eliminate k£nked hoses. If there is a drah_ restriction, call for sel*vice.
• Close lid and pull dial out to start the washer. For your safety; washer will not agitate or spin unless the lid is closed.
• The washer is equipped with a lid switch failure detector. If the lid switch should malfunction, the detector will stop
operations for your safety: Call for service.
• If the drah_ height is over eight feet, water may not be completely removed.
Load is Wetter than Normal at the End of the Cycle
• The washer is designed to reduce sphl speed if an unbalanced load is detected. This is normal.
• Redistribute the load in the tub and set the washer on SPIN.
• Spin speed may be too slow for load type. Set Wash/Spin speed to Regular/Whites (normal/fast).
Stops
• Turn the control dial to proper cycle and pull dial out to start the washer.
• Close lid and pull dial out to start the washer. For your safety5 washer will not agitate or sph_ Lu_less lid is closed.
• This may be a pause or soak period h_ the cycle. Wait briefly and it may start.
• The washer is equipped with a lid switch failure detector. If the lid switch should malfunction, the detector will stop
fill operations for your safety: Call for service.
Leaks Water
• Make sure water hllet hose connections are tight at faucet and water valve.
• Make sure end of drain hose is correctly hlserted and secured to drah_ facility-
, Avoid extended soaking - soak for 30 minutes or less.
• Avoid overloading.
Is Noisy
• Be sure washer is leveled properly as outl£ned h_ h_stallation manual.
• Weak floors can cause vibration and walkh_g.
• Be sure rubber feet are installed on levelh_g legs.
• Operath_g sounds will val T dependh_g on agitation speed.
9

Cycle Selector Advances Through Off
• Extra rinse is selected.
Fills with the Wrong Temperature Water
• Turn both faucets on fully.
• Make sure temperature selection is correct.
• If Auto Temperature Control is selected, cold water may feel warmer than cold water from the tap (see page 3).
• Make sure hoses are connected to correct faucets and inlet COlmections. Be sure water supply is regulated correctl):
Flush water lhle before fillh_g washer.
• Check the water heater. It should be set to deliver a mh_imum 120° F (49° C) hot water at the tap. Also check water
heater capacity and recovel T rate.
Disconnect hoses and clean screens. Hose filter screens may be plugged.
End of Cycle Chime Does Not Sound
• When Extended Spin (select models) is not selected, there may be a three-minute delay before chime sounds. This is
normal.
• End of Cycle Chime switch (select models) is set to Lo or Off.
For further assistance contact Maytag Services -''_,Maytag Customer Assistance:
U.S. 1-800-688-9900 or Canada 1-800-688-2002
U.S. customers using TTY for deaf, hearing impaired or speech impaired, call 1-800-688-2080.
NOTE: In our continuing effort to improve the quality of our appliances, it may be necessary to make changes to
the appliance without revising this guide.
10

Warranty & Service
Warranty
Limited One Year Warranty -
Parts and Labor
Forone [1] year from the original retail
purchase date, any part which fails in
normal home usewill be repaired or
replaced free of charge.
Canadian Residents
The abovewarranties only cover an appli-
ance installed in Canadathat has been
certified or listed byappropriate test agen-
cies for a compliance to a National
Standard of Canadaunless the appliance
was brought into Canadadue to transfer
of residence from the United Statesto
Canada.
The specific wananties expressed above are
the ONLY wananties provided by the
manufacturer: These wananties give you
specific legal rights, and you may also have
other rights which vary from state to state.
CUSTOMER'S SOLEAND EXCLUSIVE
REMEDY UNDER THIS LIMITED WAR-
RANTY SHALL BE PRODUCT REPAIRAS
PROVIDED HEREIN. IMPLIED WAR-
RANTIES, INCLUDING WARRANTIES OF
MERCHANTABILITY OR FITNESSFOR A
PARTICULAR PURPOSE,ARE LIMITED TO
ONE YEAR OR THE SHORTEST
PERIOD ALLOWED BY LAW. MAYTAG
CORPORATION SHALL NOT BE LIABLE
FOR INCIDENTAL OR CONSEQUENTIAL
DAMAGES. SOME STATESAND
PROVINCES DO NOT ALLOW THE EXCLU-
SION OR LIMITATION OF INCIDENTAL OR
CONSEQUENTIAL DAMAGES, OR LIMITA-
TIONS ON THE DURATION OF IMPLIED
WARRANTIES OF MERCHANTABILITY OR
FITNESS,SO THESE EXCLUSIONS OR
LIMITATIONS MAY NOT APPLYTO YOU.
THIS WARRANTY GIVES YOU SPECIFIC
LEGAL RIGHTSAND YOU MAY ALSO
HAVE OTHER RIGHTS,WHICH VARY STATE
TOSTATEOR PROVINCE TO PROVINCE.
What is Not Covered By These Warranties
1. Condit,ons and damages resulting from any of the following:
a. Improper mstallat,on, delivery, or maintenance.
b. Any repa,r, nlodificat,on, alterat,on, or adjustment not authorized by the
manufacturer or an authorized serv,cer.
c. M,suse, abuse, acc,dents, unreasonable use, or acts of God.
d. Incorrect electnc current, voltage, electrical and/or gas supply.
e. Improper setting of any control.
2. Warrant,es are vo,d ,f the original serial numbers have been removed, altered,
or cannot be readily determined.
3. Dght bulbs, water filters and a,r filters.
4. Products purchased for commercml or industrial use.
5. The cost of serv,ce or serv,ce call to:
a. Correct mstallat,on errors. For products requiring ventdat,on, rigid metal
ductmg must be used.
b. Instruct the user on the proper use of the product.
c. Transport the appliance to and from the serv,cer.
Any food loss due to refrigerator or freezer product fadures.
,
7.
8.
,
Expenses for travel and transportat, on for product serv,ce m remote Iocat,ons.
Outs,de of the Umted States and Canada th,s warranty does not apply.
Contact your dealer to determine ,f another warranty applies.
Consequentml or mc,dental damages sustained by any person as a result of
any breach of these warrant, es. Some states do not allow the exclumon or
lira,tat,on of consequentml or mc,dental damages, so the above exclumon may
not apply.
If You Need Service
F,rst see the Troubleshooting sect,on m your Use and Care Guide or call the deal-
er from whom your appliance was purchased or call Maytag Serv,ces, LLC,
Customer Ass,stance at 1-800-688-9900 USA and 1-800-688-2002 Canadato
locate an authorized serv,cer.
Be sure to retain proof of purchase to verify warranty status. Refer to WARRANTY
for further reformat,on on owner's responmbdit,esfor warranty serv,ce.
If the dealer or serv,ce company cannot resolve the problem, write to Maytag
Serv,ces,LLC,Attn: CAIRFCenter, RO. Box 2370,Cleveland,TN 37320-2370,or call
1-800-688-9900 USA and 1-800-688-2002 Canada. U.S.customers using
TTY for deaf, hearing mlpa,red or speech mlpa,red, call 1-800-688-2080.
User's guides, serv,ce manuals and parts ,nformat,on are avadablefrom Maytag
Serv,ces,LLC,Customer Ass,stance.
Notes: When writing or calling about a serv,ce problem, please include:
a. Your name, address and telephone number;
b. Model number and serial number;
c. Name and address of your dealer or serv,cer;
d. A clear descnpt, on of the problem you are having;
e. Proof of purchase (sales rece,pt).
11
Page is loading ...
Page is loading ...
Page is loading ...
Page is loading ...
Page is loading ...
Page is loading ...
Page is loading ...
Page is loading ...
Page is loading ...
Page is loading ...
Page is loading ...
Page is loading ...
Page is loading ...
Page is loading ...
Page is loading ...
Page is loading ...
Page is loading ...
Page is loading ...
Page is loading ...
Page is loading ...
Page is loading ...
Page is loading ...
Page is loading ...
Page is loading ...
-
 1
1
-
 2
2
-
 3
3
-
 4
4
-
 5
5
-
 6
6
-
 7
7
-
 8
8
-
 9
9
-
 10
10
-
 11
11
-
 12
12
-
 13
13
-
 14
14
-
 15
15
-
 16
16
-
 17
17
-
 18
18
-
 19
19
-
 20
20
-
 21
21
-
 22
22
-
 23
23
-
 24
24
-
 25
25
-
 26
26
-
 27
27
-
 28
28
-
 29
29
-
 30
30
-
 31
31
-
 32
32
-
 33
33
-
 34
34
-
 35
35
-
 36
36


Maytag MAV7260BWW User manual
- Category
- Washing machines
- Type
- User manual
- This manual is also suitable for
Ask a question and I''ll find the answer in the document
Finding information in a document is now easier with AI
in other languages
- français: Maytag MAV7260BWW Manuel utilisateur
- español: Maytag MAV7260BWW Manual de usuario
Related papers
Other documents
-
Magic Chef CAV1004AWW Owner's manual
-
-
Amana 2201045 Owner's manual
-
-
-
Admiral AAV7000AWW Owner's manual
-
Crosley CW5500W Owner's manual
-
-
-