Page is loading ...

PERFORMER
™
2
00
200
200
2
00
200
200
200
2
00
200
200
200
®
®
WARNING: Do not try to light this
appliance without reading "Lighting"
instructions section of this manual.
THIS BARBECUE IS DESIGNED FOR
OUTDOOR USE ONLY.
NOTICE TO INSTALLER: These
instructions must be left with the owner
and the owner should keep them for
future use.
39947 11/96
Owner’s Manual


3
WARNINGS
■ Do not use in high winds.
■ Do not use gasoline, alcohol, or other highly volatile fluids to ignite charcoal. Use a commercially
prepared firestarter, such as Weber FireStarters, and make sure that, if using lighter fluid, any fluid
that may have drained through the bottom vents is removed before lighting the charcoal.
■ Kettle should be kept in a level position at all times.
■ Infants, children, and pets should never be left unattended near a hot kettle.
■ The kettle should never be used within five feet of any combustible material.
■ Do not wear clothing with loose flowing sleeves while barbecuing.
■ Never use kettle unless all parts of the unit are in place. Make sure ash catcher is in place when
using the barbecue.
■ Charcoal starter fluid should never be added to hot or even warm coals. After use, starter fluid
should be capped and placed a safe distance from kettle.
■ The lid should be removed from the kettle while lighting and getting fire started.
■ Do not line bowl of kettle with aluminum foil - it may obstruct flow of air. Instead, use a drip pan to
catch drippings from meat when cooking by the Indirect Method.
■ Always put charcoal in Char-Baskets or on top of the lower grate (charcoal grate) and not directly
into the bottom of the bowl.
■ During cooking, the ashes may contain hot coals. Remove ashes only after all coals have
completely burned out and are fully extinguished.
■ Do not place a hot lid on carpet or grass. Use the steel lid holder provided.
■ Never attempt to move a hot kettle.
■ Do not add charcoal impregnated with lighter fluid while cooking.
■ Never touch grates or kettle to see if they are hot.
■ Do not use water to control flare-ups or extinguish coals, as it may damage the porcelain finish;
slightly close bottom air vents, instead. Close all vents completely after putting the lid on the bowl
when you are finished cooking to extinguish the fire or coals.
■ Use proper barbecue tools with long heat-resistant handles.
■ Barbecue mitts should always be worn to protect hands while barbecuing.
■ Never dump hot coals where someone may step on them or where they might start a fire. Do not
remove coals until fully extinguished and cold.
■ Hot electric starters should be handled carefully and put in a safe place after use. Electric cords
should be placed away from walkways. Keep electric cords away from hot surfaces.
■ Do not use sharp objects of any kind to clean cooking grate or remove ashes.
■ Do not use abrasive cleaners on kettle or cooking grate.
■ To adjust vents or to remove lid while barbecuing, use barbecue mitts or a hot pad.
■ When using liquid starters always check ash catcher before lighting. Any accumulation of starter
fluid in the ash catcher could ignite, resulting in a fire below the bowl. Wipe out any fluid before
igniting charcoal.
DANGER
Failure to follow the Dangers, Warnings and Cautions contained in this Owner’s
Manual may result in serious bodily injury or death, or in a fire causing damage to property.

4
Weber Stephen Products Co. (Weber) hereby
warrants to the ORIGINAL RETAIL
PURCHASER of this Weber Barbecue that if it
is assembled and operated in accordance with
the printed instructions accompanying it then
for a period of one (1) year from the date of
purchase, the cooking grate, charcoal grate,
and Char-Basket™ Fuel Holders shall be free
from defects in material and workmanship; and
for five (5) years from the date of purchase, all
other parts shall be free from defects in
material and workmanship.
Weber may require reasonable proof of your
date of purchase. THEREFORE, YOU
SHOULD RETAIN YOUR SALES SLIP OR
INVOICE AND RETURN THE WEBER
LIMITED WARRANTY REGISTRATION CARD
IMMEDIATELY.
This Limited Warranty shall be limited to the
repair or replacement of parts which prove
defective under normal use and service and
which on examination shall indicate, to Weber's
satisfaction, they are defective. Any part that is
claimed to be defective and covered by this
Limited Warranty must be returned with
transportation charges prepaid to Weber-
Stephen Products Co., Customer Service
Center, 250 S. Hicks Rd., Palatine, IL, 60067-
6241. If Weber's inspection confirms the defect
and the claim, Weber will repair or replace such
part without charge and return it to you freight or
postage prepaid.
This Limited Warranty does not cover any
failures or operating difficulties due to accident,
abuse, misuse, alteration, misapplication,
improper installation or improper maintenance
or service, or failure to perform normal and
routine maintenance as set out in this owner's
manual.
Deterioration or damage due to severe
weather conditions such as hail, hurricanes,
earthquakes or tornadoes, discoloration due to
exposure to chemicals either directly or in the
atmosphere, is not covered by this Limited
Warranty.
There are no other express warrants except as
set forth herein and any applicable implied
warranties of merchantability and fitness are
limited in duration to the period of coverage of
this express written Limited Warranty. Some
states do not allow limitation on how long an
implied warranty lasts, so this limitation may not
apply to you.
Weber is not liable for any special, indirect or
consequential damages. Some states do not
allow the exclusion or limitation of incidental or
consequential damages, so this limitation or
exclusion may not apply to you.
Weber does not authorize any person or
company to assume for it any other obligation or
liability in connection with the sale, installation,
use, removal, return, or replacement of its
equipment; and no such representations are
binding on Weber.
This Warranty applies only to products sold at
retail.
WEBER-STEPHEN PRODUCTS CO.
Customer Service Center
250 South Hicks Road
Palatine, IL 60067-6241
(800) 446-1071
WARRANTY

5
© 1996 Weber. , Weber, the kettle configuration, Go-Anywhere,
Smokey Joe, Flavorizer, One-Touch, Genesis, Crossover, FireSpice,
Grill Works and WeberGrabbers are registered U.S. trademarks; Tuck-
N-Carry, Outrider, Master-Touch, Bar-B-Kettle, Tuck-Away, Char-Basket,
The Ranch, Smokey Mountain Cooker, Performer, Touch-N-Go,
CharBin, Perma-Mount, Gas Catcher, Spider Stopper, Steam-N-Chips,
Warm-Up, FlameCheck, Corn-N-Tater and Grill Out! are U.S.
trademarks of Weber-Stephen Products Co., 200 East Daniels Road,
Palatine, IL 60067-6266. Sidekick is a registered U.S. trademark of
Bemis Manufacturing Co.
Genesis Gas Barbecues are covered under U.S. patent #4,677,964,
#4,727,853, #4,860,724, #4,941,817, #4,829,978, #D293,067 and other
patents pending. Wheels are covered under U.S. patent #D249,678.
One-Touch is covered under U.S. patent #RE33,091 and #4,576,140.
Master-Touch, Performer and The Ranch are covered under U.S. patent
#4,777,927, #4,966,125 and other patents pending. Smokey Joe is
covered under U.S. patent #4,498,452 and #D278,021. Outrider and
Smokey Joe Tuck-N-Carry are covered under U.S. patent #4,836,179.
Gas Go-Anywhere is covered under U.S. patent #4,627,408. FirePlace
is covered under U.S. patent #D293,191. Contemporary Tools are
covered under U.S. patent #D299,997, #D298,792 and #D299,996.
Corn-N-Tater Holder is covered under U.S. patent #4,458,585,
#D280,282 and #D291,855. Sidekick is covered under U.S. patent
#4,337,751. Grill Works is covered under U.S. patent #4,942,862.
Smokey Joe is a registered Canadian trademark. In Canada, Genesis
Gas Barbecues are covered under Rd 1987 Reg. #58,034 and patent
#1,279,540. One-Touch Kettle is covered under patent #1,168,124.
Printed in the U.S.A.
PATENTS AND TRADEMARKS

6
Contents
WARNINGS................................................................ 3
Warranty & Patents.................................................. 4-5
General Instructions.................................................... 7
Assembly............................................................... 8-15
Operating Instructions
Lighting............................................................. 16
Cleaning........................................................... 16
Cooking............................................................ 17
Parts Listing.............................................................. 19
FEATURES:
a) High-capacity ash catcher locks in place, eliminating
blowing ashes.
b) Easily sweep out ashes with the One-Touch
®
Cleaning System.
c) Patented Dual-Purpose Thermometer monitors the
cooking temperature inside the grill, and can also be
used as a probe to quickly check the doneness of
food.
d) Tuck-Away™ Lid slides back into the stainless steel
lid holder and acts as a windshield when lighting
briquets.
e) Access flaps swing open on the hinged cooking
grate for easy addition of briquets or wood chips
during cooking.
f) Char-Basket™ Fuel Holders allow convenient
indirect and concentrated direct cooking flexibility
with wood or charcoal.
g) Removable storage tray is a great place to store
Weber FireStarters, barbecue mitts, and
condiments.
h) CharBin™ Storage Container holds over 20 lbs. of
charcoal within easy reach.
i) Stainless steel CharBin lid serves as a great work
area and covers the CharBin to keep briquets dry.
j) Stainless steel cooking grate holder.
k) Convenient bottom rack for storage.
a
b
c
d
e
f
g
h
i
k
j

7
General Instructions
Your Weber Performer Grill is a portable outdoor
cooking appliance. You can grill, barbecue, roast and
bake with results that are difficult to duplicate with
indoor kitchen appliances.
The Performer Grill is portable so you can easily change
its location in your yard or on your patio. Portability
means you can take your Weber Charcoal Barbecue
with you if you move.
■ These instructions will give you the minimum
requirements for assembling your Performer Grill.
Please read the instructions carefully before using
your grill. Improper assembly can be dangerous.
■ Not for use by children.
Operating area
WARNING: Only use this barbecue outdoors in a
well-ventilated area. Do not use in a garage,
building, breezeway or any other enclosed area.
■ Never use your Performer Grill under an
unprotected combustible roof or overhang.
■ Do not use combustible materials within 24 inches
of the top, bottom, back or sides of the grill.
■ The entire barbecue gets hot when in use. Do not
leave unattended.
■ Keep any electrical supply cord away from any
heated surface.
■ Keep the cooking area clear of flammable vapors
and liquids, such as gasoline, alcohol, etc., and
combustible materials.

8
Tools needed
Phillips screwdriver
7/16 inch or adjustable wrench
Pliers
Packages
Your Weber Performer Grill comes in a large box
(shipper) which includes a top box, and bottom carton.
There is a hardware pack of small parts and hardware
that will be found in the bottom carton.
Note - The hardware size of nuts, bolts and screws is
given. For example "1/4-20 x 1/2 inch bolt" means a bolt
1/4 inch in diameter with 20 threads to the inch, 1/2 inch
long. On a small screw, "8-18 x 5/8 inch screw" means a
number 8 screw, with 18 threads to the inch,
5/8 inch long.
Check package contents
The following item will be found in the top box.
Bottom rack
The following items will be found in the large box
(shipper).
CharBin Storage Container
Bowl assembly
Lid assembly
ASSEMBLY INSTRUCTIONS
While we give much attention to our products,
unfortunately an occasional error may occur. If a part
is missing, do not go back to the store. Call the Weber
Customer Service Center toll free 1-800-446-1071 to
receive immediate assistance. Have your owner’s
manual available for reference.
Ash catcher assembly
Two Char-Basket Fuel Holders

9
Storage tray
Bowl panel
Charcoal grate
Hinged cooking grate
The following items will be found in the bottom
carton.
Wheel frame
Two bottom connectors
Front panel
Leg frame
Top frame assembly
W
E
B
E
R
W
E
B
E
R
W
E
B
E
R
W
E
B
E
R
Two wheels
Axle

10
The following items will be found in the hardware
pack.
Sixteen nylon washers
(actual size)
Four aluminum washers
(actual size)
Eight 1/4-20 x 1 3/4 inch bolts
(actual size)
Four 1/4-20 acorn nuts
(actual size)
Four 1/4-20 x 1/2 inch bolts
(actual size)
Two #8-18 x 5/8 Phillips head screws
(actual size)
Three tool holders
CharBin lid handle
Three hubcaps
Figure 1
Step 1
Assemble wheels
You will need: axle, two wheel hubcaps, two wheels,
wheel frame, hammer and a block of wood.
Place one end of the axle on the block of wood (or other
protected surface). Tap on one hubcap.
Put one wheel on the axle, WEBER side toward the
hubcap. Slide the axle through the frame. Add the other
wheel, WEBER side out. Tap on the hubcap. Figure 1.
W
E
B
E
R
W
E
B
E
R

11
Step 2
Remove protective packaging
Protective cardboard inserts must be removed from the
bowl before assembly. Figure 2. DO NOT
FORCEFULLY REMOVE THE INSERTS.
a) Remove cardboard insert from ash catcher ring. Be
careful when removing the cardboard not to bend
the ash catcher ring.
b) Tear cardboard along the perforations at leg
couplings and pull downward.
c) Peel off the protective plastic covering from the
nameplate on the ash catcher ring.
(a)
(b)
(c)
(b)
Figure 2
Figure 3
Step 3
Assemble the frame
You will need: top frame assembly, wheel frame
assembly and leg frame.
Note - Work on soft surface (grass, or carton inserts) to
protect the finish during frame assembly.
Set the top frame on the ground so the leg tabs point
up. Fit the wheel frame assembly onto the leg tabs at
the open end of the top frame. Figure 3.
Fit the leg frame onto the leg tabs at the other end of the
top frame. Figure 3.
The tabs must be on the inside of the frame tubes when
the joints are closed. Figure 3 (a).
(a)
Tab on the inside
of frame tube

12
Figure 4
Step 4
Continue frame assembly
You will need: frame assembly, front panel, four 1/2
inch bolts, four nylon washers, 7/16 inch wrench.
Place front panel along inside edge of frame assembly
with Weber logo on the side closest to the wheel
frame and facing out. Slip washers on bolts, insert
bolts through the front panel and screw into the frame
assembly. Figure 4.
Add the remaining bolts and washers and tighten.
Figure 5
Step 5
Complete frame assembly
You will need: two bottom connectors, four 1 3/4 inch
bolts, four nylon washers, 7/16 inch wrench.
Turn over partial frame assembly.
Place washer on bolt, insert through frame, and screw
into bottom connector. Do not fully tighten bolts until
both bottom connectors are in place. Place washer
on second bolt and insert through frame into opposite
end of bottom connector. Figure 5.
Hold the other bottom connector between wheel and leg
frame. Add washers to bolts. Insert bolts through frame
and screw into bottom connector. Figure 5. Tighten all
four bolts.
Bottom connector
Weber nameplate facing out

13
Figure 6
Step 6
Install CharBin lid handle
You will need: CharBin lid handle, two 5/8 inch screws
and a Phillips screwdriver.
Remove twist tie and protective plastic covering
from CharBin lid. Lift open lid. Insert screws through
holes from inside of lid into handle. Tighten screws.
Figure 6.
Figure 7
Step 7
Install bowl assembly
You will need: bowl assembly, four 1 3/4 inch bolts,
eight nylon washers, four aluminum washers, four acorn
nuts, 7/16 wrench and pliers.
Set bowl assembly in open end of frame with lid holder
to the outside, and align mounting brackets over holes
in frame. Figure 7.
Slip a nylon washer on a bolt and insert bolt through
bowl mounting bracket and frame. Place a nylon washer
then an aluminum washer and acorn nut on end of bolt.
Figure 7.
Repeat for the other three bolts. Do not tighten until all
four bolts are correctly in place.
CAUTION: Do not overtighten the bolts.
Overtightening can fracture the porcelain.
Lid holder
Nylon washers
Aluminum washer

14
Figure 8
Step 8
Add bowl panel, tool holders and CharBin
Storage Container
You will need: bowl panel, three tool holders and
CharBin Storage Container.
Remove protective plastic covering from bowl
panel. Slide the ends of bowl panel under bowl
mounting brackets so the ends rest on tabs inside
frame. Set the panel in place on top of the frame brace.
Figure 8.
Hook the tool holders over the frame rail. There is a cut
out on the right side of the front panel to accommodate
the tool holders. Figure 8.
Tool holders
CharBin
Bowl panel
Tab
(a)
(b)
Figure 9
Note: Before sliding the CharBin into place check that
the Cooking grate holder is sitting loosely on the frame
brace and is conforming to the frame brace.
Figure 9 (a). If it is tight or stuck over the edge of the
frame brace, Figure 9 (b), reposition as in Figure 9 (a).
If the Cooking grate holder is not correctly positioned, it
could allow the CharBin to slide through the frame.
Slide CharBin down into the top frame with the deep
end toward the rear. Figure 9.
CharBin
Inside of
Frame Brace
Cooking grate
holder

15
Figure 11
Step 10
Add grates, Char-Basket Fuel Holders and lid
You will need: charcoal grate, Char-Baskets, hinged
cooking grate and lid.
Place charcoal grate on bottom supports in bowl. Set
Char-Baskets on charcoal grate, cooking grate on top
supports, and lid on bowl. Figure 11.
Figure 10
Step 9
Install ash catcher, storage tray & bottom rack
You will need: ash catcher, storage tray and bottom
rack.
Align handle and prongs of ash catcher with their
appropriate slots on the ring. The handle fits into the
larger slot. Figure 10 (a).
Lift ash catcher up into slots and rotate to the right. Ash
catcher will fit securely into place. Figure 10 (b).
Set storage tray in place between frame braces in front
of the CharBin. Figure 10.
Slide bottom rack into position between bottom
connectors. Figure 10.
Storage tray
(a) (b)

16
OPERATING INSTRUCTIONS
Lighting
WARNING: Open lid lid before lighting. Ash catcher
must be in place when lighting and any time during
use. If using a liquid fire starter, check the ash
catcher for any accumulation of starter fluid before
lighting charcoal. If fluid is present DO NOT LIGHT.
Wipe out any fluid and replace ash catcher before
lighting.
1) Open lid.
2) Clear bowl of ashes by moving the control rod side
to side. Figure 1.
3) Open bottom bowl vents. Figure 2.
4) Position Char-Baskets in center of charcoal grate.
5) Light charcoal with Weber FireStarters or another
commercially prepared fire starter.
Figure 1
Control rod
Closed Open
Figure 2
Periodic Cleaning
CAUTION: Be sure barbecue is cool before
cleaning.
To remove ashes from the bowl, move control rod side
to side so damper blades sweep ashes through the
vents. Figure 3.
TO CLEAN KETTLE:
■ While lid is warm, wipe the inside with a paper towel
to prevent grease buildup.
■ For outer surfaces, wash with a warm soapy water
solution and rinse with clear water.
For a more thorough cleaning (to be done once a year):
1. Remove ashes.
2. Remove the grates and Char-Baskets.
3. Clean the porcelain finish with with a spray-on type
oven cleaner. Spray surfaces heavily with the oven
cleaner and leave on long enough to soften
accumulated grease.
4. Wipe out with paper towels. Wash with a mild
detergent and water. Rinse well with clear water and
wipe dry.
Figure 3
Control rod

17
Cooking Methods
Direct Method
For foods requiring fewer than 30 minutes of cooking
time, cook directly over the coals, absorbing the full
heat.
1. Place filled Char-Baskets with flat sides together in
center of charcoal grate.
2. Ignite charcoal.
3. Coals are ready when they have a light coating of
grey ash (approx. 25-30 minutes).
4. Set hinged cooking grate in place.
5. Place meat directly over coals to sear, then move
food to the perimeter of the cooking grate.
6. Cover kettle and cook according to directions.
For cooking large quantities of food, charcoal can be
piled in a pyramid in the center of the charcoal grate,
ignited and spread over the charcoal grate for a larger
Direct cooking area.
Indirect Method
For cooking whole meats such as roasts, turkeys or
hams, Char-Baskets are placed on the sides of the
kettle to circulate the heat like a convection oven.
When cooking by the Indirect method, Char-Baskets
should be positioned as shown in figure 4 with the
“flaps” of the hinged cooking grate directly above the
baskets. This is for safety reasons so the user can avoid
reaching directly over burning coals.
1. Fill each Char-Basket with 25 briquets and place
with flat sides together in center of charcoal grate.
2. Ignite charcoal.
3. Move Char-Baskets to opposite sides of the kettle
immediately after ignition. Figure 4. Wear barbecue
mitts and use long-handled tongs.
4. Place drip pan in the center of the charcoal grate
between the Char-Baskets.
5. Set hinged cooking grate in place with the “flaps”
directly over the Char-Baskets.
6. Coals are ready when they have a light coating of
grey ash (approx. 25-30 minutes).
7. Place food on the cooking grate directly above the
drip pan.
8. Cover kettle and cook according to directions.
Note - For meat that requires more than one hour of
cooking time, 8 additional coals must be added at the
end of each hour. The “flaps” on the hinged cooking
grate can be opened to easily add charcoal to the
baskets. Wear barbecue mitts and use long handled
tongs to lift “flaps” and add coals.
It is important in Indirect Cooking to have the coals
burning equally well on each side before beginning to
cook. Occasionally when the coals are ignited, one side
will start faster than the other. If this happens, wear BBQ
mitts and use long-handled tongs to move the charcoal
from one side to the other so the heat is evenly
distributed.
For additional information and cooking times, consult
the Weber Owner's Guide.
A few wood chunks or a handful of cooking woodchips
may be added to hot coals for a mild smoke flavor in
your foods.
CAUTION: Replace thermometer in lid when not in
use. Do not leave thermometer in food while
cooking.
Figure 4

18
1
2
3
4
5
6
7
8
9
10
11
12-13
14-16
17
19-20, 15
22
18, 15-16
23
24
25
26
27
28
29,20
30
19-20
31
32
33
34
35
36
37
38
39
1
40
41
42
43
48
49
44-47
21

19
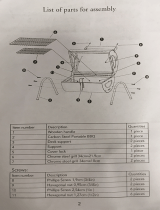
1. #8-18 x 5/8 inch screw (3)
2. Nylon lid handle (top)
3. Nylon lid handle (bottom)
4. Thermometer
5. Nylon damper handle
6. Lid assembly
7. 22 inch hinged cooking grate
8. Char-Basket Fuel Holders (2)
9. Charcoal grate
10. Hex drive
11. Damper blades
12. Lid holder support strap
13. Lid holder lower support
14. 1/4-20 x 5/8 inch truss head screw
15. 1/4 inch aluminum washer (7)
16. 1/4-20 hex keps nut (3)
17. Lid holder wire
18. Bushings (2)
19. 1/4-20 x 1 3/4 inch bolt (8)
20. 1/4 inch nylon washers (16)
21. 1/4-20 acorn nut (4)
22. Bowl
23. Ash catcher support bar
24. Thumbscrew
25. Control rod
26. Ash catcher ring assembly
27. Ash catcher handle
28. Ash catcher
29. 1/4-20 x 1/2 inch bolt (4)
30. Front panel assembly
31. Wheel frame
32. Bottom connector (2)
33. Axle
34. Wheels (2)
35. Wheel hub caps (2)
36. Bottom rack
Parts List
All items are single quantities unless otherwise
specified.
Parts can be ordered directly from Weber-Stephen
Products Company by phone or mail.
Note - Do not return parts to Weber-Stephen Products
Co. without first contacting the Customer Service Center
by phone or mail. Returning the part may not be
necessary.
37. CharBin Storage Container
38. Bowl panel
39. Storage tray
40. CharBin lid handle
41. CharBin lid
42. Hinge rod
43. Tool holders (3)
44. Top frame
45. Tubing plugs (6)
46. Hinge bushings (2)
47. Nylon insert (4)
48. Cooking grate holder
49. Leg frame
WARNING:
Use only Weber factory authorized parts.
The use of any part that is not factory
authorized can be dangerous. This will also
void your warranty.
Contact: Weber-Stephen Products Co.
Customer Service Center
250 South Hicks Road
Palatine, IL 60067-6241
(800) 446-1071

A FINAL WORD
OF
THANKS
hank you for choosing a Weber Barbecue.
Our family here at Weber has worked hard
to produce the highest quality products
for your satisfaction.
While we give much attention to our products, an
occasional error may occur. Our knowledgeable
Customer Service staff is prepared to help you with
any problems with parts or assembly.
Call our toll free number 1-800-446-1071.
For quicker service, please have your owner’s
manual available for reference. We also welcome
any comments or suggestions you might have
regarding our products.
We wish your family the
best in outdoor cooking enjoyment.
Weber-Stephen Products Company
Customer Service Center
200 East Daniels Road
Palatine, Illinois 60067-6266
T
/