Craftsman 358350360 Owner's manual
- Category
- Power chainsaws
- Type
- Owner's manual
This manual is also suitable for
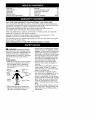
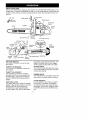
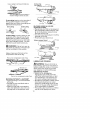
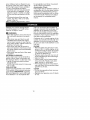
Craftsman 358350360 is a 2.2 cu.in./36cc GASOLINE 2-Cycle CHAIN SAW with a 16 in. Bar. It is designed for cutting wood and is equipped with safety features such as a handguard, Reduced-Kickback Guide Bar, and Low-Kickback Chain. The saw also has a contoured depth gauge that deflects kickback force and allows wood to gradually ride onto the cutter.
Craftsman 358350360 is a 2.2 cu.in./36cc GASOLINE 2-Cycle CHAIN SAW with a 16 in. Bar. It is designed for cutting wood and is equipped with safety features such as a handguard, Reduced-Kickback Guide Bar, and Low-Kickback Chain. The saw also has a contoured depth gauge that deflects kickback force and allows wood to gradually ride onto the cutter.


-
 1
1
-
 2
2
-
 3
3
-
 4
4
-
 5
5
-
 6
6
-
 7
7
-
 8
8
-
 9
9
-
 10
10
-
 11
11
-
 12
12
-
 13
13
-
 14
14
-
 15
15
-
 16
16
-
 17
17
-
 18
18
-
 19
19


Craftsman 358350360 Owner's manual
- Category
- Power chainsaws
- Type
- Owner's manual
- This manual is also suitable for
Craftsman 358350360 is a 2.2 cu.in./36cc GASOLINE 2-Cycle CHAIN SAW with a 16 in. Bar. It is designed for cutting wood and is equipped with safety features such as a handguard, Reduced-Kickback Guide Bar, and Low-Kickback Chain. The saw also has a contoured depth gauge that deflects kickback force and allows wood to gradually ride onto the cutter.
Ask a question and I''ll find the answer in the document
Finding information in a document is now easier with AI
Related papers
-
Sears Chainsaw 316.35084 User manual
-
Craftsman 316.350850 User manual
-
-
-
-
-
-
Craftsman 35088 - 18 in. Gas Chainsaw User manual
-
-
Other documents
-
Remington RM4214 Rebel User guide
-
Troy-Bilt TB25PS User guide
-
-
Poulan 1800 SUPER User manual
-
-
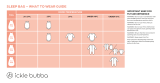 ickle bubba Sleep Bag User guide
-
Sioux Tools 5434 User manual
-
 Blue Max 21140 User manual
-
Hubbell P308-0991 User manual
-
 Maple Systems HMI5104X Installation guide


