Page is loading ...

OPERATION & MAINTENANCE
INSTRUCTIONS
ORIIGINAL INSTRUCTIONS GC1116
ROUTER TABLE
MODEL NO: CRT1
PART NO: 6462115

2
Parts & Service: 020 8988 7400 / E-mail: Parts@clarkeinternational.com or Service@clarkeinternational.com
INTRODUCTION
Thank you for purchasing this CLARKE Router Table designed for DIY use only
and is ideal for use with a CLARKE CR1C router or other routers up to155mm
dia base plate
Before attempting to use this product, please read this manual thoroughly and
follow the instructions carefully. In doing so you will ensure the safety of yourself
and that of others around you, and you can look forward to your purchase
giving you long and satisfactory service.
SPECIFICATION
ENVIRONMENTAL RECYCLING POLICY
Through purchase of this product, the customer is taking on the obligation to
deal with the WEEE in accordance with the WEEE regulations in relation to the
treatment, recycling & recovery and environmentally sound disposal of the
WEEE.
In effect, this means that this product must not be disposed of with general
household waste. It must be disposed of according to the laws governing
Waste Electrical and Electronic Equipment (WEEE) at a recognised disposal
facility.
GUARANTEE
This product is guaranteed against faulty manufacture for a period of 12
months from the date of purchase. Please keep your receipt which will be
required as proof of purchase.
This guarantee is invalid if the product is found to have been abused or
tampered with in any way, or not used for the purpose for which it was
intended.
Faulty goods should be returned to their place of purchase, no product can
be returned to us without prior permission.
This guarantee does not effect your statutory rights.
Net Weight 7kg
Dimensions L x W x H 865 x 375 x 390mm

3
Parts & Service: 020 8988 7400 / E-mail: Parts@clarkeinternational.com or Service@clarkeinternational.com
GENERAL SAFETY RULES
GENERAL SAFETY IN THE WORKPLACE
1. Always ensure that air can circulate around the machine and that the air
vents are unobstructed.
2. Always keep work area clean & tidy. Cluttered work areas and benches
invite accidents.
3. Never over-reach. Keep proper footing and balance at all times.
4. Never store equipment in a wet/damp environment or expose to rain.
5. Keep other persons away. Do not let persons, especially children, not
involved in the work, touch the machine or extension cable and keep
them away from the work area.
6. Never operate a machine when under the influence of alcohol, drugs or
medication.
7. Always ensure the workplace is well lit. Ensure that lighting is placed so that
you will not be working in your own shadow.
8. Do not use tools in the presence of flammable liquids or gasses.
9. Stay alert, watch what you are doing, use common sense and do not
operate the machine when you are tired.
CARE OF POWER TOOLS
1. Read this manual carefully. Learn the power tool’s applications and
limitations, as well as the specific potential hazards peculiar to it.
2. Always keep guards in place and in working order. A guard or other part
that is damaged should be properly repaired or replaced by an authorised
service centre, unless otherwise indicated in this instruction manual.
3. Don’t force the machine and use the correct tool for the job. It will do the
job better and safer, at the rate for which it was intended.
4. Always disconnect the machine from the power supply before carrying out
any servicing or changing of accessories.
WARNING: WHEN USING ELECTRIC POWER TOOLS, BASIC SAFETY
PRECAUTIONS SHOULD ALWAYS BE FOLLOWED TO REDUCE THE RISK OF
FIRE, ELECTRIC SHOCK AND PERSONAL INJURY INCLUDING THE
FOLLOWING. READ ALL THESE INSTRUCTIONS BEFORE ATTEMPTING TO
OPERATE THIS PRODUCT AND SAVE THESE INSTRUCTIONS FOR FUTURE
REFERENCE.

4
Parts & Service: 020 8988 7400 / E-mail: Parts@clarkeinternational.com or Service@clarkeinternational.com
5. Before further use of the machine, it should be carefully checked to
determine that it will operate properly and perform its intended function.
Check for alignment of moving parts, binding of moving parts, breakage of
parts, mounting or other condition that may affect its operation.
6. Have defective switches repaired by an authorised service centre. Do not
use a power tool if the switch does not turn it on and off.
7. Always check for any damage or any condition that could affect the
operation of the machine. Damaged parts should be properly repaired.
8. Have your power tool repaired by a qualified person. This power tool
complies with the relevant safety rules. Repairs should only be carried out
by qualified persons using original spare parts, otherwise this may result in
considerable danger to the user.
9. Never use this product for any other purpose than that described in this
booklet.
10. Never abuse the power cable by yanking the cable to disconnect it from
the socket. Keep the cable away from heat, oil or sharp edges.
11. Guard against electric shock. Avoid body contact with earthed or
grounded surfaces.
12. If the machine should be used outdoors, use only extension cables
intended for outdoor use and marked accordingly.
13. Avoid accidental starting by making sure the power switch is off before
plugging in the power cable.

5
Parts & Service: 020 8988 7400 / E-mail: Parts@clarkeinternational.com or Service@clarkeinternational.com
ELECTRICAL CONNECTIONS
Before switching the product on, make sure that the voltage of your electricity supply is
the same as that indicated on the rating plate. This product is designed to operate on
230VAC 50Hz. Connecting it to any other power source may cause damage.
This product may be fitted with a non-rewireable plug. If it is necessary to change the
fuse in the plug, the fuse cover must be refitted. If the fuse cover becomes lost or
damaged, the plug must not be used until a suitable replacement is obtained.
If the plug has to be changed because it is not suitable for your socket, or due to
damage, it should be cut off and a replacement fitted, following the wiring instructions
shown below. The old plug must be disposed of safely, as insertion into a mains socket
could cause an electrical hazard.
• The wire which is coloured Blue must be connected to the terminal which is
marked N or coloured Black.
• The wire which is coloured Brown must be connected to the terminal which is
marked L or coloured Red.
• The wire which is coloured Yellow and Green must be connected to the
terminal which is marked E ( ) or coloured Green.
WE STRONGLY RECOMMEND THAT THIS MACHINE IS CONNECTED TO THE MAINS
SUPPLY VIA A RESIDUAL CURRENT DEVICE (RCD)
If in any doubt, consult a qualified electrician. DO NOT attempt any repairs
yourself.
WARNING: READ THESE ELECTRICAL SAFETY INSTRUCTIONS
THOROUGHLY BEFORE CONNECTING THE PRODUCT TO THE MAINS
SUPPLY.
WARNING! The wires in the power cable of this product are
coloured in accordance with the following code:
Blue = Neutral Brown = Live Yellow and Green = Earth
Plug must be BS1363/A approved.
Always fit a 13 Amp fuse.
Ensure that the outer sheath of the cable is firmly held by the clamp
Neutral
(Blue)
Live
(Brown)
Earth
(Green and Yellow)

6
Parts & Service: 020 8988 7400 / E-mail: Parts@clarkeinternational.com or Service@clarkeinternational.com
PRODUCT INVENTORY
Before assembling the table, ensure all components are present, any
shortages etc should be reported to the Clarke dealer where the table was
purchased.
NO DESCRIPTION NO DESCRIPTION
1 Table top 7 Switch assembly
2 Table extension 8 Vacuum hose adaptor
3 Table leg 9 Clamp
4 Fence profile 10 Fixings kit
5 Fence pressure pad 11 Mitre gauge
6 Table pressure pad inc fittings
1

7
Parts & Service: 020 8988 7400 / E-mail: Parts@clarkeinternational.com or Service@clarkeinternational.com
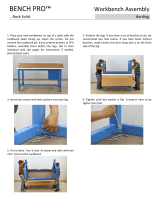
ASSEMBLY
1. Lay the main table top (item 1)
upside down on a flat surface as in
Fig. 1.
2. Position one table top extension
(item 02) as in Fig. 2.
3.
Place a table leg (Item 03) as shown in Fig. 3, loosely fix in position, using
four screws and lock nuts; do not fully tighten yet.
NOTE: The table leg fits inside the table profile, with fixing screws inserted
from the outside with locknuts on the inside, see inset.
4. Repeat item 3 above for opposite table leg.

8
Parts & Service: 020 8988 7400 / E-mail: Parts@clarkeinternational.com or Service@clarkeinternational.com
5. Once both table legs are loosely fitted, ensure the table and table
extension are lying perfectly flat, and gently tighten all screws, working
from the centre to the outside. Take care when tightening not to move the
extension table. DO NOT overtighten.
6. Repeat steps 1 to 5 for the other table extension and table legs. Once all
four legs are securely tightened, turn the assembly over, checking that the
table assy does not rock.
7. If any rocking is detected, this must be rectified before continuing, by
loosening the screws on the offending leg/legs and adjusting accordingly.
Always take care not to disturb the level of the table extensions to the main
table.
8. Insert two 50mm long coach bolts
into holes B’ from the top of the
table. Fig. 4.
9. Attach the fence assy (Item 4),
using the hex head bolt, washer
and knob supplied. Insert the bolts
from the underside of the table
through the holes marked A’ (Fig.
5). Place the fence on the bolt
and secure in position with washer
and locking knob.
10. DO NOT overtighten.
NOTE: Use the graduated marks to
line up the fence accurately.

9
Parts & Service: 020 8988 7400 / E-mail: Parts@clarkeinternational.com or Service@clarkeinternational.com
11. Fit the fence feather boards as
shown in Fig. 7 using the fixings
supplied (hex head bolt x 4,
washer x 4 and knob x 4. Pay
attention to the feed direction.
12. Fit the table feather board as
shown in Fig. 7 using the fixings
supplied; again pay attention to
the feed direction.
13. Insert the two hex head bolts from
the underside of the table pictured
in Fig. 8a, place spacers on the
bolts ensuring the correct
orientation, place the feather
board on top, place washer on
each bolt and secure with knobs.
Fig. 8b.
• DO NOT overtighten.
14. Fit the switch assembly as follows.
• Unwrap the power cable.
• Fit in position, see Fig. 9 with two
phillips head screws inserted
from the front of the table
secured with two washers and
locknuts, (supplied).
• DO NOT overtighten
MOUNTING THE ROUTER
1. Loosen the fence securing knobs
and slide the fence forward as far
as possible. This prevents the router
clamping bolts (50mm coachbolts)
from falling through the table
when it is turned over.
2. Carefully turn the table assy over
and support it by laying it on
suitable sized blocks of wood or
similar. see Fig. 10.

10
Parts & Service: 020 8988 7400 / E-mail: Parts@clarkeinternational.com or Service@clarkeinternational.com
3. Set the router in position on the
underside of the table as central
as possible, see Fig. 11. Insert two
coach bolts into holes’C’ fig. 4
from the table top, which is now
underneath.
4. Loosely secure the router in
position with four clamps (Item 9).
See Fig. 12.
5. It may be necessary to rotate the
router in order to locate all four
clamps correctly. If the router is
fitted with a speed control, try if
possible to position the speed
control where it can easily be
accessed from the front of the
table. Once the router is in the
desired position, tighten the four clamps sufficiently to prevent the router
moving whilst in operation.
6. Plug the 13amp router plug into
the bottom of the switch assembly.
Loosely tidy up the router power
cable and secure safely with
cable tie or similar, see Fig. 13.
For your personal safety and that of others around you, the router table should
be securely anchored when in use. This can be achieved by bolting or
screwing it to a work bench through the holes in the router table feet.
Alternatively the table can be bolted onto a suitable board and clamped to
the workbench etc with ‘G’ clamps or similar.
Your router table is now fully assembled and ready for use.
NOTE: Some routers are too long to fit underneath the router table, see
page 14 for suggestions to overcome this problem.

11
Parts & Service: 020 8988 7400 / E-mail: Parts@clarkeinternational.com or Service@clarkeinternational.com
OPERATION
When making adjustments etc, always ensure the router is isolated from the
electrical supply by switching off and removing the plug from the socket.
NOTE: Always refer to the specific router operating instruction manual
when making height and speed adjustments etc.
INSTALLING THE ROUTER CUTTER (BIT)
To install bits whilst the router is in situ will require the router to be lowered fully.
Select the desired bit and install. Fit the table insert closest to the size of the bit,
ensuring the bit does not touch the insert.
HEIGHT ADJUSTMENT
Raise the router until the bit protrudes through the table the required amount.
When making height adjustments, ensure the cutter does not touch the
transparent retractable guard. Operate the guard manually and check that
the guard moves freely.
Make test cuts on scrap pieces of wood to set the router accurately.
FENCE ADJUSTMENT
Loosen the two fence clamping knobs and position the fence as desired, use
the graduation marks to set the fence parallel, see Fig. 6.
Make test cuts on scrap pieces of wood to set the router accurately.
FEATHER BOARDS
Set the fence feather boards to hold the piece of wood flat on the table and
against the fence whilst machining.
To do this, place the piece of wood against the fence and below the relevant
pad to be adjusted. Loosen the two wingnuts and lower the pad until it rests
on the wood, push the pad down a little further to apply sufficient pressure to
hold the wood flat on the table.
Repeat the above procedure for the other fence board.
Adjust the table feather board in the same manner to hold the wood firmly
against the fence.
JOINTING FENCE
Set the jointing fence to support the wood when cutting the full thickness.
Adjust the cutting depth etc as previously described. Proceed to machine the
piece of wood until the leading edge passes over the jointing fence by
approx 25mm (1”). Switch off and isolate from the electrical supply. Hold the
wood firmly against the fence, loosen the jointing fence clamping knob and

12
Parts & Service: 020 8988 7400 / E-mail: Parts@clarkeinternational.com or Service@clarkeinternational.com
slide the jointing fence out towards the wood until it touches. Tighten the
clamping Knob.
Back the workpiece away from the cutter before switching on again and
continuing machining.
MITRE GAUGE
To use the mitre gauge, the table feather board must be removed first. It may
be necessary to loosen the front clamps holding the router in order to remove
the bolts, not forgetting to retighten them before using the router again.
To use the gauge, simply slot it into the
front slot on the table, adjust to the
required angle, the gauge is now
ready for use.
Switch the router ON, firmly hold the
workpiece in position against the
mitre gauge fence, see Fig. 15 and
slowly move it across the table.
As with all power tools, especially
those with cutters/blades, keep hands

13
Parts & Service: 020 8988 7400 / E-mail: Parts@clarkeinternational.com or Service@clarkeinternational.com
and fingers safely away from cutting blades by using push sticks etc when
working on small workpieces.
DUST COLLECTION
The router table is provided with a dust extraction facility, where a vacuum
extractor may be connected to the outlet at the rear of the table, using the
adapter supplied.
The connecting hose requires an inside diameter of 34mm to fit the adapter
supplied. The hose, ideally, should be a reasonably tight fit on the adapter,
which is then just pushed into the hole in the back of the table.
Note however, that this does not preclude the user from wearing a face mask
to prevent the inhalation of dust particles.
It is a requirement that a dust extraction facility be provided on all power tools,
however, due to the nature of the tool, some of the dust produced will be
forced into the surrounding atmosphere and will not be collected.

14
Parts & Service: 020 8988 7400 / E-mail: Parts@clarkeinternational.com or Service@clarkeinternational.com
HEIGHT ADJUSTMENT
In the case of routers too long to fit underneath the router table it is possible to
overcome this problem by carrying out the following.
NOTE: The following dimensions are the minimum sizes recommended,
which can be increased if desired.
Materials required:
1 x plywood baseboard 13mm (½”) x 400mm x 600mm.
2 x timber bearers 50mm x 50mm x 400mm.
2 x 5mm coachbolts x 75mm.
Lightly mark the hole centres in the baseboard as per the Fig. A, DO NOT DRILL.

15
Parts & Service: 020 8988 7400 / E-mail: Parts@clarkeinternational.com or Service@clarkeinternational.com
Centralise the router table feet on the baseboard as indicated in Fig C.
Once the table is carefully, centralised on the baseboard, ensuring the table
doesn’t move, mark the four holes (X) to be drilled, using the table feet as a
template Fig D.
Remove the table and drill the four holes in the baseboard, using a 6mm drill.

16
Parts & Service: 020 8988 7400 / E-mail: Parts@clarkeinternational.com or Service@clarkeinternational.com
Place one of the bearers onto the baseboard as centrally as possible over two
of the holes Fig. E.
Using ‘G’ clamps or similar, secure the bearer to the base board, taking care
to ensure it doesn’t move. Turn the assembly over and drill the bearer through
the holes in the baseboard using a 6mm drill.
IMPORTANT: Before removing the clamps, mark the bearer and baseboard
position to ensure it is fitted in exactly the same position when assembling with
the router table.
Repeat the procedure for other bearer.
Using coachbolts, fit the router table to the baseboard Fig F.
The complete assembly must be firmly secured to the workbench. We
recommend the use of ‘G’ Clamps or similar.

17
Parts & Service: 020 8988 7400 / E-mail: Parts@clarkeinternational.com or Service@clarkeinternational.com
PARTS DIAGRAM

18
Parts & Service: 020 8988 7400 / E-mail: Parts@clarkeinternational.com or Service@clarkeinternational.com
PARTS LIST
When requesting spare parts, please quote the reference HT-CRT1 followed by
the number listed.
ID DESCRIPTION ID DESCRIPTION
1 Table Top 16 Clamp
2 Table Extension 17 Nut
3 Table Leg 18 Switch Box Assembly
4 Table Insert 38mm dia 19 Phillips head Machine Screw
5 Fence Profile 20 Hexagon Lock Nut
6 Adjustable Fence 21 Label
7 Cutter Guard 22 Mitre Bar
8 Spring 23 Mitre Gauge Head
9 Flat Washer 24 Label
10 Screw 25 Table Insert 13mm dia (not shown)
11 Knob 26 Table Insert 19mm dia (not shown)
12 Vacuum Hose Adaptor 27 Table Insert 25mm dia (not shown)
13 Hexagon Head Bolt 28 Table Insert 32mm dia (not shown)
14 Coach Bolt 29 Fence Feather board(not shown)
15 Knob 30 Table feather board(not shown)

19
Parts & Service: 020 8988 7400 / E-mail: Parts@clarkeinternational.com or Service@clarkeinternational.com
DECLARATION OF CONFORMITY

/