iii En
i En
4 En
ii En
General
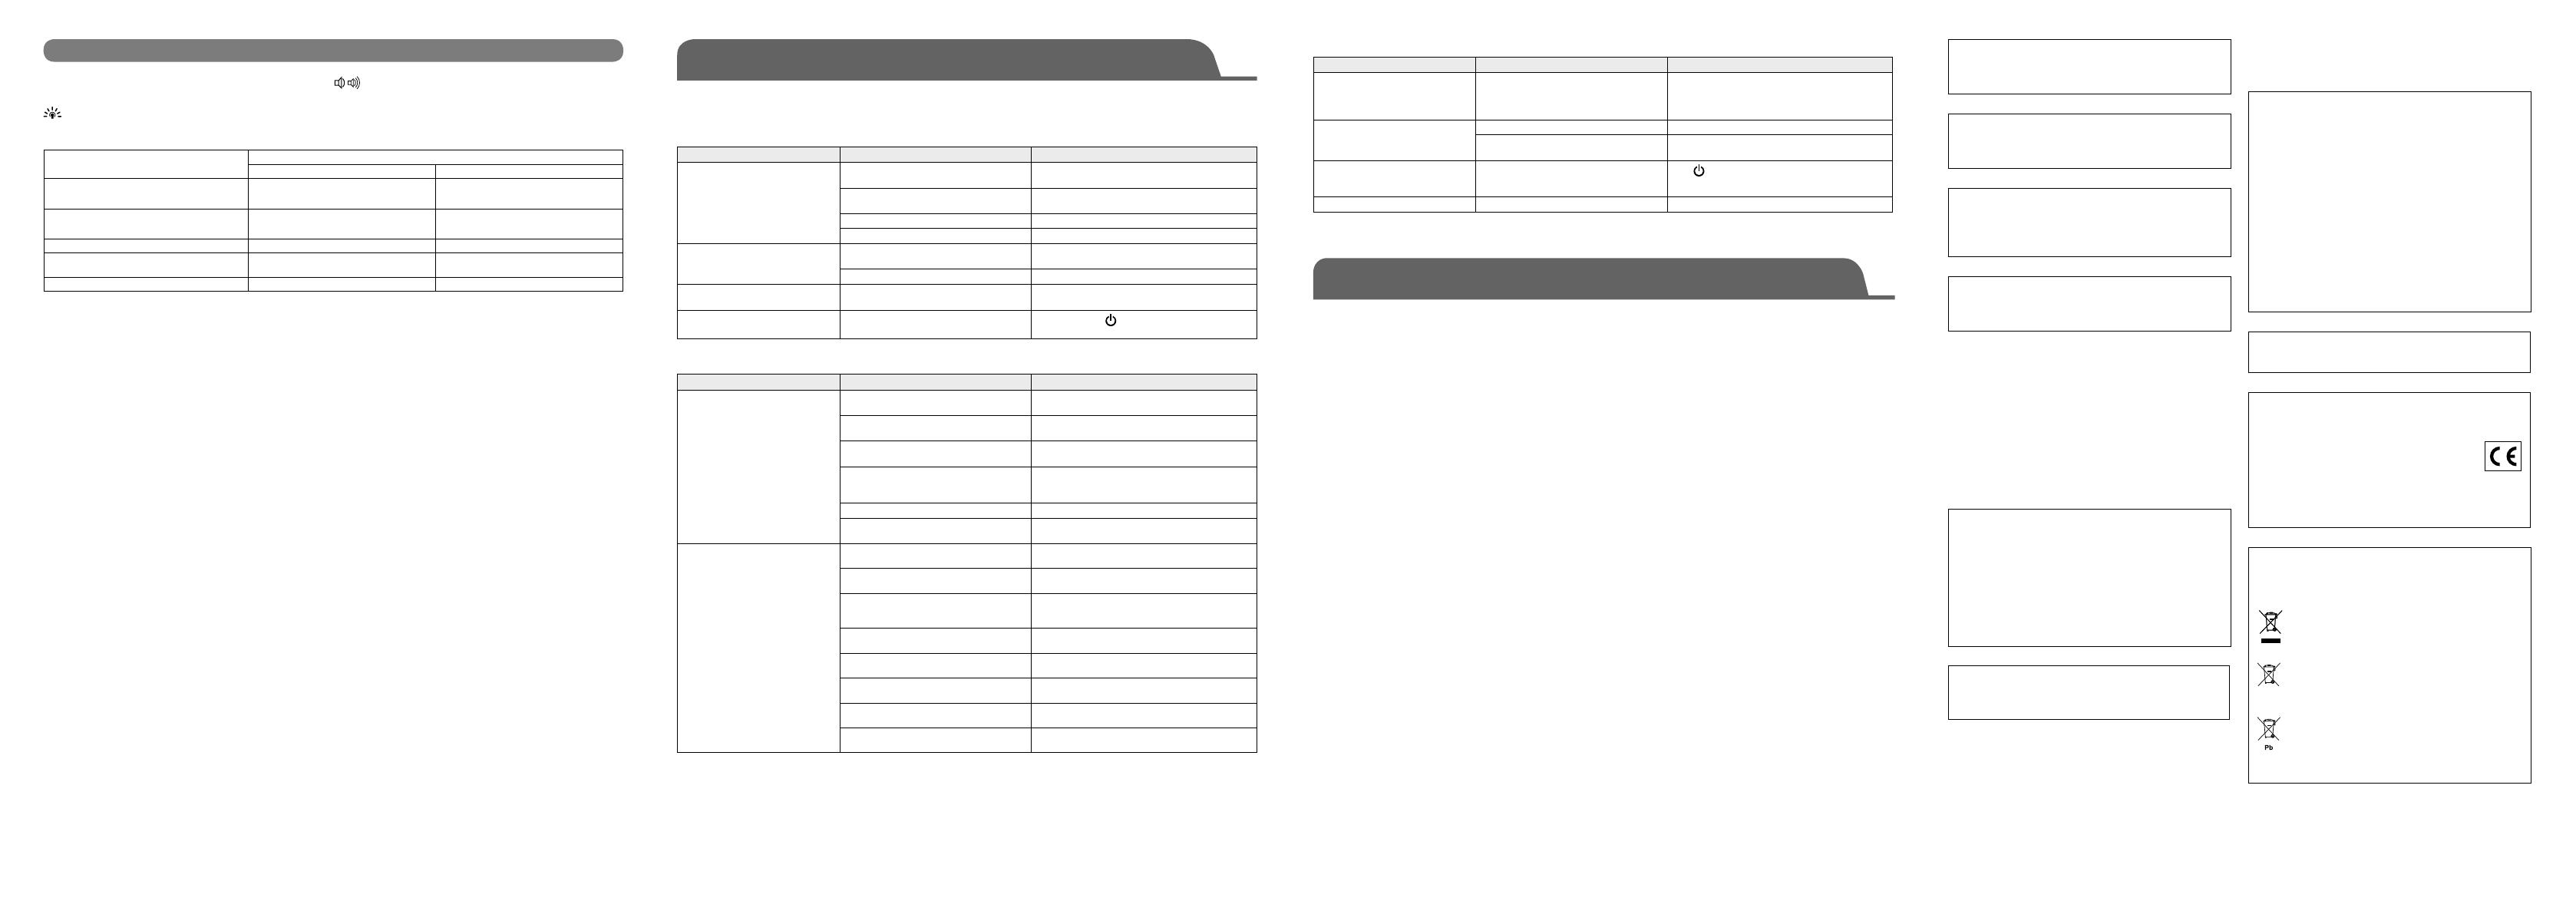
Problem Cause Remedy
No sound.
The connection between this unit and the other
component is not correct.
Connect the cable properly, or establish
Bluetooth
connection again.
The volume of this unit or other component is set
to the minimum.
Increase the volume level for both this unit and other
component.
AC adaptor is not connected correctly. Connect AC adaptor correctly.
The batteries are weak. Replace all batteries.
Even if the volume level is raised,
the sound level does not increase.
The protection circuitry has been activated by
excessive volume.
Reduce the volume level.
The volume of the other component is low. Increase the volume level of other component.
The status indicator (Green) is
blinking slowly.
The batteries are weak. Replace all batteries.
This unit does not work at all.
Reset the unit.
Press and hold the
(power) on the unit for more than
10 seconds.
When using the
Bluetooth
connection
Problem Cause Remedy
Cannot make this unit paired with
the other component.
The other component does not support A2DP. Perform pairing operations with a component which
supports A2DP.
A
Bluetooth
adaptor, etc. that you want to pair
with this unit has a passkey other than “0000”.
Use a
Bluetooth
adaptor, etc. whose passkey is “0000”.
Wrong distance. Reposition this unit within 10 m (33 ft) range from the
other component.
There is a device (microwave oven, wireless
LAN, etc.) outputs signals in the 2.4 GHz
frequency band nearby.
Reposition this unit.
The unit is in power-saving mode. Power on the unit and perform
Bluetooth
connection.
Bluetooth
connection is already established with
another component.
Disconnect
Bluetooth
connection with another component.
No sound is produced or the sound
is interrupted during playback.
The other component is not connected to this unit
by
Bluetooth
.
Perform
Bluetooth
connection (
☞
3 En).
Wrong distance. Reposition this unit within 10 m (33 ft) range from the
other component.
There is a device (microwave oven, wireless
LAN, etc.) outputs signals in the 2.4 GHz
frequency band nearby.
Reposition this unit.
The other component’s
Bluetooth
function is not
enabled.
Check that the
Bluetooth
function of the other component
is set properly.
This unit is not registered on the other
component’s
Bluetooth
device list.
Perform pairing operations again.
The other component is not set to send
Bluetooth
audio signals to this unit.
Check that the
Bluetooth
function of the other component
is set properly.
The pairing setting of the other component is not
set to this unit.
Set the pairing setting of the other component to this unit.
The other component’s volume is set to the
minimum.
Increase the volume level of the other component.
CAUTION: READ THIS BEFORE OPERATING YOUR UNIT.
To assure the finest performance, please read this manual
carefully. Keep it in a safe place for future reference.
1 Install this unit in a well ventilated, cool, dry, clean place -
away from direct sunlight, heat sources, vibration, dust,
moisture, and/or cold. (Do not use/keep this unit in a car
etc.)
2 Locate this unit away from other electrical appliances,
motors, or transformers to avoid humming sounds.
3 Do not expose this unit to sudden temperature changes from
cold to hot, and do not locate this unit in an environment
with high humidity (i.e. a room with a humidifier) to prevent
condensation inside this unit, which may cause an electrical
shock, fire, damage to this unit, and/or personal injury.
4 Avoid installing this unit where foreign objects may fall
onto this unit and/or this unit may be exposed to liquid
dripping or splashing. On the top of this unit, do NOT place:
− Othercomponents,astheymaycausedamageand/or
discoloration on the surface of this unit.
− Burningobjects(i.e.candles),astheymaycausefire,
damage to this unit, and/or personal injury.
− Containerswithliquidinthem,astheymayfalland
liquid may cause electrical shock to the user and/or
damage to this unit.
5 Do not cover this unit with a newspaper, tablecloth, curtain,
etc. in order not to obstruct heat radiation. If the temperature
inside this unit rises, it may cause fire, damage to this unit,
and/or personal injury.
6 Do not operate this unit upside-down. They may overheat,
possibly causing damage.
7 Do not use force on switches, knobs, and/or cords.
8 When disconnecting the power cable from the wall outlet,
grasp the AC plug; do not pull the cord.
9 Do not clean this unit with chemical solvents; this might
damage the finish. Use a clean, dry cloth.
10 Only the voltage specified on this unit must be used. Using
this unit with a higher voltage than specified is dangerous
and may cause fire, damage to this unit, and/or personal
injury. Yamaha will not be held responsible for any damage
resulting from use of this unit with a voltage other than that
specified.
11 Do not attempt to modify or fix this unit. Contact qualified
Yamaha service personnel when any service is needed. The
cabinet should never be opened for any reason.
12 When not planning to use this unit for long periods of time
(i.e. when going on vacation), disconnect the power cable
from the AC wall outlet.
13 Be sure to read the “TROUBLESHOOTING” section
regarding common operating errors before concluding that
the unit is faulty.
14 Before moving this unit, disconnect the power cable from
the wall outlet.
15 Be sure to use the AC adaptor supplied with this unit. Using
an AC adaptor other than the one provided may cause fire or
damage to this unit.
16 Install this unit near the wall outlet and where the power
cable can be reached easily.
17 For added protection for this product during a lightning
storm, or when it is left unattended and unused for long
periods of time, unplug it from the wall outlet.
This will prevent damage to the product due to lightning and
power-line surges.
18 The batteries shall not be exposed to excessive heat such as
sunshine, fire or the like.
– Keep the batteries in a location out of reach of children.
Batteries can be dangerous if a child were to put in his
or her mouth.
– If the batteries grow old, the effective operation range
of the remote control decreases considerably. If this
happens, replace the batteries as soon as possible.
– Do not use old batteries together with new ones.
– Do not use different types of batteries (such as alkaline
and manganese batteries) together. Read the packaging
carefully as these different types of batteries may have
the same shape and color.
– Exhausted batteries may leak. If the batteries have
leaked, dispose of them immediately. Avoid touching
the leaked material or letting it come into contact
with clothing, etc. Clean the battery compartment
thoroughly before installing new batteries.
– If you plan not to use the unit for a long period of time,
remove the batteries from the unit. Otherwise, the
batteries will wear out, possibly resulting in a leakage
of battery liquid that may damage the unit.
– Do not throw away batteries with general house waste.
Dispose of them correctly in accordance with your
local regulations.
There is a chance that placing this unit too close to a CRT-
based (Braun tube) TV set might impair picture color. Should
this happen, move this unit away from the TV set.
WARNING
TO REDUCE THE RISK OF FIRE OR ELECTRIC SHOCK,
DO NOT EXPOSE THIS UNIT TO RAIN OR MOISTURE.
This unit is not disconnected from the AC power source
as long as it is connected to the wall outlet, even if this
unit itself is turned off. In this state, this unit is designed to
consume a very small quantity of power.
CAUTION
Danger of explosion if battery is incorrectly replaced.
Replace only with the same or equivalent type.
For U.K. customers
If the socket outlets in the home are not suitable for the plug
supplied with this appliance, it should be cut off and an
appropriate 3 pin plug fitted. For details, refer to the instructions
described below.
Note
The plug severed from the mains lead must be destroyed, as a
plug with bared flexible cord is hazardous if engaged in a live
socket outlet.
AVEEA71102A
Important Notice: Guarantee Information for
customers in EEA* and Switzerland
For detailed guarantee information about this Yamaha
product, and Pan-EEA* and Switzerland warranty service,
please either visit the website address below (Printable
file is available at our website) or contact the Yamaha
representative office for your country. * EEA: European
Economic Area
(http://europe.yamaha.com/warranty/)
Radio waves may affect electro-medical devices.
Do not use this unit near medical devices or inside medical
facilities.
SPECIAL INSTRUCTIONS FOR U.K.
MODEL
IMPORTANT
THE WIRES IN MAINS LEAD ARE COLOURED IN
ACCORDANCE WITH THE FOLLOWING CODE:
Blue: NEUTRAL
Brown: LIVE
As the colours of the wires in the mains lead of this apparatus
may not correspond with the coloured markings identifying
the terminals in your plug, proceed as follows:
The wire which is coloured BLUE must be connected to
the terminal which is marked with the letter N or coloured
BLACK. The wire which is coloured BROWN must be
connected to the terminal which is marked with the letter L
or coloured RED.
Making sure that neither core is connected to the earth
terminal of the three pin plug.
Do not use this unit within 22 cm (9 inches) of persons with
a heart pacemaker implant or defibrillator implant.
We, Yamaha Music Europe GmbH hereby declare that this
unit is in compliance with the essential requirements and
other relevant provisions of Directive 1999/5/EC.
Yamaha Music Europe GmbH
Siemensstr. 22-34 25462 Rellingen, Germany
Tel: +49-4101-303-0
Information for Users on Collection and
Disposal of Old Equipment and used
Batteries
These symbols specified in the Directives 2002/96/EC and
2006/66/EC indicate that used electrical and electronic
products and batteries should not be mixed with general
household waste.
For proper treatment to avoid harmful effect on human
health and environment, plea se contact your local
municipality, your waste disposal service or the point of
sale where you purchased the items.
Note for the battery symbol (bottom two symbol
examples):
This symbol might be used in combination with a chemical
symbol. In this case it complies with the requirement set by
the Directive for the chemical involved.
Others
Problem Cause Remedy
Bluetooth
connection cannot
be established when the unit is
powered off, even if the AC adaptor
is connected.
The unit is in power-saving mode. Power on the unit and perform
Bluetooth
connection.
Auto power on does not work.
The volume of the other component is low. Increase the volume level of other component.
The played audio is too short. This unit does not power on if the duration of the sound is
short, such as a click.
The unit powered off automatically.
Auto power off has occurred.
Refer to "Auto power off" under "Power (Power
on/off)."
Press
(power) to turn this unit on.
Auto power off does not work.
The cable is connected to the AUX connector. Disconnect the cable from AUX connector.
Status indicators (LED)
Indicate the status of this unit and
Bluetooth
connection.
When the power is on, the status indicator (Green) lights up. When
/
(volume) on the unit is pressed, it blinks once.
The status indicator (Blue) lights up to show that
Bluetooth
is connected and blinks when disconnected.
The status indicator (Green) does not blink when the unit’s volume reaches minimum or maximum value, or when the volume is not
adjustable.
Status
LED
Green Blue
Bluetooth
connection not established
(Auto Connection)
Light up Blinking slowly
(once every 5 seconds)
Bluetooth
connection not established
(Waiting Status)
Light up Blinking quickly
(twice every 5 seconds)
Bluetooth
connection established Light up Light up
Clearing all the pairing data Light up Blinking quickly
(for about 3 seconds)
Batteries are weak Blinking slowly
–
Troubleshooting
Refer to the table below if the unit does not operate properly. If the problem you are experiencing is not listed below, or if the instruction
below does not help, turn off the unit, disconnect the power cable, and contact the nearest authorized Yamaha dealer or service center.

