GE DVLR223EE0WW Owner's manual
- Category
- Tumble dryers
- Type
- Owner's manual
This manual is also suitable for

wvvw.GEAppliances.com
Safety Instruc_tions ....... 2-4
Operating Instructions
Control Panel ............ 5, 6
Control Settings ............ 7
Features ................. 8, 9
I,oading and Using
the D_yer . ................ 11
Reversing the Door. ........ 10
Venting the D_yer .......... 12
Troubleshooting Tips... 13, 14
Consumer Support
Consumer Support . . Back Cover
Warranty ................. 15
DBLR3 33
DBSR453
DBXR463
DHDSR45
DJXR 4 _3
DLSR483
DRSR48 3
DS4500
DVLR223
D WSR483
D WXR48 3
DX2300
DX4500
EED 4500
E(;D4500
Write the model and serial
numbers here:
Model #
Serial #
You can find them on a label
on the fl'ont ot the (hwer behind
the doo_:
500A277P053 175D1807P469 49-90200-1 06-04 JR

IMPORTANTSAFETYINFORMATION.
READALLINSTRUCTIONSBEFOREUSING.
WARNING!
For your safety, the information in this manual must be followed to minimize the risk of fire
or explosion, electric shock, or to prevent property damage, personal injury, or death.
• Do notstoreorusegasoline or other
flammable vaporsand liquidsin the
vicinityofthis or anyotherappliance.
• Installationandservicemust be
performedbya qualifiedinstaller,
service agency orthegassupplier.
WHATTODOIF YOUSMELLGAS:
[] Do nottrytolight a match,orcigarette,or
turnonanygasor electrical appliance.
[] Do nottouchanyelectrical switch;
do notuseany phone in yourbuilding.
[] Cleartheroom,buildingor area ofall
occupants.
[] Immediately call yourgassupplier from
a neighbor'sphone.Follow the gas
supplier'sinstructionscarefully.
[] ff youcannot reach yourgassupplier,
call the fire department
Cafifomia Safe Drinking Water and ToxicEnforcement Act
This act requires tile governor (ff (;alifornia to publish a list (ff substances known to tile state to cause
cancei; birth deli_cts or other reproductive hahn and requires 1)usinesses to warn custolnei_ of potential
eXl)OS/lI'e tO Stlch s/Ibst_lnces.
Gas api)liances can cause ininor exposure to four (ff these substances, nanlely benzene, carbon n_onoxide,
fimnaldehyde and soot, caused i)iilnalily by tile ii_cOlni)lem cond)ustion of natural gas or I,P fimls.
Properly a_!justed dryei_ will nfilfimize ii_comi)lete combustion. Exposure to these substances can be
nfilfilnized flu'ther b)' i)roperly venting the dryer to the outdooi_.
%
PROPERINSTALLATION
This dryer must be properly installed and located in accordance with the Installation Instructions
before it is used. If you did not receive an Installation Instructions sheet, you can receive one by
visiting GEAppliances.com, or by calling 800.GE.CARES(800.432.2737).
• Prol)erlv, ,gr°und (ha'er to confimn with all
governing codes and ordinances. Follow details
in Installation Instructions.
• Install or store where it will not be exposed to
temperatures below fl'eezing or exposed to the
weathei; which could cause i)elmanent dalnage
and invalidate tile warranty.
• Colmect to a i)ropelty rated, protecmd and sized
power supi)ly circuit to avoid electrical overload.
• Remove all shin 1) packing imms and dispose of
all shiI)I)ing inaterials propelt>
Exhaust/Ducting
[]Gas dr}e_ MUSTbe exhausted to tile outside.
]Use onl} rigid metal 4" dianleter ductwork
inside tile dryer cabinet. Use ()ill) rigid inetal
or flexible inetal 4" dialneter ductwork fin"
exhausting to the outside. USE OFPLASTIC OR
OTHERCOMBUSTIBLEDUCTWORK CAN CAUSE
A FIRE.PUNCTURED DUCTWORK CAN CAUSEA
FIREIF IT COLLAPSESORBECOMES OTHERWISE
RESTRICTEDIN USE ORDURING INSTALLATION.
For complete details, fi)llow tile Installation
]llstrtlctions,

wvvw.GEAppliances.com
A WARNING'!
YOUflLAUNDflYAflEA
• Keep the area underneath and around your
appliances flee of combustfl)le materials
(lint, paper; rags, etc.), gasoline, chemicals and
other flammable \:q)ors and liquids.
• Nee I) the floor arotmd your appliances clean
and (hw to reduce the possibili F of slipping.
• Close supervision is necessm T if this appliance is
used bv or near chiMren. Do not allow children
to play on, with or inside this or anv other
appliance.
• Kee I) all latmch_' aids (such as detergents,
bleaches, etc.) out of the reach (ff children,
preferably in a locked cabinet. Observe all
warnings on container labels to avoid iqjm T.
• Never climb on or stand on the (hTer top.
WHENUSINGYOUflDflYEfl
• Never reach into the dryer while the drum is
moving. Before loading, mfloading or adding
clothes, wait tmtil the drum has completely
stopped.
• Clean the lint filter before each load to prevent
lint accumulation inside the d_wer or in the
room. O0 NOT OPERATETHEORYERWITHOUT
THELINT FILTERIN PLACE.
• Do not wash or (hy articles that have been
cleaned in, washed in, soaked in or spotted
with combustible or explosive substances (such as
wax, oil, paint, gasoline, degreasers, dry-cleaning
solvents, kerosene, etc.) which may ignite or
explode. Do not add these substances to the
wash watei: Do not use or place these substances
arotmd yore" washer or (hTer dining operation.
• Do not place items exposed to cooking oils in
your (hwe_: Items contaminated with cooking oils
may contribute to a chemical reaction that could
cause a clothes load to catch fire,
• Anv article on which you have used a cleaning
solvent or that contains flammable materials
(such as cleaning cloths, mops, rowels used in
beaut}, sahms, restaurants or barber shops, etc.)
must not be placed in or near the chwer until
solvents or flammable materials have been
removed. There are many highly flammable
items used in homes such as acetone, denatured
alcohol, gasoline, kerosene, some household
cleaners, SOllle spot relllOVei's, ttli'pentines,
waxes, wax removers and products containing
petroleum distillams.
• The latmdt T process can reduce the flame
retardancv oflhbrics. To avoid such a result,
carefifllv tollow the gmment malmfi_cturer's
care instrtlctions.
• Do not dry articles containing rubbe_; plastic
or similar materials such as padded bras, tennis
shoes, galoshes, bath mats, rugs, bibs, baby pants,
plastic bags, pillows, etc. that nlav melt or btlrn.
Some rubber materials, when heated, can trader
certain circumstances produce fire by
Sl)On[;l nee/is coiilb/istion.
• Do not store plastic, paper or clothing that may
bm'n or melt on top of the dryer dining
ol)eration.
• Gam_ents labeled OryAway from Heater Do Not
Tumble Dry (such as life jackets containing ICaq_ok)
must not be put in your dryer
• Do not (hT fiberglass articles in wmr dryer:
Skin irritation could result ti'om the remaining
particles that may be picked up by clothing
dtllJng stlbseqtlent dryer rises.
• To minimize the possibility of electric shock,
mq)lug this appliance fi'om the power SUl)ply
or discom_ect the (hwer at the household
distribution panel b)' removing the fllse or
switching off the circuit breaker befin'e
attempting any maintenance or cleaning
(except the removal and cleaning of the lint
filter).NOTE:Turningthe Cycle Selector knob
to an off position or pressing PAUSE does NOT
disc(mnect the appliance ti'om the power SUl)ply.
3

IMPORTANTSAFETYINFORMATION.
READALLINSTRUCTIONSBEFOREUSING.
WARNING!
WHENUSINGYOURDRYER(cont.)
• Never attempt to operate this appliance if it is
damaged, malfimcfioning, partially disassembled,
or has missing or broken parts, including a
damaged cord or plug.
• The interior of the machine and the exhaust
duct connection inside the dr)'er should be
cleaned at least once a year b)' a qualified
technidan. See the Loading and Using the Dlyer
section.
If yotus is a gas (hTe_, it is equipped with an
automatic electric ignition and does not have
a pilot light. DO NOTATTEMPTTOLIGHTWITH
A MATCH. Burns may result fl'om having your
hand in the viciniP,' oI the burner when the
• You may Msh to soften yore" laundered tid)rics
or reduce the static electricity in them, by using
a dryei_applied tid)ric softener or an and-static
condifione_; We recommend you use either a
lid)tic softener in the wash cycle, according to
the mantfli_cmrer's instructions fi)r those
products, or try a chTe>added product fin.
which the manttfi_cttu'er gives written asstmmce
on the package that their product can be satelv
used in your drvei: Service or perlimnance
problems caused by use of these products are
the responsibili_' of the manufi_cmre_s of those
pI'odtlcts and aye not coveYed tinder the v¢;li'i';inw
to this appliance.
atltOi/latic i_nition ttlYns on,
WHENNOTUSINGYOURDRYER
• (;rasp the plug firefly when disconnecting this
appliance to avoid damage to the cord while
pulling. Place the cord away fi'om traffic areas
so it will not be stepped on, tripped over or
subjected to damage.
Do not attempt to repair or replace any part of
this appliance or attempt m V servicing unless
spedfically recommended in this Owner's Manual
or in pul)lished usePrepair instructions that w_u
trade,stand and have the skills to carry (>ut.
• gefln'e discarding a (hTe_; or removing it fl'om
service, remove the dryer door to prevent
children ti'om hiding inside.
• Do not tamper with controls.
READANDFOLLOWTHISSAFETYINFORMATIONCAREFULLY.
SAVETHESEINSTRUCTIONS
4

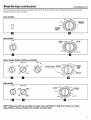
Aboutthedryercontrolpanel ._.,4,,,a.ces.com
Youcan locate your model number on the label on the front of the dryer behind the door. Throughout this manual, features and
appearance may vary from your model
Model DVLR223
80 MIN
START
©
D D
MEDIUM HEAT
Model DX2300
START
ST_
D
88MIN
;oo;o_s.... i;_;_;_i'iiiii1
TIMED DRY
Models DS4500, DBSR453, DBXR463 and DHDSR45
START
START
FABRIC CARE
¢_TONS EASYCARE
El ri
SIGNAL ,_ • MO_EOrt
. ............ i!i!iii
o_:: _o_ - Optlonalfeatures _
(on some models) ..... I
_z
Model DX4500
START FABRIC CARE
LESSE
AUTOMATIC
START COTTONS PERM PRESS COTTONS
MORE DRY
MORE DRY
ESS DRY AUTOMATIC
PERMANENT
COOL PRESS
DOWN
N0 HEAT OELICATES
LOW HEAT TIMED DRY
0EWRtORLE iO
DAMP DRY 40 S0
B ii Ig
NOTE:Drying times will vary according to the type of heat used (Electric, Natural or LPgas), size of load,
typesof fabrics, wetness of clothes and condition of exhaust ducts.
5

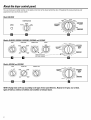
Aboutthedryercontrolpanel
Youcan locate your model number on the label on the front of the dryer behind the door. Throughout this manual, features and
appearance may vary from your model
Model DBLR333
TEMPERATURE
MEDIUM
START
F_h _ _r_i AUTOMATIC
©
D n
lo
20
30
40 50
AUTOMATIC
Models DJXR433, DRSR483, DWSR483, DWXR483 and DLSR483
START FABRIC CARE WRINKLE CARE SIGNAL
STAI_T
AUrOM_nC
2Q .......
AOrOM_C OEUVRES
%VS
Optional features ................... ->_ .......
D_eo_y_ _o _ eo
(on some models)
Models EED4500and EGD4500
START FABRIC CARE
STAI_T
WRINKLE CARE
C_TOmS EASyCA_E
F TES
_H_T _WH_T
NOTE:Drying times will vary according to the type of heat used (Electric, Natural or LPgas), size of load,
typesof fabrics, wetness of clothes and condition of exhaust ducts.

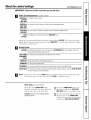
Aboutthe controlsettings, www.GEAppliances.com
IMPORTANT'.Clean the lint filter each time you use the dryer.
Fabric Care/Temperature (on some models)
Tr ttT s
COTTONS
REG.HEAT
MEDIUMor Forsynthetics,blends,delicatesanditemslabeledpermanentpress.
EASYCARE
MED.HEAT
DELICATESOnsomemodels.Fordelicates,syntheticsanditemslabeledtumbledrylow
LOWHEAT
FLUFFForfluffingitemswithoutheat.Usethe TIMEDDRYcycle.
NOHEAT
Automatic cx cles automatically detemfine rid)tic (h'vness. Select LESSDRY if you want votu" clothes
slightly, , (lamp at the end of the (h'vin, _, cycle, Select MOREDRYifyou want them to feel (h_ie_: Timed
cxcles run fi)r a selected time.
El
Drying Cycles
COTTONSForcottonsandmostlinens.FormostloadsselectOPTIMUMDRY(onsomemodels)orselectthe
PreferredRegularSettingmarkedwithan*.
EASYCARE/ Forwrinkle-free,permanentpressanddelicateitems,andknits.
PERMANENT
PRESS
TIMEDDRY SettheCycleSelectoratthedesireddryingtime.
DAMPDRY Forleavingitemspartiallydamp.
DEWRINKLEForremovingwrinklesfromitemsthatarecleananddryorthatareverylightlydamp.
QUICKFLUFFForfresheningorfluffingupalreadyd_/clothing,fabrics,linensandpillows.Usewith FLUFFNOHEAT
Provides10minutesofnoheattumbling.
Start Close the (h_,'er (loo_: Select START 0 )enin*, the door (lucin*, opera, don will stop the dryer.
To restart the dryer, close the door and select STARTto complete the cxcle.
Color Logic (on some models)
Select the correct FABRICCAREsetfing.
Match the partictflar color belo_ the words
with the same color on the Cycle Dial.
Example:Dryinga load ofclothing labeled
permanentpress.
[_ Choose the FABRIC CARE setting--tOt
this load it would be the EASYCARE
MED. HEAT (_dfich is a l)aificular color).
r-_ Turn the Cycle Dial to the area that has
the same color as the FABRICCARE
setting )ou haxe chosen--for this load it
_otfld be the EASYCAREAUTOMATIC.

Aboutthe dryerfeatures.
WRINKLE CARE Wrinkle Care Option (on some models)
Use this option to minimize the wrinkles
in clothes. It provides aI)I)ro_mamly
15 minutes of no-heat rambling after
the clothes are dry.
This option can OlflVbe used with the
COTTONSand EASYCAREc_cles.
If wm are using the CYCLESIGNAL knob
and wm select the WRINKLE CAREoption,
a signal will sotlnd at the end _ff the drying
time and several times during the WRINKLE
CAREcvcle. This will remind you that it is
time to remove the clothes.
If WRINKLE CAREis not on, the (h_er will
stop once the timer reaches the WRINKLE
CAREmark on the cycle dial.
SIGNAL
MEDIUM
Cycle Signal Option (on somemodels)
This signal will SOtlndjtlst before the end
_ff the cycle to remind you to remove the
clothes. On some models the signal sotmd
level cmmot be a(!iusted.
If you selected the WRINKLE CAREoption,
the signal will sotmd at the end (ff the
(hTing time and will sotmd several times
during the WRINKLECAREcycle. This will
remind you that it is time to remove the
clothes.
NOTE:
• Remove garments promptly at the sound
of the signal Place clothes on hangers so
wrinkles won't set in.
• Usethe Cycle Signal especially when
drying fabrics like polyester knits and
permanent press. These fabrics should
be removed so wrinkles won't set in.
Automatic Cycle Signal (onsome models)
At the end el each cycle, there is A reminder signal will sotmd periodically
approximately 15 minutes of no-heat dm_ing this time to remind wm to remove
tumbling alter the latmdrv is drx: the latmdrx:

www.GEAppliances.com
Drum Lamp (on some models)
Befi)re replacing the light bulb, be sure to
unl)lug the (hTer power cord or disconnect
the dryer at the household distribution
panel by removing the fllse or switching
off the circuit breaker. Reach above dryer
opening fl'om inside the druln. Remove the
bulb and replace with the same size bulb.
Drying Rack (on some models)
A handy dr)ing rack may be used for drying
delicate items such as washable swearers.
Hook the rack over the lint filter so the rack
extends into the (hwer drum.
NOTE"
• Thedryingrackmustbeusedwiththe
TIMEDCYCLE
• Do not use this dryingrack when there
are other clothes in the dryer.
Stainless Steel Drum (onsome models)
The stainless steel used to make the
dryer drum provides the highest reliabilib'
available in a GE (lI')'eI; If the (hTer drum
should be scratched or dented dtmng
nomml use, the drum will not rust or
corrode. These surfi_ce blemishes will
not altect the flmction or din'ability of
the drum.

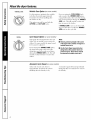
Aboutreversingthedoor.
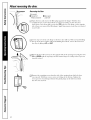
Reversing the Door
Toolsneeded
• Standard#2 • Tape-tipped
Phillipsscrewdriver pun knife
_] (-)pen the door and remove the filler plugs opposite tile hinges. _4"ith the door
c()mpletely open, remo_e tile bottom screw fl'om each hinge on tile dryer fi_ce.
]nse_l these screws about halfway into tile TOP holes, fiw each hin_,e on tile opposite
side (where you remoxed tile filler plugs). App1) tim/pressure to _(,et tile screw started
in new holes.
[_I,oosen top screw fl'om each hinge on tile dryer ti_ce half wax'. _Mth one hand holding
tile top of tile door and tile other hand hold'ing tile bottoml remo;e tile door fl'om '
tile (h_er b) lifiing it UP and OUT
_] Rotate tile door 180 °. Insert it on tile opposite side of tile opening b) moving tile door
/Nand DOWN until tile top hinge and tile bottoin hinge are resting on tile top screws
inserted in step 1.
/\
\
Remove tile remaining screws fl'om tile side of tile o _enin_, fl'om which tile door
[] WaS relllo_,ed. With these screws, sec/li'e each hinge _It tile i_ottoi_l. Tighten tile
two top screws of each hinge Reinse_t tile plastic plugs on tile side from which
tile door was i'eillo_,ed,
10

Loadingand usingthedryer.
Always follow the fabric manufacturer's care label when laundering. wvvw.GEAppliances.com
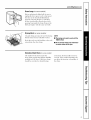
SortingandLoadingHints
_s a general rule, if clothes are sorted properly for
the washe_; they are sorted properly tor the dryer:
Do not add fabricsoftener sheetsonce the loadhas
becomewarm. Theymaycausefabricsoftenerstains.
Bounce®FabricConditionerDryerSheetshave been
approvedfor useinaft GEDryerswhen usedin
accordancewith the manufacturer#instructions.
Donotoverload.Thiswastesenergyandcauseswrinkhbg.
Donotdrythefollowingitems:f/7)erg/assitems,woolens,
rubber-coateditems,plastics,itemswithplastictnmand
foam-filleditems.
CareandCleanh)gof theDryer
The Exterior:Wipe or dust any spills or washing
compomMs with a damp ch)th. Dryer control
panel and finishes may be damaged by some
latmdry pretreannent soil and st;fin remover
products. Apply these products away ti'om the (h'ye_:
Tile ti_bfic may then be washed and dried nommllv:
Damage to yore" (h)'er caused by these products is
not covered bv VO/li"_%'_lI'I'}lIllA/.
The tintRIter: Clean the lint filter befi)re each
use. Moisten p)ur finge_ and reach into the filter
opening. Rml yore" finge_ across tile filte_, Hme a
qualified technician vactltlill the lint ti'om the dryer
once a veaE
Stainless Steel:To clean stainless steel surfi_ces,
use a damp cloth with a mild, non-abrasive
cleaner suitable for stainless steel sudhces.
Remove the cleaner residue, and then dry
with a clean cloth.
TheExhaust Duct:Inspect and clean the exhaust
ducting at least once a year m prevent clogging.
A partially clogged exhaust can lengthen the
(hying time.
Follow these steps:
[_ Tm'n off electrical supply b} dis(onnecting the
i)lug ti'om the wall socket.
_ Disc(mnect the duct fl'om the (ha'e_:
_ Vac[l[li//the duct with the hose attachment and
rec(mnect the duct.
TheExhaustHood:Check fl'om the outside that the
flails _ffthe hood move fl'eely when operating. Make
sm'e that there is no wildlite (birds, insects, etc.)
nesting inside the duct or hood.
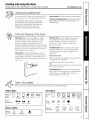
FabricCareLabels
Below are fi_bric care label "symbols" that affect the clothing you will be latmdering.
WASH LABELS
Machine
wash
cycle
=
Normal Permanent Press/ Gentle/ Do not wash I?onot wring
wrinkle resistant de_[cate }land wash
Water
temperature
000 O0 •
Hot Warm Cold/cool
150°0/12UFI 1_0°0/105FI 130_0_5_FI
BLEACHLABELS
Bleach A
symbols Anvh_o_,,_,
(when neededl
Only non-cNodne Neaeh Do not bleach
(when needed}
DRYLABELS
dr_ oooot_,v
Dry Normal Permanent Press/ Gentle/ Do not tumble dry {_sed with
wrinkle r esistant delicate do notwash}
,eat ® ®
setting
High Medium Low No beat/air
Line dry/ Drip dry Dryflat Inthe shade
hangtodry
11

Loadingand usingthedryer.
Always follow the fabric manufacturer's care label when laundering.
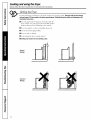
VentingtheDryer
For the best drying perfom_an(e, the chTer needs to be properly vented. The dryer will use more energy
andrunlongerif it is not ventedtothe belowspecifications. CarefullyfollowthedetailsonExhaustingin the
InstallationInstructions.
• Use only rigid metal 4" diameter (luctwork inside the
(hTer cabinet, Use only rigid metal or flexible metal 4"
diameter ductwork fi)r exhausting to the outside.
• Do not use plastic or other combustible ductwork.
• Use the shortest length possible,
• Do not crush or collapse.
• Avoid resting the duct on shaq) objects.
• Venting must conform to local building codes.
Correct
Venting
I
Incorrect
Venting
12

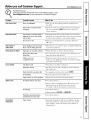
Beforeyoucall CustomerSupport... www.GEAppliances.com
Troubleshooting tips
Save time and money/.Review the charts on the following pages, or vis#
www.GEApplianees.eom. Youmay not need to call Customer Support.
Problem Possible Causes What ToDo
Dryer doesn't start Dryer is tmplugged • Make sure tile (hyer plug is pushed completely into
tile outlet.
Fuse is blmm/circuit breaker * Check tile house fllse/circuit breaker box and replace
is tripped fi/se or reset breakei: NOTE:Most electric drvei_ use
2 filses/breakei_.
Dryer doesn't heat Fuse is blown/circuit breaker is * Check tile house fllse/circuit breaker box and replace
tripped; the dryer may tumble both fllses or reset both breakei_. Your dr_er ina_ tulnble
but not heat if only one filse is blown or one breaker tripped.
Gas service is off * Make sure gas shutoff at (hTer and ulain shutoff are
flllly open.
Dryer shakes or Some shaking/noise is normal. * Move dryer to an even floor space, or a(!itIst leveling legs
makesnoise Dryer may be sitting unevenly as necessarx until exert.
Greasy spots on clothes Improper use of fabric softener * Foll_w directions on tid)ric softener package.
Drying dirty items with * Use w_ur (hyer to dry only clean itelns. Di m' items can
clean ones stain clean itelns and tile drveI:
Clothes were not * Souletil//es stains which cannot be seen when tile
completely cleml clothes are wet appearafler dITing. Use proper washing
procedures before drying.
Linton clothes Lint Filter is full * (_lean lint screen befi)re each load.
Improper sorting * Sort lint producei_ (like chelfille) ti'oln lint collectoi_
(like corduroy).
Static electricity cml attract lint * See suggestions in this section under STATIC.
Overloading • Separate large loads into smaller ones.
Paper, tissue, etc. left in pockets • Empty all pockets before laundering clothes.
Static occurs No fabric softener was used * Tl_' a lid)tic sottener.
• Bounce': Fabric (_onditioner Dryer Sheets have been
approved fin" tlse ill all (;E Dr)'eI_ when tlsed ill
accordance with tile ulamdhcturer's ii_structions.
Overdxying • Try a tid)ric softener.
• A(!i ust setting to LESSDRYor DAMPDRY.
Synthetics, permanent press • Tl_' a lid)rio sottener.
and blends cm_ cause static
Inconsistent Type of heat • Automatic dIying tilnes will \m T according to tile bl)e
drying times of heat used (electric, imtural or I,P gas), size of load,
b'pes _ff rid)tics, wetness of clothes and condition _ff
exhaust ducts.
/3

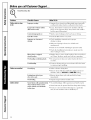
Beforeyoucall CustomerSupport...
q Troubleshooting tips
Problem Possible Causes What To Do
Clothes take too long Improper sorting * Separate heavy items ti'om lightweight items (generally,
to dry a well-sorted washer load is a well-sorted dryer load).
Large loads of heavy fabrics * im'ge heavv fabrics contain more moisture and take
(like beach towels) longer to dxT, Sepax'ate laxge, heavv lid)tics into sxnaller
loads to speed dxTing fixne.
Controls hnproperly set * Match control settings to tile load you are drvin *
Lint filter is full * Clean lint filter before evei'v load.
Improper or obstructed
ducthag
• Check installation instructions fin" proper
ducting/venting.
• Make sure ducting is clean, ti'ee ot kinks and
mlobstructed.
• Check to see if outside wall dmni)er operates easiE:
• Check the Installation Insmmtions to make sure the
dryer venting is correct.
Blown fuses or tripped * Replace fllses or reset circuit breakei_. Since most dlwei_
circuit breaker use 2 fllses/breakei_, inake sure both are operating.
OverloadJng/combhlhag loads * Do not put inore than ()lie washer load in tile dryer
at a tilne.
UnderloadJng * If you are dlying only one or two itelns, add a tew itelns
to ensure l)roper tulnbling.
Clothesare wrinkled Overdxying * Select a shorter (li3,illg dine.
• Relnove itelns while they still hold a slight alnount of
inoismre. Select a LESSDRYor DAMP DRg setting.
Letting items sit ha dryer • Ren/ove items when cycle ends and fi_l/l or hang
after cycle ends ilmnediatelv.
Overloading • Separate large loads into slnaller ones.
Clothes shrink Some fabrics will naturally shrink • To axoid shrinkage, tollow gmment care labels exactly.
when washed. Others cma be • Seine itelns Ina) be pressed back into shape after drvin ,
safely washed, but will shrink
ha the dryer • If you are concerned about shlJnkage in a i)articular
iteln, do not inachine wash or ttunble dry it.
14

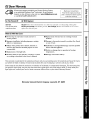
GEDryer Warranty.
All warranty support provided by our Factory Service Centers,
or an authorized Customer Care® technician. Toget Customer
Support, on-line, 24 hours a day, visit us at www.GEAppliances.com,
or call 800.GE.CARES(800.432.2737).
Staple your receipt here. I
Proofof the origbal purchase I
date is needed to obtain support
under the warrant}4
For The Period Of." GEWill Replace:
OneYear
Fromthedate ofthe
originalpurchase
Anypartof the dryer which fifils due to a defect in materials or workmanship, During this
full one-year watran#], GE will also proxkle, free of charge, all labor and related serxice costs to
replace the defecfixe part,
What GE Will Not Cover:
• Service trips to your home to teach you how to
use the product.
• Improper installation (including improper venting),
delivery or maJntenmlce.
• Failure of the product if it is abused, misused, or
used for other thaa_ the intended purpose or used
commercially.
• Replacement of the light bulb.
• Products which axe not defective or broken, or which
axe working as described in the Owner's Mmmal.
• Replacement of house fuses or resetting of circuit
breakers.
• Dmnage to the product caused by accident, fire, floods
or acts of God.
• Incidental or consequentiaJ dmnage caused by possible
defects with this applim_ce.
• Defects or dmnage due to operation in freezing
temperatures.
• Dmnage caused after delivery.
This warranty is extended to the original purchaser and any succeeding owner for products purchased for home
use within the USA. In Alaska, the warranty excludes the cost of shipping or service calls to your home.
Some states do not allow the exclusion or limitation of incidental or consequential damages. This warranty gives
you specific legal rights, and you may also have other rights which vary from state to state. Toknow what your
legal rights are, consult your local or state consumer affairs office or your state's Attorney General
Warrantor: General Electric Company.Louisville, KY 40225
15

ConsumerSupport.
GEAppliancesWebsite www.GEAppliances.com
Have a ques0on or need assistance with your appliance? Try the GE Appliances Website 24 hom_ a day,
any day of the year! For greater convenience and faster selMce, you can now download Owner's Manuals,
order parts, cat;dogs, or even schedule service ondine. You can also "_sk Our Team of EN)erts .....
yotlr qtlestions, and so II/rich II/ore...
CustomerSupport www.GEAppliances.com
Expert GE assistance is onl) a click away. Visit our On-line Technical SUl)port 24 hour5 a day, or call at your
con;enience 24 hours any day of the xear! Or call 800.GE.CARES (800.432.2737) during nomml business
hotlI3.
RealLifeDesignStudio www.GEAppliances.com
GE SUl)ports the ILrni\'e_al Design concept--l)roducts, services and environments that can be used by
people ot all ages, sizes and capabiliOes. X,Verecognize the need to design tot a wide range ot ph}:sical and
mental abili0es and impaimlents. For details of GE's Universal Design applications, including kitchen
design ideas fin" people with disabilities, check out our X,Vebsite today. For the hearing impaired, please call
800.TDD.GEAC (800.833.4322).
ExtendedWarranties www.GEAppliances.com
Purchase a (;E extended warrant_ and learn about special discounts that are axailable while _our warrant_
is still ill effect. Yell can purchase it on-line an}0nle, or call 800.626.2224 dulJng nolinal business houi_.
(;E (_onsumer Home Serxices will still be there after }our warrant}, expires.
PartsandAccessories www.GEAppliances.com
Individuals qualified to service their own appliances can have parts or accessories sent directly to their
homes (VISA, MasterCard and Discover cards are accepted). Order on-line toda 5 24 hou_ every day or
by phone at 800.626.2002 during nomml business hou_.
Instructions contained in this manual cover procedures tobe performed byany user. Other servicing generally
should be referred to qualified service personnel. Cautionmust be exercised, since improper servicing may cause
unsafe operation.
ContactUs www.GEAppliances.com
If you are not sa0sfied with the service you receive from GE, contact us on our _'ebsite with all the details
including your phone ntlIllbeI; oI" write to: General Manager; Customer Rela0ons
GE Appliances, Appliance Park
I,ouisville, KY 40225
RegisterYourAppliance www.GEAppliances.com
Register your new applim_ce on-lhae--at your convenience! Timelx, I_r°(luct registra0on, will allow fin"
enhanced communica0on and prompt service under the temls of your warranty, should the need arise.
You mm also mail in the pre-printed registra0on card included in the I)ackin'"_ material.
Printed in Canada
-
 1
1
-
 2
2
-
 3
3
-
 4
4
-
 5
5
-
 6
6
-
 7
7
-
 8
8
-
 9
9
-
 10
10
-
 11
11
-
 12
12
-
 13
13
-
 14
14
-
 15
15
-
 16
16


GE DVLR223EE0WW Owner's manual
- Category
- Tumble dryers
- Type
- Owner's manual
- This manual is also suitable for
Ask a question and I''ll find the answer in the document
Finding information in a document is now easier with AI
Related papers
Other documents
-
 GE Monogram Clothes Dryer 49-90152-1 User manual
-
Hotpoint NVLR333EE2WW Owner's manual
-
-
-
ResMed EasyCare Tx 2 User guide
-
-
AMERICANA A4425GDTAWW Owner's manual
-
Hotpoint VWSR4150DCWW Owner's manual
-
-
