Page is loading ...

- 1 -
CARBON MONOXIDE DETECTOR
ZETA 200 CO
USER’S MANUAL
PLEASE READ THESE INSTRUCTIONS BEFORE INSTALLING OPERATING
THE CO ALARM
INTRODUCTION
This Carbon Monoxide Detector is effective for detecting any
buildup of carbon monoxide, also known as CO gas, in your home
or office. The features of your CO gas detector includes:
(1) Easy to install.
(2) Monitoring for carbon monoxide in a continuous manner.
(3) Giving a loud alarm (85 dB) when it detects a buildup of carbon
monoxide.
(4) Having a Test button for you to test the detector anytime.
(5) Self-testing its operative function continuously.
(6) Complying the requirements of EN Standard 50291.
(7) Offering a 5-year warranty for the carbon monoxide sensing unit
YOU SHOULD KNOW ABOUT CARBON MONOXIDE
Carbon monoxide, also known as "CO" by the chemical form, is
considered to be a highly dangerous poisonous gas, because it is
colorless, odorless or tasteless and very toxic. In general,
biochemistry phenomena have shown that the presence of CO gas
inhibits the blood's capacity to transport oxygen throughout the
body, which can eventually lead to brain damage.
In any enclosed space (home, office, recreational vehicle or boat)
even a small accumulation of CO gas can be quite dangerous.
Although many products of combustion can cause discomfort and
adverse health effects, it is CO gas which presents the greatest
threat to life.
Carbon monoxide is produced by the incomplete combustion of
fuels such as natural gas, propane, heating oil, kerosene, coal,
charcoal, gasoline, or wood. The incomplete combustion of fuel can
occur in any device which depends on burning for energy or heat
such as furnaces, boilers, room heaters, hot water heaters, stoves,
grills, and in any gasoline powered vehicle or engine (e.g.
generator set, lawnmower). Tobacco smoke also adds CO to the air
you breathe.
When properly installed and maintained, your natural gas furnace
and hot water heater do not pollute your air space with CO. Natural
gas is known as a "clean burning" fuel because under correct
operating conditions, the combustion products are water vapor and
carbon dioxide (CO
2
), which is not toxic. The products of
combustion are exhausted from furnaces and water heaters to the
outside by means of a fuel duct or chimney.
Correct operation of any burning equipment requires two key
conditions:
(a) An adequate supply of air for complete combustion.
(b) Proper venting of the products of combustion from the
furnace through the chimney, vent or duct to the outside.
Typical carbon monoxide gas problems are summarized here:
(a) Equipment problems, due to defects, poor maintenance,
damaged and cracked heat exchangers
(b) Collapsed or blocked chimneys or flues, dislodged,
disconnected or damaged vents
(c) Downdraft in chimneys or flues. This can be caused by very
long or circuitous flue runs, improper location of flue
exhaust or wind conditions
(d) Improper installation or operation of equipment, chimney or
vents
(e) Air tightness of house envelop/inadequate combustion of
air
(f) Inadequate exhaust of space heaters or appliances
(g) Exhaust ventilation/fireplace competing for air supply
Potential sources of carbon monoxide in your home or office
include clogged chimney, wood stove, wood or gas fireplace,
automobile and garage, gas water heater, gas appliance, gas or
kerosene heater, gas or oil furnace, and cigarette smoke.
POSSIBLE SYMPTOMS OF CARBON MONOXIDE
POISONING
Carbon monoxide is colorless, odorless, tasteless, and very toxic.
When inhaled, it produces an effect known as chemical
asphyxiation. Injury is due to the combining of CO with the available
hemoglobin in the blood, lowering the oxygen-carrying capacity of
the blood. In the presence of CO gas, the body is quickly affected
by oxygen starvation.
The following symptoms are related to CO poisoning and should be
discussed with all members of the household so that you know
what to look for:
(a) Extreme exposure: unconsciousness, convulsions, cardio
respiratory failure, death
(b) Medium exposure: severe throbbing headache, drowsiness,
confusion, vomiting, fast heart rate
(c) Mild exposure: slight headache, nausea, fatigue (similar to
"flu-like" symptoms)
Young children and household pets may be the first affected.
Exposure during sleep is particularly dangerous, because the victim
usually does not awaken.
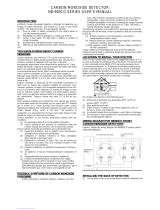
LOCATIONS TO INSTALL YOUR DETECTOR
Since CO gas moves freely in the air, the suggested location is in
or as near as possible to sleeping areas of the home. The human
body is most vulnerable to the effects of CO gas during sleeping
hours. For maximum protection, a CO detector should be located
outside primary sleeping areas or on each level of your home. In
the figure below, are suggested locations in the home. The
electronic sensor detects carbon monoxide, measures the
concentration and sounds a loud alarm before a potentially harmful
level is reached.
Do not place the detector in the following areas:
(a) Where the temperature may drop below 40
o
F (4.4
o
C) or
exceed 100
o
F (37.8
o
C)
(b) Near paint thinner fumes
(c) Within 5 feet (1.5 meter) of open flame appliances such as
furnaces, stoves and fireplaces

- 2 -
(d) In exhaust streams from gas engines, vents, flues or chimneys
(e) Do not place in close proximity to an automobile exhaust pipe;
this will damage the detector
INSTALLING YOUR DETECTOR
The Carbon Monoxide Detector is easy to install to protect you and
your family in your home, cottage, cabin and office.
The product can be installed flush mounted set into a wall/partition.
You will need the following tools to install the unit:
Drill with a 6mm bit
Phillips screwdrivers
The product is designed with the cables emerging from the bottom
of the unit.
Flush mounting
In order to flush mount the unit a suitable hole will needs to be cut
in the wall. This will need to be 150mm wide by 90mm high and a
minimum of 40mm deep. The power supply cabling and
connections for the Remote LED and relay (if used) will need to
come from behind or inside the wall. This will normally be via
conduit in solid wall or from inside the outer skin of a partition wall.
Once mounted in the hole in the wall, the unit can be secured to the
wall using the two screws provided (and if needed the raw plugs)
through the two holes either side of the base.
Figure 1 – Flush Mounting
Before connecting power ensure you have selected the correct
connection for either mains or DC installation, checking the label on
the product.
Feed the cables for the power (and, if used, the relay and Remote
LED) up from the underside of the base. The cables are then
secured using the cable clamps provide. The cable clamp can be
reversed to accommodate larger cables as shown.
Figure 2 Cable Clamps
Mains Powered Connect
CAUTION: ISOLATE THE MAINS BEFORE STARTING WORK
The detector should be wired to the mains supply via an
unswitched fused outlet to BS5733. The fuse should be rated at 3
Amps. The brown or red wire should be connected to the live
terminal shown L below and the blue or black wire should be
connected to the neutral terminal shown N. The earth terminal is
not required.
Figure 3 AC Supply Wiring
DC Powered Connect
The detector should be wired to the 12V or 24V supply with a fuse
rated at 3 Amps. The red wire should be connected to the terminal
shown below with a + (plus) sign and the black wire to the negative
terminal shown with a – (minus). Reversing the connections may
damage the product.
In caravans and motorhomes the detector should be connected to
the battery supply via the main switch. This will ensure operation
when the caravan is occupied. Permanent connection for prolonged
periods may cause a flat battery if the battery remains uncharged
Figure 4 DC Supply Wiring
HOW TO USE THE RELAY FACILITY
The relay provides a means of signalling an alarm condition to an
external warning device such as control panel or remote audible
buzzer. It can also be used to shut off a gas valve in the event of a
detected leak. The relay is a single pole changeover type that
allows contacts to be either open or closed when gas is detected.
Relay contacts can be wired in parallel to provide an alarm signal
when any of the units connected detect gas.
For the mains powered versions the relay contact is specified up to
240V @ 6A ac and for DC powered versions its is specified at 24V
@ 6A

- 3 -
Figure 5 Relay Wiring
TESTING AND RESETTING YOUR DETECTOR
A green power light indicates that power is supplied. To test the
detector (do not test when detector is at warm up mode), press the
test button and the detector will beep intermittently and the Yellow
Fault LED, Red Alarm LED will flash. Release the Test button, the
beep and the two LED will stop and green LED remains on.
A malfunctioning unit is indicated by beep-sounding twice within 4
Seconds and the Yellow Fault LED will flash. If this occurs, attempt
to disconnect the power supply to the unit for 10 seconds and then
power the unit again. Should the unit again beep intermittently, DO
NOT use this detector. Send the malfunctioning unit to the
manufacturer for servicing.
TAKING CARE OF YOUR DETECTOR
You have to maintain the detector frequently to ensure it working
properly. Few tips are provided for you to take care of your
detector:
(a) Use a vacuum cleaner to clean the air vents occasionally to
keep them free of dust. (Before cleaning your unit, unplug it
from the wall outlet or .)
(b) Push the Test button on your detector to test its operating
function once every week.
MEANINGS OF LED LIGHT & BUZZER
The LED light and buzzer turn on and/or off to indicate various
situations. There are four different light and buzzer operations:
(a) When the green LED is flashing, this situation means warm
up. This situation is occurs between detector just power on
and properly working.
(b) When the green LED remains on, this situation means
detector is working properly.
(c) When the red LED flashes and the full alarm sounds
sequentially, this situation means alarm.
(d) When the unit emits beeps twice within 4 seconds and orange
LED flashes, it indicates that the unit is malfunctioning. In
this case, the detector is needed to be returned to
manufacturer for repair or service.
Note: The Red Alarm LED and Yellow Fault LED flash every 0.5s
and buzzer beeps as the sequence that 3 beeps, pause, 3 beeps
pause, when you press the Test button.
Figure 6 Control Unit
ACTIONS TO TAKE WHEN ALARM SOUNDING
In case of harmful levels of CO gas being detected, your detector
will go into a continuous full alarm. Try to take the following
necessary actions immediately:
(a) If there is anyone experiencing the effects of carbon monoxide
poisoning such as headache, dizziness, nausea or other
flu-like symptoms, call your fire department right away or 911.
You should evacuate all the people in the premises
immediately. Do a head count to check that everybody is
accounted for.
(b) Do not re-enter the premises until the problem has been
corrected and the CO gas has been dispersed out and a safe
level is reached.
(c) If no symptoms exist, Immediately ventilate the home by
opening windows and doors. Turn off fuel burning appliances
and call a qualified technician or your utility company to
inspect and repair your problem before restarting appliances.
WARNING: Normally an activation of the detector indicates the
presence of CO gas. However, the CO gas can be extremely fatal,
if it is not detected. The source of the CO gas may come from
several possible situations, please refer to the list of sources of
carbon monoxide in page 1.
CAUTION: This detector will only indicate the presence of CO gas
at the sensor. However, you have to be aware that the CO gas may
be present in other areas in the premises.
ACTIONS TO TAKE AFTER THE PROBLEM BEING
CORRECTED
Once the problem about the CO gas presence in the premises has
been corrected, the alarm of the detector should be off. After
waiting for 10 minutes, push the Test button to test the detector so
that you can make sure that the detector is working properly again.
TECHNICAL INFORMATION
Zeta CO 200 Carbon Monoxide Detector is engineered to be able
to provide alarm sounds based on the EN standards due to various
exposure time at different level of carbon monoxide concentrations.
Specifications:
MAINS POWERED
Input Supply Voltage: 230V 50/60Hz.
Fuse Rating: 0.2Amps in unswitched fused outlet.
Power Consumption: less than 7 Watts.
DC POWERED
Input Supply Voltage: 9 to 28 Volts DC
Fuse Rating: 0.5Amps.
Power Consumption: less than 4 Watts.
ALL ALARMS

- 4 -
Temperature range: -10° to +40°C.
Sensitivity: 50ppm within 90 minutes
100ppm within 30 minutes
300ppm within 3 minutes
Audible Alarm Output: 85dB at 3m
All alarms are calibrated, tested and design to meet the stringent
performance requirements of the latest European standard for
domestic gas alarms - BS EN50291:2001
The Alarm is calibrated at the factory and does not need
recalibration. Do not tamper with the inside of the case or electric
shock or malfunction may occur.
No user maintenance or adjustment is required.
WARNING AND LIMITATION
This detector may not alarm at low carbon monoxide levels. The
Occupational Safety and Health Association (OSHA) has
established that continuous exposure levels of 30 ppm should not
be exceeded in an 8 hours period. Individuals with a medical
problem may consider more sensitive detection devices.
The CO gas detector is not suitable as a smoke or fire detector.
This detector is not suitable to install in a hazardous location, as
defined in the National Electrical Code.
This detector will not work without power. The Carbon Monoxide
Detector will not work if the power supply is disconnected or cut off
or remove the batteries for any reason. Additionally, carbon
monoxide must reach the detector for the proper performance of
CO gas detection.
Carbon monoxide detectors may wear out because they contain
electronic parts that fail at any time. Test your detector at least
every week (see the section "TESTING YOUR DETECTOR").
SERVICE OR REPAIR INFORMATION
For service or repair, return your Zeta CO 200 Carbon Monoxide
Detector intact, stating the reason for return and details of any
fault, to the distributor who supplied the product.
/