Page is loading ...


Digital Video Recorder
i
WARNING
RISK OF ELECTRIC SHOCK
DO NOT OPEN
WARNING: TO REDUCE THE RISK OF ELECTRIC SHOCK,
DO NOT REMOVE COVER (OR BACK).
NO USER-SERVICEABLE PARTS INSIDE.
REFER SERVICING TO QUALIFIED
SERVICE PERSONNEL.
The lightning flash with arrowhead symbol, within an equilateral triangle, is intended to alert
the user to the presence of uninsulated "dangerous voltage" within the product's enclosure
that may be of sufficient magnitude to constitute a risk of electric shock.
The exclamation point within an equilateral triangle is intended to alert the user to the presence
of important operating and maintenance (servicing) instructions in the literature accompanying
the appliance.
COMPLIANCE NOTICE OF FCC:
THIS EQUIPMENT HAS BEEN TESTED AND FOUND TO COMPLY WITH THE LIMITS FOR A CLASS A DIGITAL
DEVICE, PURSUANT TO PART 15 OF THE FCC RULES. THESE LIMITS ARE DESIGNED TO PROVIDE
REASONABLE PROTECTION AGAINST HARMFUL INTERFERENCE WHEN THE EQUIPMENT IS OPERATED IN
A COMMERCIAL ENVIRONMENT. THIS EQUIPMENT GENERATES, USES, AND CAN RADIATE RADIO
FREQUENCY ENERGY AND IF NOT INSTALLED AND USED IN ACCORDANCE WITH THE INSTRUCTION
MANUAL, MAY CAUSE HARMFUL INTERFERENCE TO RADIO COMMUNICATIONS. OPERATION OF THIS
EQUIPMENT IN A RESIDENTIAL AREA IS LIKELY TO CAUSE HARMFUL INTERFERENCE, IN WHICH CASE
USERS WILL BE REQUIRED TO CORRECT THE INTERFERENCE AT THEIR OWN EXPENSE.
WARNING: CHANGES OR MODIFICATIONS NOT EXPRESSLY APPROVED BY THE PARTY RESPONSIBLE
FOR COMPLIANCE COULD VOID THE USER’S AUTHORITY TO OPERATE THE EQUIPMENT.
THIS CLASS OF DIGITAL APPARATUS MEETS ALL REQUIREMENTS OF THE CANADIAN INTERFERENCE-
CAUSING EQUIPMENT REGULATIONS.
The information in this manual is believed to be accurate as of the date of publication. We are not responsible for any
problems resulting from the use thereof. The information contained herein is subject to change without notice. Revisions
or new editions to this publication may be issued to incorporate such changes.
The software included in this product contains some Open Sources. You may obtain the complete corresponding
source code from us. See the Open Source Guide on the software CD (OpenSourceGuide\OpenSourceGuide.pdf)
or as a printed document included along with the User's Manual.

User’s Manual
ii
Important Safeguards
1. Read Instructions
All the safety and operating instructions should be read before the
appliance is operated.
2. Keep Instructions
The safety and operating instructions should be kept for future
reference.
3. Cleaning
Unplug this equipment from the wall outlet before cleaning it. Do
not use liquid aerosol cleaners. Use a damp soft cloth for cleaning.
4. Attachments
Never add any attachments and/or equipment without the approval
of the manufacturer as such additions may result in the risk of fire,
electric shock or other personal injury.
5. Water and/or Moisture
Do not use this equipment near water or in contact with water.
6. Accessories
Do not place this equipment on an unstable cart, stand or table. The
equipment may fall, causing serious injury to a child or adult, and
serious damage to the equipment. Wall or shelf mounting should
follow the manufacturer's instructions, and should use a mounting
kit approved by the manufacturer.
This equipment and cart combination should be moved with care.
Quick stops, excessive force, and uneven surfaces may cause the
equipment and cart combination to overturn.
7. Ventilation
Slots and openings in the cabinet and the back or bottom are provided
for ventilation, and to ensure reliable operation of the equipment and
to protect it from overheating. These openings must not be blocked
or covered. Do not block these openings or allow them to be blocked
by placing the equipment on a bed, sofa, rug, or bookcase. Ensure that
there is adequate ventilation and that the manufacturer’s instructions
have been adhered to.
8. Power Sources
This equipment should be operated only from the type of power source
indicated on the marking label. If you are not sure of the type of
power, please consult your equipment dealer or local power company.
9. Power Cords
Operator or installer must remove power and other connections before
handling the equipment.
10. Lightning
For added protection for this equipment during a lightning storm,
or when it is left unattended and unused for long periods of time,
unplug it from the wall outlet and disconnect the antenna or cable
system. This will prevent damage to the equipment due to lightning
and power-line surges.
11. Overloading
Do not overload wall outlets and extension cords as this can result
in the risk of fire or electric shock.
12. Objects and Liquids
Never push objects of any kind through openings of this equipment
as they may touch dangerous voltage points or short out parts that
could result in a fire or electric shock. Never spill liquid of any kind
on the equipment.
13. Servicing
Do not attempt to service this equipment yourself. Refer all servicing
to qualified service personnel.
14. Damage requiring Service
Unplug this equipment from the wall outlet and refer servicing to
qualified service personnel under the following conditions:
A. When the power-supply cord or the plug has been damaged.
B. If liquid is spilled, or objects have fallen into the equipment.
C. If the equipment has been exposed to rain or water.
D. If the equipment does not operate normally by following the
operating instructions, adjust only those controls that are covered
by the operating instructions as an improper adjustment of other
controls may result in damage and will often require extensive work
by a qualified technician to restore the equipment to its normal
operation.
E. If the equipment has been dropped, or the cabinet damaged.
F. When the equipment exhibits a distinct change in performance —
this indicates a need for service.
15. Replacement Parts
When replacement parts are required, be sure the service technician
has used replacement parts specified by the manufacturer or that have
the same characteristics as the original part. Unauthorized substitutions
may result in fire, electric shock or other hazards.
16. Safety Check
Upon completion of any service or repairs to this equipment, ask
the service technician to perform safety checks to determine that the
equipment is in proper operating condition.
17. Field Installation
This installation should be made by a qualified service person and
should conform to all local codes.
18. Telnet Communication Cable
Caution: To reduce the risk of fire, use only No. 26 AWG or larger
telecommunication line cord.
19. Danger of explosion if battery is incorrectly replaced. Replace
only with same or equivalent type recommended by manufacturer.
Discard used batteries according to the manufacturer’s instruction.
WEEE (Waste Electrical & Electronic Equipment)
Correct Disposal of This Product
(Applicable in the European Union and other European countries with separate collection systems)
This marking shown on the product or its literature, indicates that it should not be disposed with other household wastes at the
end of its working life. To prevent possible harm to the environment or human health from uncontrolled waste disposal, please
separate this from other types of wastes and recycle it responsibly to promote the sustainable reuse of material resources.
Household users should contact either the retailer where they purchased this product, or their local government office, for
details of where and how they can take this item for environmentally safe recycling.
Business users should contact their supplier and check the terms and conditions of the purchase contract. This product should
not be mixed with other commercial wastes for disposal.

Digital Video Recorder
iii
Table of Contents
Chapter 1 — Product Information ............................................................................................ 1
Features .............................................................................................................................. 1
System Types ...................................................................................................................... 1
System Diagram .................................................................................................................. 1
Front Panel .......................................................................................................................... 2
Rear Panel ........................................................................................................................... 2
Turning On the DVR ............................................................................................................ 3
Turning Off the DVR ............................................................................................................ 3
Chapter 2 — SmartGuard ........................................................................................................ 5
Overview .............................................................................................................................. 5
Features .............................................................................................................................. 5
Main GUI ............................................................................................................................. 5
Logging In/Out the System ............................................................................................. 6
PTZ ................................................................................................................................. 7
Utility Buttons .................................................................................................................. 7
System Status ................................................................................................................. 7
SmartGuard Setup ............................................................................................................... 8
Setting Up the System .................................................................................................... 8
Setting Up Cameras ...................................................................................................... 11
Setting Up Schedules ................................................................................................... 14
Setting Up Sensors ....................................................................................................... 15
Setting Up the Motion Detection ................................................................................... 16
Setting Up the Video Loss ............................................................................................ 18
Setting Up the Alarm ..................................................................................................... 20
Setting Up the Text-In ................................................................................................... 21
Setting Up the Remote Access ..................................................................................... 22
Setting Up the Authority ................................................................................................ 24
Chapter 3 — SmartSearch ..................................................................................................... 27
Overview ............................................................................................................................ 27
Features ............................................................................................................................ 27
Main GUI ........................................................................................................................... 27
Image Adjustment ......................................................................................................... 28
Playback Control Buttons .............................................................................................. 28
Image Processing Buttons ............................................................................................ 29
Utility Buttons ................................................................................................................ 29
Search and Playback of Recorded Video .......................................................................... 29
Condition Search .......................................................................................................... 29
Time-Lapse Search ....................................................................................................... 31
Saving of Recorded Video ................................................................................................. 32
Save Current Image ...................................................................................................... 33
Save As Video File ........................................................................................................ 33
Save As Clip File ........................................................................................................... 34
Run CD/DVD Burner ..................................................................................................... 34
Clip Player ..................................................................................................................... 35
Printing Current Image ...................................................................................................... 37
Audio Playback .................................................................................................................. 37

User’s Manual
iv
Checking Audio Recording Configuration ..................................................................... 37
Checking Audio Playback Configuration ....................................................................... 37
Playing Recorded Audio ............................................................................................... 38
SmartSearch Environment Setup ...................................................................................... 38
General ......................................................................................................................... 39
Network ......................................................................................................................... 39
About ............................................................................................................................. 40
Chapter 4 — SmartBackup .................................................................................................... 41
Manual Backup .................................................................................................................. 42
Setup ................................................................................................................................. 43
CD/DVD Burner ............................................................................................................ 43
Target files for CD/DVD burning ................................................................................... 44
Safeguards on Installing and Using the CD/DVD Burning Program ............................. 44
Chapter 5 — Remote Access ................................................................................................. 45
Recommended BASE System Requirements ................................................................... 45
BASE Program Installation ................................................................................................ 45
SmartBase ......................................................................................................................... 46
Main GUI ....................................................................................................................... 46
Remote Monitoring ........................................................................................................ 48
SmartBase Setup .......................................................................................................... 50
Remote Setup ............................................................................................................... 52
SmartSearch ...................................................................................................................... 52
Remote Playback of Recorded Video ........................................................................... 53
Local Playback of Recorded Video ............................................................................... 54
Remote and Local Playback of Backup Video .............................................................. 54
SmartBackup ..................................................................................................................... 54
Appendix 1 — Accessing Windows ........................................................................................ 55
Appendix 2 — SmartShell ...................................................................................................... 56
Appendix 3 — Network Setup (LAN) ...................................................................................... 57
Appendix 4 — WebGuard ...................................................................................................... 58
Appendix 5 — Time Synchronization ..................................................................................... 63
Appendix 6 — Text-In Query .................................................................................................. 65
Appendix 7 — Connector Pin Outs ........................................................................................ 67
Appendix 8 — Event Log Notices .......................................................................................... 68
Appendix 9 — Protocol for Remote Controlling DVR ............................................................. 69
Appendix 10 — Troubleshooting ............................................................................................ 73
Appendix 11 — Specifications ............................................................................................... 74

Digital Video Recorder
1
Chapter 1 — Product Information
FEATURES
Compatible with color cameras and other standard video sources
H.264 codec
Video synchronization not required
Simultaneous recording, multi-screen viewing, playback, remote monitoring and archiving
Versatile display formats for convenient user interface
Main and Spot monitor outputs
On-screen graphic display including camera title, location, recording status and mode display
Sequence mode available in all screen formats
Hardware watchdog timer function
Programmable motion detection for each camera input using graphic user interface
Various image enhancement functions
Remote monitoring, playback and control via Ethernet
User-friendly interface
Proprietary encryption scheme preventing video from alteration
16-channel alarm input and 1-channel alarm output
NOTE: See Appendix 11 — Specifications for the system specifications of each model.
SYSTEM TYPES
There are two system types: POST DVR system and BASE system. The POST is a complete DVR system with cameras,
and the BASE is a computer with software to access the POST DVR. The BASE can view live or previously recorded
video from the POST DVR. The POST DVR can access another POST DVR when they are networked via LAN, however,
it can only review previously recorded video and cannot view live video from the other POST DVR.
SYSTEM DIAGRAM

User’s Manual
2
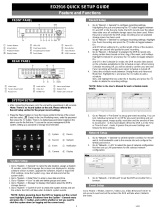
FRONT PANEL
Power Switch: Turn the system on or off.
Power LED: Is lit when the unit is turned on.
HDD LED: Flickers when the unit accesses to the
hard disk drive.
DVD RW: Use to export recorded data to the DVD
RW media.
USB: Connect USB devices such as a mouse,
keyboard, USB storage device or printer.
REAR PANEL
① Power In: Connect a power cord.
② Video In (1 to 16, BNC): Connect BNC cameras.
③ Alarm In (1 to 16): Connect external sensor devices.
④ Alarm Out (Relay): Connect external alarm-out devices such as buzzers or lights.
⑤ RS232: Connect a remote control device for RS232 communication. The RS232 settings are available at the System
tab– Remote control setting in the SmartGuard program.
⑥ RS485: Connect a remote control device for RS485 communication. The RS485 settings are available at the System
tab – Remote control setting in the SmartGuard program.
⑦ SPOT (BNC, Multi-Channel Display): Connect a spot monitor for the multi-channel display.
⑧ Audio In: Connect audio sources (Line-in).
⑨ Audio Out: Connect an amplifier (Line-out). The DVR does not have amplified audio output, so you will need a
speaker with an amplifier.
⑩ Microphone: Connect a microphone.
⑪ Network (RJ-45): Connect a Cat5 cable with an RJ-45 connector. The network settings are available at the Remote
tab – Set up network setting in the SmartGuard program.
⑫ USB: Connect USB devices such as a mouse, keyboard, USB storage device or printer.
⑬ VGA (D-Sub): Connect a PC monitor. Connect a monitor before turning on the system. Video might not be displayed
on the monitor when connecting a monitor after turning on the system.
⑭ Keyboard: Connect a keyboard.

Digital Video Recorder
3
NOTE: The location of ports in slots can be different from the image above. Refer to Appendix 7 — Connector
Pin Outs for connection of the ports located in slots.
NOTE: Windows may not operate properly when using the USB connectors on the front panel of the DVR, depending
on the model type of the USB device. In this case, connect the USB device after Windows boots properly or use
the USB connectors located on the rear panel.
TURNING ON THE DVR
Insert the key in the power switch on the front panel and rotate it count-clockwise. The switch can be left in the ON
position and the key removed. This way the DVR will power up when the ignition is turned.
CAUTION: The system will lock up if the monitor does not have high enough resolution. The DVR requires
1024x768 resolution.
TURNING OFF THE DVR
Click the Power button in the SmartGuard mode or rotate the power switch on the front panel clockwise to turn the
system off.
NOTE: When turning off the system, you must confirm that you want to turn off the unit. Turning off the system
is allowed to only authorized users for the Shut Down option during the SmartGuard SETUP – Authority setup.
CAUTION: Follow the normal shutdown procedures as mentioned above when the system is operating
normally. Turning off the DVR without shutdown procedures can cause damage to the system.

User’s Manual
4

Digital Video Recorder
5
Chapter 2 — SmartGuard
OVERVIEW
SmartGuard is powerful surveillance software. It provides multiplexer functions, digital time-lapse recording and
event-driven recording. SmartGuard also provides motion detection, PTZ control and various image enhancement
functions.
NOTE: The first time you turn on the system, it will immediately begin recording. If you have less than 16 cameras,
you must enter the setup screen and deactivate any inputs to which cameras are not connected; otherwise, the
recording speed might be decreased somewhat.
FEATURES
16 channels
Max. 480 images/sec recording (400 images/sec PAL) (416 model)
User-friendly interface
Scheduling by camera and time
Time-lapse or event-driven recording
Motion detection function
Audio recording
PTZ control
NOTE: Refer to Appendix 11 — Specifications for the maximum recording speed of each model.
MAIN GUI

User’s Manual
6
① Monitoring Screen: Displays monitoring video. Various display formats (single-screen, full-screen, quad, 3+4,
3x3, 2+8, and 4x4) are provided for convenient user interface. Each format can be selected by clicking the screen
buttons shown below. The camera groups for multi-screen formats are composed of cameras 1 to 16 in order. The
following camera groups are displayed on the monitor one at a time according to each display format: 1-4, 5-8, 9-12
or 13-16 in quad mode; 1-7 or 8-16 in 3+4 mode; 1-9 or 10-16 in 3x3 mode; 1-10 or 11-16 in 2+8 mode. The user
can select which camera group is displayed by clicking any camera button in a group from camera buttons shown
below. Information including camera title, recording mode, and recording status can be displayed on the image. Go
to Setting Up the System (p. 8) and Setting Up Cameras (p. 11) in the SmartGuard Setup section (p. 8), and
place a check in the Show OSD box to display the OSD information.
② Clock: Displays date and time. Click the left mouse button on the clock area to set date display (MM-DD-YYYY/...)
and time display (12 Hours/24 Hours) formats. Click the right mouse button on the clock area to set date, time
and time zone.
CAUTION: If you change the time, images dated later than the new date/time are deleted. Back up the images
if you want to save them.
③ Image Adjustment: Click to display image adjustment buttons. You can adjust the
brightness, contrast, hue and saturation of live image by clicking the designated buttons.
Click the Default button to reset them to the default settings. These adjustments should
not be used to correct improperly set cameras or monitors. Also, it is important that
images are properly adjusted.
④ PTZ: Displays PTZ control buttons. Refer to the PTZ section (p. 7) for details.
⑤ Utility Buttons: See the Utility Buttons section (p. 7) for details.
⑥ System Status: Displays operating mode, the remaining hard disk space and the type of hard disk usage, and also
displays system events. Refer to the System Status section (p. 7) for details.
⑦ Screen Mode Buttons: Click the desired screen mode. Move the cursor to that image and double click the left
mouse button to view a specific image in the single-screen mode. Click the left mouse button in the window to return
to the previous screen mode from the single-screen mode.
⑧ Camera Buttons: Click to display the camera buttons. Clicking the individual camera buttons displays the selected
camera.
⑨ Alarm Control: Click to display alarm control buttons. You can check the alarm status and control the alarm output.
Pressed alarm button is active mode, and released button is inactive mode. The user can active or inactive alarm
output manually by clicking the button when it is released or pressed. If the user disables the alarm during the Alarm
setup on the SmartGuard, the alarm button will be disabled.
⑩ POS: Click to display POS control buttons. The system status window will display the POS data. Click the right
mouse button on the window to toggle two display modes: POS data display mode, and event log including POS
data display mode. The POS button LED will be lit while the data is coming from the POS. If you do not want to
display the data from the POS, release the target POS number button. If the user disables the POS device during
the Text-In setup on the SmartGuard, the POS button will be disabled.
Logging In/Out the System
Log In: Click any function button on the main GUI of SmartGuard after logging out, the following User Login dialog
box appears. Enter the User ID and Password and then click the OK button if you want to log in the system.
Log Out: Click the Power button after logging in, the Quit dialog box appears. Select System quit to quit the program
or select logout to log out the system.
NOTE: When No local login is selected during the Setting Up the Authority setup section (p. 24), the DVR does
not ask login procedure.
NOTE: When you forgot the password, ask your dealer or distributor.

Digital Video Recorder
7
PTZ
The DVR provides transmission functions, and you can control popular PTZ devices and cameras.
NOTE: Up to 128 presets can be set, depending on the specification of installed PTZ devices or PTZ cameras.
Make sure available preset numbers first to make the PTZ preset function work properly.
NOTE: If you want to set up the advanced PTZ control, place the cursor on the PTZ control panel, and click the
right mouse button. Depending on the camera specifications, some features may not be supported.
Speed: Set the pan/tilt speed (from 1 to 16). The higher
the number, the faster it moves.
Move to origin: Click the button if you want to move
the camera to the origin position.
Auto Panning: Enables or disables auto panning.
Camera: Turns on or turns off the camera.
Menu: Enables or disables the menu function.
Pump/Wiper/Light/Aux: Enables or disables pump,
wiper, light and other available functions.
Utility Buttons
Accessing SmartSearch: Click the button to run the SmartSearch.
Power: Click the button to quit or log out the system. Refer to the Logging In/Out the System section
(p. 6) for details.
Manual Alarm Output: In general, the alarm is activated automatically when any related sensor is activated.
However, the user can activate all the alarm output manually by clicking this button while it is released or
deactivate all the alarm output by clicking the button when it is pressed.
Auto Sequencing: Click the button to sequence the cameras in order. Whenever you click the button, it
toggles between On and Off. The switching interval can be set during the system setup.
Record: The record mode is selected when this button is clicked. SmartGuard returns to view only mode
automatically when it is unable to record (for example, when the hard disk is full).
NOTE: The DVR records only in accordance with the recording schedule, which can be set during the system setup.
Before you install the DVR, you need to fully understand the recording schedule. Note also that clicking this recording
mode button only prepares the DVR for recording. In this state, the DVR will follow the recording schedule.
Setup: Click the button to display a Setup dialog box. Refer to the SmartGuard Setup section (p. 8) for
details.
System Status
Mode Status: There are two operating modes – View only mode and Recording mode. The SmartGuard
records images only in the Recording mode.

User’s Manual
8
HDD Indicator: Shows the remaining hard disk space and the type of hard disk usage. Go to the
SmartGuard Setup – Setting Up the System section (p. 8), and select between Once and Recycle
for HDD usage. Placing the mouse cursor on an image displays the total recording days.
NOTE: Once (displayed as Disk available: **%) records until the hard disk is full and then stops. Recycle (displayed
as Repeat Recording) records over the oldest images when the hard disk is full.
Event Logging: Displays the system events. To scroll up and down the list, hold down
the left mouse button on the list and move the cursor up and down, or roll the mouse
wheel on the list. Clicking the underlined event in the list initiates the SmartSearch
program and moves to the timetable allowing you to play back the event-detected
video if the underlined event is recorded. The display information of the event log
is as follows: ‘Date’_‘Time’ ‘Event type’ ‘Camera No.’ : ‘Camera title’
SmartGuard SETUP
Setting Up the System
Camera On/Off: Enables or disables the camera.
Location: If you have a keyboard attached to your unit, enter a location name such as “Main Office.” If you do not
have a keyboard connected to the unit, clicking the keyboard icon will display a virtual keyboard on which you can
type by clicking the letters.
Sequence dwell: Set the sequence dwell time for the main monitor by holding down and dragging the pointer. If
you set the value to 5 seconds for the Sequence dwell, the camera display will sequence every five seconds on the
Main monitor.

Digital Video Recorder
9
Screen saver dwell: Set the screen saver dwell time for the display image. The screen saver will be activated if
there is no keyboard or mouse operation during the preset dwell time.
Auto Deletion: Check the box if you want to delete the video recorded earlier than user-defined period. When
checking the Auto deletion box, move to Period and set the period to keep the recorded video. e.g. If you check
the Auto deletion box, and set 30 days in the Period box, the DVR will automatically delete the video which is older
than 30 days from the current day.
Show OSD: Check the box if you want to display OSD information on the image. OSD information includes camera
title, recording mode, recording status and event detection status.
NOTE: A R indicates the target camera is in the Time-lapse recording schedule mode. An E indicates it is in the
Event-driven recording mode. A R/E indicates it is in the Time & Event recording mode. A R located at the bottom-
right corner indicates the DVR is recording video, and a
icon displaying at the bottom-left corner indicates that
motion detection event occurs.
Remote control: Click the Set up Remote control... button when the DVR is controlled remotely using the serial
communication signals or via network connections.
– Serial (RS232/RS485): Check the box and click the Set up Serial when the DVR is controlled remotely using
the serial communication signals.
Select the DVR's COM port to use from the drop-down list. Click the
Set up port... button, and set the Baud rate from 300 to 256,000. Select
Parity from None, Even or Odd parity. Select Data bit from 7 bit or 8
bit format. Select Stop bit from 1 bit or 2 bits from the drop-down list.
Move to Device ID, and set the device ID number from 0 to 127 using the
slide bar. Refer to Appendix 9 — Protocol for Remote Controlling
DVR for details.
NOTE: When using the RS232 port, select COM 1 from the COM Port drop-down list. When using the RS485
port, select the given COM Port number. To check the given COM port number, please refer to the installed
card information displayed on the System Info. dialog box by clicking the System Info. button.
– Network: Check the box and click the Set up Network when the DVR is controlled remotely via network connections.
Enter the Network Port number.
NOTE: When selecting the Network remote control for the user’s authorization,
you can control the DVR remotely via network connections. Refer to the
Setting
Up the Authority
section (p. 24) for details.
HDD usage: Select either Once or Recycle. When Once is selected, the DVR stops recording when the hard disk
drive is full. When Recycle is selected, the DVR continues recording when the hard disk drive is full by overwriting
the oldest video.
System Info…: Click the button, and the System Info. dialog box displays the information of the installed cards,
driver, software, hard disk drive, OS and MAC address on the system.
Event log: Displays the event log list of the system.
Set up Time Sync…: Set up the time synchronization if required. Refer to Appendix 5 — Time Synchronization
for details.
Change Signal…: Select the video input signal to each camera number from a drop-down list.

User’s Manual
10
Note…: Set up the note function. The user can add or delete notes. If you want to read the note, select the line and
click the View button. Click the Load button to load the saved note, the Save button to save the current note, and
the Text Save button to save the current note to the text file.
Set up S.M.A.R.T. …: Set up the S.M.A.R.T. function
when the installed hard disk drives support S.M.A.R.T. (Self-
Monitoring, Analysis and Reporting Technology) Monitoring program (Internal hard disk drives only).
− Use S.M.A.R.T.: Check the box if you want to use S.M.A.R.T.
function.
− Show an alert dialog if HDD status is unstable: Check the box
if you want to display an alert message when the DVR senses that
the hard disk drive status is Poor. Once the alert message displays,
replacing the hard disk drive as soon as possible is recommended,
usually within 24 hours.
− Delay for the first inspection after system starts: Set the standby
time until the system performs the first inspection after the system
starts.
− Inspection interval: Set the inspection interval.
− Threshold temperature for alert: Set the threshold temperature
of hard disk drives. The DVR logs an event when the temperature
of hard disk drives exceeds the defined threshold.
Set up backup...: Set up backup information. Refer to Chapter 4 — SmartBackup for details.
Set up Web Server...: Set up an IIS (Internet Information Services) for the WebGuard program.
Click the Load... button if you want to load typical settings. Click the Save... button if you want to save the current
settings. Click the Default button if you want to load default settings. You can save your changes by clicking the OK
button. Selecting Cancel exits the dialog box without saving the changes.
NOTE: Only the administrator level user can use the Load, Save and Default buttons.

Digital Video Recorder
11
Setting Up Cameras
CAUTION: The recording speed may not be achieved when averaged over all the cameras.
Select a camera: Select a camera icon to set up.
Description: Enter a camera title such as “Front Door”. You can use either the actual keyboard or the virtual keyboard.
PTZ: Check the box to enable pan, tilt and zoom functions. Click the Set up PTZ... button to display the Set up
PTZ dialog box. Select the model of the installed RX device or PTZ camera from the Model list.
NOTE: To control camera pan, tilt and zoom, you must attach a compatible RX device or PTZ camera to the
DVR. A list of supported RX devices and PTZ camera models can be found in the Set up PTZ dialog box.
− COM Port: Select the given COM port number from the drop-down list.
To check the given COM port number, please refer to the installed card
information displayed on the System Info. dialog box by clicking the
System Info. button.
− Set up port…: Click the button to display the Set up COM port dialog
box. Set the Baud rate from 300 to 256,000, select the Parity from None,
Even or Odd parity, select the Data bit from 7 bit or 8 bit format, select
the Stop bit from 1 bit or 2 bits from the drop-down list.
− Device ID: Set the device ID number from 0 to 127 using the slide bar.
Hide image: Check the box to hide the image of the selected camera on the monitor. If this box is checked, the
selected camera will not be displayed on the monitor, however, the images from the camera will be recorded while
in the record mode.

User’s Manual
12
Text for hidden camera: Enter the text to be displayed on the hidden camera using the actual keyboard or the virtual
keyboard. If you leave this box empty, the gray screen without any text will be displayed for the hidden camera.
Show OSD: Check the box if you want to show OSD information on the image of selected camera. If you want to
enable Show OSD function, the Show OSD option should be selected during the System setup.
Same configuration for all cameras: Check the box to set all cameras with the same configuration.
Time-lapse rec. speed: Set the recording speed for the time-lapse mode by holding down and dragging the pointer.
You can set the speed from 30 to 1/30 seconds. The value of the recording speed is the time to record one image.
Therefore the lower the value, the more images are recorded during the same time. For example: 30 means one image
per 30 seconds will be recorded, 1 means one image per second, and 1/30 means that 30 images per second.
NOTE: When the recording speed is set to higher than 1/2 sec. (less than two images per second), recorded audio
will NOT be played.
NOTE: The 116 model has a maximum recording speed of 120 images per second (100 images for PAL), and
this maximum recording speed can be decreased when using more than four cameras. Refer to Appendix 11 —
Specifications for the maximum recording speed of each model.
Rec. image resolution: Set the record image size recorded by holding down and dragging the pointer.
NOTE: Higher resolution images require more storage space and will reduce the recording capacity of the hard
disk drive. When set to 704x480 (704x576 PAL), video with lots of motion may have some artifacts.
Rec. image quality: Set the record image quality by holding down and dragging the pointer. You can select the
resolution from Low, Medium, High or Very High.
NOTE: Higher quality images require more storage space and will reduce the recording capacity of the hard disk drive.
NOTE: The maximum record image size and quality of pre-event recording will be restricted to 352x240 (352x288
PAL) and Medium regardless of setting values of Rec. image resolution and Rec. image quality in order to maximize
the amount of pre-event video to be stored.
Work hour: Set the start time (From) and end time (To) of working hours by holding down and dragging the pointer.
NOTE: Work hour set in this menu is applied to the normal camera setup established in during the Time-lapse rec.
speed, Rec. image resolution and Rec. image quality setup, and all hours except the Work hours will be After hour.
After hour: Check the box if you want to set up different recording option during the hours outside hours established
in Work hour. Then, set the Time-lapse rec. speed, Rec. image resolution and Rec. image quality by holding
down and dragging the pointer. Refer to the Time-lapse rec. speed, Rec. image resolution and Rec. image quality
setup
for the available values for each setting.
Advanced Setup...: Select an advanced camera setup. You can set up the pre-event recording and event recording
options for each event.

Digital Video Recorder
13
– Pre-event recording: Check the box to enable the pre-event recording.
– Pre-event rec. speed: Set the recording speed for the pre-event mode by holding down and dragging the pointer.
– Pre-event rec. dwell: Set the duration of pre-event recording by holding down and dragging the pointer.
– Pre-event rec. image resolution: Set the record image size by holding down and dragging the pointer.
– Pre-event rec. image quality: Set the record image quality by holding down and dragging the pointer.
– Event monitoring dwell / Minimum monitoring dwell: Set the values to display the event-detected video on
the monitor by holding down and dragging the pointer. The event-detected video will be displayed during at
least the minimum monitoring dwell time. Other events occurring during the minimum monitoring dwell time
will be ignored, and the latest event will be displayed once the minimum monitoring dwell time expires.
– Event rec. speed / Event rec. dwell: Set the values for the event-driven mode by holding down and dragging
the pointer.
– On Event: Check the box if you want to use an advanced setup during event activation. Then, set the Rec. image
resolution and Rec. image quality by holding down and dragging the pointer.
– On Priority Event: Check the box if you want to use an advanced setup during high-priority event activation. Then,
set the Recording speed, Rec. image resolution and Rec. image quality by holding down and dragging the pointer.
You can save your changes by clicking the OK button. Selecting Cancel exits the Advanced camera setup dialog
box without saving the changes.
NOTE: When the recording speed is set to higher than 1/2 sec. (less than two images per second), recorded audio
will NOT be played.
NOTE: The configuration of the Advanced camera setup is also set for all cameras when the Same configuration
for all cameras is selected.

User’s Manual
14
Setting Up Schedules
Select a camera: Select a camera icon
to set up.
Hour: Set the recording schedule for each day (MON to SUN) and holidays (HOL). Select the hours to record by
holding down on the recording start time and dragging to recording finish time. The hour selection will be made
through both hours and days. The cells you select will be filled in blue.
Rec. mode: Click the desired recording mode button. If you click the Time-lapse button, an R will display in the
selected cells. Nothing displays when selecting View only.
NOTE: The DVR provides four different recording modes. View only mode — No recording will be made during
selected hours. Time-lapse mode — Time-lapse recording will be made during selected hours. Event mode —
Event-driven recording will be made during selected hours. Time & Event mode — Time-lapse recording will be
made during selected hours and the DVR will go into the event-driven recording mode during selected hours when
an event occurs.
Quick setup: Select the desired button to adjust the current settings of the selected camera to another camera. Click
the Copy button, and select another camera to be scheduled by clicking the camera icon in the same dialog box, and
then click the Paste button. Click the Apply all button if you want to adjust the current settings to all cameras.
Set up holiday...: Set up holidays. This function compensates for different holidays in different countries.
Click the date in the calendar you want as a holiday, and click the
Add button. The selected date will be displayed in the list next to
the calendar. If you want to delete a holiday, click the Delete button
after selecting the date in the list. Move to other months using the
arrow buttons located at the top of the calendar. You can save your
changes by clicking the OK button. Selecting Cancel exits the
Holiday setup dialog box without saving the changes.
/