Olympus Camedia C-211 Zoom
The Olympus Camedia C-211 Zoom is a versatile digital camera that combines the flexibility of a digital camera with the convenience of an instant camera. With its many advanced features, the C-211 Zoom is perfect for capturing and sharing your memories.
Some of the key features of the C-211 Zoom include:
- 2.1-megapixel CCD sensor for high-quality images
- 3x optical zoom lens for getting closer to your subjects
- Built-in flash for taking pictures in low-light conditions
- Large 1.8-inch LCD monitor for easy viewing and playback of images
- Polaroid 500 film for instant prints


-
 1
1
-
 2
2


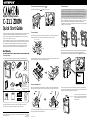
Olympus C-211 Quick start guide
- Type
- Quick start guide
- This manual is also suitable for
Olympus Camedia C-211 Zoom
The Olympus Camedia C-211 Zoom is a versatile digital camera that combines the flexibility of a digital camera with the convenience of an instant camera. With its many advanced features, the C-211 Zoom is perfect for capturing and sharing your memories.
Some of the key features of the C-211 Zoom include:
- 2.1-megapixel CCD sensor for high-quality images
- 3x optical zoom lens for getting closer to your subjects
- Built-in flash for taking pictures in low-light conditions
- Large 1.8-inch LCD monitor for easy viewing and playback of images
- Polaroid 500 film for instant prints
Ask a question and I''ll find the answer in the document
Finding information in a document is now easier with AI
Related papers
-
Olympus Camedia C-211 Zoom User manual
-
-
-
-
-
-
-
-
-
Zoom 2100 User manual