READ AND SAVE THESE INSTRUCTIONS
CFL Bulb (2)
WARNING: To reduce the possibility of electrical shock, be sure that the power is turned off at its source
(fuse or circuit breaker). All electrical components must be installed in accordance with national and local
electrical codes. To reduce the risk of fire and electrical shock, the light fixture should be used only with
UL, CUL, or ETL Certified Casablanca ceiling fans.
K2AA LIGHT FIXTURE
FOR USE WITH SELECT CASABLANCA GLASS BOWLS. FOR A COMPLETE LISTING
OF COMPATIABLE GLASS, ASK YOUR CASABLANCA DEALER.
Fig. 1
Fig. 4
Prepare Fan
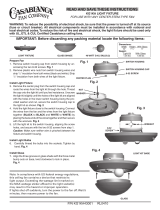
1. Remove switch housing cap from switch housing
by unscrewing the two 8-32 screws. Fig. 1
2. Remove plastic wirenuts from switch housing
wires and strip
1
/2″ insulation from both wires
(black and white). Strip
1
/2″ insulation from both
wires of the light fixture.
Install Light Fixture
3. Remove the center plug from the switch housing
cap and route the wires from the light kit through
the hole. Thread the cap onto the light fixture
until cap is flush with the light kit. Using the
provided washer and nut, secure the switch
housing cap to the light kit as shown. Fig. 2
4. Hold the light fixture close to the switch housing.
Connect the wires from the fan and the wires from
the light fixture together (BLACK to BLACK or
Blue to Black and WHITE to WHITE) by placing
the bare ends of the wires together and then
secure with the wirenuts. Fig. 3
Install Glass
1. For 3-Speed fans, remove the Fob from the
end of the pull chain and run chain through
holes in the bottom of the glass.
2. Insert the threaded rod of the light kit through
the center hole at the base of the glass.
Secure with the provided washer and nut
from the light kit, tighten by hand.
3. Insert threaded rod through center of glass
cap and secure with finial.
LIGHT KIT BASE
Inteli•Touch
Advan•Touch
GLASS
GLASS CAP
PULL
CHAIN
Glass for the K2AA is sold separately.
Refer to instructions that come with the glass
(if applicable) for additional instructions.
Note, provided with the glass are glass caps and finials
in several finishes to best complement your fan. There
are also two types of glass caps, one for 3-Speed fans
with holes provided for the pull chain, and a solid version
for Inteli•Touch and Advan•Touch fans.
FINIAL
LIGHT
FIXTURE
3-SPEED
WASHER
NUT
Dimensions:
Height Width
6
1
/
2
" 4
3
/
8
"
Weight:
Light Kit
1 lb
SWITCH HOUSING
SWITCH HOUSING CAP
8-32 SCREW
CENTER PLUG
Fig. 3
Fig. 2
Note: Bulbs included with this product will not dim. If this light kit is installed on a
fan with a light dimming function, then bulbs that are capable of dimming need to be
purchased separately.
NUT WASHER
IMPORTANT: Before discarding any packing material locate the following items:
WIRENUT (2)
5. Lift the light kit to the switch housing, aligning the screw holes, and secure with the two
8-32 screws from step 1.
Caution: Make sure wires are not pinched between the switch housing and cap.
Install Light Bulbs
1. Carefully thread the bulbs into the sockets. Tighten by hand. Fig. 3
P/N K2AA43001 RL0910


