BABYTREND 8625 Owner's manual

Type
Owner's manual

This manual is also suitable for

Trend High Chair
Instruction Manual
Convenience through Innovation and thoughtful design
10.07
Read all instructions BEFORE assembly and USE of product.
KEEP INSTRUCTIONS FOR FUTURE USE.
WARNING: Retain these instructions for future reference.
Failure to follow these instructions could result in serious injury or death.
WARNING: The tray is not designed to hold the child in the chair.
The child is to be secured by the safety harness at all times while in the
high chair.
WARNING: Prevent serious injury or death from falls or sliding
out. Always secure child in the safety belt, either in the reclining, semi-
reclining or upright position. The tray is not designed to hold the child in
the chair. Always keep child in view while in high chair. Never leave child
unattended. It is recommended that the high chair be used in the upright
position only by children capable of sitting upright unassisted. See page 7
for instructions on proper use of restraint system.
* Accessory items may change the balance of the high chair and cause hazardous unstable conditions.
* Be certain the high chair is fully erect and latched in the open position before allowing the child near
the high chair.
* Use of the high chair with a child weighing more than 40 pounds will cause excessive wear and stress on
high chair.
* Never allow your high chair to be used as a toy.
* To clean use only mild household soap or detergent and warm water on a sponge or clean cloth.
* Check your high chair for loose screws, worn parts, torn material or stitching on a regular basis.
Replace or repair parts as needed.
* Discontinue use of the high chair should it malfunction or become damaged. Please contact our
customer service Parts Hotline to arrange for repair or obtain replacement parts.
Please: If you experience any difculty with the use of our product or have a question regarding these
instructions, please contact our Customer Service Department at (800) 328-7363 between the hours of
8:00 am and 4:30 pm Pacic Standard Time or visit our website at www.babytrend.com. Please do not
return to the store as once it is returned it cannot be resold and the materials and energy used to make
it are wasted.
Baby Trend, Inc.
1567 S. Campus Ave.
Ontario, CA 91761
Parts Hotline:
1-800-328-7363
8:00 am and 4:30 pm Pacic Standard Time
8806
WARNINGS
2
Seat Back
Height Brackets
Tray Insert
Tray
Crotch Retainer
Legs
4 Casters (2 with brakes)
Footrest
Seat Brace
Seat Base
Seat Back Hinge Rod
Recline Fittings
Upper Frame Assembly
1 (5mm x 10) Black Screw
4 (3.5mm x 10) Screws
Toy
1
2
3
4
6
7
8
1
1. Slidereclinettingsontotheendsoftherecline
mechanismrodasshowningure1.
2. Placetheseatbaseonaatsurfaceasshowningure2.
3. Join the seat back to the seat base using the seat back
hingerodasshowningure3.Therodisinsertedfrom
right to left as shown.
4. Insert the (5mm x10) screw into the end of the seat back
hingeasshowningure4.Thisscrewpreventsthe
unintentional loosening of the hinge rod. Tighten the
screw until snug: DO NOT OVER-TIGHTEN.
Recline Fittings
Recline Mechanism Rod
Figure 1
Figure 2Figure 3Figure 4
CONTENTS
ASSEMBLY
3
10
13
14
15
5
11
12
2
3
4
5
6
7
8
9
10
11
12
13
14
15
16
16
9
5. Alignthefootrestwiththeseatbaseasshowningure5.
6. A: Snap footrest into place with the seat base, B: Insert
the seat brace through the seat base rings and footrest as
showningure6.
7. Align the holes on the seat brace with the holes in the
bottomoftheseatbaseasshowningure7.
Figure 5
Footrest
8. Slide the left and right sides height bracket onto the end of
theseatbraceasshowningure8.
9. Rotate height bracket until it snaps into locking tab located
ontheseatbase.Seegure9.
10. Secure the height brackets to the seat brace with the
2 (3.5mm x 10) screws provided.Pleaseseegure10.
Tighten the screws until snug: DO NOT OVER-TIGHTEN.
Check that the height brackets are securely attached to
the seat.
11. Insert the front tube of the right side upper frame assembly
intotheheightbracketasshowningure11.Thefront
tube is easily distinguished from the rear tube by the array
of holes located on the backside of the tube. Squeeze the red
release handle and push the tube through the height bracket
untilitlocksonthehighestposition.Seegure12.
Figure 9
Attach
3.5mm x 10
screw here
Seat Brace
Figure 6
Figure 7
Footrest
Height
Bracket
Figure 8
Seat
Brace
Figure 10
A
B
Upper Frame
Assembly
Height
Bracket
Figure 11
Red Release
Handle
4
12.Repeatthisstepontheleftsideheightbracket.Seegure13.
13. Insert the leg into the ends of the front tube of both the right
andleftupperframeassembliesasshowningure14.
14. Insert another leg into the ends of the rear tube of both the right
andleftupperframeassemblyasshowningure15.
15. Attach each of the casters to the high chair feet as shown
ingure16.Snapcastersintobottomofthefoot.Casters
with brakes can be installed on front or rear legs (rear leg
recommended). Check that all four casters are securely
fastened to the high chair.
16. Flip over tray to attach the crotch retainer. The molded plastic
housing must be oriented by facing the slot toward front of the
tray. Insert the 2 provided (3.5mm x 10) screws and tighten.
DO NOT OVER-TIGHTEN.Seegure17.
Foot
Caster
Figure 14
Figure 15
Figure 16
Caster
Foot
Figure 13
Figure 12
Figure 17
5
OPEN HIGHCHAIR
Push the legs apart until fully open
and locked. (see Fig. 1) Push downward on fold levers (left and
right) to ensure frame is locked open.
WARNING: Always check
that the high chair is locked in the open
position before using.
WARNING: The tray is not
designed to hold the child in the chair.
The child is to be secured by the safety belt
at all times while in the high chair.
TO ATTACH AND OPERATE TRAY
To attach the tray, line up the grooves on the bottom of the tray
with the armrests of the high chair. Squeeze the tray release han-
dle and slide the tray onto the armrest (see Fig.2). The tray has a
3-position adjustment. To adjust the position, squeeze the tray re-
lease handle located underneath the tray and reposition the tray
to the desired position. (see Fig.3). Release tray release han-
dle. Check that the tray is securely locked in it’s new position.
The dishwasher safe food tray snaps onto the high chair tray and is
held in place by tabs on the child side of the tray and the latch on
the front of the tray. When installing the food tray make sure that it
snaps into place to prevent the child from removing the food tray. To
remove the food tray, carefully push reward on the latch and lift the
tray upward and forward.
RECLINE SEAT
Squeeze recline lever on back of the seat and adjust to
the preferred recline or upright position. (see Fig.4). When adjusting
the seat back position, be very careful that the child’s arms, hands
or legs do not get caught.
WARNING: It is recommended that
only children capable of sitting upright unassist-
ed use the high chair in the upright position.
WARNING: Prevent serious injury
or death from falls or sliding out. Always
secure child in the restraint system, either in the
reclining, semi-reclining or upright position.
Push
Tray Release located
underneath tray
3-position
Figure 1
Figure 2
Figure 3
Figure 4
Push down
to lock open
6
TO USE SAFETY BELT
The tray is not designed to hold the child in the chair. Always keep
child in view while in high chair. Never leave child unattended.
Step 1.
Place your child’s arms through the loops formed by the shoulder and
waist straps. Place the crotch strap between your child’s legs. Insert
the buckles into the center buckle to fasten. (see Fig. 5)
Step 2.
Adjust shoulder and waist straps for your child’s comfort and safety
by sliding buckles in either direction. Safety straps are to t snug
around your child.
TO RELEASE SAFETY BELT
Step 1.
Squeeze sides of buckles to release. (see Fig. 6)
WARNING: Do not adjust seat height
with child in seat. Adjust seat height before plac-
ing your child in the high chair.
TO ADJUST SEAT HEIGHT
Step 1.
Squeeze the buttons on the height adjustment bracket and adjust to the
ideal position. (see Fig. 7)
WARNING: Always check that the
height adjustment bracket is level and both left
and right sides locked before placing child in the
high chair.
TO FOLD HIGH CHAIR
The high chair may be folded with the seat in any of the height
positions. The high chair will be the most compact with the seat in
the lowest position.
Step 1.
Place seat in the desired height position (see Fig. 7).
Step 2.
Place seat back in the most upright position. (see Fig 4).
Step 3.
Squeeze the tray release handle and slide the tray out. (see Fig 2).
Hang the tray on the hooks located on the back of the rear leg.
(see Fig. 8)
Step 4.
Pull upward on the release levers (located on the sides of the frame)
and push the rear legs in the direction of the front legs until folded.
(see Fig. 9) Chair is now ready to put away. DO NOT allow your
child to play around a folded high chair as it may fall.
Adjustforasnugt
6-position
Figure 5
Figure 6
Figure 7
Figure 8
Figure 9
7
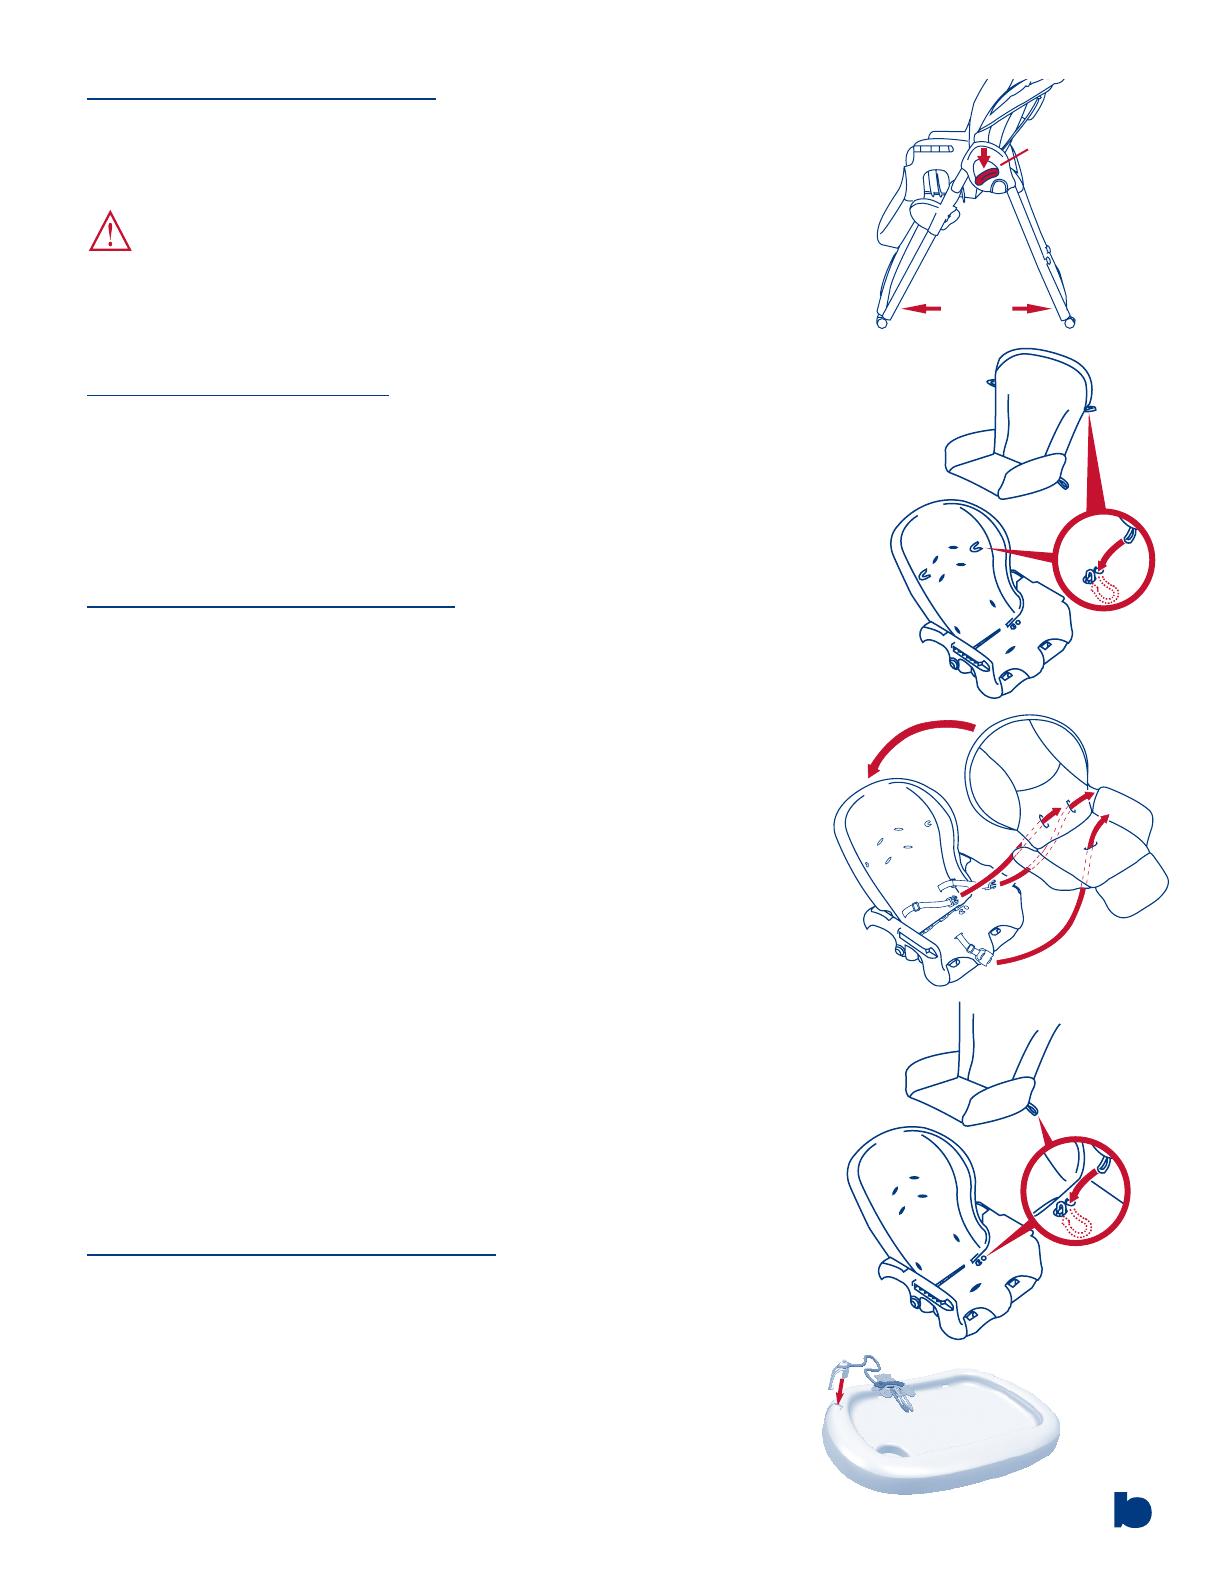
TO UNFOLD HIGH CHAIR
Push the legs apart until fully open and locked. Push downward on the
fold levers (Left and Right) to ensure the frame is locked.
(See Fig. 1)
WARNING:
Always check that the high chair is locked in the
open position before using.
TO ATTACH SEAT PAD
Toattachseatpadtothechair,looptheaponthebackofthepadover
the top rear of the seat. Connect the pad to the upper seat back with the
two elastic loops (See Figure 2). Insert the waist belts and crotch strap
through the holes in the seat pad (See Fig. 3). Connect the bottom of the
pad to the seat bottom with the two elastic loops (See Fig. 4).
CARE AND MAINTENANCE
Dishwasher safe food tray:
The food tray is dishwasher safe to 160 degrees Fahrenheit. Do not use
scouring pads on the Dishwasher food tray as they will damage the
surfaceandthetraywillbecomemoredifculttoclean.
High Chair/Tray:
Clean high chair after each use using mild household dish soap.
Please use only a soft bristle brush, sponge or cloth to clean the surface or
remove particles of food. DO NOT submerge high chair tray in water:
Surface clean only.
To remove fabric pad for washing:
Disconnect the elastic loops holding the seat bottom and sides as shown
in (Figures 2 and 4). Push waist belt buckles and crotch strap through
holes in pad. Gently pull upward on pad to remove. Hand wash only using
mild detergent and cold water. Hang dry. DO NOT USE BLEACH. DO
NOT MACHINE WASH. Refer to the “To Attach Seat Pad” section
above to put the pad back on chair.
From time to time check your high chair for loose screws, worn parts, torn
material or stitching. Replace or repair as needed. Excessive exposure to
the sun or heat could cause fading, yellowing or warping of parts.
TO ATTACH OR REMOVE TOY
Press the toy connector into the curved slot in tray edge and snap bottom
of connector over lower lip of tray. Reverse
to remove the toy (See Fig 5).
Push
Figure 1
Push down
to lock open
Figure 2
Figure 3
Figure 4
Figure 5
IF YOU EXPERIENCE ANY DIFFICULTY IN USING THIS PRODUCT,
PLEASE CONTACT OUR CUSTOMER SERVICE DEPARTMENT
AT (800) 328-7363 BETWEEN THE HOURS OF 8:00AM AND 4:30PM
PACIFIC STANDARD TIME FOR ASSISTANCE.
8
  • Page 1 1
  • Page 2 2
  • Page 3 3
  • Page 4 4
  • Page 5 5
  • Page 6 6
  • Page 7 7
  • Page 8 8

BABYTREND 8625 Owner's manual

Type
Owner's manual
This manual is also suitable for

Ask a question and I''ll find the answer in the document

Finding information in a document is now easier with AI