Zanussi ZDF26001WA User manual
- Category
- Dishwashers
- Type
- User manual
This manual is also suitable for
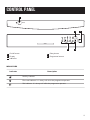
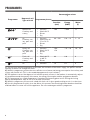
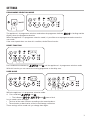
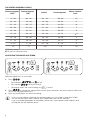
Zanussi ZDF26001WA is a dishwasher designed for household use, offering efficient cleaning and drying performance. It features 5 programs tailored to various needs, including Normal, Eco, Intensive, Fresh, and Rinse. With a capacity of 13 place settings, it accommodates a full load of dishes. The adjustable water softener and rinse aid dispenser ensure optimal results based on your water conditions. Additionally, the XtraDry option provides enhanced drying performance for sparkling clean dishes.
Zanussi ZDF26001WA is a dishwasher designed for household use, offering efficient cleaning and drying performance. It features 5 programs tailored to various needs, including Normal, Eco, Intensive, Fresh, and Rinse. With a capacity of 13 place settings, it accommodates a full load of dishes. The adjustable water softener and rinse aid dispenser ensure optimal results based on your water conditions. Additionally, the XtraDry option provides enhanced drying performance for sparkling clean dishes.


-
 1
1
-
 2
2
-
 3
3
-
 4
4
-
 5
5
-
 6
6
-
 7
7
-
 8
8
-
 9
9
-
 10
10
-
 11
11
-
 12
12
-
 13
13
-
 14
14
-
 15
15
-
 16
16
-
 17
17
-
 18
18
-
 19
19
-
 20
20


Zanussi ZDF26001WA User manual
- Category
- Dishwashers
- Type
- User manual
- This manual is also suitable for
Zanussi ZDF26001WA is a dishwasher designed for household use, offering efficient cleaning and drying performance. It features 5 programs tailored to various needs, including Normal, Eco, Intensive, Fresh, and Rinse. With a capacity of 13 place settings, it accommodates a full load of dishes. The adjustable water softener and rinse aid dispenser ensure optimal results based on your water conditions. Additionally, the XtraDry option provides enhanced drying performance for sparkling clean dishes.
Ask a question and I''ll find the answer in the document
Finding information in a document is now easier with AI