
Cooker
Installation and use
Konyhabútor
Beépítés és használat
K3G51S/HU

3
14
Cooker with electric oven
Instructions for installation and use
Elektromos sütõvel rendelkezõ tûzhely
Használati útmutató

3
Important safety warnings
1 This appliance is intended for nonprofessional use within the home.
2 These instructions are only for those countries whose symbols appear in
the booklet and on the serial no. plate of the appliance.
3 This owner’s manual is for a class 1 appliance (insulated) or
class 2, subclass 1 appliances (installed between two cabi-
nets.
4 Before using your appliance, read the instructions in this owner’s manual
carefully since it provides all the information you need to ensure safe
installation, use and maintenance. Always keep this owner’s manual close
to hand since you may need to refer to it in the future.
5 When you have removed the packing, check that the appliance is not
damaged. If you have any doubts, do not use the appliance and contact
your nearest Ariston Service Centre. Never leave the packing components
(plastic bags, polystyrene foam, nails, etc.) within the reach of children
since they are a source of potential danger.
6 The appliance must be installed only by a qualified technician in compliance
with the instructions provided. The manufacturer declines all liability for
improper installation, which may result in personal injury and damage to
property.
7 The electrical safety of this appliance can only be guaranteed if it is correctly
and efficiently earthed, in compliance with regulations on electrical safety.
Always ensure that the earthing is efficient. If you have any doubts, contact
a qualified technician to check the system. The manufacturer declines all
liability for damage resulting from a system which has not been earthed.
8 Before plugging the appliance into the mains, check that the specifications
indicated on the date plate (on the appliance and/or packaging) correspond
with those of the electrical and gas systems in your home.
9 Check that the electrical capacity of the system and sockets will support
the maximum power of the appliance, as indicated on the data plate. If you
have any doubts, contact a qualified technician.
10 An omnipolar switch with a contact opening of at least 3 mm or more is
required for installation.
11 If the socket and appliance plug are not compatible, have the socket
replaced with a suitable model by a qualified technician, who should also
check that the cross-section of the socket cable is sufficient for the power
absorbed by the appliance. The use of adaptors, multiple sockets and/or
extensions, is not recommended. If their use cannot be avoided, remember
to use only single or multiple adapters and extensions which comply with
current safety regulations. In these cases, never exceed the maximum
current capacity indicated on the individual adaptor or extension and the
maximum power indicated on the multiple adapter.
12 Do not leave the appliance plugged in if it is not in use. Switch off the main
switch and gas supply when you are not using the appliance.
13 The openings and slots used for ventilation and heat dispersion must never
be covered.
14 The user must not replace the supply cable of this appliance. Always
contact an after-sales service centre which has been authorised by the
manufacturer if the cable has been damaged or needs replacement.
15 This appliance must be used for the purpose for which it was expressly
designed. Any other use (e.g. heating rooms) is considered to be improper
and consequently dangerous. The manufacturer declines all liability for
damage resulting from improper and irresponsible use.
16 A number of fundamental rules must be followed when using electrical
appliances. The following are of particular importance:
• Do not touch the appliance when your hands or feet are wet.
• Do not use the appliance barefooted.
• Do not use extensions, but if they are necessary, caution must be
exercised.
• Never pull the power supply cable or the appliance to unplug the
appliance plug from the mains.
• Never leave the appliance exposed to atmospheric agents (rain, sun
etc.)
• Do not allow children or persons who are not familiar with the appliance
to use it, without supervision.
17 Always unplug the appliance from the mains or switch off the main switch
before cleaning or carrying out maintenance.
18 If you are no longer using an appliance of this type, remember to make it
unserviceable by unplugging the appliance from the mains and cutting the
supply cable. Also make all potentially dangerous parts of the appliance
safe, above all for children who could play with the appliance.
19 To avoid accidental spillage do not use cookware with uneven or deformed
bottoms on the burners. Turn the handles of pots and pans inwards to avoid
knocking them over accidentally.
20 Never use flammable liquids such as alcohol or gasoline, etc. near the
appliance when it is in use.
21 When using small electric appliances near the hob, keep the supply cord
away from the hot parts.
22 Make sure the knobs are in the “•”/”¡” position when the appliance is not in
use.
23 When the appliance is in use, the heating elements and some parts of the
oven door become extremely hot. Make sure you don’t touch them and keep
children well away.
24 Gas appliances require regular air exchange to ensure trou-
ble-free performance. When installing the cooker, follow the
instructions provided in the paragraph on “Positioning” the
appliance.
25 The glass top (only on certain models) can shatter if it is overheated.
Therefore, all of the burners or hot plates must be turned off before the top
is closed.
26 If the cooker is placed on a pedestal, take the necessary precautions to
prevent the same from sliding off the pedestal itself.
27 Warning: never place hot containers or items and
flammable materials inside the dishwarmer drawer.
To maintain the EFFICIENCY and SAFETY of this appliance, we recommend:
• call only the Service Centers authorized by the manufacturer
• always use original Spare Parts

4
All instruction on the following pages must be carried out
by a competent person (corgi registered) in compliance
with gas safety (installation and use) regulation 1984.
Important: disconnect the cooker from the electrycity
and gas supply when any adjustment, etc.
Positioning your appliance
Important: this appliance may be installed and used only
in permanently ventilated rooms in compliance with current
directives. The following precautions should be taken:
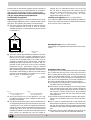
a) The room must be provided with an external exhaust
system obtained with a hood or with an electric
ventilator that goes on automatically each time the unit
is switched on.
In the case of chimneys or flues Directly to the
with branches (for cookers) exterior
b) The room must be provided with a system for air inflow
which is necessary for a regular combustion. The air
flow necessary for the combustion should be at least 2
m
3
/h for kW of installed power. The system may be
realized by drawing the air directly from outside the
building through a pipe that has at least a 100 cm
2
useable section and which must not be accidently
obstructed (Fig. A). And further it may be realized
indirectly from other adjacent rooms which are provided
with a ventilation pipe for the expulsion of the fumes to
the outside of the building as foresaid, and which must
not be part of the building in common use or rooms
with risk of fire, or bedrooms (Fig. B).
Detail A Adjacent Room to
room be ventilated
Fig. A Fig. B
Examples of ventilation openings Increased opening between
for the comburent air the door and and floor
c) During prolonged use of the appliance you may
consider it necessary to open a window to the outside
to improve ventilation.
d) The liquefied petroleum gases, which are heavier than
air, stagnate towards the ground. Therefore, the rooms
containing LPG cans must have openings towards the
outside in order to allow the venting from the ground of
eventual gas leak. Thus, the LPG cans must not be
installed or settled in rooms that are below the ground
level, (cellar, etc.) whether the cans are empty or
partially full. It is advisable to keep in the room only
the can which is being used, and it must be placed
away from direct heat sources (ovens, fireplaces,
stoves, etc.) that could make the can reach
temperatures higher than 50°C.
Levelling your appliance (only on a few models)
Your cooker is supplied with feet for levelling the appliance.
If necessary, these feet can be screwed into the housings
in the corners of the cooker base.
Mounting the legs (only on a few models)
Press-fit legs are supplied which fit under the base of your
cooker.
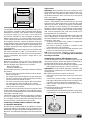
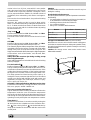
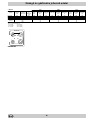
Installation of the cooker
The appliance can be installed next to furniture units which
are no taller than the top of the cooker hob. The wall in
direct contact with the back panel of the cooker must be
made of non-flammable material. During operation the
back panel of the cooker could reach a temperature of
50°C above room temperature. For proper installation of
the cooker, the following precautions must be taken:
a) The appliance can be placed in a kitchen, dining room
or bedsit, but not in a bathroom.
b) All furniture around the appliance must be placed at
least 200 mm from the top of the cooker, should the
surface of the appliance be higher than the worktop of
this furniture. Curtains should not be placed behind
the cooker or less than 200 mm away from the sides
of the appliance.
c) Any hoods must be installed according to the require-
ments in the installation manual for the hoods them-
selves.
d) If the cooker is installed beneath a wall cabinet, the
latter must be situated at a minimum of 420 mm above
the hob. The minimum distance between the worktop
and kitchen units made of combustible material is 700
mm.
e) The wall in direct contact with the back panel of the
cooker must be made of non-flammable materials.

5
Connecting the gas
The appliance should be connected to the mains or to a
gas cylinder in compliance with current directives. Before
making the connection, check that the cooker is regulated
for the gas supply you are using. If not, follow the
instructions indicated in the paragraph “Adapting to
different types of gas”. On some models the gas supply
can be connected on the left or on the right, as necessary;
to change the connection, reverse the position of the hose
holder with that of the cap and replace replace the gasket
(supplied with the appliance). When using liquid gas from
a cylinder, install a pressure regulator which complies with
current directive.
Important: check that the supply pressure complies with
the values indicated in table 1 “Characteristics of the
burners and nozzles” since this will ensure safe operation,
correct consumption and ensure a longer life to your
appliance.
Connection with hose
Make the connection using a gas hose complying with
the the characteristics provided in current directive. The
internal diameter of the pipe used is as follows:
- 8mm for liquid gas;
- 13mm for methane gas.
When installing the hose, remember to take the following
precautions:
• No part of the hose should touch parts whose tempe-
rature exceeds 50°C;
• The length of the hose should be less than 1500 mm;
• The hose should not be subject to twisting or pulling,
and should not have bends or kinks.
• The hose should not touch objects with sharp edges,
any moving parts, and it should not be crushed;
• The full length of the hose should be easy to inspect in
order to check its condition;
Check that the hose fits firmly into place at the two ends
and fix it with clamps complying to current directive.If any
of the above recommendations can not be adopted, flexible
metal pipes should be used.
Should the cooker be installed according to the conditions
of Class 2, subdivision 1, only a flexible metal pipe which
is in compliance with current safety standards should be
used to make the connection to the gas mains.
Connecting a flexible jointless stainless steel pipe
to a threaded attachment
Remove the hose holder fitted on the appliance. The gas
supply pipe fitting is a threaded 1/2 gas cylindrical male
attachment. Only pipes and gaskets complying with current
directives. The full length of the pipe must not exceed 2000
mm.
Tight control
Important: when installation has been completed, check
the pipe fitting for leaks with a soapy solution. Never use a
flame. Once the connection has been made, ensure that
the flexible metal tube does not touch any moving parts
and is not crushed.
Connecting the supply cable to the mains
Install a normalised plug corresponding to the load
indicated on the data plate. When connecting the cable
directly to the mains, install an omnipolar circuit-breaker
with a minimum contact opening of 3 mm between the
appliance and the mains. The omnipolar circuit breaker
should be sized according to the load and should comply
with current regulations (the earth wire should not be
interrupted by the circuit breaker).
The supply cable should be positioned so that it does not
reach a temperature of more than 50°C with respect to
the room temperature, along its length. Before making the
connection, check that:
• the limiter valve and the home system can support the
appliance load (see data plate);
• the mains is properly earthed in compliance with
current directives and regulations;
• there is easy access to the socket and omnipolar circuit
breaker, once the hob has been installed.
N.B: never use reducers, adaptors or shunts since they
can cause heating or burning.The plug and socket must
be easily accessible.
Adapting the cooker to different types of gas
In order to adapt the cooker to a different type of gas with
respect to the gas for which it was produced (indicated on
the label attached to the lid), follow these steps:
a) replace the hose holder mounted on the appliance with
that supplied in the bag of “cooker accessories”.
Important: the hose holder for liquid gas is marked 8, the
hose holder for methane gas is marked 13. Always fit the
sealing gasket.
b) Replacing the burner nozzles on the hob:
• remove the grids and slide the burners from their
housings;
• unscrew the nozzles using a 7 mm socket spanner,
and replace them with nozzles for the new type of gas
(see table 1 “Burner and nozzle characteristics”).
• replace all the components by repeating the steps in
reverse order.
c) Minimum regulation of the hob burners:
•
turn the tap to minimum;
• remove the knob and adjust the regulation screw, which
is positioned in or next to the tap pin, until the flame is
HOOD
420
Min.
min.
650
mm. with hood
min.
700
mm. without hood
mm.
600
Min. mm.
420
Min. mm.

6
small but steady.
N.B.: in the case of liquid gas, the regulation screw
must be screwed in to the bottom.
• check that the flame does not turn off when you turn
the tap quickly from high to low.
d Regulating the primary air of the burners:
The primary air of the burners requires no regulation.
Important
On completion of the operation, replace the old rating
sticker with one indicating the new type of gas used. This
sticker is available from our Service Centres.
Note
Should the pressure of the gas used be different (or vary)
from the recommended pressure, it is necessary to fit a
suitable pressure regulator onto the inlet pipe in
compliance with current National Regulations relative to
“regulators for channelled gas”.
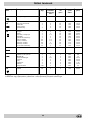
Burner and nozzle characteristics
S
S
R
A
K3G51S/HU
Table1 (For Hungary)
G 20 G 25.1 G 30
Burner Diameter
(mm)
By-pass
1/100 (mm)
Thermal
power kW
Reduced
Nozzle
1/100
(mm)
Thermal
power kW
Nominal
Flow*
l/h
Nozzle
1/100
(mm)
Thermal
power kW
Flow*
l/h
Nozzle
1/100
(mm)
Thermal
power kW
Nominal
Flow*
g/h
Fast (R) 100 41 0.80 128 3,30 314 128 2,85 262 87 3,00 218
Semi Fast (S) 75 30 0.50 104 2,10 200 104 1,95 179 70 1,90 138
Auxiliary (A) 51 30 0,50 76 1,15 109 76 1,05 97 52 1,00 73
Supply pressures
Nominal (mbar)
Minimum (mbar)
Maximum (mbar)
25
20
30
25
20
30
30
20
35
* At 15°C and 1013 mbar-dry gas
P.C.S. G20 37,78 MJ/m
3
P.C.S. G25.1 39,11 MJ/m
3
P.C.S. G30 49,47 MJ/kg

7
Inner dimensions of the oven:
Width: 39 cm
Depth: 41 cm
Height: 34 cm
Inner Volume of the Oven:
54 lt
Maximum absorber power:
2100 W
Inner Dimensions of the Food Warmer:
Width: 42 cm
Depth: 44 cm
Height: 18 cm
Voltage and Frequency of Power Supply:
220-230V - 50/60Hz
Burners:
adaptable for use with all the types of gas indicated on
the data plate situated inside the flap or, once the
dishwarmer drawer has been opened, on the inside wall
of the left-hand side panel.
7
This appliance conforms with the following
European Economic Community directives:
- 73/23/EEC of 19/02/73 (Low Voltage) and subsequent
modifications;
- 89/336/EEC of 03/05/89 (Electromagnetic
Compatibility) and subsequent modifications;
- 93/68/EEC of 22/07/93 and subsequent
modifications.
The European Directive 2002/96/EC on Waste Electrical
and Electronic Equipment (WEEE), requires that old
household electrical appliances must not be disposed of
in the normal unsorted municipal waste stream. Old
appliances must be collected separately in order to optimise
the recovery and recycling of the materials they contain
and reduce the impact on human health and the
environment. The crossed out “wheeled bin” symbol on the
product reminds you of your obligation, that when you di-
spose of the appliance it must be separately collected.
Consumers should contact their local authority or retailer
for information concerning the correct disposal of their old
appliance.
Technical Specifications
104
60
50
85/90
ENERGY LABEL
Directive 2002/40/EC on the label of electric ovens
Norm EN 50304
Energy consumption for Natural convection
heating mode: Convection
Declared energy consumption for Forcedconvection Class
heating mode: Fan assisted

8
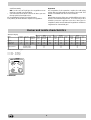
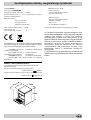
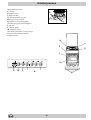
A. Tray for Catching Overflows
C. Gas Burner
E. Top Grate
F. Control Panel
G. Adjustable Feet or Legs
H. Dripping Pan or Baking Sheet
I. Oven Rack
J. Electronic Lighting Device (only a few models)
K. Flame Failure Device for Cooktop Burners (only a
few models)
L. Selection knob
M. Thermostat knob
N. Control Knobs for Gas Burners on Hob
O. The oven-operating pilot lamp
S. Timer Knob
The cooker with electric oven
J
K
G

9
The various functions included in the cooker are selected by
operating the control devices located on the cooker control
panel.
Control Knobs for the Gas Burners on the Hob (N)
The position of the gas burner controlled by each one of the
knobs is shown by a symbol of a solid ring:•. To light one of
the burners, hold a lighted match or lighter near the burner.
Press down and turn the corresponding knob in the counter-
clockwise direction to the maximum E setting. Each burner
can be operated at its maximum, minimum or intermediate
power. Shown on the knob are the different symbols for off •
(the knob is on this setting when the symbol lines up with the
reference mark on the control panel), for maximum E and
minimum C.
To obtain these settings, turn the knob counter-clockwise
with respect to the off position. To turn off the burner, turn the
knob clockwise until it stops (corresponding again with the •
symbol).
Electronic Ignition for the Gas Hob
Some of the models are provided with instant electronic lighting
of the hob gas burners; these models are identified by the pres-
ence of a lighting device (see detail J). For immediate lighting,
first press the button and then turn the knob.
Important: Should the burner flames accidentally go out,
turn off the control knob and wait at least 1 minute before
trying to relight.
Models with Hob Gas Burner Safety Devices to Prevent
Leaks (only on certain models)
These models can be identified by the presence of the device
itself (see detail K).
Important: Since the hob burners are equipped with a safety
device, you must hold the control knob in for about 6 seconds
after the burner has been lighted to allow the gas to pass until
the safety thermocouple has heated.
Attention: before using the oven and grill for the first time,
turn the oven on for approximately one half hour. Make sure
that the oven is empty, the thermostat on high, the door open,
and the room properly ventilated. The odor which can be
detected at times is due to the evaporation off the substances
used to protect the oven and the grill during the period
between the time of production and installation of the
appliance.
Attention: Only use the bottom shelf of the oven when using
the rotisserie to cook (where present). For all other types of
cooking, never use the bottom shelf and never place anything
on the bottom of the oven when it is in operation because
this could damage the enamel. Always place your cookware
(dishes, aluminium foil, etc. etc.) on the grate provided with
the appliance inserted especially along the oven guides.
The oven knobs
With these two controls you can select the different
functions of the oven and choose the cooking temperatu-
re suitable for the food you are preparing. The different
cooking functions are set up by operating the two knobs:
L - the selection knob
M - the thermostat knob
on the oven panel.
For any selection-knob setting different from idle, identified
by the “0”, the oven light turns on; the knob setting marked
8 permits turning on the oven light without any heating
element being switched on. When the oven light is on, it
means that the oven is in use, and it will remain on for the
entire time the oven is being used.
“Defrosting” Mode
Position of thermostat knob “M”: any
The fan located on the bottom of the oven makes the air
circulate at room temperature around the food. This is
recommended for the defrosting of all types of food, but in
particular for delicate types of food which do not require
heat, such as for example: ice cream cakes, cream or
custard desserts, fruit cakes. By using the fan, the
defrosting time is approximately halved. In the case of
meat, fish and bread, it is possible to accelerate the
process using the “multi-cooking” mode and setting the
temperature to 80° - 100°C.
Convection Mode

10
results in less loss of juices, meat which is more tender
and a decrease in the loss of weight for the roast. The fan
assisted mode is especially suited for cooking fish, which
can be prepared with the addition of a limited amount of
condiments, thus maintaining their flavour and appear-
ance.
Desserts: the fan assisted mode is also perfect for baking
leavened cakes.
Moreover, this mode can also be used to thaw quickly
white or red meat and bread by setting the temperature to
80 °C. To thaw more delicate foods, set the thermostat to
60°C or use only the cold air circulation feature by setting
the thermostat to 0°C.
“Top” oven
Position of thermostat knob “M”: Between 50°C and Max.
The top heating element comes on.
This mode can be used to brown food at the end of cook-
ing.
Grill
Position of thermostat knob “M”: Between 50°C and Max.
The top heating element and the turnspit come on.
The extremely high and direct temperature of the grill makes
it possible to brown the surface of meats and roasts while
locking in the juices to keep them tender. The grill is also
highly recommended for dishes that require a high temperature
on the surface: such as beef steaks, veal, rib steak, filets,
hamburgers etc...
Always leave the oven door ajar during cooking, except
when using the turnspit.
Some grilling examples are included in the “Practical Cooking
Advice” paragraph.
Fan Assisted Grill
Position of thermostat knob “M”: between 50°C and 200°C.
The top central heating element and the fan come on. This
combination of features increases the effectiveness of the
unidirectional thermal radiation of the heating elements
through forced circulation of the air throughout the oven.
This helps prevent food from burning on the surface, al-
lowing the heat to penetrate right into the food. Excellent
results are achieved with kebabs made with meats and
vegetables, sausages, ribs, lamb chops, chicken in a spicy
sauce, quail, pork chops, etc.
All “gratin” cooking must be done with the oven door shut.
This mode is also ideal for cooking fish steaks, like sword-
fish, tuna, grouper, stuffed cuttlefish etc.
The oven-operating pilot lamp (O)
Signals when the oven is heating. It switches off when the
temperature inside the oven reached the temperature
selected by the knob. At this point the alternate turning on
and turning off of this light indicates that the thermostat is
operating correctly to keep the oven temperature constant.
Timer Knob (S)
In order to use the timer, it must be wound by turning the
"S" knob almost one complete turn in the clockwise direc-
tion . Then, turning it back , set the desired time by
lining up the number for the minutes with the mark on the
control panel.
Attention
Avoid the children touch the oven door because it is very hot
during the cooking.
Practical advice for burner use
In order to get the maximum yield it is important to remember
the following:
· Use appropriate cookware for each burner (see table) so
as to avoid flames overshooting the edges.
· At boiling point turn the knob to minimum.
· Use cookware with lids.
· Always use cookware with flat bottoms.
Storage recess below the oven (only a few models)
Below the oven a recess can be used to contain cooking pans
and cooker accessories. Moreover, during oven operation, it may
be used to keep food warm.To open the storage is necessary
turn it downwards.
Caution: this storage recess must not be used to store
inflammable materials.
Burner ø Cookware diameter (cm)
Fast (R) 24 - 26
Semi Fast (S) 16 - 20
Auxiliary (A) 10 - 14

11
The oven offers a wide range of alternatives which allow
you to cook any type of food in the best possible way. With
time you will learn to make the best use of this versatile
cooking appliance and the following directions are only a
guideline which may be varied according to your own per-
sonal experience.
Baking cakes
The oven should always be warm before putting in cakes
wait till the end of preheating (about 10-15 min.). Cake-
baking temperatures are normally around 160°C/200°C.
Do not open the oven door during the baking process as
this could cause the cake to sink.In general:
Cooking fish and meat
When cooking white meat, fowl and fish use low
temperatures. (150°C-175°C). When red meat must be
superficially well-cooked but succulent inside, it is
advisable to start with a high temperature (200-220°C)
for a short time, and then to reduce it at a later point.
Generally speaking, the more meat there is, the lower the
temperature and the longer the cooking time should
be.Place the meat in the centre of the grid and put a spill-
tray underneath to catch grease drips. Insert the grid so
that it is in the middle of the oven. If more heat from below
is required, use the 1° bottom shelf.
To grill
When using any of the grilling modes, it is recommended
that the thermostat knob be turned to the highest setting,
as it is the most efficient way to use the grill (which
utilizes infrared rays). If necessary, however, the
thermostat can be set to lower temperatures for grilling.
When using the grill functions, place the grid on the
lower racks (see cooking table) then, to prevent fat and
grease from dripping onto the bottom of the oven and
smoke from forming, place a dripping-pan on the 1st
oven rack from the bottom.
Important: always use the grill with the oven door
closed. This will allow you both to obtain excellent results
and to save on energy (approximately 10%). Table 1
includes the recommended temperatures, cooking times
and positions for you to obtain the best results when
cooking.
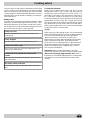
Cooking advice
Pastry is too dry
Increase the temperature by 10°C and reduce the
cooking time.
Pastry dropped
Use less liquid or lower the temperature by 10°C.
Cooked well on the inside but sticky on the
outside
Use less liquid, lower the temperature, and increase
the cooking time.
The pastry sticks to the pan
Grease the pan well and sprinkle it with a dusting of
flour.
Pastry is too dark on top
Place it on a lower rack, lower the temperature, and
increase the cooking time.

12
Before each operation, disconnect the cooker from the
electricity.To assure the long life of the cooker, it must be
thoroughly cleaned frequently, keeping in mind that:
· Do not use steam equipment to clean the appliance.
· the enamelled parts and the self-cleaning panels are
washed with warm water without using any abrasive
powders or corrosive substances which could ruin
them;
· the inside of the oven should be cleaned fairly often
while it is still warm using warm water and detergent,
followed by careful rinsing and drying;
· the flame spreaders should be washed frequently with
hot water and detergent taking care to eliminate any
scale;
· in cookers equipped with automatic lighting, the
terminal part of the electronic instant lighting devices
should be cleaned frequently and the gas outlet holes
of the flame spreaders should be checked to make
sure they are free of any obstructions;
· the electric plates are cleaned with a damp cloth and
they should be lubricated with a little oil while they still
warm;
· Stainless steel may become marked if it comes into
contact with very hard water or harsh detergents
(containing phosphorous) for long periods of time. After
cleaning, it is advisable to rinse thoroughly and dry. It
is also recommended to dry any water drops;
· On models with glass covers, the covers should be
cleaned with hot water; the use of rough cloths or
abrasives is to be avoided.
N.B: avoid closing the cover while the gas burners
are still warm. Remove any liquid from the lid before
opening it.
Important: periodically check the wear of the gas hose
and substitute it if there are any defects; we recommended
changing it every year.
Replacing the oven lamp
· Unplug the oven from the mains;
· Remove the glass cover of the lamp-holder;
· Remove the lamp and replace with a lamp resistant to
high temperatures (300°C) with the following
characteristics::
- Voltage 230V
- Wattage 25W
- Type E14
· Replace the glass cover and reconnect the oven to
the mains.
Greasing the Taps
The taps may jam in time or they may become difficult to
turn. If so, the tap itself must be replaced.
N.B.: This operation must be performed by a technician
authorised by the manufacturer.
Removing the lid
The cooker lid can be removed to facilitate cleaning. To
remove the lid, first open it completely and pull it
upwards (see figure)
Cooker routine maintenance and cleaning

13
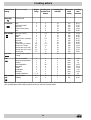
Cooking advice
Selector knob
setting
Food to be cooked
Weight
(in kg)
Cooking rack
position from
bottom
Preheating time
(minutes)
Thermostat
knob
setting
Cooking
time
(minutes)
Defrosting
All frozen food
Convection
Duck
Roast veal or beef
Pork roast
Biscuits (short pastry)
Tarts
1
1
1
-
1
3
3
3
3
3
15
15
15
15
15
200
200
200
180
180
65-75
70-75
70-80
15-20
30-35
Fan assisted
Pizza (on 2 racks)
Lasagne
Lamb
Roast chicken + potatoes
Mackerel
Plum-cake
Cream puffs (on 2 racks)
Biscuits (on 2 racks)
Sponge cake (on 1 rack)
Sponge cake (on 2 racks)
Savoury pies
1
1
1
1
1
1
0.5
0.5
0.5
1.0
1.5
2-4
3
2
2-4
2
2
2-4
2-4
2
2-4
3
15
10
10
10
10
10
10
10
10
10
15
220
200
180
180
180
170
190
180
170
170
200
15-20
30-35
50-60
60-75
30-35
40-50
20-25
10-15
15-20
20-25
25-30
Top Oven
Browning food to perfect
cooking
- 3/4 15 220 -
Grill
Soles and cuttlefish
Squid and prawn kebabs
Cod filet
Grilled vegetables
Veal steak
Cutlets
Hamburgers
Mackerels
Toasted sandwiches
1
1
1
1
1
1
1
1
n.° 4
4
4
4
3/4
4
4
4
4
4
5
5
5
5
5
5
5
5
5
Max
Max
Max
Max
Max
Max
Max
Max
Max
8-10
6-8
10
10-15
15-20
15-20
7-10
15-20
2-3
Fan assisted
grill
Grilled chicken
Cuttlefish
1.5
1.5
3
3
5
5
200
200
55-60
30-35
NB: cooking times are approximate and may vary according to personal taste. When cooking using the grill or fan assisted
grill, the dripping pan must always be placed on the 1st oven rack from the bottom.

14
Biztonsági utasítások
1 Ezt a készüléket csak otthoni, háztartási használatra szabad
alkalmazni.
2 Ez a használati útmutató csak akkor érvényes, ha a készüléken
a következõ országkód fel van tüntetve: HU.
3 Ez a használati útmutató 1 osztályú (függetlenül beszerelt)
vagy 2 osztályú, 1 alcsoportú (két szekrény közé beszerelt)
készülékekre vonatkozik.
4 A készülék használata elõtt kérjük figyelmesen olvassa végig
az ebben a füzetben található utasításokat, mert fontos
információkat tartalmaznak a biztonságos beszerelésrõl,
használatról és ápolásról. Kérjük gondosan õrizze meg ezt a
füzetet, hogy bármikor elolvashassa!
5 A csomagolás levétele után gyõzõdjön meg a készülék
sértetlenségérõl! Kétség esetén ne használja a készüléket, hanem
forduljon a szervizhez! A csomagolás részeit (mûanyag
zacskók, habszivacs, csavarok stb.) úgy tárolja, hogy azt
gyermekek ne érhessék el, mert ezek potenciális veszélyforrást
jelentenek!
6 Az üzembe helyezést csak szakember végezheti a gyártó
utasításainak alapján. A helytelen beszerelés miatt keletkezõ
sérülésekért és károkért a gyártó semmilyen felelõsséget nem
vállal.
7 A készülék elektromos biztonsága csak akkor megfelelõ, ha az
szakszerûen, az érvényben lévõ biztonsági elõírásoknak
megfelelõen, földelt hálózathoz van csatlakoztatva. Fontos,
hogy ezt az alapvetõ biztonsági követelményt ellenõrizze és
kérdéses esetben egy szakemberrel elvégeztesse a földelés
alapos ellenõrzését! A gyártó nem vonható felelõsségre a
berendezés hiányzó földelése miatt keletkezõ károkért.
8 Felállítás elõtt biztosítani kell, hogy a készülék felszereléskori
beállítása összhangban legyen a helyi ellátási feltételekkel -
gázfajta, és névleges csatlakozási gáznyomás, valamint az
elektromos hálózattal.
9 Gyõzõdjön meg arról, hogy az elektromos rendszer és az aljzat
megfelel-e a típuscímkén megadott maximális teljesítmény
értéknek! Kérdéses esetben kérje szakember véleményét!
10 A beszerelésnél egy legalább 3 mm-es kontakt nyílású
multipoláris kapcsolót kell elhelyezni.
11 Ha az aljzat és a készülék csatlakozó dugója nem kompatibilis,
cseréltesse ki az aljzatot egy megfelelõre szakemberrel, akinek
arról is meg kell gyõzõdnie, hogy a hálózati csatlakozó, amelyet
az aljzathoz csatlakoztat, megfelel-e a készülék által felvett
maximális teljesítménynek! Nem ajánlatos adapter, többszörös
aljzat és/vagy hosszabbító használata. Ha mégis szükség van
ezek használatára, csak olyan egyszeres vagy többszörös
adaptert és hosszabbítót használjon, amelyek megfelelnek az
érvényben lévõ biztonsági elõírásoknak! Figyeljen arra, hogy
ne lépje túl az egyszeres adapteren és hosszabbítón jelzett
érvényes kategóriát, vagy a többszörös adapteren jelzett
maximális teljesítményt!
12 Amennyiben nem használja a készüléket, kapcsolja ki a
készülék fõkapcsolóját, vagy húzza ki a csatlakozó dugót az
aljzatból és zárja el a gáz fõcsapot!
13 Ne takarja le a nyílásokat és réseket, amelyek a készülék
szellõzésére vagy a hõ eloszlatására szolgálnak!
14 Ha a készülék hálózati kábele sérült, vagy ki kell cserélni, azt
csak a gyártó által javasolt szerviz szakemberei cserélhetik ki.
15 A tûzhely kizárólag arra a célra használható, amelyre tervezték.
Minden más használatra (pl.: helyiségek fûtésére) alkalmatlan
és veszélyes. A gyártó nem vonható felelõsségre olyan károkért,
amelyek szakszerûtlen, hibás, vagy nem rendeltetésszerû
használatra vezethetõk vissza.
16 Elektromos készülékek használata néhány alapvetõ szabály
betartását igényli. Különösen:
· A készüléket soha ne érintse meg nedves, vizes kezekkel és
lábakkal!
· A készüléket soha ne üzemeltesse mezítláb!
· Ha hosszabbító használata szükséges, különös óvatossággal
használja azt!
· Soha ne a hálózati kábelnél fogva vagy a készülék eltolásával
húzza ki a csatlakozót az elektromos hálózatból! Ne használja
a tûzhelyet, ha a hálózati kábel sérült, hanem forduljon
engedélyezett szakszervizhez!
· A készüléket ne tegye ki az idõjárás viszontagságainak (esõ,
nap stb.)!
· A készüléket felügyelet nélkül ne használják gyerekek vagy
erre alkalmatlan személyek!
17 Tisztítási és karbantartási munkálatok elõtt áramtalanítsa a
készüléket a hálózati csatlakozó dugó kihúzásával vagy a biztosíték
kikapcsolásával és várja meg amíg a készülék lehûl!
18 Ha úgy dönt, hogy nem használja többet a készüléket tegye azt
használhatatlanná a hálózati csatlakozó dugó kihúzásával és a
vezeték átvágásával! Tegyen minden potenciális veszélyforrást
biztonságossá, ez az óvintézkedés különösen a gyermekek
megvédése érdekében fontos, akik játszhatnak a nem használt
és kidobott készülékkel.
19 A balesetek elkerülése érdekében ne használjon egyenlõtlen
vagy deformálódott aljú edényeket az égõkön vagy az
elektromos mezõkön! Az edények és serpenyõk fogantyúit
forgassa belülre, hogy elkerülje, hogy véletlenül meglökje
azokat!
20 A készülék egyes részei hosszú ideig melegek maradnak a
használat után. Ügyeljen arra, hogy ne érintse meg azokat, amíg
teljesen le nem hûltek!
21 Soha ne használjon gyúlékony folyadékokat, mint pl. alkohol,
benzin, stb. a készülék közelében üzemelés közben!
22 Ha a tûzhely közelében kis elektromos készülékeket használ, tartsa
távol a hálózati csatlakozó vezetéket a meleg részektõl!
23 Amennyiben nem használja a készüléket, állítsa a gombokat
“·”/”o” pozícióra!
24 A készülék egyes részei és a sütõ ajtó használat közben nagyon
magas hõmérsékletet érhetnek el. Ne érintse meg ezeket a
részeket és tartsa távol a gyermekeket!
25 A gázkészülékeknek megfelelõ szellõzésre van szükségük a
helyes mûködéshez. Tartsa be a Készülék üzembe
helyezése címû fejezet utasításait!
26 Az üveglap (típustól függõen) meleg hatására elrepedhet. Ezért
csak akkor hajtsa le, ha az összes égõt és fõzõmezõt kikapcsolta!
27 Amennyiben a sütõt egy talpazatra állítja, tegye meg a szükséges
óvintézkedéseket annak érdekében, hogy a készülék ne
csúszhasson le a talpazatról!
A készülék teljesítõképességének és biztonságának megtartásának érdekében kérjük figyeljen a következõkre:
· kizárólag a jótállási jegyen felsorolt szervizeinkhez forduljon!
· ragaszkodjon eredeti alkatrészek beszereléséhez!

15
Ezek az utasítások szakképzett, engedélyezett mûszaki
szerelõnek szólnak azért, hogy biztosítsa a beszerelés,
beállítások és karbantartások helyes elvégzését a jelenleg
érvényben lévõ elõírások betartásával.
Fontos: minden beállítási vagy karbantartási munkálat
elvégzése elõtt válassza le a készüléket az áramhálózatról!
A készülék elhelyezése:
Tûzveszélyesség besorolás tekintetében ez a készülék X típusú,
ami azt jelenti, hogy a tûzhely közvetlenül konyhabútor mellé
is elhelyezhetõ feltéve, hogy a bútor magassága nem haladja
meg a tûzhely magasságát. A tûzhely hátoldalával érintkezõ
falnak nem szabad gyúlékony anyagból lennie. Ne felejtse el,
hogy használat közben a tûzhely hátsó fala akár 50°C-kal is a
szobahõmérséklet fölé emelkedhet!
Fontos: A készülék csak megfelelõen szellõzõ helyiségben
állítható fel az érvényben lévõ elõírásoknak megfelelõen.
Ügyeljen a következõ elõírások betartására:
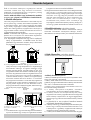
a) A helyiségnek rendelkeznie kell egy elszívó rendszerrel,
amely az égésterméket a szabadba vezeti. Ez lehet
páraelszívó vagy elektromos ventilátor, amely a sütõ üzembe
helyezésekor automatikusan bekapcsol.
Kürtõ vagy kürtõ rendszer (tûzhelyekhez) Elvezetés közvetlenül a
szabadba
b) A helyiségnek rendelkeznie kell egy olyan rendszerrel is,
amely biztosítja a levegõ utánpótlást. Ez a megfelelõ égés
biztosításához szükséges. Az égéshez szükséges levegõ
áramlás nem lehet kisebb, mint kW-onként 2m
3
/óra. Ez a
levegõellátás történhet közvetlenül a szabadba nyúló csövön
keresztül, melyiknek keresztmetszete legalább 100 cm
2
kell
hogy legyen. Ügyeljen arra, hogy a nyílás ne tömõdhessen
el, mert ez balesetveszélyes!. (A ábra) A levegõmennyiség
biztosítása történhet közvetett módon is a szomszédos
helyiségen keresztül. Ekkor a szomszédos helyiségnek kell
a fentebb leírtak szerinti szellõzéssel rendelkeznie, és a két
helyiség között megnövelt rést kell alkalmazni. Ezek a
helyiségek azonban nem lehetnek nappalik, hálószobák vagy
tûzveszélyes helyiségek. (B ábra)
A részlet Szomszédos A szoba,amelyet
helyiség szellõztetni kell
A szükséges levegõ mennyiség Megnövelt nyílás az ajtó és a talaj
biztosítása a szabadból között
A ábra B ábra
c) A készülék intenzív vagy hosszabb ideig tartó használatakor
nyissa ki az ablakot vagy növelje a levegõáramlás mértékét
a megfelelõ szellõzés biztosítása érdekében!
d) PB gázzal üzemelõ készülék esetén - mivel a PB gáz nehezebb,
mint a levegõ - a helyiség alján legyen a kivezetõ nyílás,
amelyen keresztül egy esetleges gázszivárgás esetén a gáz
eltávozhat. A teli vagy félig üres palackokat nem szabad
talajszint alatti helyiségben (pl. pince) üzemeltetni vagy
tárolni, mert ez balesetveszélyes. Csak az éppen
használatban lévõ palackot tartsa a tûzhellyel egy
helyiségben, a hõforrásoktól (tûzhely, kémény, fõzõlap stb.)
távol, hogy a palack hõmérséklete ne érhesse el az 50°C-ot!
A készülék szintezése (csak néhány típusnál)
A készüléket felszerelték állítható lábacskákkal amellyel
szintezheti a készüléket. Amennyiben szükséges, ezeket a
lábacskákat becsavarhatja a tûzhely alsó sarkainál a burkolatba.
A lábak felszerelése (csak néhány típusnál)
A lábak tartozékok és a tûzhely alapzata alá kell szerelni azokat.
A tûzhely üzembe helyezése
A tûzhelyet felállíthatja közvetlenül olyan konyhabútor mellé,
amely nem magasabb a készüléknél.
A tûzhely hátsó oldalával közvetlenül érintkezõ fal nem lehet
gyúlékony anyagból. Használat közben a tûzhely hátsó fala akár
50°C-kal is a szobahõmérséklet fölé emelkedhet
A tûzhely helyes üzemelésének biztosításához tartsa be a
következõ biztonsági elõírásokat:
a) A tûzhely elhelyezhetõ konyhában, étkezõben,
garzonlakásban, de nem használható a fürdõszobában.
b) A tûzhely mellett lévõ konyhaszekrénynek (amely
magasabb, mint a tûzhely) legalább 200 mm távolságra kell
lennie a tûzhely tetejétõl mérve. Ne tegyen függönyöket a
tûzhely mögé vagy 200 mm-nél közelebb a tûzhely széleitõl
mérve!
c) A páraelszívót az arra vonatkozó használati útmutató
utasításainak betartásával kell beépíteni!
d) A tûzhely szélével egy vonalban elhelyezhet faliszekrényeket
feltéve, hogy a szekrény alsó fala minimum 420 mm-re van
a fõzõlap felett. A gyúlékony anyagból készült szekrények
minimális távolsága a fõzõlaptól mérve 700 mm.
e) A tûzhely hátsó oldalával érintkezõ falnak tûzálló anyagból
A
Üzembe helyezés

16
kell lennie.
Gáz csatlakoztatás
A tûzhely gáz-csatlakoztatását csak szakképzett gázszerelõ
végezheti. A helytelen üzembe helyezésbõl adódó károkért a
gyártó semmilyen felelõsséget nem vállal.
A készüléket a helyi gázmûvek elõírásai és az érvényben lévõ
szabályozások betartásával kell a hálózatra vagy a gázpalackra
csatlakoztatni.
Mielõtt a készüléket rákötné a gázra ellenõrizze, hogy a tûzhely
a háztartásban lévõ gázfajtára van-e beállítva! Ha nem, akkor a
gáz csatlakoztatása elõtt kövesse az Átállás más gázfajtára
címû fejezet utasításait!
Néhány típusnál a készülék jobb é

17
Megjegyzés: Folyékony PB gáz esetén a szabályzó csavart
teljesen be kell csavarni.
· Gyõzõdjön meg arról, hogy a láng nem alszik el, amikor a
gombot gyorsan a maximum pozícióról a minimumra forgatja!
d) Az égõ primer levegõjének szabályozása:
Az égõ primer levegõjét nem szükséges beállítani.
Fontos: A mûvelet befejezése után cserélje ki a régi azonosító
matricát egy másikra, amely az új gáztípust jelzi! A matrica a
szervíznél szerezhetõ be.
Megjegyzés: Abban az esetben, ha a használt gáz nyomása az
ajánlott nyomástól eltér (vagy változik) egy erre alkalmas
nyomás szabályzó beszerelése szükséges a bevezetõ csõbe az
ide vonatkozó érvényben lévõ elõírásoknak megfelelõen.

18
Gázégõ és gázfúvóka jellemzõ adatai
S
S
R
A
K3G51S/HU
1. táblázat G 20 G 25.1 G 30
Gázégõ
Átmérõ
(mm)
Gyújtóláng,
1/100
(
mm
)
Csökkent
ett
hõenergia
, kW
Fúvóka,
1/100
(mm)
Névleges
hõenergia,
kW
Átáramlás*
l/h
Fúvóka,
1/100
(
mm
)
Névleges
hõenergia,
kW
Átáramlás*
l/h
Fúvóka,
1/100
(mm)
Névleges
hõenergia,
kW
Átáramlás*
g/h
Gyors (R) 100 41 0.80 128 3.30 314 128 2.95 262 87 3.00 218
Fél-
gy
ors
(
S
)
75 30 0.50 104 2.10 200 104 1.95 179 70 1.90 138
Kisegítõ (A) 51 30 0.50 76 1.15 109 76 1.05 97 52 1.00 73
Hálózati
nyomás
Nom.
Min.
Max
25
20
30
25
20
30
30
25
35
15°C-on és 1013 mbar-nál
P.C.S. G20 37,78 MJ/m
3
P.C.S. G25.1 39,11 MJ/m
3
P.C.S. G30 49,47 MJ/k
g

19
Gyártó: INDESIT
Azonosító jel: K3G51S/HU
Névleges feszültség: 220-230V~ 50/60 Hz
Érintésvédelmi osztály: I. (csak védõföldeléssel ellátott
aljzathoz csatlakoztatható)
Befoglaló méretek:
szélesség: 500 mm
mélység: 600 mm
magasság: 850/900 mm
Max. elektromos teljesítmény: 2100 W
Sütõ térfogat: 54 l
Tûzveszélyességi besorolás: X
7
A forgalombahozó a 79/1997 (XII.31) IKIM, valamint a többször
módosított 22/1998.(IV.17)IKIM rendeletek alapján tanúsítja,
hogy a fenti készülék megfelel a követelményeknek.
73/23/CEE, 1973.02.19 (Alacsony feszültség) és
vonatkozó módosításai
89/336/CEE, 1989.05.03 (Elektromágneses
kompatibilitás) és vonatkozó módosításai
93/68/CEE, 1993.07.22 és vonatkozó módosításai
90/396/CEE, 1990. 06.028 (Gáz) és vonatkozó
módosításai
MSZ EN 30-1-1:1998
Indesit Company
Viale Aristide Merloni 47.60044
Fabriano (AN) ITALY
Indesit Company
Hungary Representatíve Office
Interoffice Irodaház
Nyár utca 32
H- 1072 Budapest (Hungary)
A készülék jótállási feltételei a mellékelt jegy szerintiek.
Az elektromos készülékek megsemmisítésérõl szóló
európai direktíva 2002/96/EC elõírja, hogy a régi háztartási
gépeket nem szabad a normál nem szelektív
hulladékgyûjtési folyamat során összegyûjteni. A régi
gépeket szelektíven kell összegyûjteni, hogy optimalizálni
lehessen a bennük lévõ anyagok újrahasznosítását és
csökkenteni lehessen az emberi egészségre és
környezetre gyakorolt hatásukat. Az áthúzott
szemeteskuka jele emlékezteti Önt arra, hogy
kötelessége ezeket a termékeket szelektíven
összegyûjteni.
A fogyasztóknak a helyi hatóságot vagy kereskedõt kell
felkeresniük a régi háztartási gépek helyes elhelyezését
illetõen.
Vevõtájékoztató adatlap, megfelelõségi nyilatkozat
104
60
50
85/90
ENERGY LABEL (ENERGIA TÁBLA)
Az elektromos sütok jelzéseirol szóló 2002/40/EU eloírás.
EN 50304 szabvány
Kényszer hõáramlás Osztály energiafogyasztása
melegítõ funkció: Statikus
Természetes hoáramlási névleges névleges energiafogyasztása
melegíto funkció: Légkeveréses

20
A Zsírfelfogó borítólap
C Gáz égõ
E Edénytartó rács
F Kapcsoló tábla
G Állítható lábacska vagy láb
H Serpenyõ vagy sütõtepsi
K Égésbiztosító a fõzõlap égõihez
J Elektromos gyújtó (típustól függõen)
I Sütõ rács
L Választó gomb
M Termosztát gomb
N A tûzhely gázégõinek vezérlõ gombjai
O Sütõ üzemelés ellenõrzõ lámpa
S Idõmérõ gomb
A tûzhely leírása
J
K
G
A
F
I
H
E
C
N
L
M
S
Page is loading ...
Page is loading ...
Page is loading ...
Page is loading ...
Page is loading ...
Page is loading ...
Page is loading ...
Page is loading ...
-
 1
1
-
 2
2
-
 3
3
-
 4
4
-
 5
5
-
 6
6
-
 7
7
-
 8
8
-
 9
9
-
 10
10
-
 11
11
-
 12
12
-
 13
13
-
 14
14
-
 15
15
-
 16
16
-
 17
17
-
 18
18
-
 19
19
-
 20
20
-
 21
21
-
 22
22
-
 23
23
-
 24
24
-
 25
25
-
 26
26
-
 27
27
-
 28
28


Ask a question and I''ll find the answer in the document
Finding information in a document is now easier with AI
Related papers
-
Indesit KN6G52S(X)/BA User guide
-
Indesit K1G21S(X)/R User guide
-
Indesit K1G21S/HU User guide
-
-
-
-
-
-
Indesit K3G51S(W)/HU S User guide
-
Other documents
-
Whirlpool K6G21(W)/EX CKD User guide
-
-
-
-
-
-
-
-
-