Russell Hobbs product_232 User manual
- Category
- Mixers
- Type
- User manual
This manual is also suitable for

instructions

2

3
Read the instructions and keep them safe. Pass them on if you pass the mixer on.
Remove all packaging, but keep it till you know the mixer works.
important safeguards
Follow basic safety precautions, including:
1 This appliance must only be used by a responsible adult. Use and store it out of
reach of children.
2 Don’t put the appliance in liquid. Don’t use it in a bathroom, near a source
of water, or outdoors.
3 Keep fingers, hair, clothing and kitchen utensils clear of the attachments.
4 Switch off and unplug before fitting or removing the attachments, before cleaning,
and when not in use.
5 Don’t use attachments or accessories unless we supply them.
6 Don’t run the motor continuously for more than 3 minutes, to avoid overheating.
After 3 minutes, let it cool for 5 minutes before reusing.
7 Keep the appliance and the cable away from hotplates, hobs or burners.
8 Don’t try to sit the mixer on it’s end – it’ll fall over.
9 Don’t use the mixer for any purpose other than those described in these instructions.
10 Don’t use the mixer if it’s damaged or malfunctions.
11 If the cable is damaged, return the mixer, to avoid hazard.
household use only
before using for the first time
1 Lay the mixer on a stable, flat work surface.
2 Put the LV plug into the socket under the handle.
3 Plug the adapter into a power socket (switch the socket on, if it’s switchable), and
leave it to charge for 16 hours.
4 Route the cable so it doesn’t overhang, and can’t be caught or tripped over.
the twist lock
5 To change from right angled drive to straight through (or vice versa)
a) switch off (0)
b) press the end of the twist lock furthest from the drive head
c) twist the drive head through 90 degrees
d) release the twist lock
6 The drive head twists in one direction only – if it won’t twist, try the other way.
the switch
7 There are 2 speeds available, 1 (low) and 2 (high).
8 To switch off, move the speed control to 0, the middle position.
fitting the attachments
9 Switch off (0) and unplug the mixer before fitting or removing the attachments.
10 Turn the attachment to align the pips on the shaft with the hole in the drive head,
then push it into the drive head till it clicks into place.
removing the attachments
11 To remove the attachment, switch off (0), and shake off any excess mixture.
12 Grip the attachment firmly, and pull it straight out of the drive head.

4
using the mixer
13 To avoid splashing/splattering, don’t start the mixer till the attachment is inside the
mixing bowl and immersed in the food/liquid to be mixed.
14 Use the whiz for mixing and aerating drinks and milk shakes.
15 Use the whisk for beating/aerating batter, egg whites and cream
16 Use the beater for mixing light dough and cake mix.
17 If the motor starts to labour, add more liquid to the mix, if possible, or switch off and
carry on by hand.
18 If you need to set the mixer down, switch off (0), and shake any mixture off the
attachment.
19 Don’t run the motor continuously for more than 3 minutes, to avoid overheating.
After 3 minutes, let it cool for 5 minutes before reusing.
20 Don’t try to sit the mixer on it’s end – it’ll fall over.
timings and speeds
21 Timing and speed will vary with the amount, thickness, and composition of the mix.
22 Generally thicker mixes suggest longer timings and slower speeds.
23 Thinner mixes suggest shorter timings and higher speeds.
24 Speed and timing aren’t usually critical. If you’re unsure, use bursts. Switch on,
switch off, look/feel/taste, till it feels right.
care and maintenance
25 Switch off (0) before cleaning.
26 Remove any attachment.
27 Wipe the handle with a damp cloth – don’t let liquid get inside the mixer.
28 Wash the whisk, beater, and whiz in warm, soapy water.
31 Don’t put the mixer in water or any other liquid.
32 Don’t put any part of the appliance in a dishwasher.
33 Don’t use harsh or abrasive cleaning agents or solvents.
charging
34 The battery loses its charge slowly when it’s not in use.
35 A charge should last a couple of days in “average” use.
36 Recharge for at least 12 hours – overnight is usually easiest.
37 Don’t leave the adapter permanently connected – you’ll reduce the battery life.
38 The adapter gets a bit hot – don’t worry about it.
39 Use the mixer only with the adapter supplied, and vice versa.

5
wall mounting
We cannot accept responsibility for any damage or loss of any nature arising out of this
operation. If you’re in any doubt about your ability to do this, employ a craftsman to do
it for you.
You’ll need:
a) 2 dome-head screws – the underside of the heads must be flat, not countersunk,
and the heads should be small enough to pass through the bottom of the
“keyhole” shaped screw holes
b) 2 wall plugs – these must fit the screws
c) a drill and bit to fit the screws or wall plugs
d) a screwdriver to fit the screws
what to do:
1 Choose a location: close to a power socket, out of reach of children, and safe from
the risk of accidental knocks.
2 Check for pipes and wires in, on, or behind the location. If you find any, go back to
point 1 and choose another location.
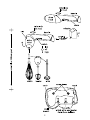
3 The holes must be 104mm apart.
4 Use the guide on the left of page 2 of this booklet.
5 Turn page 2 through 90 degrees, so that the edge of the page is horizontal.
6 Hold the page against the wall, and push a pin through the crosses to mark the wall.
7 Drill the holes on the pin marks.
8 Insert the wall plugs (if necessary), and push them in till they’re flush with the wall
surface. You may need to give them a couple of (gentle) taps with a hammer.
9 Push the screws through the holes on the back of the mount, and into the holes or
wall plugs.
10 Screw in the screws, but leave the heads about 10mm clear.
11 Put the wall mount over the screws, so that the screw heads come through the
bottom of the “keyhole” shaped screw holes.
12 Slide the wall mount down, to bring the screws into the upper parts of the screw
holes.
13 Tighten the screws – they should be firm, but not over-tight. If you over-tighten
them, you may distort the mount.
mounting the mixer
14 Twist the drive head so that it’s at 90 degrees to the handle.
15 Push the drive head end into the wall mount first, then the handle.
16 To remove it, pull the handle away first.
17 Hang the whisk, whiz, and beater from the holders at the bottom of the wall mount.

6
battery disposal
Sadly, nothing lasts forever, and the day will come when your appliance comes to the
end of its natural life. When this happens, don’t put the dead appliance out with your
normal household rubbish. It contains a nickel metal hydride (NiMH) battery, which
must be removed from the appliance, and recycled, or disposed of in an
environmentally friendly way.
Your local authority will have arrangements for recycling or disposing of the battery.
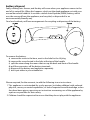
To remove the battery:
a) remove the screw in the base, next to the hole for the LV plug
b) remove the screw buried in the hole at the top of the handle
c) split the mixer along the seams that run up the back and front of the handle
d) pull the connectors off the battery terminals.
e) dispose of the battery and appliance separately
f) don’t put either in your wheelie bin.
We are required, for the moment, to add the following to our instructions:
1 This appliance is not intended for use by persons (including children) with reduced
physical, sensory or mental capabilities, or lack of experience and knowledge, unless
they have been given supervision or instruction concerning use of the appliance by
a person responsible for their safety.
2 Children should be supervised to ensure that they do not play with the appliance.

7

8
wheelie bin symbol
To avoid environmental and health problems due to hazardous substances in
electrical and electronic goods, appliances marked with this symbol mustn’t be
disposed of with unsorted municipal waste, but recovered, reused, or recycled.
service
If you ring Customer Service, please have the Model No. to hand, as we won’t be able
to help you without it. It’s on the rating plate (usually underneath the product).
The product isn’t user-serviceable. If it’s not working, read the instructions, check that
it’s fully charged. If it’s still not working, consult your retailer. If that doesn’t solve the
problem:
Pack carefully, with a note of your name, address, day phone number, and what’s
wrong. If under guarantee, say where and when purchased, and include proof of
purchase (till receipt). Send it to Customer Returns (address below right).
Customer Service Customer Returns
(correspondence only) Salton Europe Ltd
Salton Europe Ltd Heath Mill Road
Failsworth Wombourne
Manchester Wolverhampton
M35 0HS WV5 8AQ
Customer Service (serv[email protected])
telephone 0845 658 9700 (local rate number)
guarantee
Defects affecting product functionality appearing within one year of purchase will be
corrected by replacement or repair provided the product is used and maintained in
accordance with the instructions. Your statutory rights are not affected.
Documentation, packaging, and product specifications may change without notice.
online
www.russellhobbs.co.uk for more products
550-006
-
 1
1
-
 2
2
-
 3
3
-
 4
4
-
 5
5
-
 6
6
-
 7
7
-
 8
8


Russell Hobbs product_232 User manual
- Category
- Mixers
- Type
- User manual
- This manual is also suitable for
Ask a question and I''ll find the answer in the document
Finding information in a document is now easier with AI
Related papers
-
 Russell Hobbs product_223 User manual
-
 Russell Hobbs product_326 User manual
-
Russell Hobbs product_214 User manual
-
 Russell Hobbs product_192 User manual
-
 Russell Hobbs 18553 User manual
-
 Russell Hobbs 18962 Your Creations 3 in 1 Hand Mixer User manual
-
 Russell Hobbs 25893 User manual
-
 Russell Hobbs 18961 User manual
-
 Russell Hobbs 18962 User manual
-


Other documents
-
Metos SP-502A-B Owner's manual
-
Breville SHM2 Operating instructions
-
Kenwood Major KM810 Instructions Manual
-
-
-
-
-
Kenwood KMM710 User manual
-
Kenwood KM010 User manual
-