Frigidaire FFVU17F4QW Owner's manual

Category
Fridges
Type
Owner's manual

This manual is also suitable for

TABLE OF CONTENTS
www.frigidaire.com USA 1-800-944-9044 www.frigidaire.ca Canada 1-800-265-8352
All about the
Use & Care
of your Convertible
Freezer/Refrigerator
Product Registration ..........................................2
Important Safety Instructions ..............................2
First Steps ........................................................4
Setting the Temperature Control.................... ....6
Optional Features....................................6
A01063504 (May 2017)
Energy-Saving Tips.. ..........................................9
Care and Cleaning .............................................9
Power/Freezer Failure ....................................10
Before You Call .................................................10
Major Appliance Warranty .................................13
2
PRODUCT REGISTRATION
Read and Save These Instructions
This Owner’s Guide provides specic operating
instructions for your model. Use your appliance
only as instructed in this guide. These
instructions are not meant to cover every
possible condition and situation that may occur.
Common sense and caution must be practiced
when installing, operating, and maintaining
any appliance.
Record Your Model and
Serial Numbers
Record the model and serial numbers in the
space provided below.
Model Number:
Serial Number:
Purchase Date:
Denitions
This is the safety alert symbol. It is used to
alert you to potential personal injury hazards.
Obey all safety messages that follow this
symbol to avoid possible injury or death.
WARNING
Please read all instructions before using
this unit.
DANGER
DANGER indicates an imminently hazardous
situation which, if not avoided, will result in
death or serious injury.
WARNING
WARNING indicates a potentially hazardous
situation which, if not avoided, could result
in death or serious injury.
CAUTION
CAUTION indicates a potentially hazardous
situation which, if not avoided, may result in
minor or moderate injury.
IMPORTANT
IMPORTANT indicates installation, operation
or maintenance information which is
important but not hazard-related.
Register Your Product
The self-addressed
PRODUCT REGISTRATION
CARD should be lled in
completely, signed and
returned to Electrolux Home Products.
This Use and Care Guide provides operating
instructions for your model. Use your unit only
as instructed in this Use and Care Guide.
WARNING
For your safety
Do not store or use gasoline or other
ammable vapors and liquids in the vicinity
of this unit or any other appliance. Read
product labels for ammability and other
warnings.
Do not operate the unit in the presence of
explosive fumes.
Remove and discard any spacers used to
secure the shelves during shipping. Small
objects are a choke hazard to children.
Remove all staples from the carton.
Staples can cause severe cuts, and also
destroy nishes if they come in contact
with other appliances or furniture.
IMPORTANT SAFETY
INSTRUCTIONS
Model and Serial
Number Plate
3
IMPORTANT SAFETY INSTRUCTIONS
WARNING
Child Safety
Destroy carton, plastic bags, and any ex-
terior wrapping material immediately after
the unit is unpacked. Children should
never use these items for play. Cartons
covered with rugs, bedspreads, plastic
sheets or stretch wrap may become
airtight chambers and can quickly cause
suffocation.
An empty, discarded icebox, refrigerator,
or freezer is a very dangerous attraction
to children.
Remove the door(s) of any appliance that
is not in use, even if it is being discarded.
WARNING
Risk of child entrapment
Child entrapment and suffocation are not
problems of the past. Junked or abandoned
appliances are still dangerous – even if they
will sit for “just a few days”. If you are getting
rid of your old appliance, please follow the
instructions below to help prevent accidents.
We strongly encourage responsible
appliance recycling/disposal methods. Check
with your utility company or visit www.
recyclemyoldfridge.com for more information
on recycling your old appliance.
Before you throw away
your old appliance:
Remove door.
Leave shelves in place so
children may not easily
climb inside.
Have the refrigerant
removed by a
qualied technician.
Grounding type wall receptacle
Power cord with
3-prong grounded plug
Do not, under
any circumstances,
cut, remove,
or bypass the
grounding prong.
WARNING
Avoid re hazard or electric shock. Do not
use an extension cord or an adapter plug.
Do not remove any prong from power cord.
4
NOTE
It is very important for your appliance to be
level in order to function properly. If the unit
is not leveled during installation, the door may
be misaligned and not close or seal properly,
causing cooling, frost, or moisture problems.
IMPORTANT SAFETY
INSTRUCTIONS
FIRST STEPS
WARNING
Other Precautions
To defrost, always unplug unit rst.
Never unplug the unit by pulling on the
power cord. Always grip the plug rmly and
pull straight out from the receptacle.
Turning the control to “OFF” turns off the
compressor but does not disconnect power
to other electrical components.
Leveling
The appliance must have all bottom corners
resting rmly on a solid oor. The oor must be
strong enough to support a fully loaded unit.
This Use & Care Guide provides general operating
instructions for your model. Use the unit only
as instructed in this Use & Care Guide. Before
starting the unit, follow these important
rst steps.
Location
Choose a place that is near a grounded
electrical outlet.
For the most efcient operation, the appliance
should be located where surrounding
temperatures will not exceed 110°F (43°C).
Models with the electronic temperature control
option can be located where the surrounding
temperature drops to 0°F (-18°C). Additional
compressor heaters are not recommended.
Models with electromechanical temperature
control should not be located where the
surrounding temperature drops below
40°F (4°C). These models do not have the
automatic freeze control option to prevent
refrigerated food from freezing. Allow space
around the unit for good air circulation. Leave
a 3 inch (75 mm) space on all sides of the unit
for adequate circulation.
3” (75 mm)
3” (75 mm)
3” (75 mm) Air Space
3” (75 mm)
WARNING
Electrical Information
These guidelines must be followed to ensure
that safety mechanisms in the design of this
appliance will operate properly.
Refer to the serial plate for correct electri-
cal rating. The power cord of the appliance
is equipped with a three-prong grounding
plug for your protection against electrical
shock hazards. It must be plugged directly
into a properly grounded three-prong
receptacle, protected with a 15-amp time
delay fuse or circuit breaker. The recep-
tacle must be installed in accordance with
the local codes and ordinances. Consult a
qualied electrician. Receptacles protected
by Ground Fault Circuit Interrupters (GFCI)
are NOT RECOMMENDED. Do NOT use an
extension cord or adapter plug.
If the power cord is damaged, it should be
replaced by an authorized service techni-
cian to prevent any risk.
Never unplug the appliance by pulling on
the power cord. Always grip the plug rm-
ly, and pull straight out from the receptacle
to prevent damaging the power cord.
Unplug the appliance before cleaning
and before replacing a light bulb to avoid
electrical shock.
If voltage varies by 10% or more, appliance
performance may be affected. Operating
the unit with insufcient power can dam-
age the motor. Such damage is not covered
under the warranty. If you suspect your
household voltage is high or low, consult
your power company for testing.
To prevent the appliance from being turned
off accidentally, do not plug unit into an out-
let controlled by a wall switch or pull cord.
Do not pinch, knot, or bend power cord in
any manner.
5
CAUTION
To allow door to close and seal properly, DO
NOT let food packages extend past the front
of shelves.
To Level Upright Units:
After discarding crating screws, use a
carpenter’s level to level the appliance from
front-to-back. Adjust the plastic leveling feet in
front, ½ bubble higher, so that the door closes
easily when left halfway open.
Repositioning the Mid-Level Basket
(some models):
1. To remove the support-hanging basket,
press upward on underside of front of
support to release from shelf rod.
2. Rotate front under the shelf, and then
slide support-hanging basket forward to
remove from back shelf rod.
3. To remove shelf grommet, slide away
from wall, then pull from rod.
4. Repeat steps 1-3 for other side.
5. With the shelf
installed, press the
2 shelf grommets
down onto the rod
that is anchored
into the appliance
wall (located in the
back only). Be sure
to keep the larger
end of the shelf grommets away from
the wall.
6. Push the shelf
grommets onto the
shelf rod until rmly
seated.
7. Slide the shelf
grommets into the
wall grommets
already in the unit
wall until they
are ush.
8. Guide the support-
hanging basket
underneath the
shelf, inserting the
slotted end of the
support onto the
rear shelf rod.
9. Rotate the support-
hanging basket up to bring the front end
over the front shelf rod. Slide forward to
locate front of support-hanging basket
over front of shelf rod. Push down on
support until it snaps into place.
FIRST STEPS
To install the handle clips to the basket
(some models):
1. Place the basket on
a rm, at surface.
2. With the narrow
side of the handle
clip on the inside of
the basket, snap the
handle clip to the
recessed area in
the basket.
3. Once the inside
surface snaps in
place, continue the
process by rolling
the handle clip
slightly outward and
pressing down rmly
to snap onto the
outside surface. If
installed incorrectly,
the handle clip will not lay at.
6
NOTE
Your appliance may have some, or all of the
features listed below. Become familiar with
these features, and their use and care.
SETTING THE
TEMPERATURE CONTROL
Cool Down Period
For safe food storage, allow 4 hours for the unit
to cool down completely. The appliance will run
continuously for the rst several hours. Foods that
are already frozen may be placed in the freezer
after the rst few hours of operation. Unfrozen
foods should NOT be loaded into the freezer until
freezer has operated for four (4) hours.
When loading freezer, freeze only three (3)
pounds of fresh food per cubic foot of freezer
space at one time. Distribute packages to be
frozen evenly throughout the freezer. It is not
necessary to turn the control knob to a colder
setting while freezing food.
Door Removal
If door must be removed, unplug the unit.
1. Gently lay appliance on its back, on a
rug or blanket.
2. Remove 2 base screws and base panel.
3. Remove wire from clips on bottom of
cabinet if required.
4. Unplug connector, if required, by holding
the cabinet connector in place, and
pulling door connector out. If equipped,
pull Harness Retainer from Cabinet.
5. Remove 4 bottom hinge screws.
6. Remove plastic top hinge cover.
7. Remove 2 screws from top hinge.
8. Remove top hinge from cabinet.
9. Remove door and bottom hinge
from cabinet.
10. To replace door, reverse the above
order and securely tighten all screws to
prevent hinge slippage. Harness must be
routed as shown in gure.
FIRST STEPS
Temperature Control
Electromechanical Temperature Control
(some models)
Converting Between Refrigerator
and Freezer:
The convertible model can operate as
either a freezer or a refrigerator. The
electromechanical temperature control
provides this adjustment and is located inside
the appliance. The temperature is factory
preset to provide satisfactory food storage
temperatures. However, the temperature
control is adjustable to provide a range of
temperatures for your personal satisfaction.
OPTIONAL FEATURES
Base Screw
Hinge
Screws
Wire
Door
Connector
Cabinet
Connector
Harness
Restraint
All Freezer or All Refrigerator
Change Modes to Fit Your Needs
STEP 1: Locate the temperature control knob
at the bottom of the interior back wall.
STEP 2: Turn the knob to the area marked
“freezer” or “refrigerator” to select
your desired mode.
7
OPTIONAL FEATURES
Electronic Temp Alarm
If a malfunction causes an unsafe temperature
inside the freezer, the high temp will display on
the control panel and the alarm will sound. To
silence the alarm, press the “set” button next
to the “alarm off” indicator on the display or
any key on the control panel.
Quick Freeze
Quick freeze can be enabled by entering into
the “options” menu on the control panel and
by pressing the “set” button once the indicator
is highlighted next to “quick freeze”. The unit
will be in quick freeze mode for 72 hours and
will show a snowake indicator on the control
panel to indicate that it is in quick freeze
mode. To exit quick freeze mode, enter into
the options menu on the control panel and
press the “set” button once the indicator is
highlighted next to “quick freeze,” after which
the snowake indicator will be removed from
the control panel. Or quick freeze will end
automatically after 72 hours.
Control lock
Control lock can be enabled by entering into
the options menu on the control panel and by
pressing the “set” button once the indicator
is highlighted next to “control lock”. A control
lock icon will be displayed on the control
panel to indicate that the control panel has
been locked. To unlock, press and hold the
set button for 3 seconds, after which the lock
indicator will be removed from the control
panel and the control panel has been unlocked.
Electronic Temperature Control (some models)
Converting
Between
Refrigerator
and Freezer:
The convertible
model can
operate as either
a freezer or a
refrigerator. The
selection is made
by pressing
and holding the
minus “-” and
“set” buttons
on the control
panel. The display will indicate whether it is
in the refrigerator or freezer mode.
Adjusting the
Temperature
Setting:
The temperature
is factory preset
to provide
satisfactory
food storage
temperatures.
To adjust the
temperature
setting, press the
plus “+” button
for warmer
temperatures
and the minus “-” button for colder
temperatures. Allow several hours for
the temperature to stabilize between
adjustments.
Automatic Freeze Control
When in the refrigerator mode the Freeze
Control Feature will maintain proper interior
refrigerator temperature even when the
refrigerator is placed in an area where the
surrounding temperature drops to 10°F (-12°C).
OFF
ALARM
DEMO
HRS
POWER FAILHIGH TEMP
DOOR AJAR
ºC
REFRIGERATOR
FREEZER
ºF
quick freeze
power off
exit
control lock
PRESS
& HOLD
Temperature Conversion
Press and hold both temperature buttons ("+"
and "-") to toggle between °F and °C.
Power Off
To shut cooling off to the unit and to turn off
the interior lights of the unit, enter into the
options menu on the control panel and press
and hold the “set” button for 3 seconds once
the indicator is highlighted next to “power off”.
“Power off” will be displayed on the control
panel to indicate that the unit is in the powered
off mode. To turn power back on to the unit,
press and hold the “set” key for 3 seconds. After
which the power off indicator will be removed
from the control panel and the set point of the
unit will be displayed again.
Powering off: To shut off cooling to the unit,
turn the temperature control knob counter-
clockwise to the OFF position.
STEP 3: Adjust the knob to customize your
temperature setting or select * for
our recommended setting.
TIP: Change modes a few hours before you
need to load up your freezer or refrigerator
to allow time for the temperature to stabilize
between adjustments.
8
OPTIONAL FEATURES
NOTE
While in Sabbath mode, neither the lights
nor the control panel will work until Sabbath
mode has been deactivated.
Adjustable door bins
Some models have adjustable door bins that
can be moved to suit individual needs.
To move door bins:
1. Lift bin straight up.
2. Remove bin.
3. Place bin in desired position.
4. Lower bin onto supports until locked
in place.
Door Storage
Door bins, shelves, and racks are provided for
convenient storage of jars, bottles, and cans.
Frequently used items can be quickly selected.
Some models have door racks or bins that can
accommodate gallon-sized plastic drink containers
and economy-sized jars and containers.
The dairy compartment, which is warmer than
the general food storage section, is intended for
short term storage of cheese, spreads, or butter.
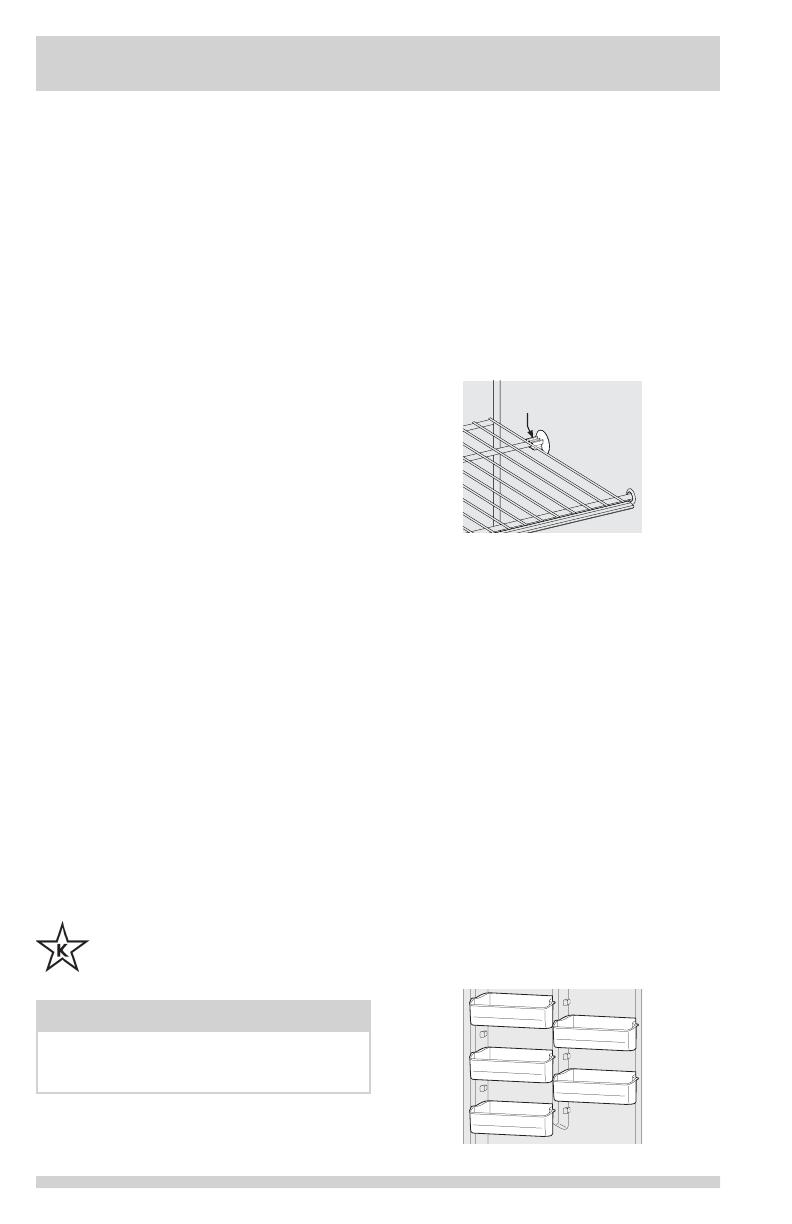
Adjustable Interior Shelves
Multi-position adjustable interior shelves can
be moved to any position for larger or smaller
packages. The shipping spacers that stabilize
the shelves must be removed prior to adjusting
the shelf location. Move shelf to the right and
lift left to move to the desired location.
The unit stays in Sabbath mode after a power
failure recovery. It must be deactivated with
the buttons on the control panel.
Power Fail
If your unit has lost power, the control panel
will display “power fail” and the number of
hours that your unit has been without power
up to a maximum of 50 hrs. The alarm will
sound until the condition is acknowledged by
pressing the set button or any other button on
the control panel.
Door Ajar
If your door has been left open for more than
5 minutes, the control panel will display “door
ajar” and will sound an alarm until the door
has been closed or any button is pressed on
the control panel. If a button on the control
panel has been pressed but the door has not
been closed, “door ajar” will continue to be
displayed on the control panel until the door
has been closed.
Sabbath Mode
The Sabbath mode is a feature that disables
portions of the appliance and its controls in
accordance with observance of the weekly
Sabbath and religious holidays within the
Orthodox Jewish community.
To turn Sabbath mode on, simultaneously
press and hold the “Options” button and “+”
button for 5 seconds, after which “Sb” will be
displayed on the control panel indicating that
the unit is in Sabbath mode. To exit Sabbath
mode, press and hold the “Options” button
and “+” button for 5 seconds, after which the
display will return to displaying the set point of
the unit.
In the Sabbath mode, the High Temp alarm
is active for health reasons. For example,
if the door is left ajar the High Temp alarm
is activated. The refrigerator will function
normally once the door is closed, without
any violation of the Sabbath/Holidays. The
High Temp alarm is permitted when cabinet
temperature is outside the safe zone for 20
minutes. The alarm silences itself after 10
minutes while the High Temp icon stays lit until
the Sabbath mode is exited.
For further assistance, guidelines of
proper usage and a complete list of
models with the Sabbath feature,
please visit the web at http:\\www.star-k.org.
Power On Light
The Power On Light indicates that the
appliance is properly connected to electrical
power. The light glows even when the
temperature control is turned to OFF. If the
light goes out, refer to “Appliance does not
run” in the Before You Call section.
Packaging Spacer
9
OPTIONAL FEATURES
Crispers (some models)
The crispers, located under the bottom
refrigerator shelf, are designed for storing
fruits, vegetables, and other fresh produce.
Wash items in clear water and remove excess
water before placing them in the crispers.
Items with strong odors or high moisture
content should be wrapped before storing.
Cleaning the Inside
Wash inside surfaces of the unit with a solution
of 2 tbsp. (25 g) of baking soda in 1 qt. (1 l)
warm water. Rinse and dry. Wring excess water
out of the sponge or cloth.
Wash the removable parts with the baking soda
solution mentioned above or mild detergent and
warm water. Rinse and dry. Never use metallic
scouring pads, brushes, abrasive cleaners, or
alkaline solutions on any surface. Do not wash
removable parts in a dishwasher.
Cleaning the Outside
Wash the cabinet with warm water and mild
liquid detergent. Rinse well and wipe dry with
a clean soft cloth. Replace parts and food.
Do not use razor blades or other sharp
instruments, which can scratch the surface
when removing adhesive labels. Any glue left
from the tape can be removed with a mixture
of warm water and mild detergent, or touch
the residue with the sticky side of the tape
already removed. DO NOT REMOVE THE
SERIAL PLATE.
CAUTION
Damp objects stick to cold metal surfaces.
Do not touch interior metal surfaces with
wet or damp hands.
Appliance must be unplugged (to avoid
electrical hazard) from power source
when defrosting unit.
Convertible model is frost free and will defrost
automatically, but should be cleaned occasionally.
CARE AND CLEANING
WARNING
If leaving door open while on vacation, make
certain that children cannot get into the
appliance and become entrapped.
ENERGY-SAVING TIPS
The appliance should
be located in the
coolest area of the
room, away from heat-
producing appliances or
heating ducts, and out
of direct sunlight.
Let hot foods cool to
room temperature before
placing in the unit. Overloading the unit
forces the compressor to run longer. Foods
that freeze too slowly may lose quality
or spoil.
Be sure to wrap foods properly and wipe
containers dry before placing them in the
appliance. This cuts down on frost build-up
inside the unit.
Appliance shelves and baskets should not
be lined with aluminum foil, wax paper, or
paper toweling. Liners interfere with cold
air circulation, making the unit
less efcient.
Organize and label food to reduce door
openings and extended searches. Remove
as many items as needed at one time, and
close door as soon as possible.
10
NOTE
DO NOT open appliance door unnecessarily
if unit is off for several hours.
POWER/FREEZER FAILURE
If a power failure occurs, frozen foods
will stay frozen for over 2 days (upright/
convertible) or 3 days (chest) if the appliance
is kept closed*. If the power failure continues,
pack seven or eight pounds of dry ice into
the unit every 24 hours. Look in the Yellow
Pages under “Dry Ice”, “Dairies”, or “Ice Cream
Manufacturers” for local dry ice suppliers.
Always wear gloves and use caution when
handling dry ice.
If the appliance has stopped operating,
see the “Freezer does not run” section in the
Avoid Service Checklist section of this use and
care guide. If you cannot solve the problem, call
an authorized service personnel immediately.
If the unit remains off for several hours,
follow the directions above for the use of dry ice
during a power failure. If necessary, take the
food to a local locker plant until the appliance
is ready to operate. Look in the Yellow Pages
under “Frozen Food Locker Plants”.
*Average cabinet temperature as tested per AHAM
standard HRF-1-2007 Section 7.9 at 70º with door
remaining closed.
CARE AND CLEANING
PROBLEM CAUSE CORRECTION
APPLIANCE OPERATION
Appliance
does not run.
Appliance is plugged into a
circuit that has a ground
fault interrupt.
Temperature Control is in
the OFF position.
Appliance may not be
plugged in or plug is loose.
House fuse blown or
tripped circuit breaker.
Power outage
Use another circuit. If you are unsure
about the outlet, have it checked by a
certied technician.
See Setting the Temperature
Control section.
Ensure plug is tightly pushed into outlet.
Check/replace fuse with a 15-amp time-
delay fuse. Reset circuit breaker.
Check house lights. Call local electric company.
Visit our web site at
www.frigidaire.com.
1-800-944-9044 (United States)
1-800-265-8352 (Canada)
Before calling for service, review this list. It may save you time and expense. This list includes com-
mon occurrences that are not the result of defective workmanship or materials in this appliance.
BEFORE YOU CALL
Vacation and Moving Tips
Short Vacations: Leave the unit operating
during vacations of less than three weeks.
Long Vacations: If the appliance will not
be used for several months, remove all food
and unplug the power cord. Clean and dry the
interior thoroughly. To prevent odor and mold
growth, leave the appliance door open slightly,
blocking it open if necessary.
Moving: Disconnect the power cord plug from
the wall outlet. Remove food, defrost, and then
clean the unit. Secure all loose items such as
base panel, baskets, and shelves by taping
them securely in place to prevent damage.
In the moving vehicle, secure the appliance
in an upright position, and secure to prevent
movement. Also protect outside of the unit
with a blanket, or similar item.
11
BEFORE YOU CALL
PROBLEM CAUSE CORRECTION
Appliance
runs too much
or too long.
Room or outside weather
is hot.
Appliance has recently
been disconnected for a
period of time.
Large amounts of warm
or hot food have been
stored recently.
Door is opened too
frequently or too long.
Appliance door may be
slightly open.
Temperature control is set
too low.
Appliance gaskets are dirty,
worn, cracked, or poorly tted.
It’s normal for the appliance to work
longer under these conditions.
It takes 24 hours for the appliance to cool
down completely.
Warm food will cause appliance to run
more until the desired temperature is
reached.
Warm air entering the appliance causes it
to run more. Open door less often.
See “DOOR PROBLEMS”.
Turn control knob to a warmer setting. Allow
several hours for the temperature to stabilize.
Clean or change gasket. Leaks in door seal
will cause appliance to run longer in order
to maintain desired temperatures.
Pressing the “-“
or “+” buttons
on the control
panel does not
change the
set points
Verify the control panel
is not locked or in
Sabbath mode.
To unlock, press and hold the “set” button
for 3 seconds; to exit Sabbath mode, press
and hold “set” and “Options” for 5 seconds.
APPLIANCE TEMPERATURES
Interior ap-
pliance tem-
perature is
too cold.
Temperature control is set
too low.
The unit is in quick
freeze mode.
Set control to a warmer setting. Allow several
hours for temperature to stabilize. See “Tem-
perature Control” in Optional Features section.
Exit quick freeze mode by entering into
the options menu on the control panel and
pressing the “set” button once the indicator
is highlighted next to “quick freeze”.
Temperature
inside appli-
ance is
too warm.
The unit is in
Refrigerator mode.
Door is opened too
frequently or too long.
Door may not be
seating properly.
Large amounts of warm
or hot food has been
stored recently.
Appliance has recently
been disconnected for a
period of time.
Set control to a colder setting. Allow several
hours for temperature to stabilize. See “Tem-
perature Control” in Optional Features section.
Warm air enters the appliance every time
the door is opened. Open door less often.
See “DOOR PROBLEMS”.
Wait until the appliance has had a chance
to reach its selected temperature.
Appliance requires 24 hours to cool
down completely.
Temperature of
external
appliance is
too warm.
The external walls can be
as much as 30º F warmer
than room temperature.
This is normal while the compressor works
to transfer heat from inside the cabinet.
SOUND AND NOISE
Louder sound
levels when
appliance
is on.
Modern appliance have
increased storage capacity
and more stable
temperatures. They require
a high efciency compressor.
This is normal. When the surrounding noise
is low, you might hear the compressor
running while it cools the interior.
12
PROBLEM CAUSE CORRECTION
Longer sound
levels when
compressor
comes on.
Appliance operates at
higher pressures during
the start of the ON cycle.
This is normal. Sound will level off or
disappear as appliance continues to run.
Popping or
cracking sound
when compres-
sor comes on.
Metal parts undergo
expansion and contraction,
as in hot water pipes.
This is normal. Sound will level off or
disappear as appliance continues to run.
Bubbling
or gurgling
sound, like
water boiling.
Refrigerant (used to cool
the appliance) is circulating
throughout the system.
This is normal.
Vibrating or
rattling noise.
Appliance is not level. It
rocks on the oor when it
is moved slightly.
Floor is uneven or weak.
Appliance is touching
the wall.
Level the unit. Refer to ”Leveling” in the
First Steps Section.
Ensure oor can adequately support appliance.
Level the appliance by putting wood or metal
shims under part of the freezer.
Re-level the appliance or move appliance
slightly. Refer to “Leveling” in the First
Steps Section.
Alarm is
sounding
from the con-
trol panel
Look on the control panel to
determine which indicator
light is on (High Temp,
Power Fail, or Door Ajar).
Press the “set” button to acknowledge the
alarm or close the door if the door ajar
indicator is shown.
WATER/MOISTURE/FROST INSIDE APPLIANCE
Moisture
forms on
inside appli-
ance walls.
Weather is hot and humid.
Door may not be
seating properly.
Door is opened too often
or too long.
The rate of frost buildup and internal
sweating increases. This is normal.
See “DOOR PROBLEMS”.
Open door less often.
ODOR IN APPLIANCE
Odor in
appliance.
Interior needs to be
cleaned.
Foods with strong odors
are in the appliance.
Clean interior with sponge, warm water,
and baking soda.
Cover the food tightly.
DOOR PROBLEMS
Door will
not close.
Appliance is not level. It
rocks on the oor when it
is moved slightly.
Floor is uneven or weak.
Appliance rocks on oor
when it is moved slightly.
This condition can force the cabinet out
of square and misalign the door. Refer to
“Leveling” in the FIRST STEPS Section.
Level the oor by using wood or metal
shims under the appliance or brace oor
supporting the appliance.
LIGHTING PROBLEMS
Interior light
bulb is not on.
No electric current is
reaching the appliance
Control is in Sabath mode
(Sb is displayed on control)
See “APPLIANCE DOES NOT RUN”.
Depress TEMP MODE key and CONTROL
LOCK key for 3 seconds.
Power Avail-
able Light is
not on
LED may be burned out.
No electric current is
reaching the appliance.
The door has been left open
for more than 5 minutes.
Contact a qualied service dealer.
See “Appliance does not run” in
APPLIANCE OPERATION”.
Close the door.
BEFORE YOU CALL
13
MAJOR APPLIANCE WARRANTY
1
MAJOR APPLIANCE WARRANTY
Your appliance is covered by a one year limited warranty. For one year from your original date of
purchase, Electrolux will pay all costs for repairing or replacing any parts of this appliance that prove
to be defective in materials or workmanship when such appliance is installed, used and maintained in
accordance with the provided instructions.
Exclusions
If You Need Service
This warranty does not cover the following:
1. Products with original serial numbers that have been removed, altered or cannot be readily determined.
2. Product that has been transferred from its original owner to another party or removed outside
the USA or Canada.
3. Rust on the interior or exterior of the unit.
4. Products purchased “as-is” are not covered by this warranty.
5. Food loss due to any refrigerator or freezer failures.
6. Products used in a commercial setting.
7. Service calls which do not involve malfunction or defects in materials or workmanship, or for appliances
not in ordinary household use or used other than in accordance with the provided instructions.
8. Service calls to correct the installation of your appliance or to instruct you how to use your appliance.
9. Expenses for making the appliance accessible for servicing, such as removal of trim, cupboards,
shelves, etc., which are not a part of the appliance when it is shipped from the factory.
10. Servicecallstorepairorreplaceappliancelightbulbs,airlters,waterlters,other
consumables, or knobs, handles, or other cosmetic parts.
11. Surcharges including, but not limited to, any after hour, weekend, or holiday service calls, tolls, ferry
trip charges, or mileage expense for service calls to remote areas, including the state of Alaska.
12.Damagestothenishofapplianceorhomeincurredduringinstallation,includingbutnot
limitedtooors,cabinets,walls,etc.
13. Damages caused by: services performed by unauthorized service companies; use of parts other than
genuine Electrolux parts or parts obtained from persons other than authorized service companies; or
externalcausessuchasabuse,misuse,inadequatepowersupply,accidents,res,oractsofGod.
DISCLAIMER OF IMPLIED WARRANTIES; LIMITATION OF REMEDIES
CUSTOMER’S SOLE AND EXCLUSIVE REMEDY UNDER THIS LIMITED WARRANTY SHALL BE PRODUCT
REPAIR OR REPLACEMENT AS PROVIDED HEREIN. CLAIMS BASED ON IMPLIED WARRANTIES,
INCLUDINGWARRANTIESOFMERCHANTABILITYORFITNESSFORAPARTICULARPURPOSE,ARE
LIMITED TO ONE YEAR OR THE SHORTEST PERIOD ALLOWED BY LAW, BUT NOT LESS THAN ONE
YEAR.ELECTROLUXSHALLNOTBELIABLEFORCONSEQUENTIALORINCIDENTALDAMAGESSUCH
ASPROPERTYDAMAGEANDINCIDENTALEXPENSESRESULTINGFROMANYBREACHOFTHIS
WRITTEN LIMITED WARRANTY OR ANY IMPLIED WARRANTY. SOME STATES AND PROVINCES DO
NOTALLOWTHEEXCLUSIONORLIMITATIONOFINCIDENTALORCONSEQUENTIALDAMAGES,
OR LIMITATIONS ON THE DURATION OF IMPLIED WARRANTIES, SO THESE LIMITATIONS OR
EXCLUSIONSMAYNOTAPPLYTOYOU.THISWRITTENWARRANTYGIVESYOUSPECIFICLEGAL
RIGHTS.YOUMAYALSOHAVEOTHERRIGHTSTHATVARYFROMSTATETOSTATE.
This warranty only applies in the USA and Canada. In the USA, your appliance is warranted by
Electrolux Major Appliances North America, a division of Electrolux Home Products, Inc. In Canada,
your appliance is warranted by Electrolux Canada Corp. Electrolux authorizes no person to change
or add to any obligations under this warranty. Obligations for service and parts under this warranty
mustbeperformedbyElectroluxoranauthorizedservicecompany.Productfeaturesorspecications
as described or illustrated are subject to change without notice.
Keep your receipt, delivery slip, or some other appropriate payment record to establish the warranty
period should service be required. If service is performed, it is in your best interest to obtain and
keep all receipts. Service under this warranty must be obtained by contacting Electrolux at the
addresses or phone numbers below.
USA
1.800.944.9044
Frigidaire
10200 David Taylor Drive
Charlotte, NC 28262
Canada
1.800.265.8352
Electrolux Canada Corp.
5855 Terry Fox Way
Mississauga, Ontario, Canada
L5V 3E4
  • Page 1 1
  • Page 2 2
  • Page 3 3
  • Page 4 4
  • Page 5 5
  • Page 6 6
  • Page 7 7
  • Page 8 8
  • Page 9 9
  • Page 10 10
  • Page 11 11
  • Page 12 12
  • Page 13 13

Frigidaire FFVU17F4QW Owner's manual

Category
Fridges
Type
Owner's manual
This manual is also suitable for

Ask a question and I''ll find the answer in the document

Finding information in a document is now easier with AI