
Programming
Guide
CX208/212
Desktop Printer
®

SATO America, Inc.
10350-A Nations Ford Rd.
Charlotte, NC 28273
MainPhone:(704) 644-1650
Technical SupportHotLine:(704) 644-1660
Fax:(704) 644-1661
http://www.satoamerica.com
© Copyright 2001
SATO America, Inc.
Warning: This equipment has been tested and found to comply with the limits for a
Class B computing device pursuant to Part 15 of the FCC rules. These limits are
designed to provide reasonable protection against harmful interference in a
residential installation. This equipment generates, uses, and can radiate radio
frequency energy and, if not installed in accordance with the instruction may cause
harmful interference to radio communications.However, there is no guarantee that
interference will not occur in a particular installation. If this equipment does cause
harmful interference to to radio or television reception, which can be determined by
turning the equipment off and on, the user is encouraged to try and correct the
interference by one or more of the following measures:
• Reorient or relocate the receiving antenna.
• Increase the separation between the equipment and the receiver.
• Connect the equipment into an outlet or a circuit different from that to
which the receiver is connected.
• Consult an experienced radio/TV technician for help.
Caution: The FCC warns the users that changes or modifications of the unit not
expressly approved by the party responsible for compliance could void the user’s
authority to operate the equipment.
All rights reserved. No part of this document may be reproduced or issued to third
parties in any form whatsoever without the express permission of SATO America, Inc.
The material in this document is provided for general information and is subject to
change without notice. SATO America, Inc. assumes no responsibility for any errors
that might appear.

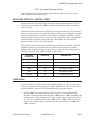
TABLE OF CONTENTS
CX200 PROGRAMMING GUIDE
Introduction ..............................1
The SATO Programming Language...................1
Selecting Protocol Control Codes....................2
Using Basic ...............................2
The Print Area.............................4
Rotated Fields .............................6
Command Default Settings .......................7
Printer Configuration..........................8
Label Sensing .............................9
Command Code Page Reference ....................10
Bar Codes..............................11
Bar Codes, Expansion .......................16
Bar Codes, Variable Ratio .....................17
Base Reference Point ........................19
Characters, Custom Designed ...................21
Character Expansion ........................23
Character, Fixed Spacing ......................25
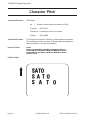
Character Pitch ...........................26
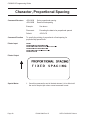
Character, Proportional Spacing ..................28
Clear Print Jobs & Memory .....................29
Continuous Forms Printing .....................30
Copy Image Area ..........................31
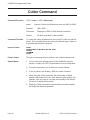
Cutter Command ..........................33
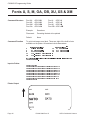
Fonts, U, S, M, OA, OB, XU, XS and XM ..............34
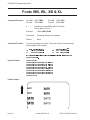
Fonts, WB,WL, XB and XL .....................36
Form Feed .............................38
Form Overlay Recall ........................39
Form Overlay Store.........................40
Graphics, Custom..........................41
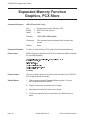
Graphics, PCX ...........................43
Journal Print ............................44
Lines and Boxes ..........................45
Line Feed ..............................47
Media Size .............................48
Off-Line...............................49
Postnet ...............................50
Print Darkness ...........................51
Print Length, Expanded ......................52
Print Position ............................53
Print Quantity ...........................56
Print Speed .............................57
Repeat Label ............................58
Replace Data (Partial Edit) .....................59
Reverse Image ...........................61
Rotate, Fixed Base Reference Point.................63
Rotate, Moving Base Reference Point ...............65
Sequential Numbering .......................67
SATOCX208/212PrintersPN9001092Rev.BPage-i

Start/Stop Label ..........................69
Expanded Memory Option Commands ...............70
Clear Memory Area .......................71
Fonts, TrueType Recall .....................72
Fonts, TrueType Store .....................73
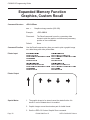
Graphics, Custom Recall ....................74
Graphics, Custom Store.....................75
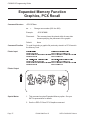
Graphics, PCX Recall ......................76
Graphics, PCX Store ......................77
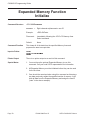
Initialize ............................79
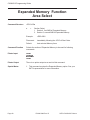
Slot Select ...........................80
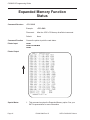
Status..............................81
Two-Dimensional Symbols .....................82
Maxicode ............................83
PDF417 .............................85
Configuration Commands .......................87
Auto-Calibrate ...........................88
Backfeed Enable ..........................89
Calibrate Sensor ..........................90
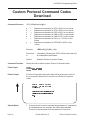
Custom Protocol Command Codes Download ...........91
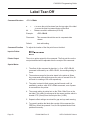
Label Tear-Off ...........................93
Print Darkness Range Adjustment .................94
Print Test Label...........................95
Set Print Mode ...........................96
Set RS232 Parameters .......................97
Set Sensor Type ..........................98
Enable Options ...........................99
SATOCX208/212PrintersPN9001092Rev.BPage-ii

CX208/212 PROGRAMMING GUIDE
INTRODUCTION
This section presents the commands that are used with the SATO CX208/212 printers
to produce labels with logos, bar codes and alphanumeric data. The commands listed
include all revisions of firmware up to and including P2.15.
The following information is presented in this section:
• The SATO Programming Language
• Selecting Protocol Control Codes
• Using Basic
• The Print Area
• Printer Configuration
• Command Codes
THE SATO PROGRAMMING LANGUAGE
A programming language for a printer is a familiar concept to most programmers. It is
a group of commands that are designed to use the internal intelligence of the printer.
The commands, which are referred to as SATO Command Codes, contain
non-printable ASCII characters (such as <STX>, <ETX>, <ESC>) and printable
characters. These commands must be assembled into an organized block of code to be
sent as one data stream to the printer, which in turn interprets the command codes
and generates the desired label output. The programmer is free to use any
programming language available to send the desired data to the printer.
The command codes used are based upon “Escape” (1B hexadecimal) sequences.
Typically there are four types of command sequences:
<ESC>{Command}
These commands generally tell the printer to perform a specific action, like “clear the
memory.”
<ESC>{Command} {Data}
Commands with this format tell the printer to perform a specific action which is
dependent upon the following data, like “print X labels”, where the value for X is
contained in the data.
<ESC>{Command} {Parameter}
These commands set the operational parameters of the printer, like “set the print
speed to 3.”
SATOCX208/212PrintersPN9001092Rev.BPage1

<ESC> {Command} {Parameter} {Data}
Some commands can contain both Parameter and Data elements, such as “print a
Code 39 symbol containing the data.”
SELECTING PROTOCOL CONTROL CODES
Protocol codes are the special control characters that prepare the printer to receive
instructions. For example, the <ESC> character tells the printer that a command
code will follow.
The Protocol Control Code set set is made up of six special characters. The Standard
Protocol Control codes are non-printable characters. They can be changed to printable
characters using the Protocol Control code download command. This may be useful
on host computers using protocol converters or in an application where non-printable
ASCII characters cannot be sent from the host. This manual uses the Standard
Protocol Control codes for all of the examples.
The Protocol Control codes must be downloaded from the host using the <ESC>LD
command. Once they are downloaded, the printer will not respond to standard
protocol codes. The current protocol codes active in a printer can be determined by
printing a Test Label (see CX208/212 User’s Guide, Page 9).
CONTROL
CHARACTER
HEX VALUE DESCRIPTION
STX 02 Start of Data
ETX 03 End of Data
ESC 1B Command code to follow
ENQ 05 Not Used on CX200
CAN 18 Not Used on CX200
Off-Line 40 Take printer Off-Line
USING BASIC
It may be useful to test your printer using a BASIC program on a PC. You may also
write your actual production programs in BASIC. Whatever the reason, if you will be
working in BASIC, some of the following hints may help you get started:
1. Set the WIDTH of the output device to 255 characters to avoid automatically
sending <CR> and <LF> characters after every line. The command string
should be continuous and uninterrupted by <CR> and/or <LF> commands. The
examples given in this manual are printed on separate lines because they will not
fit on one line and do not contain any <CR> and/or <LF> characters. If these
characters are needed, they are explicitly noted by the inclusion of <CR> and
<LF> notations.
SATOCX208/212PrintersPN9001092Rev.BPage2
CX208/212 Programming Guide

2. If you are using the printer’s RS232 interface, it is necessary to set the COM port
on the PC such that the CTS and DSR signals will be ignored. Send your OPEN
“COM” statement in the following way:
OPEN “COM1:9600,E,8,1,CS,DS” AS #1
This sets the RS232 communication parameters of the host PC’s COM1 port for 9600
baud, Even parity, 8 Data bits, 1 Stop bit and directing the port to ignore the CTS and
DSR control signals.
3. You may want to minimize keystrokes and program size by assigning the <ESC>
character to a string variable since this character is used quite often.
The following two examples in BASIC show a typical example using these hints. Both
of these examples use the Standard Protocol codes.
Printing with the Parallel Port
5 REM Parallel Example Identifies the program as a parallel port
print label. The “REM” prevents this data
from being sent to the printer and
displays it only on the screen.
10 E$=CHR$(27) Sets the “E$” string as an <ESC>
character
20 WIDTH “LPT1:”,255 Sets the width of the output to 255
characters
30 LPRINT E$;"A"; Sends an “<ESC>A” command code to
the LPT1 parallel port
40 LPRINT E$;"H400";E$;"V100";E$;"WL1SATO"; Sends the data “SATO” to be to be
placed 400 dots horizontally and 100
dots vertically on the label and printed in
the “WL” font.
50 LPRINT E$;"Q1"; Instructs the printer to print one label.
60 LPRINT E$; “Z”; Tells the printer that the last command
has been sent. The printer can now
create and print the job.
Printing with the RS232 Port
5 REM RS232 Example Identifies the program as a RS232 port
print label. The “REM” prevents this data
from being sent to the printer and
displays it only on the screen.
10 E$=CHR$(27) Sets the “E$” string as an <ESC>
character.
20 OPEN “COM1:9600,N,8,1,CS,DS” AS #1 Opens the COM1 port for output and
sets the parameters as 9600 baud, No
parity, 8 Data bits, 1 Stop bit and
instructs the port to ignore the CTS and
DSR control signals.
30 PRINT #1,CHR$ (2); Sends an <STX> (ASCII Code a
decimal “2”) to the printer instructing it to
prepare to receive a message.
SATOCX208/212PrintersPN9001092Rev.BPage3
CX208/212 Programming Guide

40 PRINT #1,E$;"A"; Sends an “<ESC>A” command code to
Print Port #1 opened by statement 20
above.
50 PRINT #1, E$;"H400";E$;"V100";E$;"WL0SATO"; Sends the data “SATO” to be to be
placed 400 dots horizontally and 100
dots vertically on the label and printed in
the “WL” font.
60 PRINT #1, E$;"Q1"; Instructs the printer to print a quantity of
one label.
70 PRINT #1, E$; “Z”; Tells the printer that the last command
has been sent. The printer can now
create and print the job.
80 PRINT #1,CHR$ (3); Sends an <ETX> (ASCII Code decimal
“3”) to the printer telling it that this is the
end of the message.
THE PRINT AREA
<ESC>A
<ESC>H0050<ESC>V0100<ESC>L0303<ESC>MSATO
<ESC>H0050<ESC>V0200<ESC>B103100*SATO*
<ESC>H0070<ESC>V0310<ESC>L0101<ESC>USATO
<ESC>Q1<ESC>Z
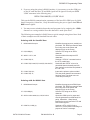
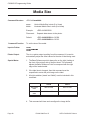
The maximum print area for the various CX208/212 printers is listed in Table 1, Print
Area. Most of your label applications will not require labels that fill the entire print
area. To make label design simplier, the media on the CX208/212 printers is center
justified, i.e. the label is always centered on the print head. An <ESC>A1 Media Size
command is then used to specify the length and width of the label. The CT printer
uses this information to automatically calculate an “offset” that will move the
Horizontal Reference point to coincide with the first printable dot position on the
specified label. It is extremely important to use the Media Size command. If you do
not, you will have to manually calculate the offset and send it to the printer using the
<ESC>A3 Base Reference Point command.
SATOCX208/212PrintersPN9001092Rev.BPage4
CX208/212 Programming Guide
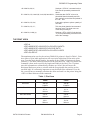
CX208 CX212
Resolution 203 dpi
8 dpmm
305 dpi
12 dpmm
Max Print Width 832 dots
4.1 in.
104 mm
1248 dots
4.1 in.
104 mm
Max Label Width 4.25 in.
108 mm
4.25 in.
108 mm
Print Length 4064 dots
20 in.
508 mm
3780 dots
12.6 in.
320 mm
Table 1, Print Area

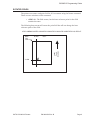
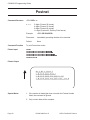
The diagram below illustrates the maximum print area and a sample 2 inch wide by 3
inch long label placed within this area. As can be seen, your label will be oriented in
the middle of the print head as viewed from the front of the printer. The normal
reference point is located at the H1, V1 position of the print area in the normal print
orientation (no rotation).
SATOCX208/212PrintersPN9001092Rev.BPage5
Max
Print
Width
Max. Print
Length
3"
2"
Print Area
Your
Label
Label
Feed
Direction
Normal
Reference
Point
H1, V1
Adjusted
Reference
Point
H1, V1

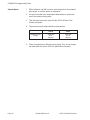
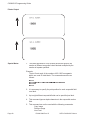
ROTATED FIELDS
The printers can rotate each print field in 90° increments using the Rotate command.
There are two variations of this command.
• <ESC>% - The field rotates, but the base reference point for the field
remains the same.
The following data stream will rotate the print field but will not change the base
reference point of the field:
<ESC>A<ESC>%1<ESC>V800<ESC>H200<ESC>L0202<ESC>WB1E<ESC>Q1<ESC>Z
SATOCX208/212PrintersPN9001092Rev.BPage6
CX208/212 Programming Guide
“%1”
E
H=200
V=800
Base
Ref
Point
Label
Feed
Direction

COMMAND DEFAULT SETTINGS
There are some types of commands that must have a value specified before a label
can be printed. If the data stream does not contain these commands, a “default” value
is assumed. The commands and the corresponding default values are:
COMMAND
DEFAULT NOTE
Print Rotation 0° (1)
Vertical Reference Point 0 (1)
Horizontal Reference Point 0 (1)
Character Pitch 2 (1)
Base Reference Point H=0, V=0 (2)
Character Expansion 1 (1)
Print Darkness 3 (1)
Print Speed 3 ips (2)
NOTES:
(1) The settings for these commands will revert to the default value when the printer
receives an <ESC>Z or an <ESC>*.
(2) These values transmitted with these commands will remain in effect until a new
command is received.
PRINTER CONFIGURATION
The CX208/212 printers are different from other SATO models in that they do not use
DIP switches for printer configuration. Instead, all printer configuration is done via
software commands. The parameters that can be configured are:
• Sensor Calibration
• Protocol Codes
• Print Darkness Range
• Sensor Type
• RS232 Parameters
• Label Tear-Off Position
• Backfeed Enable/Disable
Because there are no DIP switches to indicate the current printer settings, a Test Label
can be printed that lists the active settings in the printer. This Test Label lists all of
the information a user needs to ascertain the printer configurtation. Test Labels can
be printed out by sending a command via software (Configuration Commands) or by
using the FEED and On-Line/Off-Line Indicator buttons on the control panel (see
Page 7 of the CX208/212 User’s Guide).
SATOCX208/212PrintersPN9001092Rev.BPage7
CX208/212 Programming Guide

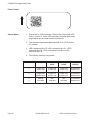
LABEL SENSING
The CX208/212 printers can use eye-mark (black bar), gap or notch label sensing.
The gap and notch sensor is a transmissive or see-thru type with an infrared light
source directed through the label/ribbon combination from above and detected by a
separate sensor underneath the label. A reflective sensor is used to detect eye-marks
printed on the bottom of the label liner or tag. The eye-mark must not reflect more
than 12% of the light. Since the same receiving sensor is used for all three types of
sensing, it must be calibrated with the media that will be used. The ribbon must be
installed while the calibration is being performed for thermal transfer printing.
When calibrating the printer sensors, the gap or eye-mark sensor type must be
selected first using the <ESC>CI command and then the Direct Thermal or Thermal
Transfer print mode must be specified with an <ESC>CP command. These two
commands are followed by an <ESC>CA calibrate command to instruct the printer to
preform the calibration procedure. The resulting calibration values are stored in the
printer and used until the unit is recalibrated. A separate value is stored for direct
thermal and thermal transfer modes because the settings will differ significantly
because of the inclusion of the ribbon for thermal transfer. For example, the following
SATOCX208/212PrintersPN9001092Rev.BPage8
CX208/212 Programming Guide
Note 1: The the trailing-edge of the black eye-mark can be positioned anywhere
within the 0 to +98mm range of sensor offset adjustment and the first print line
(V=000). The first print line position can be adjusted to the desired position
using the <ESC>CB Label Tear-Off command. If the pitch offset is 19 mm (the
factory setting), placing the eye-mark trailing edge at 0 mm will place the first
print position at the top edge of the label.
Label Feed Direction
Center
Line
Gap, Notch or Bar Width
Min: 0.125" (3.2 mm)
Max: 1.0" (25 mm)
Fixed Position
Sensor
Min Label Pitch
0.375" (9.5 mm)
See
Note 1
0.75"
(19 mm)
Print Head
(V = 000)
4.250 "(108 mm) = max label width
0.125” (3.2 mm)
Eye-Mark centered
on underneath side
of label
Min. Length = 1"
(25.4mm)

command stream will calibrate the printer in the thermal transfer mode for gap
sensing:
<ESC>A<ESC>CP1<ESC>CI2<ESC>CA<ESC>Z
When Auto-Calibrate is enabled, the printer will automatically attempt to calibrate
when it detects an out-of-paper condition (10" of platen feed after a label is printed
without detecting a label edge or sense mark). If the calibration is successful, the
printer shall move paper to the next index mark and resume normal operations. If the
calibration is not successful, the printer shall indicate an out-of-paper condition by a
red READY LED and the printer shall restore the original index circuit settings.
SATOCX208/212PrintersPN9001092Rev.BPage9
CX208/212 Programming Guide

COMMAND CODE PAGE REFERENCE
This section contains all the printer Command Codes. The commands must be sent to
the printer in an organized fashion in order for the label(s) to print.
The purpose of this section is to:
1. Explain the different commands and provide examples of their usage.
2. To provide a detailed reference for programming.
Each command begins on a separate page with its own heading. A uniform layout is
used to help you find key information about each command. For each Command
Code in this section, there will be a sample data input stream to the printer and the
expected print output. By studying the examples, you can learn how to use the
particular command within a whole block of printer code. Pay particular attention to
the “Special Notes” with each command to learn other important information.
The subject commands are highlighted in bold letters in the Reference Sheets. There
are two parts of most, but not all, commands. The first is the command character
which immediately follows the <ESC> code. It is always an upper case alpha or a
special character (such as an “&” or a “%”). It is never a lower case alpha character. If
the command requires additional variable information, it is represented by a group of
lower case alpha characters immediately following the command character. For
example, if an aaaabb is listed following the basic command, the printer will look
for six characters immediately following the command. The first four would represent
the value of aaaa and the next two the value of bb.
The maximum number of characters defined in a parameter is represented by the
number of characters shown in the command structure. For example, a command
followed by an aaaa can have up to four characters. In general, commands with only
one parameter following the command can be entered without the leading zeroes. In
the above example, you could enter either “809” or “0809”. However, certain
commands require the exact number of matching characters. A command with two
parameters listed following the command code, such as aaaabbbb require the exact
number of digits to be entered. If the value of aaaa is “800” and the value of bbbb is
“300”, then the parameters must be entered as “08000300”. It is recommended that
you make it a practice to always enter leading zeros to prevent any mistakes.
All label illustrations in this section are designed to be printed on a CX208 using four
inch wide labels.
SATOCX208/212PrintersPN9001092Rev.BPage10
CX208/212 Programming Guide

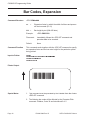
Bar Codes
Command Structure 1:3 narrow/wide bar ratio: <ESC>Babbcccd
2:5 narrow/wide ratio: <ESC>BDabbcccd
1:2 narrow/wide bar ratio: <ESC>Dabbcccd
a = Bar Code Symbol
0 Codabar
1 Code 39
2 Interleaved 2 of 5 (I 2/5)
3 UPC-A / EAN-13
4 EAN-8
5 Industrial 2 of 5
A MSI
C Code 93
E UPC-E
F Bookland
G Code 128
I UCC 128
bb = Number of dots (01-12) for narrow bar and narrow space
ccc = Bar height in dots (001-600)
d = UCC 128 only. Not used for other bar code types
0 No human readable text
1 Human readable at top
2 Human readable at bottom
Example: <ESC>BD103200
Placement: Immediately preceding data to be encoded
Default: None
Command Function To print bar code images on a label. With this command, there are 13
standard bar code symbologies available to be printed and three two
dimensional symbols.
Page11PN9001092Rev.BSATOCX208/212Printers
CX208/212 Programming Guide

Input to Printer
Page12PN9001092Rev.BSATOCX208/212Printers
CX208/212 Programming Guide

Printer Output
Page13PN9001092Rev.BSATOCX208/212Printers
CX208/212 Programming Guide

UCC-128 Without Incrementing
With Incrementing
Page14PN9001092Rev.BSATOCX208/212Printers
CX208/212 Programming Guide

Special Notes 1. UPC and EAN bar codes are not affected by the different types of
narrow to wide ratios. Instead, the <ESC>D command adds
descender bars to these codes where needed to meet UPC
specifications. The <ESC>BD command puts decender bars and
human readable text below the symbol.
2. The Code 128, UCC 128, MSI, and Code 93 bar codes are not
affected by the narrow to wide ratios.
3. The Codabar and Code 39 bar codes are affected by the
Character Pitch command. This command must be placed before
the Bar Code command.
4. Because of their unique characteristics, two-dimensional symbols
are covered separately.
5. For UCC128, the FNC1 code is automatically inserted and the
Mod 10 and Mod 103 check digits are automatically calculated.
6. For the MSI bar code, the check digit is not automatically
calculated.
7. To select UPC-A, 11 digits of data is sent. The printer adds a “0”
and automatically generates the check digit. If 12 digits of data are
sent, the printer asumes an EAN-13 symbol and automatically
generates the check digit. The last digit of the bar code data is a
modulo 10 check digit. If 13 digits of data are sent to the printer,
the check digit is not created and must be supplied by the
programmer. It must be the last character of the 13 digit string.
Page15PN9001092Rev.BSATOCX208/212Printers
CX208/212 Programming Guide

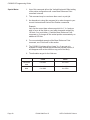
Bar Codes, Expansion
Command Structure <ESC>BWaabbb
aa = Expansion factor by which the width of all bars and spaces
will be increased (01-12)
bbb = Bar height by dot (004-600 dots)
Example: <ESC>BW02100
Placement: Immediately follows the <ESC>BT command and
precedes data to be encoded.
Default: None
Command Function This command works together with the <ESC>BT command to specify
an expansion factor and the bar code height for the particular symbol
being printed.
Input to Printer:
Printer Output:
Special Notes 1. This command must be preceded by the Variable Ratio Bar Codes
<ESC>BT command.
2. The following bar codes will be affected by the Character Pitch
command: Codabar, Code 39 and Interleaved 2 of 5.
Page16PN9001092Rev.BSATOCX208/212Printers
CX208/212 Programming Guide
Page is loading ...
Page is loading ...
Page is loading ...
Page is loading ...
Page is loading ...
Page is loading ...
Page is loading ...
Page is loading ...
Page is loading ...
Page is loading ...
Page is loading ...
Page is loading ...
Page is loading ...
Page is loading ...
Page is loading ...
Page is loading ...
Page is loading ...
Page is loading ...
Page is loading ...
Page is loading ...
Page is loading ...
Page is loading ...
Page is loading ...
Page is loading ...
Page is loading ...
Page is loading ...
Page is loading ...
Page is loading ...
Page is loading ...
Page is loading ...
Page is loading ...
Page is loading ...
Page is loading ...
Page is loading ...
Page is loading ...
Page is loading ...
Page is loading ...
Page is loading ...
Page is loading ...
Page is loading ...
Page is loading ...
Page is loading ...
Page is loading ...
Page is loading ...
Page is loading ...
Page is loading ...
Page is loading ...
Page is loading ...
Page is loading ...
Page is loading ...
Page is loading ...
Page is loading ...
Page is loading ...
Page is loading ...
Page is loading ...
Page is loading ...
Page is loading ...
Page is loading ...
Page is loading ...
Page is loading ...
Page is loading ...
Page is loading ...
Page is loading ...
Page is loading ...
Page is loading ...
Page is loading ...
Page is loading ...
Page is loading ...
Page is loading ...
Page is loading ...
Page is loading ...
Page is loading ...
Page is loading ...
Page is loading ...
Page is loading ...
Page is loading ...
Page is loading ...
Page is loading ...
Page is loading ...
Page is loading ...
Page is loading ...
Page is loading ...
Page is loading ...
Page is loading ...
-
 1
1
-
 2
2
-
 3
3
-
 4
4
-
 5
5
-
 6
6
-
 7
7
-
 8
8
-
 9
9
-
 10
10
-
 11
11
-
 12
12
-
 13
13
-
 14
14
-
 15
15
-
 16
16
-
 17
17
-
 18
18
-
 19
19
-
 20
20
-
 21
21
-
 22
22
-
 23
23
-
 24
24
-
 25
25
-
 26
26
-
 27
27
-
 28
28
-
 29
29
-
 30
30
-
 31
31
-
 32
32
-
 33
33
-
 34
34
-
 35
35
-
 36
36
-
 37
37
-
 38
38
-
 39
39
-
 40
40
-
 41
41
-
 42
42
-
 43
43
-
 44
44
-
 45
45
-
 46
46
-
 47
47
-
 48
48
-
 49
49
-
 50
50
-
 51
51
-
 52
52
-
 53
53
-
 54
54
-
 55
55
-
 56
56
-
 57
57
-
 58
58
-
 59
59
-
 60
60
-
 61
61
-
 62
62
-
 63
63
-
 64
64
-
 65
65
-
 66
66
-
 67
67
-
 68
68
-
 69
69
-
 70
70
-
 71
71
-
 72
72
-
 73
73
-
 74
74
-
 75
75
-
 76
76
-
 77
77
-
 78
78
-
 79
79
-
 80
80
-
 81
81
-
 82
82
-
 83
83
-
 84
84
-
 85
85
-
 86
86
-
 87
87
-
 88
88
-
 89
89
-
 90
90
-
 91
91
-
 92
92
-
 93
93
-
 94
94
-
 95
95
-
 96
96
-
 97
97
-
 98
98
-
 99
99
-
 100
100
-
 101
101
-
 102
102
-
 103
103
-
 104
104


Ask a question and I''ll find the answer in the document
Finding information in a document is now easier with AI