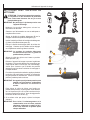
John Deere HR1250E1 User manual
- Category
- High-pressure cleaners
- Type
- User manual

Operator’s Manual 1
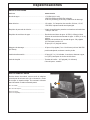
HR-1250E1
High Pressure Washer

2 Operator’s Manual
Introduction
THANK YOU for purchasing a John Deere product.
READ THIS MANUAL carefully to learn how to operate
and service your machine correctly. Failure to do so could
result in personal injury or equipment damage. This manual
and safety signs on your machine may also be available in
other languages. (See your John Deere dealer to order.)
THIS MANUAL SHOULD BE CONSIDERED a permanent
part of your machine and should remain with the machine
when you sell it.
MEASUREMENTS in this manual are given in both
metric and customary U.S. unit equivalents. Use only
correct replacement parts and fasteners. Metric and inch
fasteners may require a specific metric or inch wrench.
RIGHT HAND AND LEFT HAND sides are determined by
facing the motor end of the machine.
The SERIAL NUMBER is located in the Specification or
Identification Numbers section. Accurately record all the
numbers to help in tracing the machine should it be stolen.
Your dealer also needs these numbers when you order
parts. File the identification numbers in a secure place
off the machine.
WARRANTY is provided from your John Deere dealer for
customers who operate and maintain their equipment as
described in this manual. The warranty is explained on
the warranty certificate shown in this manual.
This warranty provides you the assurance that your
dealer will back products where defects appear within
the warranty period. Should the equipment be abused,
or modified to change its performance beyond the original
factory specifications, the warranty will become void.

Operator’s Manual 3
Contents
Page
Safety ........................................................................ 5
Safety Signs ........................................................... 10
Controls ................................................................. 13
Preparing the Washer ............................................ 14
Operating the Washer ............................................ 20
Troubleshooting
..................................................... 26
Service .................................................................... 28
Storage .................................................................... 31
Specifications ......................................................... 33
Accessories ........................................................34-35
Warranty .................................................................. 38
Notes ........................................................................ 39
All information, illustrations and specifications in this manual are based
on the latest information available at the time of publication. The right is
reserved to make changes at any time without notice.

4 Operator’s Manual
Contents

Operator’s Manual 5
W
A
R
N
I
N
G
W
A
R
N
I
N
G
S
I
N
T
H
E
M
A
N
U
A
L
S
.
W
A
R
N
I
N
G
S
I
N
T
H
E
M
A
N
U
A
L
S
.
C
A
U
T
I
O
N
O
C
A
U
T
I
O
N
S
I
N
O
T
H
E
M
A
N
U
A
L
S
O
C
A
U
T
I
O
N
S
I
N
O
T
H
E
M
A
N
U
A
L
S
O
C
A
U
T
I
O
N
S
I
N
O
T
H
E
M
A
N
U
A
L
S
O
C
A
U
T
I
O
N
S
I
N
O
T
H
E
M
A
N
U
A
L
S
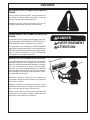
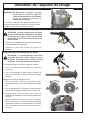
Safety
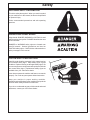
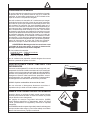
RECOGNIZE SAFETY INFORMATION
This is the safety alert symbol. When you see this symbol
on your machine or in this manual, be alert to the potential
for personal injury.
Follow recommended precautions and safe operating
practices.
UNDERSTAND SIGNAL WORDS
A signal word--DANGER, WARNING or CAUTION--is used
with the safety-alert symbol. DANGER identifies the most
serious hazards.
DANGER or WARNING safety signs are located near
specific hazards. General precautions are listed on
CAUTION safety signs. CAUTION also calls attention to
safety messages in this manual.
FOLLOW SAFETY INSTRUCTIONS
Carefully read all safety messages in this manual and on
your machine safety signs. Keep safety signs in good
condition. Replace missing or damaged safety signs. Be
sure new equipment components and repair parts include
the current safety signs. Replacement safety signs are
available from your John Deere dealer.
Learn how to operate the machine and how to use controls
properly. Do not let anyone operate without instruction.
Keep your machine in proper working condition.
Unauthorized modifications to the machine may impair the
function and/or safety and affect machine life.
If you do no understand any part of this manual and need
assistance, contact your John Deere dealer.

6 Operator’s Manual
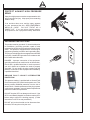
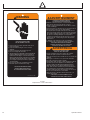
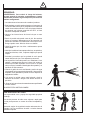
PROTECT AGAINST HIGH PRESSURE
SPRAY
Spray from high pressure nozzles can penetrate the skin
and cause serious injury. Keep spray from contacting
hands or body.
If an accident does occur and the spray appears
to have penetrated the skin, SEEK EMERGENCY
MED IC AL CAR E. DO N O T TR EAT AS A
SIMPLE CUT. If you are using cleaning agents,
be prepared to tell a physician exactly what kind.
GROUNDING INSTRUCTIONS
This product must be grounded. If it should malfunction
or breakdown, grounding provides a path of least
resistance for electric current to reduce the risk of electric
shock. This product is equipped with a cord having an
equipment-grounding conductor and a grounding plug.
The plug must be plugged into an appropriate outlet that
is properly installed and grounded in accordance with
local codes and ordinances.
DANGER - Improper connection of the equipment-
grounding conductor can result in a risk of electrocution.
Check with a qualified electrician or service person if
you are in doubt as to whether the outlet is properly
grounded. Do not modify the plug provided with the
product--if it will not fit, have a proper outlet installed by
a qualified electrician.
GROUND FAU LT CIRCUIT INTER RUPTER
PROTECTION
This pressure washer is provided with a Ground Fault
Circuit Interrupter (GFCI) built into the power cord. This
device provides additional protection from the risk of
electric shock. Should replacement of the plug or power
cord become necessary, use only identical replacement
parts that include GFCI protection.
DO NOT drop the GFCI as damage could result. If the
GFCI is accidentally dropped, be certain to test the GFCI
before using to ensure it is working properly. (Follow
instructions on GFCI for test procedures.)
DO NOT pull on the electrical cord to disconnect from
the outlet, OR carry the unit by the cord.

Operator’s Manual 7
EXTENSION CORDS
Extension cords are not recommended for use on this
pressure washer. If the use of an extension cord is
unavoidable, it must be plugged into a GFCI found in
circuit boxes or protected receptacles.
Use only 3-wire extension cords that have 3-prong
grounding type plugs and 3-pole cord connectors that
accept the plug from the washer. Use only extension
cords that are intended for outdoor use. These extension
cords are identified by a marking “Acceptable for use
with outdoor appliances; store indoors while not in use”.
Use only extension cords having an electrical rating not
less than the rating of the product. Do not use damaged
extension cords. Examine extension cord before using
and replace if damaged. Do not abuse extension cord
and do not yank any cord to disconnect. Keep cord
away from heat and sharp edges. Always disconnect the
extension cord from the receptacle before disconnecting
the product from the extension cord.
WARNING: To reduce the risk of electrocution,
keep all connections dry and off the ground. Do not
touch plug with wet hands.
On extension cords:
Cable Length Wire Gauge
Up to 50 feet 14 AWG
50 to 100 feet 12 AWG
Use of smaller cords will cause electric motor stalling or
circuit breaker stoppage.
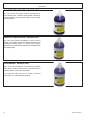
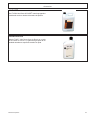
CLEANING DETERGENT PRECAUTIONS
Know the detergent being used. Be prepared to tell a
physician exactly what you are using in the event of an
emergency. Read all detergent labels and follow all
instructions exactly regarding preparation, use, safety,
transportation, and disposal. Keep all detergents out of
the reach of children, pets and livestock.
NEVER spray combustible liquids of any kind.
Do not use highly corrosive detergents or acid-type
cleaners with this washer.
HANDLE CHEMICAL PRODUCTS SAFELY
Direct exposure to hazardous chemicals can cause injury.
Potentially hazardous chemicals used with the pressure
washer includes such items as detergents.
A Material Safety Data Sheet (MSDS) provides specific
details on detergents; physical and health hazards, safety
procedures and emergency response techniques.
Check the MSDS before you start any job using a detergent.
That way you will know exactly what the risks are and how to
do the job safely. Then follow procedures and recommended
equipment. (See your John Deere dealer for MSDS Sheets
on products used with this equipment.)
MSDS

8 Operator’s Manual
IMPORTANT SAFETY INSTRUCTIONS
WARNING: To reduce the risk of injury, read this
operator’s manual completely. When using this product,
the following basic precautions should always be
followed:
1. Read all the instructions before using the product.
2. This product is equipped with a Ground Fault Circuit
Interrupter (GFCI) in the power cord to reduce the risk
of electrical shock. If replacement of the plug or cord
is needed, use only identical replacement parts.
3. Follow the grounding instructions included in this
manual.
4. High pressure water spray can cut skin. Do not direct
spray at persons. Keep operating area clear of all
persons or pets. Warn children that the water spray
can cut. Supervise children closely.
5. Do not allow children or untrained person to operate
the washer.
6. Do not spray electrical switches, receptacles or light
bulbs, or glass or fragile objects that may shatter.
7. Dirt and debris removed by spray can cause eye injury.
Wear eye protection.
8. Wet surfaces can be slippery. Wear shoes and keep
both feet on the ground. Do not climb on items being
cleaned. Do not overreach or stand on unstable
support. Keep good footing and balance at all
times.
9. When the spray trigger is released, water pressure
is trapped in the discharge hose. Release trapped
pressure by triggering the spray gun after the washer
is turned off.
10. Do not operate the washer when fatigued or under
the influence of drugs or chemicals. Stay alert.
Watch what you are doing.
11. Follow the maintenance instruction specified in this
manual.
SAVE THESE INSTRUCTIONS
WEAR PROTECTIVE CLOTHING
Wear close fitting clothing and safety equipment
appropriate to the job.
Wear a suitable hearing protective device such as
earmuffs or earplugs to protect against objectionable or
uncomfortable loud noises.
Operating equipment safely requires the full attention of
the operator. Do not wear radio or music headphones while
operating machine.

Operator’s Manual 9
INSPECT HIGH PRESSURE WASHER
Be sure all covers, guards and shields are in place.
Locate all operating controls and safety labels.
Keep all hardware and plumbing fittings tight.
Inspect power cord for damage before using. There is a hazard
of electrical shock from crushing, cutting or heat damage.
Inspect high pressure hose for kinking, cuts or abrasive
wear.
PREPARE FOR EMERGENCIES
Keep a first aid kit and fire extinguisher handy.
Keep emergency numbers for doctors, ambulance service,
hospital and fire department near your telephone.
Be prepared if a fire starts.
SERVICE HIGH PRESSURE WASHER
SAFELY
Before servicing washer, disconnect unit from power source,
relieve water pressure and allow unit to cool down.
Service washer in a clean dry flat area.

10 Operator’s Manual
SAFETY SIGNS
34-1423 and 34-1424
Location: Motor Housing
34-1428 and 34-1429
Location: Handle Sides
34-1427
Location: Motor Housing

Operator’s Manual 11
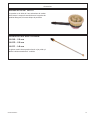
34-1445
Location: Handle
34-1430 and 34-1431
Location: Motor Housing
34-1425 and 34-1426
Location: Motor Housing

12 Operator’s Manual
34-1035
Location: Power Cord
RISK OF ELECTROCUTION.
DO NOT REMOVE THIS TAG.
FAILURE TO FOLLOW THE ABOVE
INSTRUCTIONS COULD RESULT
IN A SEVERE ELECTRICAL SHOCK.
34-1035-E/F/S-111899-ENG
1. Connect only to a properly grounded outlet. Do not
remove ground pin.
2. Inspect cord before using. Do not use if cord is
damaged.
3. Keep all connections dry and off the ground.
4. Do not touch plug with wet hands.
5. This unit may be provided with a Ground Fault Circuit
Interrupter (GFCI) built into the power cord plug. If
replacement of the plug or cord is needed, use only
identical replacement parts. If this unit is not provided
with a GFCI, this unit should only be connected to a
power supply receptacle protected by a ground fault
circuit interrupter.
6. Do not use an extension cord with this machine.
7. Read the operator's manual before using.
WARNING
ADVERTISSEMENT
•Brancher seulement á une prise correctement mise á la
terre. Ne pas enlever la broche de mise á la terre.
•Vérifier le cordon avant l'utilisation. Ne pas utiliser le cordon
s' il est endommage.
•Conserver toutes les connexions au sec et au-dessus du sol.
•Ne pas toucher la prise avec des mains humides.
•Cet appareil peut être équipé d'un disjoncteur de fuite à la
terre incorporé dans la fiche du cordon électrique. S'il s'avère
nécessaire de remplaçer la fiche ou le cordon, n'utiliser que
des pièces de rechange identiques. Si cet appareil ne
comporte pas un disjoncteur de fuite à la terre, ne le relier
qu'à une prise de courant protégée par un disjoncteur de
fuite à la terre.
•L' utilisation d' une rallonge n' est pas recommandée.
•Lire le manuel de l' opérateur av
ant d' utiliser l' appareil.
RISQUE D' ÉLECTROCUTION NE
PAS ENLEVER CETTE ÉTIQUETTE
DES CHOCS ÉLECTRIQUES SÉVÉRES
SERONT POSSIBLES SI LES DIRECTIVES
CI-DESSUS NE SONT PAS SUIVIES.
•Conecte solamente a una toma corr
iente que está bien
fundado. No quite la pata de conexión de la tierra.
•Antes de usar inspeccióne la cuerda. No use si la cuerda està
dañando.
•Mantenga los conexiones secos y apar tados de la tierra.
•No torque el enchufe con manos mojados.
•Este producto debe conectarse a tierra.
Asegúrese de que la
lavadora a presión esté equipada con un Interruptor de
circuito de falla a tierra (Ground Fault Circuit Interrupter,
GFCI) incorporado en el cordón de alimentación. Si no lo
tiene, debe conectarse la lavadora a presión únicamente en
un receptáculo que esté protegido por un Interruptor de
circuito de falla a tierra. Desconéctela cuando no esté en uso.
•No use una cuerda extensión con la unidad.
•Antes de usar lea y entienda todas las instrucciónes y el
manual de operación.
ADVERTENCIA
SI NO SIGA LAS INSTRUCCIÓNES HAY EL
RIESGO DE ELECTROCUCIÓN SEVERA.
RIESGO DE ELECTROCUCION.
NO QUITE EST
A ETIQUETA.

Operator’s Manual 13
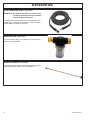
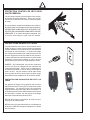
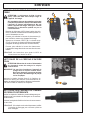
Controls
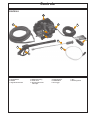
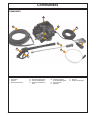
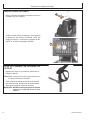
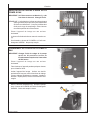
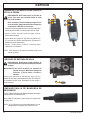
CONTROLS
A--On/Off Switch
B--Handle
C--High Pressure Outlet
D--Water Inlet Fitting
E--Power Cord
F--Ground Fault Circuit
Interrupter
J--Gun
K--Discharge Hose
G--Detergent Hose
H--Nozzle Wand
I--Gun Trigger
K
J
H
G
B
A
E
I
F
C
D

14 Operator’s Manual
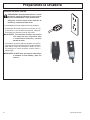
ELECTRICAL REQUIREMENTS
CAUTION: To avoid electrical shock, connect
the washer to a properly grounded electrical
receptacle. Do not use an adapter or remove third
(ground) prong.
Make certain the connection between the washer
power cord and receptacle is kept dry.
The following electrical requirements must be met:
1. The electrical supply must provide a minimum of 110 to
120 volts. With the washer operating, line voltage must
not drop below 108 volts.
IMPORTANT: Operating the pressure washer with
low line voltage may damage electrical
components and cause motor to stall.
2. This pressure washer is equipped with a Ground Fault
Circuit Interrupter in the power cord to reduce the risk
of electrical shock. However the GFCI will not protect
against all faults, short circuits, or overloads.
IMPORTANT: The GFCI MUST be reset each time the
washer is unplugged and plugged in
again.
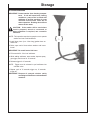
Preparing the Washer

Preparing the Washer
Operator’s Manual 15
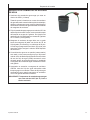
INLET WATER SUPPLY REQUIREMENTS
1. Inlet water supply must be a minimum of 20 PSI (1.4
bar).
Attempting to operate the washer with less than
adequate water supply will cause rapid wear of packings,
valves and bearings that will dramatically shorten pump
life. Symptoms of inadequate water supply are pump
shuddering and flattening of the supply hose.
2. Inlet water flow must be at least 125% of pump rated
flow. Check volume by timing how long it takes to fill a
5 gallon (19 L) container. For example, a flow rate of
3.0 GPM would fill a 5 gallon container in 5/3 minute
(100 seconds).
3. Water supply hose should be a good grade of garden
hose with a minimum I.D. 5/8 in. (16mm) and no longer
than 50 ft. (15.24 m). If longer supply hose must be
used, check to be certain flow is at least equal to the
“GPM Supply Required”.
4. If non-pressurized (static draw) water supply is used,
check to be certain flow is at least 125% of pump rated
flow. In static draw situations, water flow rate (GPM)
can be increased by elevating the water supply tank
or changing to a larger inside diameter water supply
hose.
5. Adding on extension to the supply hose will reduce water
flow rates. Check for adequate water flow rate each
time an extension is added. Water flow rates can be
increased by using the largest possible internal diameter
supply hose.
IMPORTANT: Inlet water temperature must not be more
than 125° F (60° C). Damage to the pump
may result.

Preparing the Washer
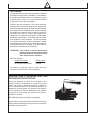
16 Operator’s Manual
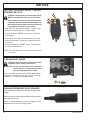
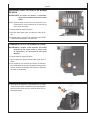
1. Remove shipping plug and install vented plug (A) on
pump.
2. Check oil in pump. With washer on level surface, the
oil should fill the oil level sight glass (B). If necessary,
top with HYGARD
®
or SAE30W non-detergent oil.
A
CHECK PUMP OIL
CONNECT DISCHARGE HOSE TO GUN
1. Apply pipe tape or sealant to threads on gun.
2. Attach discharge hose to gun using two open-end
wrenches. Tighten hose fitting enough to prevent
leaks.
IMPORTANT: Do not attach nozzle wand to gun handle
until water system is primed.
B

Preparing the Washer
Operator’s Manual 17
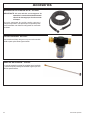
IMPORTANT: If washer is to be connected to a well water
system, use 851-0207 water inlet filter (A).
This will increase sand filtering capability
and avoid damage to the pump.
A
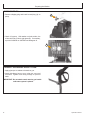
CONNECT HOSES AND PRIME PUMP
1. Hose washer with screen (A) is already attached into
end of brass hose coupler.
NOTE: Conical screen in washer (A) should protrude out of
coupler and into flow from inlet hose.
2. Install inlet water hose (A) and hand tighten. Install high
pressure discharge hose (B) with quick connect.
B
A
A

Preparing the Washer
18 Operator’s Manual
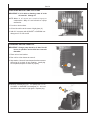
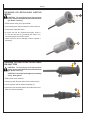
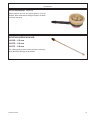
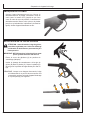
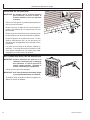
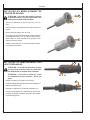
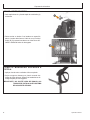
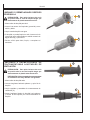
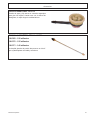
INSTALLING NOZZLE WAND
CAUTION: To avoid injury from escaping fluids
under pressure, relieve the pressure in the
system by stopping the washer and depressing
gun trigger. Lock trigger before adjusting
nozzle.
IMPORTANT: Do not attach nozzle wand until water
system is primed.
1. Place trigger lock (A) in locked position.
2. Insert connection fitting of nozzle wand (B) into gun
(C). Tighten threaded collar (D) on gun down on wand
threads to attach wand.
NOTE: When changing accessories, the wand is
disconnected here and the accessory is connected
at this point. Washer wand has yellow dot (E) on
nozzle.
C
D
B
3. Open water supply. Squeeze trigger on gun. Allow
water to run (with motor off) until water runs out of
pressure hose. Start motor and cycle trigger on gun
until “crackling” sound (air in lines) stops. Turn off water
supply.
A
E

Operator’s Manual 19
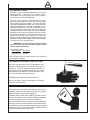
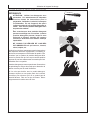
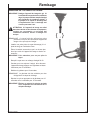
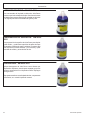
TE ST I N G GR OU N D FA ULT CI RC U I T
INTERRUPTER (GFCI)
CAUTION: Ground Fault Circuit Interrupter (GFCI)
MUST be tested before each use of the washer.
If the results in each one of the following steps are
not as described, shut washer off immediately. DO
NOT operate until the washer has been inspected
by a qualified electrician or your dealer.
1. Plug GFCI into grounded receptacle. Connect high
pressure outlet hose and turn on water supply.
2. Press and release “RESET” button (A) to verify power
to the washer.
3. Press “TEST” button (B). Red indicator bar (C) on reset
button should appear. (Power to the washer should be
interrupted).
4. Press and release the “RESET” button. Power should
be restored to the washer.
NOTE: GFCI test instruction are also found on the front of
the GFCI.
Preparing the Washer
A
A
C
B
B
C

20 Operator’s Manual
STARTING MOTOR
IMPORTANT: To prevent possible pump damage, do
not allow washer pump to run in bypass
(with gun trigger released) for longer than
3 minutes.
The washer ON/OFF switch (A) is a rocker switch that
includes a circuit breaker for protection against motor
electrical overload.
Move the ON/OFF switch to the “ON” position.
Operating the Washer
LOCKING GUN TRIGGER
CAUTION: Gun trigger should be locked when not
in use or whenever adjustments are being made
to gun or nozzle. This will help prevent accidental
discharge of high pressure fluid.
1. Pivot lock (A) down to prevent trigger engagement.
2. Pivot lock up to release trigger.
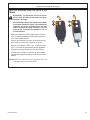
ADJUSTING SPRAY NOZZLE PRESSURE AND
PATTERN
CAUTION: High pressure spray can cause serious
injury. Keep away from spray. Never point the gun
at yourself or anyone else. Never put your hand,
fingers, eyes or body directly over spray. Do not
point spray toward fragile materials.
Spray nozzle can be adjusted in four ways to obtain best
results.
Pressure Adjustments:
1. For high pressure spray pull nozzle cover toward the gun
handle (A).
2. For detergent spray push nozzle cover away from gun
handle (B). In this position, nozzle sprays at low pressure
and draws detergents into the system if the detergent the
hose is attached and in solution.
Pattern Adjustment:
1. For 0° Pinpoint Pattern-Turn nozzle fully clockwise (C).
2. For 60° Fan-Type Pattern-Turn nozzle cover fully
counterclockwise (D).
3. For Infinate Adjustment-Turn nozzle for desired spray
pattern anywhere between 0° and 60°.
In the high pressure spray position, water pressure can be
varied by turning the pressure adjusting knob (E) clockwise
to increase pressure and counterclockwise to decrease
pressure.
A
A
E
BA
C
D
Page is loading ...
Page is loading ...
Page is loading ...
Page is loading ...
Page is loading ...
Page is loading ...
Page is loading ...
Page is loading ...
Page is loading ...
Page is loading ...
Page is loading ...
Page is loading ...
Page is loading ...
Page is loading ...
Page is loading ...
Page is loading ...
Page is loading ...
Page is loading ...
Page is loading ...
Page is loading ...
Page is loading ...
Page is loading ...
Page is loading ...
Page is loading ...
Page is loading ...
Page is loading ...
Page is loading ...
Page is loading ...
Page is loading ...
Page is loading ...
Page is loading ...
Page is loading ...
Page is loading ...
Page is loading ...
Page is loading ...
Page is loading ...
Page is loading ...
Page is loading ...
Page is loading ...
Page is loading ...
Page is loading ...
Page is loading ...
Page is loading ...
Page is loading ...
Page is loading ...
Page is loading ...
Page is loading ...
Page is loading ...
Page is loading ...
Page is loading ...
Page is loading ...
Page is loading ...
Page is loading ...
Page is loading ...
Page is loading ...
Page is loading ...
Page is loading ...
Page is loading ...
Page is loading ...
Page is loading ...
Page is loading ...
Page is loading ...
Page is loading ...
Page is loading ...
Page is loading ...
Page is loading ...
Page is loading ...
Page is loading ...
Page is loading ...
Page is loading ...
Page is loading ...
Page is loading ...
Page is loading ...
Page is loading ...
Page is loading ...
Page is loading ...
Page is loading ...
Page is loading ...
Page is loading ...
Page is loading ...
Page is loading ...
Page is loading ...
Page is loading ...
Page is loading ...
Page is loading ...
Page is loading ...
Page is loading ...
Page is loading ...
Page is loading ...
Page is loading ...
Page is loading ...
Page is loading ...
Page is loading ...
Page is loading ...
Page is loading ...
Page is loading ...
-
 1
1
-
 2
2
-
 3
3
-
 4
4
-
 5
5
-
 6
6
-
 7
7
-
 8
8
-
 9
9
-
 10
10
-
 11
11
-
 12
12
-
 13
13
-
 14
14
-
 15
15
-
 16
16
-
 17
17
-
 18
18
-
 19
19
-
 20
20
-
 21
21
-
 22
22
-
 23
23
-
 24
24
-
 25
25
-
 26
26
-
 27
27
-
 28
28
-
 29
29
-
 30
30
-
 31
31
-
 32
32
-
 33
33
-
 34
34
-
 35
35
-
 36
36
-
 37
37
-
 38
38
-
 39
39
-
 40
40
-
 41
41
-
 42
42
-
 43
43
-
 44
44
-
 45
45
-
 46
46
-
 47
47
-
 48
48
-
 49
49
-
 50
50
-
 51
51
-
 52
52
-
 53
53
-
 54
54
-
 55
55
-
 56
56
-
 57
57
-
 58
58
-
 59
59
-
 60
60
-
 61
61
-
 62
62
-
 63
63
-
 64
64
-
 65
65
-
 66
66
-
 67
67
-
 68
68
-
 69
69
-
 70
70
-
 71
71
-
 72
72
-
 73
73
-
 74
74
-
 75
75
-
 76
76
-
 77
77
-
 78
78
-
 79
79
-
 80
80
-
 81
81
-
 82
82
-
 83
83
-
 84
84
-
 85
85
-
 86
86
-
 87
87
-
 88
88
-
 89
89
-
 90
90
-
 91
91
-
 92
92
-
 93
93
-
 94
94
-
 95
95
-
 96
96
-
 97
97
-
 98
98
-
 99
99
-
 100
100
-
 101
101
-
 102
102
-
 103
103
-
 104
104
-
 105
105
-
 106
106
-
 107
107
-
 108
108
-
 109
109
-
 110
110
-
 111
111
-
 112
112
-
 113
113
-
 114
114
-
 115
115
-
 116
116


John Deere HR1250E1 User manual
- Category
- High-pressure cleaners
- Type
- User manual
Ask a question and I''ll find the answer in the document
Finding information in a document is now easier with AI
in other languages
- français: John Deere HR1250E1 Manuel utilisateur
- español: John Deere HR1250E1 Manual de usuario
Related papers
-
 John Deere AC-2500E User manual
-
Unbranded BM23781 Operating instructions
-
 John Deere AC-3000EH-3 User manual
-
 John Deere AC-3500GHH User manual
-
 John Deere AT-3105-J User manual
-
 John Deere AT-3107-J User manual
-
 John Deere AT-3104-J User manual
-
 John Deere AT-3103-J User manual
-
 John Deere AT-3401-J User manual
-
 John Deere AT-3502-J User manual


Other documents
-
Ryobi RY142711 User manual
-
Ryobi ZRRY142300 User manual
-
-
-
DeVillbiss Air Power Company WD1600E User manual
-
-
-
-
 Mi-T-M HB & HU Series Owner's manual
-
PowerStroke PS141912 Owner's manual
