American Standard 2257.101.020 Installation guide

Category
Flat panel accessories
Type
Installation guide
SAVE FOR FUTURE USE
7301962-100 Rev. E
Product names listed herein are trademarks of AS America, Inc.
© AS America, Inc. 2014
Closet Carrier Support
Putty Knife
Sealant
Tape Measure
Regular Screwdriver
Adjustable Wrench
Carpenters Level
Flush Valve
RECOMMENDED TOOLS AND MATERIALS
Models 3351.101, 3352.101, 3353.101, 3354.101, 2257.101, 2257.101.NAF, 2633.101, 2634.101
AFWALL
®
MILLENNIUM
FLUSHOMETER
WALL-MOUNTED TOILETS
INSTALLATION INSTRUCTIONS
CAUTION: PRODUCT IS FRAGILE. TWO PEOPLE ARE RECOMMENDED FOR HANDLING
TO AVOID BREAKAGE AND POSSIBLE INJURY!
NOTE: For proper operation product requires a minimum of 30 psi working line pressure
Meets the American Disabilities Act Guidelines and ANSI A117.1
Requirements for the Physically Challenged
Thank you for selecting American Standard – the benchmark of fine quality for over 100 years. To ensure this product
is installed properly, please read these instructions carefully before you begin. (Certain installations may require
professional help.) Also be sure your installation conforms to local codes.
!
1
2
Pictures may not exactly define contour of china
FIXTURE MOUNTING
Fixture studs should project 58mm (2-1/4")
from face of finished wall.
FRONT VIEW
SIDE VIEW
FINISHED WALL
58mm
(2-1/4")
(4) STUDS
FINISHED WALL
FINISHED
FLOOR
(4) Ø 22mm
(7/8") HOLES
73mm
(2-7/8")
660mm
(26")
470mm
(18-1/2")
333mm
(13-1/8")
356mm
(14")
191mm
(7-1/2")
133mm
(5-1/4")
229mm
(9")
381mm
(15")
41mm
(1-5/8")
NOTE: If carrier bolt does not extend or is
flush with china, use retrofit caps
7381285-200.0070A
(sold separately).
STANDARD
BOLT CAP
CHINA / TOILET
WALL
RETROFIT
BOLT CAP
WALL
CHINA / TOILET
STANDARD BOLT CAP
RETROFIT BOLT CAP
Place back-up nuts on both bottom bolts, and
the top left-hand bolt only.
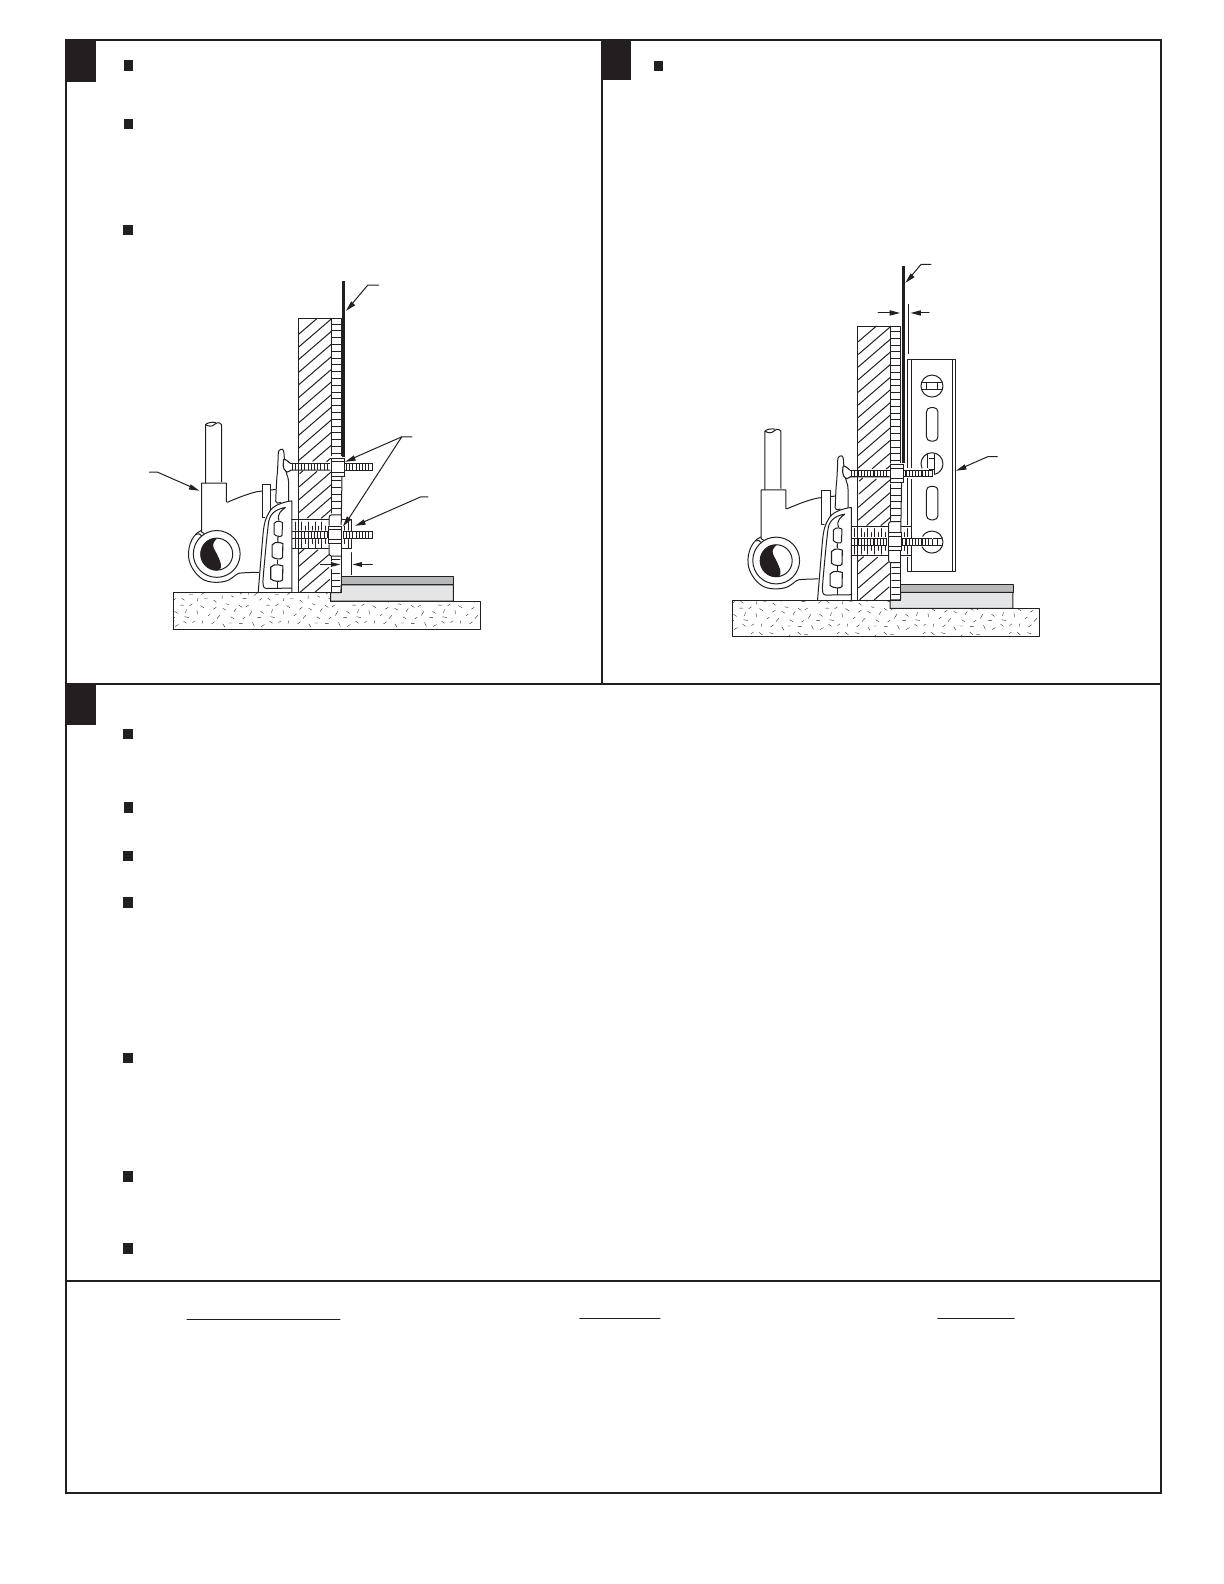
Adjust the two lower back-up nuts so that front
face of nuts and washers are positioned to allow
a minimum 1/16" (2mm) gap between fixture and
wall surface.
Adjust waste horn to project 7mm (5/16") from
finished wall.
NOTE: Bearing nuts and washers must be set to take full loading from the fixture allowing 1/16" (2mm)
clearance between fixture and wall.
Follow support manufacturer's recommended setting of closet outlet connection.
Place felt or neoprene gasket (wax ring not recommended) on closet outlet.
When the fixture is installed, closet outlet gasket must be compressed sufficiently to assure a gas and
watertight seal.
Install bowl on support using cap nuts and fiber washers with the back-up nuts and washers.
DO NOT APPLY TOP RIGHT FIBER WASHER AND CAP NUT UNTIL OTHER CAP NUTS HAVE BEEN
FIRMLY TIGHTENED USING A WRENCH.
Install top right cap nut with fiber washer and run up hand tight. Wrench tighten approximately 1/4 turn.
Apply sealant to gap between bowl and finished wall. Remove excess sealant.
7301962-100 Rev. E
3
5
4
- 2 -
FINISHED WALL
CLOSET
CARRIER
SYSTEM
(3) NUTS
WASTE HORN
7mm (5/16" )
LEVEL
FINISHED WALL
2mm (1/16")
(IRREGULAR
WALL SURFACE)
The following steps require a helper:
In the United States:
American Standard Brands
P.O. Box 6820
Piscataway, New Jersey 08855
Attention: Director of Customer Care
For residents of the United States, warranty
information may also be obtained by calling
the following toll free number: (800) 442-1902
www.americanstandard.com
In Canada:
AS Canada, ULC
5900 Avebury Rd.
Mississauga, Ontario
Canada L5R 3M3
Toll Free: (800) 387-0369
www.americanstandard.ca
In Mexico:
American Standard B&K Mexico
S. de R.L. de C.V.
Via Morelos #330
Col. Santa Clara
Ecatepec 55540 Edo. Mexico
Toll Free: 01-800-839-1200
www.americanstandard.com.mx
Using a level, adjust the top left back-up nut so
that it is in the same vertical plane as the lower
left back-up nut.
  • Page 1 1
  • Page 2 2
  • Page 3 3
  • Page 4 4
  • Page 5 5
  • Page 6 6

American Standard 2257.101.020 Installation guide

Category
Flat panel accessories
Type
Installation guide

Ask a question and I''ll find the answer in the document

Finding information in a document is now easier with AI