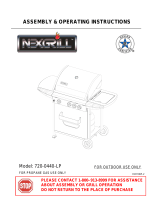
Nexgrill 720-0894F User manual
- Category
- Barbecues & grills
- Type
- User manual
This manual is also suitable for

19000584A1
WARNING
To reduce the risk of fire, burn hazard or other injury,
read the manual carefully and completely before
using your grill.
WARNING
FOR OUTDOOR USE ONLY.
WARNING
This grill is not intended to be
installed in or on recreational
vehicles and/or boats.
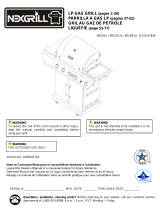
Example only: SERIAL #__________MFG. DATE___________PURCHASE DATE:_______________
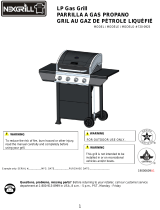
Questions, problems, missing parts? Before returning to your retailer, call our customer service
department at 1-800-913-8999 in USA, 8 a.m. - 5 p.m., PST, Monday - Friday
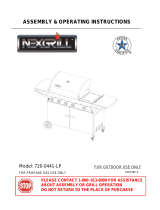
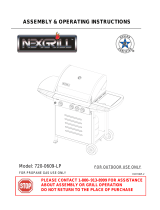
MODEL / MODÈLE / MODELO # 720-0894F
1
LP Gas Grill page 1-13
PARRILLA A GAS PROPANO pagina 14-
26
GRIL AU GAZ DE PÉTROLE LIQUÉFIÉ
page 27-42

Safety Precautions--------------------------------
Lighting Instructions----------------------------
Cooking Instruction----------------------------------
Cooking Chart-----------------------------------------
Cleaning and Maintenance--------------------------
Troubleshooting--------------------------------------
Warranty------------------------------------------------
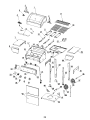
Parts Diagram ---------------------------------------
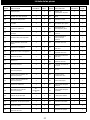
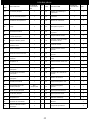
Parts List-----------------------------------------------
Table of Contents
3
6
9
10
11
12
13
40
41
State of California Proposition 65 Warnings:
WARNING: To operate, this equipment requires
the use of propane gas, which contains the
chemical Benzene which is known to the State
of California to cause cancer and other
reproductive harm.
WARNING: This product contains one or more
chemicals known to the State of California to
cause cancer.
WARNING: This product contains one or more
chemicals known to the State of California to
cause birth defects or other reproductive harm.
.
In the State of Massachusetts, the following
installation instructions apply:
Installations and repairs must be performed
by a qualified or licensed contractor, plumber,
or gasfitter qualified or licensed by the State of
Massachusetts.
If using a ball valve, it shall be a T-handle
type.
A flexible gas connector, when used, must
not exceed 3 feet.
2
ASSEMBLER: Leave this manual with consumer.
CONSUMER: Keep this manual for future reference.
ASEMBLADOR: Deje este manual al consumidor.
CONSUMIDOR: Conserve este manual para futuras referencias .
ASSEMBLEUR: Laissez ce manuel avec le consommateur.
CONSOMMATEUR: Conserver ce manuel à titre de référence ultérieure .

WARNING
Failure to comply with these instructions could result in a
fire or explosion that could cause serious bodily injury,
death, or property damage.
WARNING
Your grill will get very hot. Never lean over the
cooking area while using your grill. Do not touch
cooking surfaces, grill housing, lid or any other grill
parts while the grill is in operation, or until the gas grill
has cooled down after use.
Failure to comply with these instructions may
result in serious bodily injury.
WARNING
1. Do not store or use gasoline or other
flammable liquids or vapors in the
vicinity of this or any other appliance.
2. An LP cylinder not connected for use
shall not be stored in the vicinity of this
or any other appliance.
DANGER
If you smell gas:
1. Shut off gas to the appliance.
2. Extinguish any open flame.
3. Open lid.
4. If odor continues, keep away from the
appliance and immediately call your gas
supplier or your fire department.
Grill Installation Codes
The installation must conform with local codes or, in the
absence of local codes, with either the national fuel gas
code, ANSI Z 223.1/NFPA 54, Natural gas and propane
installation code, CSA B149.1, or propane storage and
handling code, B149.2, or the standard for Recreational
vehicles, ANSI A 119.2, and CSA Z240 RV series
recreational vehicle code, as applicable.
LP gas grill models are designed for use with a
standard 20 lb. Liquid Propane Gas tank, not included
with grill. Never connect your gas grill to an LP gas tank
that exceeds this capacity.
!
!
Precautions
!
!
A tank of approximately 12 inches in diameter by 18-1/2 inches
high is the maximum size LP gas tank to use.
You must use an OPD gas tank which offers an Overfill
Prevention Device.
This safety feature prevents the tank from being overfilled
which can cause malfunction of the LP gas tank, pressure
regulator and/or grill.
The LP gas tank must be constructed and marked in
accordance with specifications of the U.S. Dept. of
Transportation (DOT). In Canada, the LP gas tank must meet
the National Standard of Canada ,CAN/CSA-B339 , Cylinders ,
spheres and Tubes for Transportation of Dangerous Goods
and Commission .
1. The LP gas tank must have a shutoff valve, terminating in an
LP gas supply tank valve outlet, that is compatible with a Type
1 tank connection device. The LP gas tank must also have a
safety relief device that has a direct connection with the vapor
space of the tank.
2. The tank supply system must be arranged for vapor
withdraw.
3. The LP gas tank used must have a collar to protect the tank
valve.
Proper Placement and Clearance of Grill
Never use your gas grill in a garage, porch, shed, breezeway
or any other enclosed area. Your gas grill is to be used
outdoors only, at least 36 inches from the back and side of
any combustible surface. Your gas grill should not be used
under overhead combustible construction . Do not obstruct the
flow of ventilation air around the gas grill housing.
• Do not install this outdoor gas grill in or on recreational
vehicles or boats
• Keep outdoor gas grill area clear and free from combustible
materials, gasoline and other flammable vapors and liquids
• Do not obstruct the flow of combustion and ventilation air.
Check for this each time prior to using grill.
• Never connect an unregulated LP gas tank to your gas grill.
The gas pressure regulator assembly supplied with your gas
grill is adjusted to have an outlet pressure of 11” water column
(W.C.) for connection to an LP gas tank.
• Only use the pressure regulator and the hose assembly
supplied with your gas grill. Replacement pressure regulators
and hose assemblies must be those specified in this manual.
3

• Have your LP gas tank filled by a reputable propane
gas dealer and visually inspected and re-qualified at
each filling.
• Do not store a spare LP gas tank under or
near this appliance.
• Never fill the tank beyond 80 percent full . If this
information is not followed exactly a fire causing death
or serious injury may occur.
• Always keep LP gas tanks in an upright position.
• Do not store or use gasoline or other flammable vapors
and liquids in the vicinity of this gas grill.
• Do not subject the LP gas tank to excessive heat.
•
Never store an LP gas tank indoors. If you store your
gas grill in the garage or other indoor location, always
disconnect the LP gas tank first and store it safely
outside.
• Place dust cap on cylinder valve outlet whenever the
cylinder is not in use. Only install the type of dust cap
on the cylinder valve outlet that is provided with the
cylinder valve. Other types of caps or plugs may result
in leakage of propane.
• LP gas tanks must be stored outdoors in a well-
ventilated area and out of reach of children.
Disconnected LP gas tanks must not be stored in a
building, garage or any other enclosed area.
• When your gas grill is not in use the gas must be
turned off at the LP gas tank.
• The pressure regulator and hose assembly must be
inspected before each use of the grill. If there is
excessive abrasion or wear or if the hose is cut, it must
be replaced prior to the grill being used again.
• Keep the gas pressure regulator hose away from hot
grill surfaces and dripping grease. Avoid unnecessary
twisting of hose. Visually inspect the hose prior to each
use for cuts, cracks, excessive wear or other damage.
If the hose appears damaged do not use the gas grill.
Call 1-800-913-8999 for a replacement hose.
• Never light your gas grill with the lid closed or before
checking to ensure the burner tubes are fully seated
over the gas valve orifices.
• Never allow children to operate your grill.
Always keep the LP cylinder at
90° (upright) orientation to
provide vapor withdraw.
WARNING
A strong gas smell, or the hissing sound of gas
indicates a serious problem with your gas grill or the
LP gas tank. Failure to immediately follow the steps
listed below could result in a fire or explosion that
could cause serious bodily injury, death, or property
damage.
• Shut off gas supply to the gas grill.
• Turn the control knobs to OFF position.
• Put out any flame with a proper fire extinguisher.
• Open Grill Lid.
• Get away from the LP gas tank.
• Do not try to fix the problem yourself.
• If odor continues or you have a fire you can not
extinguish, call your fire department. Do not call near
the LP gas tank because your telephone is a form of
electrical device and could create a spark resulting in
fire and/or explosion.
NOTE: The normal flow of gas through the pressure
regulator and hose assembly can create a humming
noise. A low volume of noise is perfectly normal and
will not interfere with operation of the grill. If humming
noise is loud and excessive you may need to purge
air from the gas line or reset the pressure regulator
excess gas flow device. This purging procedure
should be done every time a new LP gas tank is
connected to your grill. For help with this procedure
refer to page 7, Item 4 of “If Grill Still Fails To Light”,
or call the Grill Information Center at 1-800-913-8999.
!
4

CAUTION: Spiders and small insects occasionally spin
webs or make nests in the grill burner tubes during transit
and warehousing. These webs can lead to gas flow
obstruction which could result in a fire in and around burner
tubes. This type of fire is known as “FLASH-BACK” and can
cause serious damage to your grill and create an unsafe
operating condition for the user.
Although an obstructed burner tube is not the only cause of
“FLASH-BACK”, it is the most common cause.
To reduce the chance of “FLASH-BACK”, you must clean
the burner tubes before assembling your grill, and at least
once a month in late summer or early fall when spiders are
most active. Also perform this burner tube cleaning
procedure if your grill has not been used for an extended
period of time.
See Cleaning Burner Tubes and Ports on page # 11.
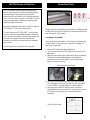
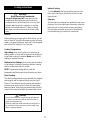
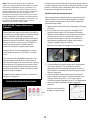
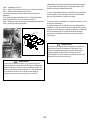
Visually check the burner flames prior to each use. The flames should
look like picture, if they do not, refer to the cleaning burner tubes and
ports, see page 11 of this manual.
CAUTION: Beware of Flash-Back Burner Flame Check
1. Make a 50/50 (soap/water) mild soap solution.
2. Turn the control knobs to full OFF position; then turn gas ON at
supply tank.
3.
Apply the soap solution with a clean brush to all gas connections.
See below. If growing bubbles appear in the solution the
connections are not properly sealed. Check each fitting and
tighten or repair as necessary.
4. If you have a gas connection leak you cannot repair, turn gas
OFF at supply tank, disconnect fuel line from your grill and call
1-800-913-8999 or your gas supplier for repair assistance.
5. Also apply soapy solution to the tank seams. See below. If
growing bubbles appear, shut tank OFF and do not use or move
it! Contact an LP gas supplier or your fire department for
assistance.
Gas Connection Leak Check
Gas Tank Leak Check
Checking for LP gas leaks
Never test for leaks with a flame. Prior to first use, at the beginning
of each season, or every time your LP gas tank is changed, you
must check for gas leaks.
5

WARNING
Failure to open grill lid during the lighting
procedure could result in a fire or explosion that
could cause serious bodily injury, death, or
property damage.
!
Grill Lighting Instruction
3. Be sure all gas connections are securely tightened.
4. Turn on gas supply.
5. Open the grill main lid.
6. Push and turn any main burner control knob to
/HIGH, at the same time, press and hold electronic
ignition button to light the burner. Once the burner is lit,
release the electronic ignition button and knob.
7. If the burner does not light after 5 seconds, turn knob
to OFF. Turn gas OFF at LP tank and wait 5 minutes
for gas to clear. Then turn gas ON at tank and repeat
step 6.
8. If burner still does not light, see Match Lighting section
and If Grill Still Fails to Light section on following page.
9. To light additional burners, turn burner knob(s) to
/HIGH . Push and hold electronic ignition button to
light burner. Adjust knob(s) to desired setting.
Grill Lighting Instructions for Main Burners
1. Do not smoke while lighting grill or checking gas supply
connections.
2. Be sure that LP gas tank is sufficiently full.
6

WARNING
Never lean over the grill cooking area while lighting
your gas grill. Keep your face and body a safe
distance (at least 18 inches) from the cooking grid
surface when lighting your grill by match.
If Grill Still Fails To Light
1. Check gas supply and connections for leaks. Check that
all wire connections are secure.
2. Repeat basic lighting procedure. If your grill still fails to
operate, turn the gas off at source, turn the control knobs to
OFF, then check the following:
• Misalignment of burner tubes over orifices
Correction: Reposition burner tubes over orifices.
• Plugged orifice
Correction: Remove burners from grill, carefully lift each
burner up and away from gas valve orifice. Remove the
orifice from gas valve and gently clear any obstruction with
a fine wire. Then reinstall all orifices, burners, and cooking
components.
3. If an obstruction is suspected in grill burner valves,
please call for repair service at 1-800-913-8999.
4. If the grill still does not light you may need to purge air
from the gas line or reset the pressure regulator excess gas
flow device. Note: This procedure should be done every
time a new LP gas tank is connected to your grill.
To purge air from your gas line and/or reset the
pressure regulator excess gas flow device:
• Turn all control knobs to the OFF position.
• Turn off the gas at the tank valve.
• Disconnect pressure regulator from LP gas tank.
• Let unit stand for 5 minutes.
• Reconnect pressure regulator to the LP gas tank.
• Turn the tank valve on slowly until ¼ to ½ open.
• Open the grill lid.
• Push and turn any control knob to .
• Turn control knobs to until all the burners are lit
•
You may start to use the grill
5. If all checks or corrections have been made and you still
have questions about operating your gas grill, call the Grill
Information Center at 1-800-913-8999
WARNING
Should a “FLASH-BACK” fire occur in/or around the
burner tubes, follow the instructions below. Failure
to comply with these instructions could result in a
fire or explosion that could cause serious bodily
injury, death, or property damage.
• Shut off gas supply to the gas grill.
• Turn the control knobs to OFF position.
• Put out any flame with a proper fire extinguisher.
• Open grill lid.
• Once the grill has cooled down, clean the burner tubes
and burners according to the cleaning instructions found
on page 11.
!
!
•If the burner will not light after several attempts then the burner
can be match lit, before using the match allow 5 minutes for any
accumulated gas to dissipate.
•Clip a paper match on one end of the lighting rod.
•Light match.
•Hold lighting rod and insert lighted match right next to the
burner ports or ceramic file.
•Push and turn the designated control knob to /HIGH.
•Burner should ignite immediately.
Match light
7

Congratulations
Your Nexgrill gas grill is now ready for use. Before
the first use and at the beginning of each season
(and whenever the LP gas tank has been changed):
1. Read all safety, lighting and operating instructions.
2. Check gas valve orifices, burner tubes and burner
ports for any obstructions.
3. Perform gas leak check according to instructions
found on next page of the manual.
Important
Before cooking on your grill the first time, wash
cooking grids and cooking rack with warm , soapy
water. Rinse and dry thoroughly. Season with
cooking oil regularly. After cooking is completed, turn
grill to HIGH setting for 3 to 5 minutes to burn off
excess grease or food residue.
DISCONNECTING THE LIQUID PROPANE CYLINDER
Turn the grill burner valves “OFF” and make sure the
grill is cool.
Turn the Liquid Propane Cylinder valve “OFF” by
turning clockwise until it stops.
Detach the pressure regulator assembly from the
cylinder valve by turning the quick coupling nut
counterclockwise.
Place dust cap on cylinder valve outlet whenever the
cylinder is not in use. Only install the type of dust cap
on the cylinder valve outlet that is provided with the
cylinder valve. Other types of caps or plugs may
result in leakage of propane.
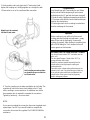
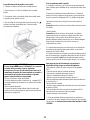
Hold coupling nut and regulator
as shown for proper connection
to LP tank valve.
Nipple has to be centered
into the LP tank valve.
5. Hold regulator and insert nipple into LP tank valve. Hand-
tighten the coupling nut, holding regulator in a straight line with
LP tank valve so as not to crossthread the connection.
6. Turn the coupling nut clockwise and tighten to a full stop. The
regulator will seal on the back-check feature in the LP tank
valve, resulting in some resistance. An additional one-half to
three-quarters turn is required to complete the connection.
Tighten by hand only – do not use tools.
NOTE:
If you cannot complete the connection, disconnect regulator and
repeat steps 5 and 6. If you are still unable to complete the
connection, do not use this regulator! Call 1-800-913-8999 for
assistance.
8

!
WARNING
Do not leave the grill unattended.
Your grill will get very hot. Never lean over the
cooking area while using your grill. Do not touch
cooking surfaces, grill housing. Grill Lid or any other
grill parts while the grill is in operation, or until the
grill has cooled down after use. Failure to comply
with these instructions may result in serious bodily
injury.
Burn-off
Before cooking on your gas grill for the first time, you will
want to “burn off” the grill to eliminate any odor or foreign
matter. Just ignite the burners, lower the Lid, and operate
grill on the HIGH setting for 3 to 5 minutes.
Cooking Temperatures
High setting: Only use this setting for fast warm-up,
searing steaks or chops and for burning food residue off
the grill after cooking is complete. Never use the HIGH
setting for extended cooking.
Medium to Low Settings: Most recipes specify medium
to low settings, including all smoking, rotisserie cooking
and for cooking lean cuts such as fish.
NOTE: Temperature settings will vary with the
temperature and the amount of wind outside your home.
Direct Cooking
The direct cooking method can be used with the supplied
cooking grids and food placed directly over the lit grill
Burners. The method is ideal for searing and whenever
you want meat, poultry or fish to have and open-flame
barbecued taste. Deep frying and smoking are also best
cooked in this manner because they require direct heat.
Indirect Cooking
To cook indirectly, the food should be placed on the
left or right side of your grill with the burner lit on the
opposite side.
Flare-ups
The fats and juices dripping from grilled food can cause
flare-ups. Since flare-ups impart a favorably, distinctive
taste and color to food cooked cover an open flame,
they should be accepted up to a point. Nevertheless,
uncontrolled flaring can result in a ruined meal.
WARNING
Do not line the bottom of the grill housing with aluminum
foil, sand or any substance that will restrict the flow of
grease into the grease tray.
Failure to comply with these instructions could result in a
fire or explosion which could cause serious bodily injury,
death, or property damage.
!
Cooking Instructions
9

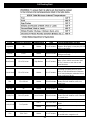
FOOD Weight or thickness Temperature Time Special instructions and tips
Vegetables NA Medium 8 to 20 minutes
Slice or chop vegetables and dot with butter or
margarine. Wrap tightly in heavy duty foil. Grill
turning occassionally.
Potatoes Whole Medium 40 to 60 minutes
Wrap individually in heavy duty foil. Cook
rotating occassionally.
Meat/Steaks 1/2 to 3/4 inches High-Medium 4 to 15 minutes
Pre heat grill for 15-20 minutes then sear
steaks on each side for two minutes. Next
grill 3 to 5 minutes on each side or until
desired doneness.
Ground Meats 1/2 to 3/4 inches Medium 8 to 15 minutes
Grill turning once when juices rise to the
surface or until desired amount of doneness.
Do not leave hamburgers unattended since a
flare-up could occur quickly.
Ribs 1/2 or full rack Medium 20 to 40 minutes
Grill turning occassionally. During last few
minutes brush with barbecue sauce, turn
several times.
Hot dogs NA Medium 5 to 10 minutes
Grill turning four times. 2-4 minutes on each of
four sides.
Poultry-Cut 1/4 to 1/2 pounds Low or Medium 20 to 40 minutes
Grill turning occassionally. During last few
minutes brush with barbecue sauce if desired,
turn several times.
Low or 1 to 1-1/2 hours
Use poultry stand and brush frequently as
desired
Medium 40 to 60 minutes
Use poultry stand and brush frequently as
desired
Fish 3/4 to 1 inch Medium 8 to 15 minutes
Grill turning once to desired doneness. Brush
with melted butter, margarine or oil.
Poultry Whole
2 to 3 pounds
Grill Cooking Chart
10

To ensure a proper working unit the following proper care
and maintenance is suggested. Caution: Regular cleaning of
the bowl assembly is required to prevent grease build-up.
Cleaning Cooking Grids
We suggest you wash your cooking grids in a mild soap and
warm water solution. You can use a wash cloth or soft brush
to clean your cooking grids.
Cleaning Heat diffusers
Periodically you should wash the heat diffusers in a soap and
warm water solution. Use a soft brush to remove stubborn
burnt-on cooking residue. The heat diffusers should be dry
before you reinstall them.
Cleaning Grease Tray
The grease tray should be emptied and wiped down
periodically and washed in a mild detergent and warm water
solution. A small amount of sand or cat litter may be placed
in bottom of grease tray to absorb the grease.
Check the grease tray frequently, don’t allow excess grease
to accumulate and overflow out of the grease tray.
Annual Cleaning of Grill Interior
Burning-off the grill after every use will keep it ready for your
next use. However, once a year you should give the entire
grill a thorough cleaning to keep it in top operating condition.
Follow these steps.
1. Turn all burner valves to full OFF position.
2. Turn LP gas tank valve to full OFF position.
3. Detach LP gas hose and pressure regulator assembly
from your gas grill. Inspect for any damage and replace as
necessary with manufacturer replacement part number found
on parts list.
4. Remove and clean heat diffusers, cooking grids and grill
burners.
5. Cover each gas valve orifice with aluminum foil.
6. Brush inside and bottom of grill with a nylon brush, and
wash with a mild soap and warm water solution. Rinse
thoroughly and let dry.
7. Remove the aluminum foil, then reinstall heat diffusers,
and cooking grids.
8. Reconnect gas source and observe burner flame for
correct operation.
Cleaning Exterior Surface
We suggest you wash your grill using a mild soap and warm
water solution. You can use a wash cloth or sponge for this
process. Do not use abrasives or a brush that might remove
finish during the cleaning process.
Cleaning Exterior Stainless Steel Surfaces
Weathering and extreme heat can cause exterior stainless steel
surfaces to turn tan in color. Machine oils used in manufacturing
process of stainless steel can also cause this tanning color. Use a
stainless steel cleaner to polish stainless steel surfaces of your grill.
Never use abrasive cleaners or scrubbers because they will scratch
and damage your grill.
Cleaning Burner Tubes and Burner Ports
To reduce the chance of “FLASH-BACK” the procedure below should
be followed at least once a month in late summer or early fall when
spiders are most active or when your grill has not been used for a
period of time.
1. Turn all burner valves and gas tank valve to off position.
2. Detach the LP gas pressure regulator assembly from your gas grill.
3. Remove cooking grids, heat diffusers, and grease tray from the grill.
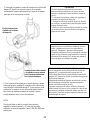
4. Remove the R clip from the burner and lift the burners up and away
from the gas valve orifice.
5. Using a bent stiff wire in the shape of a hook , air hose or a bottle
brush, run it through the burner tube and inside several times to
remove any debris.
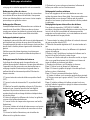
6. Replace burners, see illustration below.
Step 1. Replace R clip.
Step 2. Take off R clip which fixes burner at the end side.
Step 3. Locate the new burner onto the orifice.
(a) Insert the burner over the main burner gas valve .
(b) Make sure the orifice stud (C1) is inside the burner venture (D1)
as shown in (Fig.23).
Step 4. Secure the main burner on the back wall use R clip, and fix on
ignite wire.
Cleaning and Maintenance
C1
D1
11

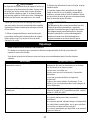
BEFORE CALLING FOR SERVICE
If the grill does not function properly, use the following check list before calling for service.
You should inspect the burners at least once a year or immediately after any of the following conditions occur:
Regardless of which burner cleaning procedure you use, we
recommend you also complete the following steps to help
prolong burner life.
1. Use a fiber pad or nylon brush to clean the entire outer surface
of each burner until free of food residue and dirt.
WARNING
Spiders and insects can nest inside the burners of the grill
and disrupt gas flow. This very dangerous condition could
cause a fire behind the valve panel, thereby damaging the
grill and making it unsafe for operation. Inspect the grill at
least twice a year.
!
2. Clean any clogged ports with a stiff wire, such as an open
paper clip.
3. Inspect each burner for damage (cracks or holes) and if such
damage is found, order and install a new burner. After installation
check to ensure that gas valve orifices are correctly placed inside
the ends of the burner tubes.
Troubleshooting
PROBLEMS WHAT TO DO
Check to see if LP tank is empty.
Clean wires and/or electrode by rubbing
with alcohol and clean swab.
Wipe with dry cloth.
Make sure the wire is connected to
electrode assembly.
Do other burners on the unit operate?
Check to see if other burners operate. If
so, check the gas orifice on the
malfunctioning burner for an obstruction.
Burner flame is yellow or orange, in
combination with the odor of gas.
Refer to Clean Burner Tubes and Burner
Ports on page 11. If problem still exists,
call 1-800-913-8999.
Low heat with knob in “HI” position. Is the fuel hose bent or kinked?
Is the grill in a dusty area?
Is there adequate gas supply available?
If it is only one burner that appears low,
does the orifice or burner need cleaning?
Is the gas supply or gas pressure low?
Grill won’t light when the control knob is
rotated.
WARNING
The location of the burner tube with respect to the orifice is vital
for safe operation. Check to ensure the orifice is inside the
burner tube before using the gas grill. If the burner tube does not
fit over the valve orifice, lighting the burner may cause explosion
and/or fire.
!
MANUFACTURER/ FABRICANTE/ FABRICANTE:Nexgrill Industries, Inc.14050 Laurelwood Pl. Chino, CA
91710
12

LIMITED WARRANTY (Model # 720-0894F)
The manufacturer warrants to the original consumer-purchaser only
that this product (Model #720-0894F) shall be free from defects in workmanship
and materials after correct assembly and under normal and reasonable home use for the periods indicated below beginning on the date of
purchase. The manufacturer reserves the right to require photographic evidence of damage, or that defective parts be returned, postage and/or
freight pre-paid by the consumer, for review and examination. Nexgrill’s obligation is limited to repair, replacement, or depreciated value, at the
option of Nexgrill.
• TUBE BURNERS: 1 year LIMITED warranty against perforation.
• COOKING GRIDS and FLAME TAMERS: 1 year LIMITED warranty; does not cover dropping, chipping, scratching, or surface damage.
• STAINLESS STEEL PARTS: 1 year LIMITED warranty against perforation; does not cover cosmetic issues like surface corrosion, scratches and
rust.
•
ALL OTHER PARTS: 1 year LIMITED warranty (Includes, but not limited to, valves, frame, housing, cart, control panel, igniter, regulator, hoses)
*Does not cover chipping, scratching, cracking surface corrosion, scratches or rust.
Upon consumer supplying proof of purchase as provided herein, Manufacturer will repair or replace the parts which are proven defective during the
applicable warranty period. Parts required to complete such repair or replacement shall be free of charge to you except for shipping costs, as long
as the purchaser is within the warranty period from the original date of purchase. The original consumer-purchaser will be responsible for all
shipping charges of parts replaced under the terms of this limited warranty. This limited warranty is applicable in the United States and Canada
only, is only available to the original owner of the product and is not transferable. Manufacturer requires reasonable proof of your date of purchase.
Therefore, you should retain your sales receipt and/or invoice. If the unit was received as a gift, please ask the gift-giver to send in the receipt on
your behalf, to the below address. Defective or missing parts subject to this limited warranty will not be replaced without registration or proof of
purchase. This limited warranty applies to the functionality of the product ONLY and does not cover cosmetic issues such as scratches, dents,
corrosions or discoloring by heat, abrasive and chemical cleaners or any tools used in the assembly or installation of the appliance, surface rust, or
the discoloration of stainless steel surfaces. Surface rust, corrosion, or powder paint chipping on metal parts that does not affect the structural
integrity of the product is not considered a defect in workmanship or material and is not covered by this warranty. This limited warranty will not
reimburse you for the cost of any inconvenience, food, personal injury or property damage. If an original replacement part is not available, a
comparable replacement part will be sent. You will be responsible for all shipping charges of parts replaced under the terms of this limited warranty.
MANUFACTURER WILL NOT PAY FOR:
•Service calls to your home.
•Repairs when your product is used for other than normal, single-family household or residential use.
•Damage resulting from accident, alteration, misuse, lack of maintenance/cleaning, abuse, fire, flood, acts of God, improper installation, and
installation not in accordance with electrical or plumbing codes or misuse of product.
•Any food loss due to product failures.
•Replacement parts or repair labor costs for units operated outside the United States or Canada.
•Pickup and delivery of your product.
•Postage fees or photo processing fees for photos sent in as documentation.
•Repairs to parts or systems resulting from unauthorized modifications made to the product.
•The removal and/or reinstallation of your product.
•
Shipping cost, standard or expedited, for warranty/non warranty and replacement parts.
DISCLAIMER OF IMPLIED WARRANTIES; LIMITATION OF REMEDIES
Repair or replacement of defective parts is your exclusive remedy under the terms of this limited warranty. Manufacturer will not be responsible for
any consequential or incidental damages arising from the breach of either this limited warranty or any applicable implied warranty, or for failure or
damage resulting from acts of God, improper care and maintenance, grease fire, accident, alteration, replacement of parts by anyone other than
manufacturer, misuse, transportation, commercial use, abuse, hostile environments (inclement weather, acts of nature, animal tampering), improper
installation or installation not in accordance with local codes or printed manufacturer instructions.
THIS LIMITED WARRANTY IS THE SOLE EXPRESS WARRANTY GIVEN BY THE MANUFACTURER. NO PRODUCT PERFORMANCE
SPECIFICATION OR DESCRIPTION WHEREVER APPEARING IS WARRANTED BY MANUFACTURER EXCEPT TO THE EXTENT SET FORTH
IN THIS LIMITED WARRANTY. ANY IMPLIED WARRANTY PROTECTION ARISING UNDER THE LAWS OF ANY STATE, INCLUDING IMPLIED
WARRANTY OF MERCHANTABILITY OR FITNESS FOR A PARTICULAR PURPOSE OR USE, IS HEREBY LIMITED IN DURATION TO THE
DURATION OF THIS LIMITED WARRANTY.
Neither dealers nor the retail establishment selling this product has any authority to make any additional warranties or to promise remedies in
addition to or inconsistent with those stated above. Manufacturer's maximum liability, in any event, shall not exceed the documented purchase price
of the product paid by the original consumer. This warranty only applies to units purchased from an authorized retailer and or re-seller. NOTE:
Some states do not allow an exclusion or limitation of incidental or consequential damages, so some of the above limitations or exclusions may not
apply to you; this limited warranty gives you specific legal rights as set for herein. You may also have other rights which vary from state to state.
If you wish to obtain performance of any obligation under this limited warranty, you should write to:
Nexgrill Customer Relations
14050 Laurelwood PI
Chino, CA 91710
All consumer returns, parts orders, general questions, and troubleshooting
assistance can be acquired by calling U.S.A:1-800-913-8999
13

19000584A1
MODEL / MODÈLE / MODELO # 720-0894F
ADVERTENCIA
Para reducir el riesgo de incendio, el peligro de
quemaduras u otras lesiones, lea atentamente y por
completo el manual antes de utilizar su parrilla.
ADVERTENCIA
PARA USO EN EXTERIORES
SOLAMENTE.
ADVERTENCIA
Esta parrilla no fue diseñada con la
intención de ser instalada en
vehículos recreacionales ni en
botes.
Sólo a modo de ejemplo: SERIE Nº ________ FECHA DE FAB ________ COMPRA : _________
¿Tiene preguntas, problemas o le faltan piezas? Antes de devolver el producto a la tienda
minorista, llame a nuestro departamento de servicio al cliente al 1-800-913-8999 en Estados
Unidos, de lunes a viernes de 8 a.m. a 5 p.m., hora del Pacífico
14
LP Gas Grill page 1-13
PARRILLA A GAS PROPANO pagina 14-
26
GRIL AU GAZ DE PÉTROLE LIQUÉFIÉ
page 27-42

Precauciones de seguridad-----------------------------
Instrucciones de cocción---------------------------------
Tabla de cocción en la parrilla------------------------
Limpieza y mantenimiento -------------------------------
Localización y resolución de problemas --------------
Garantía------------------------------------------------------
Diagrama de piezas --------------------------------------
Listado de piezas ------------------------------------------
Índice
16
21
22
23
25
26
39
41
Advertencias de la Proposición 65 del estado de
California:
ADVERTENCIA: Para operar, este equipo requiere el
uso de gas propano, que contiene la sustancia química
benceno identificada por el estado de California como
causante de cáncer u otro tipo de daño en la función
reproductora.
ADVERTENCIA: Este producto contiene una o más
sustancias químicas identificadas por el estado de
California como causantes de cáncer.
ADVERTENCIA: Este producto contiene una o más
sustancias químicas identificadas por el estado de
California como causantes de defectos congénitos o
algún otro tipo de daños en la función reproductora.
En el estado de Massachusetts se aplican las
siguientes instrucciones de instalación:
Las instalaciones y reparaciones se deben efectuar
por un contratista, plomero o gasista calificado o
licenciado por el estado de Massachusetts.
Si se usa una válvula de bola, debe ser un tipo de
manigueta T.
Si se usa un conector de gas flexible no debe exceder
de 3 pies.
15

ADVERTENCIA
En caso de que estas instrucciones no se cumplieran,
ello podría dar como resultado un incendio o una
explosión que podría causar lesiones corporales graves,
la muerte o daños a la propiedad.
ADVERTENCIA
Su parrilla llegará a tener una temperatura muy
elevada. Nunca se incline sobre el área de cocción
mientras use la parrilla. No toque las superficies de
cocción, la carcasa de la parrilla, la tapa o cualquier otra
pieza de la parrilla mientras esta esté operando o hasta
que la parrilla de gas se haya enfriado luego de usarla.
El incumplimiento de estas instrucciones puede dar
como resultado lesiones corporales graves.
ADVERTENCIA
1. No almacene ni use gasolina u otros líquidos
o vapores inflamables en las cercanías de
este o cualquier otro dispositivo.
2. No se debe almacenar en las cercanías de
este o cualquier otro dispositivo un cilindro
de propano líquido (LP, por sus siglas en
inglés) que no esté conectado para su uso.
PELIGRO
En caso de que usted huela gas :
1. Cierre el suministro de gas del dispositivo.
2. Apague cualquier tipo de llama abierta.
3. Abra la tapa.
4. Si el olor persiste, manténgase alejado del
dispositivo y llame inmediatamente a su
proveedor del servicio de gas o al
departamento de bomberos.
!
!
Precauciones
!
!
Códigos de instalación de la parrilla
La instalación debe cumplir con los códigos locales o, en ausencia de
ellos, con todo código de gas combustible a nivel nacional, norma
ANSI Z 223.1/NFPA 54, el código de instalación para gas propano y
gas natural, norma CSA B149.1 o el código de manipulación y
almacenamiento de propano, norma B149.2, o las normas para
vehículos recreativos, norma ANSI A 119.2, y el código de vehículos
recreativos serie CSA Z240 RV, según corresponda.
Los modelos de parrilla de gas LP están diseñados para que se usen
con un tanque de gas propano líquido de 20 lb, que no está incluido
con la parrilla. Nunca conecte su parrilla de gas a un tanque de gas LP
que supere esta capacidad.
Un tanque de 12 pulgadas de diámetro por 18½
pulgadas de alto aproximadamente es el tamaño
máximo del tanque de gas LP para usar en la prrilla.
Debe usar un tanque de gas OPD que brinda un Dispositivo
de Prevención por Sobrecarga.
Esta función de seguridad evita que el tanque se sobrecargue lo
que puede ocasionar un funcionamiento incorrecto del tanque
de gas LP, del regulador y/o de la parrilla.
El tanque de gas LP debe estar construido y marcado de
acuerdo con las especificaciones del Departamento de
Transporte de Estados Unidos (DOT, por sus siglas en inglés).
En Canadá, el tanque de gas LP debe cumplir con las Normas
Nacionales de Canadá, norma CAN/CSA-B339, sobre cilindros,
esperas y tubos de la Comisión y Transporte de Mercadería
Peligrosa.
1. El tanque de gas LP debe tener una válvula de cierre que
cancele la salida del suministro de gas LP de la válvula del
tanque y que sea compatible con un dispositivo de conexión
para tanque Tipo 1. El tanque de gas LP también debe contar
con un dispositivo de escape de seguridad que tenga una
conexión directa con el espacio de vapor del tanque.
2. El sistema de suministro del tanque debe estar adaptado para
la salida de vapores.
3. El tanque de gas LP debe tener un collarín que proteja la
válvula del tanque.
Colocación correcta y espacio libre de la parrilla
Nunca use la parrilla de gas en un garaje, entrada, cobertizo,
corredor o cualquier otro lugar cerrado. La parrilla de gas debe
utilizarse sólo al aire libre, al menos 36 pulgadas desde la
parte de atrás y del costado de cualquier superficie combustible.
La parrilla de gas no debe utilizarse en una construcción
combustible elevada.
16

•No obstruya el flujo de aire de la ventilación que se encuentra en la
carcasa de la parrilla de gas.
• No instale esta parrilla de gas para exteriores en o sobre vehículos
recreativos o botes
• Mantenga despejada y sin materiales combustibles, gasolina y
demás vapores y líquidos inflamables el área donde se encuentra la
parrilla de gas para exteriores
• No obstruya el flujo de combustión y del aire de la ventilación.
Controle esto con anterioridad cada vez que use la parrilla.
• Nunca conecte un tanque de gas LP sin regular a la parrilla de gas.
El ensamble del regulador de gas que viene con su parrilla de gas
está adaptado para que tenga una presión de salida de una columna
de agua (W.C.) de 11” para la conexión a un tanque de gas LP.
• Sólo use el ensamble del regulador y la manguera que viene con su
parrilla de gas. Los ensambles de los reguladores y de la manguera
de reemplazo deben ser los que se especifican en este manual.
•Haga llenar su tanque de gas LP por un distribuidor de gas propano
de confianza, haga que le practiquen una inspección ocular y lo dejen
en condiciones cada vez que llene el tanque.
• No guarde un tanque de gas LP de repuesto debajo de o cerca de
este dispositivo.
• Nunca llene el tanque superando el 80 por ciento de la capacidad.
Si esta instrucción no se cumpliera con exactitud, es posible que se
produzca un incendio que ocasione la muerte o lesiones graves.
• Siempre mantenga los tanques de gas LP en una posición vertical.
• No almacene o use gasolina u otros vapores o líquidos inflamables
en las cercanías de esta parrilla de gas.
• No someta el tanque de gas LP a un calor excesivo.
• Nunca almacene en un ambiente cerrado un tanque de gas LP. Si
usted guarda su parrilla de gas en el garaje o en otro lugar cerrado,
siempre desconecte el tanque de gas LP en primer término y
guárdelo afuera en un lugar seguro.
• Coloque la tapa anti-polvo sobre la salida de la válvula del cilindro
siempre que el mismo no esté en uso. Instale sólo el tipo de tapa
anti-polvo sobre la salida de la válvula del cilindro que viene con la
mencionada válvula. Otros tipos de tapas o tapones pueden causar
fugas de propano.
Conserve siempre el cilindor de
propano líquido a 90º (vertical) para
proporcionar la eliminación del vapor
• Los tanques de gas LP deben guardarse en exteriores, en
áreas bien ventiladas y fuera del alcance de los niños.
No deben guardarse los tanques de gas LP desconectados en
viviendas, garajes o en cualquier otro tipo de lugar cerrado.
• Cuando su parrilla de gas no esté en uso, se debe cerrar el
paso de gas en el tanque de gas LP.
• El ensamble del regulador y la manguera deben
inspeccionarse con anterioridad cada vez que se use la parrilla.
En caso de que exista abrasión o desgaste excesivo o si la
manguera está cortada, se debe reemplazar antes de que se
utilice la parrilla nuevamente.
• Mantenga la manguera del regulador de gas alejada de
superficies calientes de la parrilla y que recolecten grasa. Evite
la torsión innecesaria de la manguera. Haga una inspección
visual de la manguera con anterioridad cada vez que use la
parrilla para detectar cortes, rajaduras, desgaste excesivo u
otros daños. Si la manguera pareciera estar dañada, no use la
parrilla de gas. Llame al 1-800-913-8999 para solicitar una
manguera de reemplazo.
• Nunca encienda su parrilla de gas con la tapa cerrada o antes
de controlar a fin de asegurarse si los tubos de los mecheros
están colocados por complete en los orificios de las válvulas de
gas.
• Nunca permita que los niños operen la parrilla.
ADVERTENCIA
Un fuerte olor a gas o un sonido siseante del gas indica un
problema grave respecto de la parrilla de gas o el tanque de
gas LP. En caso de que las siguientes instrucciones no se
cumplieran, ello podría dar como resultado un incendio o
una explosión que podría causar lesiones corporales
graves, la muerte o daños a la propiedad.
• Cierre el suministro de gas de la parrilla.
• Gire las perillas de control a la posición de apagado
(OFF).
• Apague cualquier tipo de llama con un extintor de
incendios adecuado.
• Abra la tapa de la parrilla.
• Aléjese del tanque de gas LP.
• No intente solucionar el problema usted mismo.
• Si el olor persiste o tiene un incendio que no puede
apagar, llame al departamento de bomberos de su área. No
llame cerca del tanque de gas LP ya que el teléfono es una
forma de dispositivo eléctrico y podría generar chispas que
den como resultado un incendio y/o una explosión.
!
17

NOTA: El flujo normal de gas que va por el ensamble del
regulador y la manguera puede causar un zumbido. Un volumen
bajo de ruido es perfectamente normal y no interferirá con la
operación de la parrilla. Si el zumbido es fuerte y excesivo, es
posible que deba purgar el aire de la línea de gas o reajustar el
dispositivo de flujo de gas en exceso del regulador. Este
procedimiento de purga debe hacerse cada vez que se conecte
un nuevo tanque de gas LP a la parrilla. Para obtener asistencia
con este procedimiento, consulte la página 24, del título “En caso
de que aún no se encienda la parrilla” o llame al Centro de
Información sobre Parrillas al 1-800-913-8999.
PRECAUCIÓN: Tenga cuidado con los
fogonazos
PRECAUCIÓN: Las arañas y los insectos pequeños pueden
ocasionalmente tejer telillas o hacer nidos en los tubos de
los mecheros de la parrilla durante el transporte o mientras
están en el depósito. Estas telillas pueden causar
obstrucciones en el flujo de gas que podrían hacer que se
quemen los tubos de los mecheros y áreas circundantes.
Este tipo de evento se lo conoce como “FOGONAZO” y
puede causar graves daños a la parrilla y generar
condiciones de operación riesgosas para el usuario.
Aunque el tubo de un mechero obstruido no es la única
causa para que se genere un "FOGONAZO", es la más
común.
A fin de minimizar las probabilidades de que ello ocurra,
usted debe limpiar los tubos de los mecheros antes de
armar la parrilla y luego por lo menos una vez al mes hacia
el final del verano o a principios del otoño que es cuando
las arañas tienen mayor actividad. Asimismo realice este
procedimiento de limpieza si usted no ha usado la parrilla
durante un tiempo prolongado.
Consulte la sección Limpieza de Tubos y Puertos de los
Mecheros en la página 24
Control de las llamas de los mecheros
Controle en forma visual las llamas de los mecheros antes de cada uso.
Las llamas debe tener el aspecto que se observa en la imagen. En caso
contrario, consulte la sección sobre limpieza de los tubos y puertos de
los mecheros en la página 24 de este manual.
18
Verificación para detectar fugas de gas LP
Nunca haga pruebas para detectar fugas con una llama. Antes de
usarla por primera vez, al comienzo de cada estación o cada vez
que se cambie el tanque de gas LP, debe verificar el dispositivo
para detectar fugas de gas.
1. Haga una solución de jabón suave en partes iguales (50% agua/
50% jabón).
2. Gire las perillas de control a la posición de apagado (OFF);
luego abra el paso de gas (ON) en el tanque de suministro.
3.
Aplique la solución jabonosa con un cepillo limpio en todas las
conexiones de gas. Observe a continuación. Si aparecen
formaciones de burbujas en la solución, las conexiones no
están selladas apropiadamente. Verifique cada conexión y
ajústelas o repárelas según sea necesario.
4. Si tiene una fuga en la conexión de gas que no pueda reparar,
cierre el paso de gas (OFF) en el tanque de suministro,
desconecte la línea de combustible de la parrilla y llame al 1-
800-913-8999 o a su proveedor de servicios de gas para que lo
asista en la reparación.
5. Asimismo, aplique la solución jabonosa en las junturas del
tanque. Observe a continuación. Si aparecen formaciones de
burbujas, cierre el tanque (OFF) y no lo use ni lo mueva.
Contacte al proveedor especialista en gas LP o al departamento
de bomberos de su localidad para obtener asistenciafor
assistance.
Verificación para la detección de fugas en la conexión de gas
Verificación para la detección
de fugas en el tanque de gas

Encendido manual de la parrilla con un cerillo
1. Coloque un cerillo en la varilla de encendido manual.
2. Siga los pasos 1 a 5 del Procedimiento de Encendido
Básico.
3. Encienda el cerillo y extienda la varilla de encendido hasta
la superficie de la rejilla de cocción.
4. Gire la perilla de control que desee hasta la posición de
máximo para liberar la salida del gas. El mechero debe
encenderse de inmediato.
ADVERTENCIA
En caso de que ocurriera un “FOGONAZO” en o cerca de
los tubos de los mecheros, siga las siguientes
instrucciones. En caso de que estas instrucciones no se
cumplieran, ello podría dar como resultado un incendio o
una explosión que podría causar lesiones corporales
graves, la muerte o daños a la propiedad.
• Cierre el suministro de gas de la parrilla.
• Gire las perillas de control a la posición de apagado (OFF).
• Apague cualquier tipo de llama con un extintor de incendios
adecuado.
• Abra la tapa de la parrilla.
• Cuando la parrilla se haya enfriado, limpie los tubos del
mechero y los mecheros según las instrucciones de limpieza
que están en la página 24.
!
19
Si no se puede encender la parrilla
1. Verifique el suministro y las conexiones de gas para detectar
fugas. Verifique que la totalidad de las conexiones de cables sean
seguras.
2. Repita el procedimiento de encendido básico. Si todavía la
parrilla no funciona, apague la fuente de gas, gire las perillas de
control a la posición de apagado (OFF), y verifique lo siguiente:
• Alineación errónea de los tubos de los mecheros sobre los
orificios
Corrección: vuelva a posicionar los tubos de los mecheros sobre
los orificios.
• Orificio tapado
Corrección: quite los mecheros de la parrilla, con cuidado
levante cada uno de los mecheros y aléjelos del orificio de la
válvula de gas. Quite el orificio de la válvula de gas y con
gentileza destape cualquier obstrucción con un alambre delgado.
Luego vuelva a instalar todos los orificios, mecheros y
componentes de cocción.
3. Si sospecha de que existe una obstrucción en las válvulas de
los mecheros de la parrilla, llame para solicitar un servicio de
reparación al 1-800-913-8999.
4. Si todavía la parrilla no enciende, es posible que deba purgar el
aire de la línea de gas o reajustar el dispositivo de flujo de gas en
exceso del regulador. Nota: Este procedimiento debe hacerse
cada vez que se conecte un nuevo tanque de gas LP a la parrilla.
Para purgar el aire de la línea de gas y/o reajustar el
dispositivo de flujo de gas en exceso del regulador:
• Gire todas las perillas de control a la posición de apagado
(OFF).
• Cierre el paso del gas de la válvula del tanque.
• Desconecte el regulador del tanque de gas LP.
• Deje a la unidad reposar durante 5 minutos.
• Vuelva a conectar el regulador al tanque de gas LP.
• Abra la válvula del tanque lentamente hasta que esté abierta en
un nivel de 1/4 a ½.
• Abra la tapa de la parrilla.
• Presione y gire cualquiera de las perillas de control a la posición
de máximo (HIGH).
• Gire las perillas de control a la posición de máximo (HIGH)
hasta que todos los mecheros estén encendidos.
• Puede comenzar a usar la parrilla
5. Si se han realizado todas las operaciones de verificación y
corrección y aún tiene consultas sobre la operación de su parrilla
de gas, llame al Centro de Información sobre Parrillas al 1-800-
913-8999.

Sostenga la tuerca del acoplador
y el regulador como se muestra
para conectarlos debidamente
con la válvula del tanque.
El niple tiene que estar
centrado con la válvula
del tanque LP.
5. Sostenga el regulador e inserte el empalme en la válvula del
tanque LP. Apriete con la mano la tuerca del acoplador,
sosteniendo el regular verticalmente con respecto del tanque
para que no se trasrosque la conexión.
6. Gire la tuerca del acoplador en el sentido del reloj y apriete
hasta que tope por completo. El regulador sella la función de
cierre lento de la válvula del tanque LP, lo que produce cierta
resistencia. Se requiere un giro adicional de media vuelta o
tres cuartos de vuelta para realizar la conexión. Aprieta
exclusivamente a mano; no use herramientas.
NOTA:
Si no puede llevar a cabo la conexión, desconecte el
regulador y repita los pasos 5 y 6. Si aun así no puede
realizarla, no use este regulador. Llame 1-800-913-8999 para
pedir ayuda.
Felicitaciones
Su parrilla de gas Nexgrill ya está lista para usarse.
Antes de usarla por primera vez y al principio de cada
estación (y siempre que se haya cambiado el tanque de
gas LP):
1. Lea todas las instrucciones relativas a la seguridad, el
encendido y la operación del dispositivo.
2. Verifique los orificios de la válvula de gas, los tubos de
los mecheros y los puertos de los mecheros para detectar
todo tipo de obstrucciones.
3. Realice un control para detectar fugas de gas de acuerdo
con las instrucciones que se encuentran en la siguiente
página de este manual.
Importante
Antes de cocinar en su parrilla por primera vez, lave las
rejillas y plataformas de cocción con agua caliente y
jabonosa. Enjuáguelas y séquelas minuciosamente.
Colóqueles aceite para cocinar en forma regular. Luego de
que la cocción se termine, ponga la parrilla en la posición
de máximo (HIGH) durante 3 a 5 minutos para quemar el
exceso de grasa o los residuos de comida.
DESCONEXIÓN DEL CILINDRO DE PROPANO LÍQUIDO
Gire las válvulas del mechero de la parrilla a la posición de
apagado (OFF) y asegúrese de que la parrilla esté fría.
Gire la válvula del cilindro de propano líquido a la posición de
apagado (OFF) girando las mismas en sentido de las agujas del
reloj hasta que haga tope.
Desprenda el ensamble del regulador de presión de la válvula
del cilindro girando la arandela de acoplamiento rápido en
sentido contrario de las agujas del reloj.
Coloque la tapa para polvo sobre la salida de la válvula del
cilindro cuando el cilindro no se use. Instale sólo el tipo de tapa
para polvo en la salida de la válvula del cilindro que viene con
dicha válvula. Otros tipos de tapas o tapones pueden dar como
resultado fugas de propano.
20
Page is loading ...
Page is loading ...
Page is loading ...
Page is loading ...
Page is loading ...
Page is loading ...
Page is loading ...
Page is loading ...
Page is loading ...
Page is loading ...
Page is loading ...
Page is loading ...
Page is loading ...
Page is loading ...
Page is loading ...
Page is loading ...
Page is loading ...
Page is loading ...
Page is loading ...
Page is loading ...
Page is loading ...
Page is loading ...
-
 1
1
-
 2
2
-
 3
3
-
 4
4
-
 5
5
-
 6
6
-
 7
7
-
 8
8
-
 9
9
-
 10
10
-
 11
11
-
 12
12
-
 13
13
-
 14
14
-
 15
15
-
 16
16
-
 17
17
-
 18
18
-
 19
19
-
 20
20
-
 21
21
-
 22
22
-
 23
23
-
 24
24
-
 25
25
-
 26
26
-
 27
27
-
 28
28
-
 29
29
-
 30
30
-
 31
31
-
 32
32
-
 33
33
-
 34
34
-
 35
35
-
 36
36
-
 37
37
-
 38
38
-
 39
39
-
 40
40
-
 41
41
-
 42
42


Nexgrill 720-0894F User manual
- Category
- Barbecues & grills
- Type
- User manual
- This manual is also suitable for
Ask a question and I''ll find the answer in the document
Finding information in a document is now easier with AI
in other languages
- français: Nexgrill 720-0894F Manuel utilisateur
- español: Nexgrill 720-0894F Manual de usuario
Related papers
-
 Nexgrill 720-0440 Owner's manual
-
 Nexgrill 720-0441 Owner's manual
-
 Nexgrill 720-0609 Owner's manual
-
 Nexgrill 720-0925 Owner's manual
-
 Nexgrill 720-0783C Owner's manual
-
 Nexgrill 720-0783E Owner's manual
-
 Nexgrill 122.166489 User manual
-
 Nexgrill 720-0718C Owner's manual
-
 Nexgrill 810-0010 Owner's manual
-
 Nexgrill 820-0012 Owner's manual


Other documents
-
 BHG 720-0783H Owner's manual
-
 BHG BH15-101-099-07 Owner's manual
-
Nex 720-0548 Owner's manual
-
Kenmore 122.166489 Owner's manual
-
-
-
-
-
-

