Ford 2009 Explorer Sport Trac Reference guide
- Category
- Cars
- Type
- Reference guide

was engineered with your lifestyle in mind – tough enough to take on what the road ahead gives you,
yet sophisticated with new and advanced features. Some of these features you will find to be intuitive,
while others may be new to you. Please take a few moments to familiarize yourself with your new
Sport Trac by reading this Quick Reference Guide, which discusses features, specifications and
general information. For more detailed information including important safety information, please refer
to your Owner’s Guide.
Use extreme caution when using any device or feature that may take your attention off the road. Your
primary responsibility is the safe operation of the vehicle. Only use non-essential features and devices
when it is safe to do so.
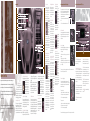
THE 2009 SPORT TRAC
Instrument Panel
1
2
4
5
6
3
7
8
9
1. ABS Warning Light
The ABS light illuminates briefly
when the ignition is turned on. If the
ABS light remains on or continues to flash,
a malfunction has been detected. Contact your
authorized dealer as soon as possible. Normal
braking (less ABS) is still functional unless the
brake warning light
is also illuminated.
2. Service Engine Soon Light
The Service engine soon light
illuminates briefly
when the ignition is turned on. If it remains on
or is blinking after the engine is started, the On
Board Diagnostics System (OBD-II) has detected
a malfunction. Drive in a moderate fashion and
contact your authorized dealer as soon as possible.
3. Low Tire Pressure Warning Light
This light
illuminates when the ignition is turned
on. If the light does not turn on
or begins to flash, contact your
authorized dealer as soon as
possible. For more information,
please refer to Tire pressure
monitoring system (TPMS) in
the Tires, Wheels and Loading
chapter of your Owner’s Guide.
4. Message Center (if equipped)
The message center displays important vehicle
information through a constant monitoring of vehicle
systems. The system will notify you of potential
vehicle problems with a display of system warnings
followed by a long indicator chime.
Optional Message Center (if equipped)
INFO: Press to scroll through the following
displays: Odometer, Trip Odometer A or B, Distance
10
11
13
12
to Empty, Average Fuel Economy, Instantaneous
Fuel Economy, Fuel Used, Trip Elapsed Drive Time
and Blank.
RESET: Press to select and reset functions shown
in the Info (Information) and Setup Menu.
SETUP: Press to scroll through: System Check,
Units (English/Metric), Language, Autolamp,
Autolock, Autounlock, Park Aid, Compass Zone
and Compass Calibration.
5. Multi-function Lever
Rotate the end of the control up to increase the
speed of the wipers and rotate down to decrease
the speed of the wipers. Briefly press the end of the
stalk for a single swipe of the wipers without washer
fluid. A quick push and hold results in three swipes
with washer fluid while a longer push and hold
activates the wash pattern for up to five seconds.
Pull the lever towards you briefly to activate the
‘flash to pass’ feature. For better visibility, your
vehicle will also automatically turn on your headlights
(during daylight) if your windshield wipers and
autolamps
are on. To operate
your rear window wiper, turn the
rear wiper control to the 1 or 2
speed settings or O (off). For
a rear wash cycle, turn the rear
wiper control to the
position.
To turn on the highbeams, push
the lever away from you. Pull the
lever toward you to deactivate.
6. Hazard Flasher Control
The hazard flasher is located
on the steering column, just
behind the steering wheel.
Press to activate all front and
rear direction signals. Press
to deactivate.
4
7. Speed Control
To set the speed control, press
and release ON. Accelerate to
the desired speed. Press and
release the SET + control. Take
your foot off the accelerator
pedal. The speed control
indicator light
will illuminate in
the cluster. To set a higher speed:
press and hold
SET+ until the
desired speed
is reached,
or briefly
press SET+
to increase
the speed by
small amounts. To set a lower
speed: press and hold SET- until
the desired speed is reached, or
briefly press SET- to decrease the
speed by small amounts. Press
RES to return to the previously
set speed. To turn speed control
off, press OFF.
8. Headlamps, Fog Lamps,
Panel Dimmer Control
Turn the control one position
to the right
to turn on the
parking lamps, instrument panel
lamps, license plate lamps and
tail lamps. Turn
the control to
the second
position on
the right
to turn on the
headlamps.
Turn the
control one position to the left
to activate the autolamp feature,
which automatically turns the
exterior lamps on and off, based
on available daylight. Pull the
control toward you to activate the
fog lamps. (The fog lamps will
not operate when the control is
turned off (O) or when the high
beams are on). Use the panel
dimmer control to adjust the level
of brightness on the instrument
panel during parking lamp and
headlamp operation. Move the
control to the full right position,
past the detent, to turn on the
interior lamps.
9. Parking Brake Release
Pull the lever to release the
parking brake. Driving with
the parking brake engaged
will cause the brakes to wear
out prematurely and reduce
fuel economy.
10. Four-Wheel Drive
(if equipped)
When 4X4 AUTO is selected,
power is automatically provided
to all four wheels. It is used
for normal street and highway
driving. 4X4 HIGH is used
for extra traction in slippery
conditions, such as in snow, on
icy roads, or in off-road situations.
It should not be operated on dry
pavement. 4X4 LOW can be
selected to provide extra gearing
to deliver maximum power to all
four wheels. It is intended only
for off-road applications such as
deep sand, steep grades or
pulling heavy objects.
11. AdvanceTrac
®
with Roll
Stability Control
™
(RSC
®
)
Stability Enhancement System
Your vehicle is equipped with an
AdvanceTrac
®
stability system.
This system focuses on three
main areas: Traction control
(which helps avoid wheel spin
and loss of traction), Electronic
Stability Control (which helps
avoid skids or lateral slides), and
Roll Stability Control (which helps
avoid a vehicle
roll-over).
These features
work together
to help you
to maintain
stability and
steerability of
your vehicle during a variety of
road conditions. If your vehicle
becomes stuck in the snow,
mud or sand, try turning off the
AdvanceTrac
®
system to allow
wheel spin and help increase
momentum to dig the vehicle out.
The system defaults to on and
the control will illuminate when
turned off.
12. Power Adjustable
Pedals (if equipped)
Press the bottom of the control
q
to move
the pedals
closer to you
or the top of
the control p
to move the
pedals further
away from you.
The pedals should only be
adjusted when the vehicle is
stopped and in Park (P).
13. Heated Seats (if equipped)
To operate the
heated seat
function, push
the control to
activate and
push again to
deactivate.
Overdrive Control
Drive with the vehicle in Overdrive
(D) for the best fuel economy.
You can deactivate overdrive by
pressing the transmission control
switch on the
side of the
shift handle.
Use this
during heavy
city traffic
where you are
continuously
shifting in and out of overdrive,
hilly terrain, heavy loads, trailer
towing and when engine breaking
is required. To return to overdrive,
simply press the transmission
control switch again.
Tonneau Cover (if equipped)
Your vehicle may be equipped with a lockable tonneau cover. The
tonneau cover key is separate from the ignition key. The tonneau cover
has been designed to maximize fuel economy and should be fully
installed whenever possible.
To open the front panel:
1. Open the front driver side lock cover and unlock the front panel.
2. Lift the panel to access items in the pickup box near the cab.
3. To close, lower the panel down on the pickup box.
To open the rear panel:
1. Open the lock cover and unlock the rear panel using your ignition key.
2. Lift the rear panel to access items in the pickup box.
3. To close, lower the rear panel on the pickup box.
For a more detailed description on proper usage, refer to the Driver Controls chapter of your Owner’s Guide.
Interior Tiedown Hooks
Your vehicle is equipped with interior tiedown hooks mounted inside
the pickup box. Each tiedown hook can secure loads up to 200 lb.
(91 kg). Total pickup box cargo weight is not to exceed overall
vehicle payload.
Cargo Cage (if equipped)
Your vehicle may be equipped with a cargo cage designed to extend
the pickup box for larger loads. To extend the cargo cage:
1. Lower tailgate.
2. Pull the lever on each side of the cargo cage to release it from the
pickup box.
3. Flip the cargo cage over on to the tailgate.
4. Evenly push down on the cargo cage and push the lever in on each
side locking it in place. The cargo cage can be used to secure a load of
up to 100 lb (45kg).
To stow the cargo cage, follow steps one through four in reverse order. For more information, refer to the
Driver Controls chapter of your Owner’s Guide.
Cargo Management System & Pickup Box Storage
The cargo management system consists of 3 storage compartments
located in the floor of the pickup box and behind each wheel well.
The storage compartments have been designed to be a water
resistant system. A small amount of water may drain into the storage
compartments with the lid closed.
1. To open, turn the latch counterclockwise to unlock and lift
the lid.
2. To close, lower the lid and turn the latch clockwise to lock.
4
Dual Automatic Temperature Control (DATC) (if equipped)
1. EXT: Press EXT to display outside air
temperature. Press again to display cabin
temperature settings.
2. Driver/Passenger Side Temperature
Control: To control the temperature on the driver’s
side in single zone mode, press the driver temperature
control; the climate system’s display indicates the
selected temperature. The passenger side can
also be controlled by selecting the passenger
temperature control, the temperature will appear
in the display.
3. AUTO: Press to engage full automatic operation.
The system will automatically determine fan speed,
airflow distribution, A/C on or off and either outside
or recirculated air to heat or cool the vehicle to
reach the desired temperature.
4. OFF: Outside air is shut out and the fan will
not operate.
5. Manual Override Controls: Allows you to
manually determine where airflow is directed.
To return to fully automatic control, press AUTO.
6. DUAL: Press to activate dual zone mode where
the driver and passenger have control of their
individual temperature settings. Press again to
return to single zone where the driver’s settings will
determine the temperature for the entire vehicle.
7. MAX A/C: Press to distribute recirculated air
through the instrument panel vents to cool the
vehicle. This recooling of the interior air is more
economical and efficient.
8. Defrost
: Press to clear the windshield of fog
and thin ice.
6
2
7
3
2
1
8
5

2009 SPORT TRAC Quick Reference Guide
Rear Seats – Folding down the 2nd row 60/40 seats
1. Lower the head restraints by pulling the strap.
2. Locate the handle on the side of the seat cushion by the door.
3. Pull up on the handle and push the seatback forward toward the front of the vehicle.
To return the seat to the upright position make sure there are no objects trapped behind the seatback
and then:
1. Lift the seatback toward the rear of the vehicle.
2. Pull up on the handle and rotate the seatback until you hear a click, locking it in the upright position.
3. Lift up on the head restraint until it locks into its original position.
2009 SPORT TRAC Seating
Please refer to the Seating and Safety Restraints chapter in your Owner’s Guide for additional seating information.
Auxiliary Input Jack
Your vehicle is equipped with an Auxiliary Input Jack located inside the console bin.
This allows you to plug and play auxiliary audio devices. Press AUX repeatedly on
your audio system to access. When LINE IN appears in the display, plug in your auxiliary
audio device. For more detailed information, please refer to your Owner’s Guide.
USB Port (if equipped)
Your vehicle may be equipped with a USB port inside your center console. This
feature allows you to plug in your media playing devices among other options. For
more detailed information, please refer to the SYNC
®
supplement or the SYNC
®
section of the Navigation Supplement.
Power Down Back Window (if equipped)
To lower the back window, the ignition must be turned on or in the accessory position.
Press and release the control located in the overhead console to lower the window to
the vent position. Press and release the control again to lower the window to the full
open position. Press and release the control again to raise the window all the way to
the full closed position.
ADDITIONAL FEATURES (Continued)
Remote Entry System
Your vehicle is equipped with a remote entry system which allows you to:
Press
once to unlock the driver’s door. The interior lamps will illuminate.
Press
twice to unlock the passenger doors.
Press
once to lock all the doors. The lamps will flash.
Press
twice to confirm all the doors are closed and locked. The doors will lock
again, the horn will chirp and the lamps will flash once if all the doors and trunk are closed.
Press
to activate the panic alarm. The horn will sound and the turn lamps will flash. Press again
or turn the ignition on to deactivate the panic alarm.
Car Finder: Press
twice within three seconds. The horn will chirp and the lamps will flash.
It is recommended to use this method to locate your vehicle, rather than using the panic alarm.
SecuriCode™ Keyless Entry System (if equipped)
You can use the keyless entry keypad to lock or unlock the doors without a key. To unlock
the driver’s door, enter your five digit factory code (available on the owner’s wallet card in
the glove box or from your authorized dealer.) To unlock all doors, enter your five digit factory
code and, within five seconds, press 3-4. To lock all doors, simply press 7-8 and 9-0 at the
same time (you do not need to enter your factory code first). Refer to your Owner’s Guide
for more information.
Truck Bed Auxiliary Power Point
An additional 12V auxiliary power point is located in the bed
of the truck. Lift the cover to access the auxiliary power point.
SYNC
®
(if equipped)
Your vehicle may be equipped with SYNC
®
– a hands-free
communications and entertainment system with special
phone and media features. For more information, please
refer to the SYNC
®
Supplement or to the SYNC
®
section in the
Navigation Supplement. Please also feel free to visit www.SyncMyRide.com.
ADDITIONAL FEATURES
4
14
13
11
12
9
8
2
1
3
7
6
5
15
10
Audiophile AM/FM In-Dash Six CD/MP3 Satellite Compatible Sound System (if equipped)
1. (CD Eject): Press and hold to auto eject all
CDs present in the system. Press
and a
memory preset to eject from a specific slot.
2. LOAD: Press LOAD and a memory preset to
load to a specific slot. Press and hold to autoload
up to six CDs.
3. CD: Press to enter CD/MP3 mode. If a CD/
MP3 is already loaded into the system, CD play
will begin where it ended last. If no CD is loaded,
NO DISC will appear in the display.
4. TEXT/SCAN: Press and hold for a brief
sampling of radio stations or CD tracks. Press
again to stop. In CD/MP3 mode, press to
display track title, artist name and disc title.
5. SEEK: Press
to access the previous strong
station or track. Press
to access the next strong
station or track.
6. FF (Fast Forward): Press to manually advance
in a CD or MP3 track.
7. REW (Rewind): Press to manually reverse
in a CD or MP3 track.
8. FOLDER: In folder mode, press to access the
previous or next folder on MP3 discs, if available.
9.
/ (Tune/Disc Selector): Press and release
to manually advance up/down the radio frequency
or to select a desired disc. Press and hold for
a fast advance through radio frequencies or all
loaded discs. Also use in menu mode to select
various settings.
10.
(Phone): If your vehicle is equipped with
SYNC
®
, press to access SYNC
®
PHONE features.
For more information, please refer to the SYNC
®
supplement. If your vehicle is not equipped with
SYNC
®
, the display will read NO PHONE.
11. MENU: Press this button when satellite radio
mode is active to access. Press OK to enter into
the satellite radio menu. Press
/ to cycle
through the following options: Category, Save
Song, Delete Song, Delete All Songs and Enable
Alerts/Disable Alerts. For more information,
please consult your Owner’s Guide.
SATELLITE RADIO CONTROLS: (if equipped)
12. AUX: Press repeatedly to cycle through SAT1,
SAT2, SAT3 (satellite radio mode if equipped), or
LINE IN (auxiliary audio mode). Press AM/FM to
return to radio mode.
Satellite radio is available only with a valid SIRIUS
radio subscription. Check with your authorized
dealer for availability.
13. SHUFFLE: Press to play the tracks on the
current disc in random order.
14.
/ II OK (PLAY/PAUSE): When a CD is
playing press the control to play or pause the
current CD. The CD status will display in the
radio display.
OK - Your vehicle may be equipped with special
phone and media features which will require you
to confirm commands by pressing OK. For further
information, refer to the SYNC
®
supplement.
15. Memory Presets: To set a station, select
frequency band AM/FM1/FM2, tune to a
station, press and hold a preset button (1-6)
until sound returns.
Navigation System: (if equipped) Your vehicle
may be equipped with a navigation system. Refer
to the Navigation Supplement for more information.
Location of Spare Tire: If you get a flat tire while driving, do not apply the brake heavily. Instead, gradually
decrease your speed. Hold the steering wheel firmly and slowly move to a safe place on the side of the
road. Your vehicle is equipped with a temporary spare tire located under the vehicle, just forward of the
rear bumper. The temporary spare is designed for emergency use only and should be replaced as soon as
possible. The jack and tools are located under the carpeted floor panel in the rear cargo area. For complete
details on how to change your tire, refer to the Roadside Emergencies chapter in your Owner’s Guide.
Fuses: If the vehicle’s electrical components are not operating, a fuse may have blown. The fuse panel
is located below the instrument panel on the driver’s side; remove the cover to view the fuses. For more
information regarding changing fuses, refer to the Roadside Emergencies chapter of your Owner’s Guide.
Fuel Type and Tank Capacity: Your fuel tank capacity is 22.5 gallons (85.2L). Your vehicle is designed
to use “Regular” unleaded gasoline with an octane rating of 87. Do not use gasoline labeled as “Regular”
in high altitude areas that are sold with octane ratings less than 87. Your vehicle was not designed to run
on E85 fuels that are blended with a maximum of 85% ethanol.
Tire Pressure: Your tire pressure is properly set at the dealership according to the recommended
specifications found on the Safety Compliance Certification Label or Tire Label located on the on the
B-Pillar or the edge of the driver’s door. Check your tire pressure at least once a month and before long
trips (including spare). As an added safety feature, your vehicle may be equipped with a Tire Pressure
Monitoring System (TPMS) that illuminates a low tire pressure warning light
when one or more of
your tires is significantly under-inflated. Improperly inflated tires can affect vehicle handling and can fail
suddenly, possibly resulting in loss of vehicle control. Refer to the Tires, Wheels and Loading chapter in
your Owner’s Guide for more information.
Fuel Pump Shut-Off Switch: The fuel pump shut-off switch is a device intended to stop the electric fuel
pump when your vehicle has been involved in a substantial jolt. The switch is located in the passenger’s
footwell, by the kick panel. After a collision, if the engine cranks but does not start, the fuel pump shut-off
switch may have been activated. For more information regarding the fuel pump shut-off switch, refer to the
Roadside Emergencies chapter of your Owner’s Guide.
Roadside Assistance: Your new Ford Explorer Sport Trac comes with the assurance and support of
24-hour emergency roadside assistance. Roadside assistance includes such services as: lockout assistance,
limited fuel delivery, battery jump starts, changing a flat tire, towing, and winch out. To receive roadside
assistance in the United States, call 1 (800) 241-3673. In Canada, call 1 (800) 665-2006. For more
information on coverage period and details of service, refer to your Roadside Assistance information card.
S.O.S. Post Crash Alert System: Your vehicle is equipped with the S.O.S. Post Crash Alert system.
This system provides audible and visual alarms in the event of a crash which causes the deployment
of airbags or the activation of the safety belt pretensioners. The turn signals will flash and the horn
will sound. To deactivate the system, press the hazard flasher control, or you can press
on your
remote transmitter.
Roof Rack Crossbars: If the crossbars are repositioned close to each other, the vehicle may exhibit
objectionable noise at highway speeds. This noise can be minimized by positioning the front crossbar just
behind the front door, and the rear crossbar in the furthest rearward position. Refer to the Owner’s Guide
for more information.
ESSENTIAL INFORMATION
This Quick Reference Guide is not intended to replace your vehicle Owner’s Guide which contains
more detailed information concerning the features of your vehicle, as well as important safety
warnings designed to help reduce the risk of injury to you and your passengers. Please read your
entire Owner’s Guide carefully as you begin learning about your new vehicle and refer to the
appropriate sections when questions arise.
All information contained in this Quick Reference Guide was accurate at the time of duplication. We
reserve the right to change features, operation and/or functionality of any vehicle specification at any
time. Your Ford dealer is the best source for the most current information. For detailed operating and
safety information, please refer to your Owner’s Guide.
Ford Motor Company
Customer Relationship Center
P.O. Box 6248
Dearborn, MI 48121
1-800-392-3673 (FORD)
(TDD for the hearing impaired: 1-800-232-5952)
August 2008
First Printing
Quick Reference Guide
Sport Trac
Litho in U.S.A.
9L2J 19G217 AA
-
 1
1
-
 2
2


Ford 2009 Explorer Sport Trac Reference guide
- Category
- Cars
- Type
- Reference guide
Ask a question and I''ll find the answer in the document
Finding information in a document is now easier with AI
Related papers
-
Ford 2010 Explorer Sport Trac Reference guide
-
-
-
-
-
-
-
-
-