Haier HWO60S4LMX1 User manual

Category
Ovens
Type
User manual

This manual is also suitable for

HWO60S4MX1/
HWO60S7EX1 Models
HWO60S4LMX1/
Cod:0040304139
User Manual
Built-in Electric Oven
Safety instructions......................................................................................................4
How to save energy.............................................................................................................5
Disposal of the appliance....................................................................................................5
Unpacking.............................................................................................................................5
Description of the appliance..................................................................................6
Installation......................................................................................................................8
Operation.......................................................................................................................10
Prior first use........................................................................................................................10
Electronic programmer.......................................................................................................10
Oven.....................................................................................................................................15
Cleaning and maintenance....................................................................................17
Operation in case of emergency.........................................................................19
Baking in the oven....................................................................................................20
Technical information..............................................................................................26
Mechanical timer.................................................................................................................15
The appliance and its accessible parts become hot
during use.
Care should be taken to avoid touching heating elements.
Children less than 8 years of age shall be kept away unless
supervised.continuously
During use the appliance becomes hot. Care should be taken
touching heating elements inside the ovento avoid
WARNING: Accessible parts may become hot during use.
Young children should be kept away
This appliance can be used by children aged from 8 years and
above and persons with reduced physical, sensory or mental
capabilities or lack of experience and knowledge if they have
been given supervision or instruction concerning use of the
appliance in a safe way and understand the hazards involved.
Children shall not play with the appliance. Cleaning and user
maintenance shall not be made by children without supervision.
DISPOSAL OF THE APPLIANCE
Old appliances should not
simply be disposed of with
normal household waste,
but should be delivered to
a collection and recycling
centre for electric and
electronic equipment.
A symbol shown on the product, the
instruction manual or the packaging shows
that it is suitable for recycling.
Materials used inside the appliance are
recyclable and are labeled with information
concerning this. By recycling materials or
other parts from used devices you are
making a significant contribution to the
protection of our environment.
Information on appropriate disposal
centers for used devices can be provided
by your local authority.
temperature red indicator
4
5
Mechanical timer
6
6
HWO60S4MX1
HWO60S4LMX1
6
HWO60S7EX1
The means for disconnection from
the supply mains having a contact
separation in all poles that provide
full disconnection under over voltage
the grounding wire shall be
longer than the other wires.
fixed wiring in accordance with the
wiring rules.
HO5RR-F
570
20
547
595
558
570
20
547
595
558
564
600
5
6
0
564
600
56
0
Button1
Button3
MODE
Button2
D
E
F
G
At power on, “12.00",
and flashes.
displayed
.Enter the
timer setting.
or
directly press the button 2,
The current time can be set with
button 1 and 3, 5 secondsafter the
time has been set ,the new data
will be saved .
23 and 59 minutes.
your setting is saved.
and alarm signal will go off. Or
signal will be turned off automatically
after 2 minutes.
the
alarm
1 2 3
1 2 3
1 2 3
1 2 3
1 2 3
4
To decrease the numbers
on the digital display
To increase the numbers
on the digital display
Display field
Seconds Icon
Function
Timer
Cooking time
Current time
End of cooking time
D
E
F
G
cooking
End of cooking time automatically
change to 5:00.
end of cooking time
Cooking time automatically
change
Press , button 2
to adjust the cook
time,
the
and always on.
cooking
And press button 2.
Press any button,the alarm signal and
the icon go off,will
Or
end of cooking time:
the alarm
after 2 minutes.
turned signal will be off automatically
1 2 3
1 2 3
and the will go off.
to 3:00.
End of cooking time = current time + cooking
time
Press any button,the alarm signal and
the icon go off,will
Or
the alarm
after 2 minutes.
turned signal will be off automatically
2
Press the function button ,
to adjust the
cooking time,
End of cooking time
end of cooking time
end of
end of cooking time
After the auto function be off,the cooking
time to 0,end of cooking time and current
time remains the same.
want to oven work
of 3 hours,end of cooking time
5:00
3:00
5:00
Or press button “ ” twice.
end of cooking time
set either the
cooking time.
by
1 2 3
end
If the cooking time set to be 0 or the
end of cooking time set to be the current
time,the auto function will be off.
1 and 3.
1 and 3.
end of cooking time-
1 and 3.
end of cooking time.
End of cooking time > current time
+ cooking time <= 10hours
At least more than one minute cooking
time, cooking time and end of cooking
time must be set.
After the auto function be off,the cooking
time to 0,end of cooking time and current
time remains the same.
The oven is switched off
automatically.
end of cooking time
1 2 3
1 2 3
1 2 3
1 2 3
1 2 3
1 2 3
When use oven, user must set food
cooking time.
2.Turn function knob to the function
position you want.
3.Turn temperature knob to the
position you want.temperature
4.After above operation, oven knob
runs normally.
5.When oven works till pre-set time,
timer will have sound which means
the cooking is finished.
in a
clockwise way
(between
120 minutes)
10 and
If you don't want the oven work
controlled by the mechanical timer ,
a anti-clockwiseway to the position
Caution:
Don't turn
in a
clockwise way from 120 to“ ”
mechanical timer
This function uses the fan to circulate the
heat from the grill element around the food.
The temperature can be set between 50
and250 .
16
6
Switch off all working units of the oven
Call the service centre
Some minor faults can be fixed by referring to the instructions given in the table
Knob is
.
Changing the Oven Lamp
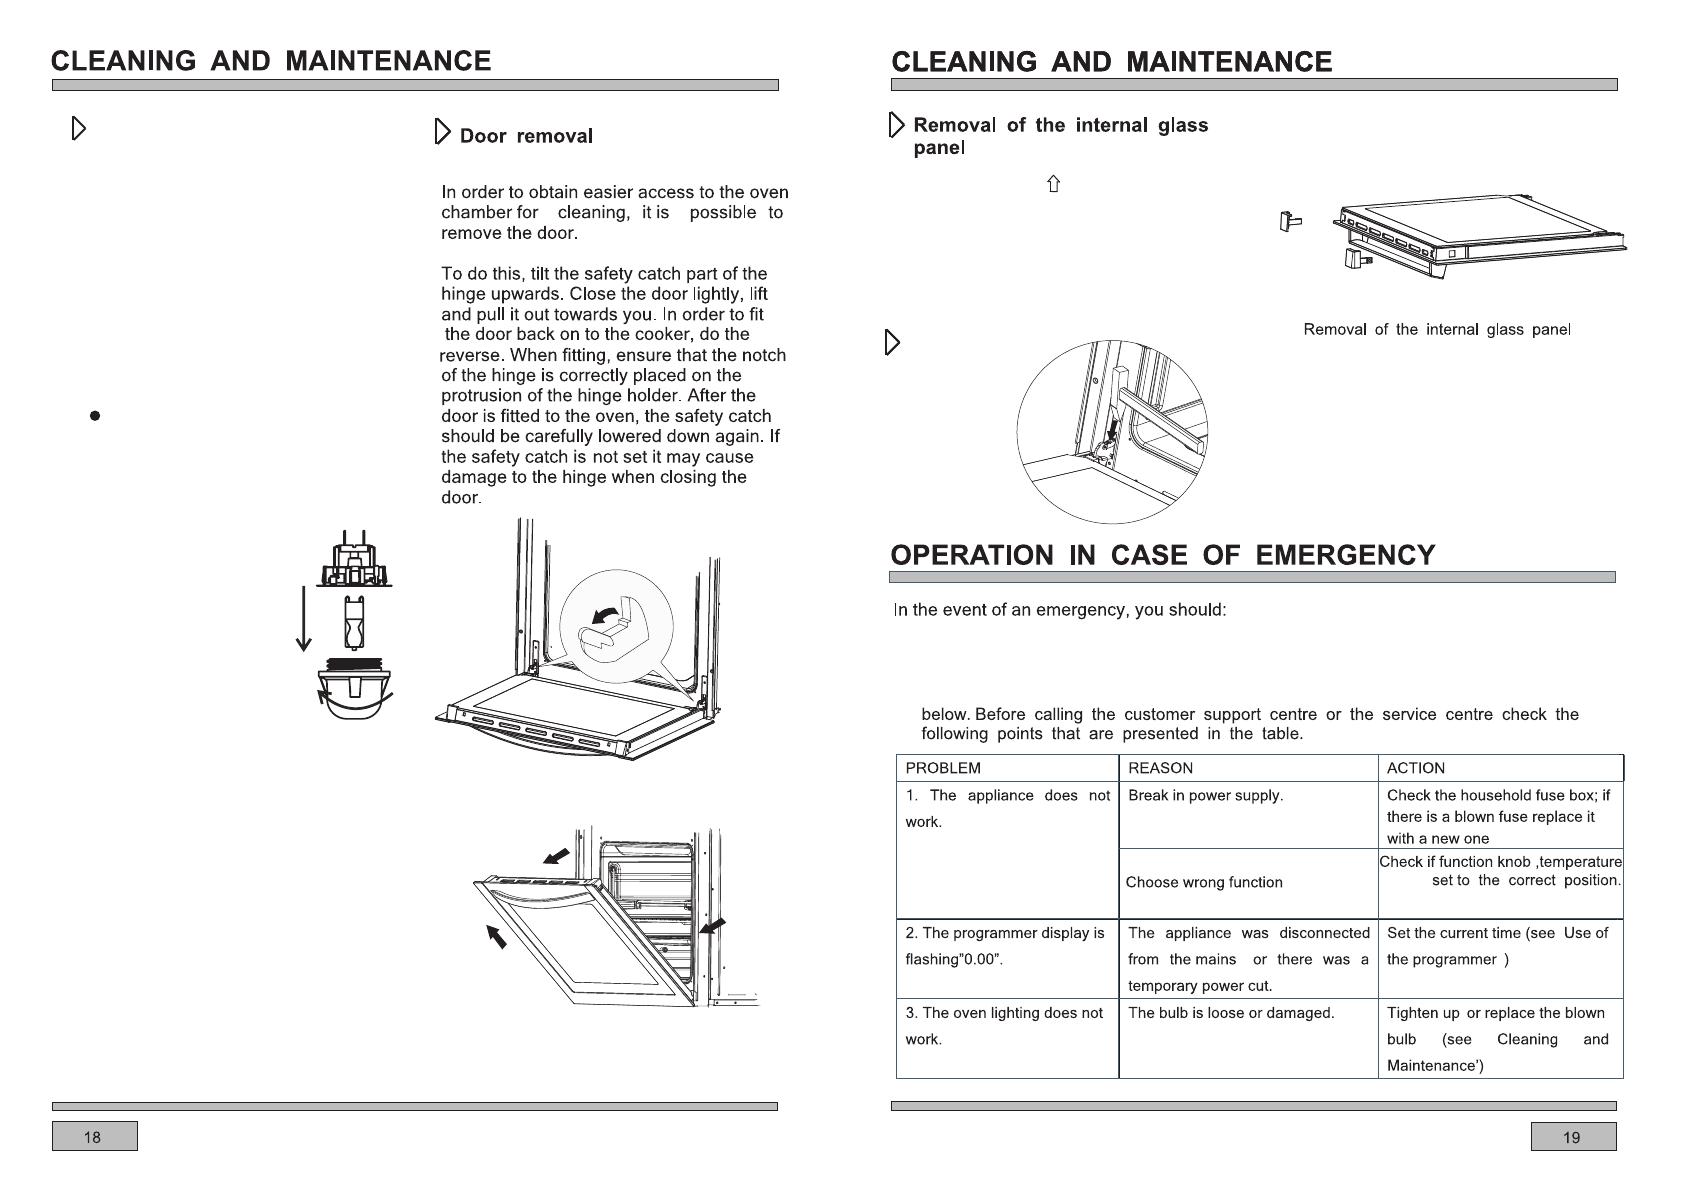
Press the symbol and outward the
plastic latch that is in the corner at the
top of the door. Next take out the glass
from the second blocking mechanism and
remove. After cleaning, insert and block
the glass panel, and insert in the blocking
mechanism.
Install door
Before any maintenance is started
involving electrical parts, the
appliance must be disconnected
from the power supply.
If the oven has been in use, let the
oven cavity and the heating elements
cool down before attempting any
maintenance.
Changing the bulb
Unscrew the protective cover. We
recommend that you wash and dry the
glass cover at this point.
Carefully remove the old bulb and
insert the new bulb suitable for high
temperatures (300ºC) having the
following specifications: 220-240V,
50Hz, 25W, G9 fitting.
Refit the protective cover.
IMPORTANT
Never use screwdrivers or other
utensils to remove the light cover.
This could damage the enamel of the
oven or the lampholder. Remove only
by hand.
IMPORTANT
Never replace the bulb with bare
hands as contamination from your
fingers can cause premature failure.
Always use a clean cloth or gloves.
Please note:
The bulb replacement is not covered
by your guarantee
l
l
Tilting the hinge safety catches
Door removal
Pastry Baking Table
Type of pastry Guide level
(from down
upwards)
Temp(℃)
Guide level
(from down
upwards)
Temp(℃)
Baking time
(in min.)
Sweet pastry
Raisin cake 2 160-170 2 150-160 55-70
Ring cake 2 160-170 2 150-160 60-70
Tree cake (tart
form)
2 160-170 2 150-160 45-60
Cheese cake
(tart form)
2 180-190 3 160-170 60-80
Fruit cake 2 190-200 3 170-180 50-70
Fruit cake with
icing
2 180-190 3 160-170 60-70
Sponge cake 2 180-190 2 160-170 30-40
Flake cake 3 190-200 3 170-180 25-35
Fruit cake mix
dough
3 180-190 3 160-170 50-70
Cherry cake 3 190-210 3 170-200 30-50
Jelly roll 3 190-200 3 170-180 15-25
Fruit fan 3 160-170 3 150-160 25-35
Plait bun 2 190-210 3 180-210 35-50
Christmas cake 2 180-190 3 170-200 45-70
Apple pie 2 190-210 3 170-200 40-60
Puff paste 2 180-190 3 160-170 40-60
Salted pastry
Bacon roll 2 190-200 3 170-180 45-60
Pizza 2 220-240 3 210-230 30-45
Bread 2 200-220 3 180-210 50-60
Rolls 2 210-230 3 200-220 30-40
Cookies
Caraway roll 3 180-190 3 160-170 15-25
Biscuits 3 180-190 3 160-170 20-30
Danish pastry 3 190-210 3 170-200 20-35
Flaky pastry 3 200-210 3 180-200 20-30
Cream puff 3 190-210 3 170-200 25-45
Deep frozen
pastry
Apple pie,
cheese pie
2 190-210 3 170-200 50-70
Cheese cake 2 190-200 3 170-180 65-85
Pizza 2 210-230 3 200-220 20-30
Chips for oven 2 210-230 3 200-220 20-35
Potato fries for 2 210-230 3 200-220 20-35
Roasting table
Type of meat Weight
(in grams)
Guide level
(from
bottom up)
Temp
(℃)
Roasting
time
(in min.)
temp
(℃)
Roasting
time
in min.
Beef
Beef loin 1000 2 210-230 2 200-220 100-120
Beef loin 1500 2 210-230 2 200-220 120-150
Roast beef,
rare
1000 2 230-240 2 220-230 30-40
Roast beef,
well done
1000 2 230-240 2 220-230 40-50
Pork
Pork roast with
skin
1500 2 190-200 2 170-180 140-160
Flank 1500 2 200-210 2 180-190 120-150
Flank 2000 2 190-210 2 170-200 150-180
Pork loin 1500 2 210-230 2 200-220 120-140
Meat roll 1500 2 210-230 2 200-220 120-140
Pork cutlet 1500 2 190-210 2 170-200 100-120
Minced meat
roast
1500 2 220-230 2 210-220 60-70
Veal
Veal roll 1500 2 190-210 2 170-200 90-120
Veal knuckle 1700 2 190-210 2 170-200 120-130
Lamp
Lamp prime
ribs
1500 2 200-210 2 180-200 100-120
Mutton blade
bone
1500 2 200-210 2 180-200 120-130
Venison
Hare ribs 1500 2 200-220 2 180-210 100-120
Hare blade
bone
1500 2 200-220 2 180-210 100-120
Boar ham 1500 2 200-220 2 180-210 100-120
Poultry
Chicken entire 1200 2 210-220 2 200-210 60-70
Hen 1500 2 210-220 2 200-210 70-90
Duck 1700 2 190-210 2 170-200 120-150
Goose 4000 2 170-180 2 150-160 180-200
Turkey 5000 2 160-170 2 140-150 180-240
Fish
Fish, entire 1000 2 210-220 2 200-210 50-60
Fish soufflé 1500 2 190-210 2 170-200 50-70
220-240V
rating
-60
Z
220-240V
-60
Z
/
/
HWO60S4LMX1
HWO60S7EX1
HWO60S4MX1
  • Page 1 1
  • Page 2 2
  • Page 3 3
  • Page 4 4
  • Page 5 5
  • Page 6 6
  • Page 7 7
  • Page 8 8
  • Page 9 9
  • Page 10 10
  • Page 11 11
  • Page 12 12
  • Page 13 13
  • Page 14 14

Haier HWO60S4LMX1 User manual

Category
Ovens
Type
User manual
This manual is also suitable for

Ask a question and I''ll find the answer in the document

Finding information in a document is now easier with AI