4
CroozerKidPlus-Kid18-ENG-10-17
Description
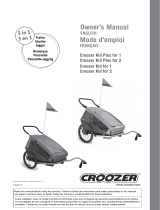
What are the Croozer Kid Plus and Croozer
Kid?
The Croozer Kid Plus and Croozer Kid are vehicles for
transporting children. They consist of a chassis that can be
quickly and easily converted to a Bicycle Trailer, a swivel-
wheel Stroller or a xed-wheel Jogger. No longer will you
need a eet of vehicles because, with the Croozer, you can
take your child on a bike ride, a walk in the park or a trek
through the countryside.
How should the Croozer Kid Plus and
Croozer Kid be used?
The Croozer is intended for private use for carrying
children in daylight hours on roads and other smooth,
well-surfaced paths as a Bicycle Trailer, a swivel-wheel
Stroller or a xed-wheel Jogger for walking and hiking. The
instructions and safety guidelines provided in this manual
must be followed at all times. Only children who are able
to sit upright unassisted and are within the specied age
range should ride in the Croozer Kid Plus or Croozer Kid.
If a child is unable to sit upright unassisted, the Croozer
Baby Seat must be used. Be sure to secure all cargo and
take-along items in the designated pockets and compart-
ments and observe the weight limits specied in the table
below. It is vitally important that all cargo be secured to
prevent it from shifting while the vehicle is in use. It is the
user’s responsibility to ensure that the transported cargo
does not compromise the safety of the passengers.
Maximum Load* (Passengers + Cargo)
Croozer Kid Plus/Kid for 1
Croozer Kid Plus/Kid for 2
35 kg (77 lb), max. 1 child
45 kg (100 lb), max. 2 children
Of which in rear cargo compart-
ment
max. 5 kg (11 lb)
Of which in Handlebar Bag (ac-
cessory)
max. 2 kg (4.4 lb)
Minimum Age of Passengers
Without Baby Seat 6 months
(if the child can sit upright
unassisted)
With Baby Seat (accessory) 1 month
Maximum Age of Passengers
Without Baby Seat 6 years
With Baby Seat (accessory) 10 months
Maximum Height of Passengers 117 cm (46 inch)
Hitch-arm Load (Nose Weight) 3 to 8 kg (6.6 to 17.6 lb)
* Weight limits only apply if the hitch-arm load is within the speci-
ed range of 3–8 kg (6.6 to 17.6 lb). See page 31.
When in use as a Bicycle Trailer in poor visibility conditions
or at night, dusk or dawn, the Croozer must be equipped
with a lighting system that complies with the applicable
laws and regulations in the country of use. The handlebar
of the Croozer Kid Plus comes with an integrated Click
& Flash lighting system. The Croozer Kid comes with a
battery-powered light that must be mounted to the light-at-
tachment loop on the cover of the rear cargo compartment.
However, the handlebar of the Croozer Kid can also be
retrotted with a Click & Flash lighting system. Any spare
parts or accessories used for either Croozer model must
be approved by Croozer GmbH and properly installed, ide-
ally by a professional bicycle mechanic.
How shouldn’t the Croozer Kid Plus and
Croozer Kid be used?
The Croozer Kid Plus and Croozer Kid may not be used in
any manner other than as specied above. Never trans-
port animals together with children in the Croozer. Never
use the Croozer as a cargo trailer. Never use the Jogger
or Stroller for jogging or skating. For more information,
see page 35-36. Commercial use, overloading, excessive
speeds, improper repairs and use on unsurfaced roads or
paths are not permitted. Never install a car seat or other
seating device not approved by Croozer GmbH. Never
use the handlebar for carrying loads, such as children’s
vehicles or bags (other than the Handlebar Bag available
as an accessory).
Never pull the Croozer with a motorised vehicle, such as a
moped or scooter. This also applies to motorised bicycles
with a maximum speed of more than 25 km/h (15 mph).
Do not mount the hitch to a bicycle with a rear-wheel hub
motor, unless this modication is approved by the manu-
facturer. Croozer GmbH will not be liable for any damages
resulting from non-compliance with these requirements.
Orientation and wording
Unless otherwise indicated, the terms “right” and “left”
in this manual refer to the passenger’s right or left when
seated in the bicycle trailer, facing forward (i.e. relative to
the direction of travel).
For simplicity, this manual generally refers to the child or
passenger in singular form. It is understood, however, that
the Croozer Kid Plus and Croozer Kid for 2 will be carrying
up to two children, and the Croozer Kid Plus and Croozer
Kid for 1, only one child.
This Owner’s Manual is intended for use with both the
Croozer Kid Plus and Croozer Kid. In sections that ap-
ply equally to both models, the name “Croozer” is used
for simplicity, and the Croozer Kid Plus is pictured in the
respective illustrations. In sections where the two models
differ, the instructions and/or information for both models
are given separately and marked as follows:
For the sake of clarity, the Croozer two-seater is shown
in most of the photos and graphics used in this manual.
However, all descriptions and instructions also apply to the
one-seater version.
Croozer Kid
Croozer Kid Plus
Applicable standards
The following standards were taken into
consideration:
EN 15918:2011+A2:2017, EN 1888:2012
Materials tested for harmful
substances
The materials used for producing the Croozer
Kid Plus and Croozer Kid pose no threat to
the health of your children. All materials are
tested for harmful substances to achieve
standards over and above the legal require-
ments.