Page is loading ...

Protect yourself and others by observing all safety information, warnings, and cautions. Failure to
comply with instructions could result in personal injury and/or damage to product or property.
Please retain instructions for future reference!
2400WATT 2600PSI
PRESSURE
WASHER
ROSSPOWER RPPW2400EH


SPECIFIC SAFETY INSTRUCTIONS
IMPORTANT WARNING
NEVER operate the pressure washer using a pulsing
action. Pulsing is the repeated and rapid ON & OFF
operation of the trigger. This action could result in the
failure of components and connections that are under
pressure.
ELECTRICAL SAFETY
• If the supply cord is damaged, it must be
replaced by the manufacturer, its service agent
or similarly qualified person in order to avoid a
hazard.
• Be familiar with the controls and proper use of the
equipment.
• Before use check the supply and extension cord
for signs of damage or ageing. If the cord becomes
damaged during use, disconnect the cord from the
supply immediately. Do Not Touch The Cord Before
Disconnecting The Supply,
• Do not use the pressure washer if the mains cord is
damaged or worn..
• Keep extension cords away from pools of water.
• It is recommended that the tool be used in con-
junction with a residual current device (RCD) with a
rated residual current of 30mA or less.
WARNING
Inadequate extension cords and reels can be danger-
ous. If an extension reel is used, it must be designed
for outside use and be of suitable construction for the
product. All plug’s, sockets and connectors must be of
water/splash proof construction. Always switch off and
disconnect from the electrical power supply before
carrying out any adjustments, cleaning or user mainte-
nance.
WATER SUPPLY
• This is a clean, cold water pressure washer The
working temperature range must be between +5°C
and +40°C.
• The water supply pressure must not exceed 4 Bar
and must be clean and free of any abrasive particles
or corrosive contaminates
CAUTION
When the machine is fully pressurized and the trigger
is squeezed the release of pressure will cause the spray
gun to recoil. Adopt a stable stance and hold the spray
gun firmly in both hands before squeezing the trigger.
Failure to do so could result in an injury from a whip-
ping spray gun.
SAFE OPERATION
• High pressure jets can be dangerous if subject to
misuse.
• Do Not direct the water jet at live electrical equip-
ment or the appliance itself.
• Do Not let children or persons unfamiliar with the
machine operate the pressure washer.
• Do not direct the jet against yourself, others, ani-
mals or the unit.
• Do not use the machine to pump gasoline, kero-
sene or any other flammable or corrosive
• Do not attempt to modify the machine, connectors,
hoses or other fittings in any way.
• Do not leave the spray gun unattended while the
machine is running.
• Never let the machine run for more than 2 minutes
with the spray gun in its closed position.
• Do Not allow the machine to run dry as this will
cause serious damage to the seals and pump.
• Do not use the appliance near other persons unless
they are wearing protective clothing.
DETERGENT CLEANING
• The detergent bottle / detergent tank is designed
for use with most proprietary domestic cleaning
agents and shampoo’s.
• Do Not use domestic washing up liquid, industrial
cleaning agents or solvents. Your local motorists
accessory outlet can advise on a suitable cleaning
agent.
• The use of other cleaning agents or chemicals may
adversely affect the safety of the appliance.
• To ensure the appliance safety, use only original
pare parts from or approved by the manufacturer.
WARNING
• High pressure hose’s, fittings and couplings are
important for the safety of the machine. Use only
hoses, fittings and couplings suitable for high pres-
sure use.
• Locate the machine in areas away from combustible
materials, combustible fumes or dust.
• Keep the hose connected to the machine and he
spray gun while the system is pressurized.
• Disconnecting the hose whilst the unit is pressur-
ised is dangerous.
• Always ensure that all water pressure is released and
the machine is switched off before attempting to
disconnect any hoses or connectors.
• Cleaning areas should have adequate slopes and
drainage to reduce the possibility of a fall due to
slippery surfaces.
• This machine is rated for domestic use only and
should not be used for professional or commercial
purposes.
CAUTION
The machine consists of a motor and pump protected
by an outer casing of shock resistant material. The
outer casing has been manufactured to offer an easy
clean surface with a handle and wheels, where fitted,
for easy mobility.
The machine can be used for washing roller shutters,
main doors, tiles, fencing, patio paving, drive ways,
cars and campers etc., where water pressure is neces-
sary to remove dirt. The foam bottle / detergent tank
can be used to carry out foaming and washing with a
suitable cleaning agent.

EXTENSION LEADS
This tool may require the use of an extension lead .
Only use extension leads suitable for outside use. The
cross section of the wire must be at least 1.5 mm2.
(max. length of extension cord: 30M) Keep extension
cords away from pools of water.
NOTE: Extension leads longer than 30M will re-
duce the performance of the tool.
GENERAL SAFETY RULES
WARNING! Read all instructions Failure to follow
all instructions listed below may result in electric
shock, fire and/or serious injury. The term “power
tool” in all of the warnings listed below refers to your
mains operated (corded) power tool or battery oper-
ated (cordless) power tool.
SAVE These Instructions
1) WORK AREA
A) Keep work area clean and well lit.
CLUTTERED and dark areas invite accidents.
B) Do not operate power tools in explosive at-
mospheres, such as in the presence of ammable
liquids, gases or dust. Power tools create sparks
which may ignite the dust or fumes.
C) Keep children and bystanders away while op-
erating a power tool. Distractions can cause you to
lose control.
2) ELECTRICAL SAFETY
A) Power tool plugs must match the outlet. Never
modify the plug in any way. Do not use any adapter
plugs with earthed (grounded) power tools. Unmodi-
ed plugs and matching outlets will reduce risk of
electric shock.
B) Avoid body contact with earthed or grounded
surfaces such as pipes, radiators, ranges and re-
frigerators. There is an increased risk of electric shock
if your body is earthed or grounded.
C) Do not expose power tools to rain or wet con-
ditions. Water entering a power tool will increase the
risk of electric shock.
D) Do not abuse the cord. Never use the cord for
carrying, pulling or unplugging the power tool. Keep
cord away from heat, oil, sharp edges or moving parts.
Damaged or entangled cords increase the risk of elec-
tric shock.
E) When operating a power tool outdoors, use
an extension cord suitable for outdoor use. Use
of a cord suitable for outdoor use reduces the risk of
electric shock.
3) PERSONAL SAFETY
A) Stay alert, watch what you are doing and use
common sense when operating a power tool. Do
not use a power tool while you are tired or under the
inuence of drugs, alcohol or medication. A moment
of inattention while operating power tools may result
in serious personal injury.
B) Use safety equipment. Always wear eye protec-
tion. Safety equipment such as dust mask, non-skid
safety shoes, hard hat, or hearing protection used for
appropriate conditions will reduce personal injuries.
C) Avoid accidental starting. Ensure the switch is
in the off position before plugging in. Carrying power
tools with your nger on the switch or plugging in
power tools that have the switch on invites accidents.
D) Remove any adjusting key or wrench before
turning the power tool on. A wrench or a key left at-
tached to a rotating part of the power tool may result
in personal injury.
E) Do not overreach. Keep proper footing and bal-
ance at all times. This enables better control of the
power tool in unexpected situations.
F) Dress properly. Do not wear loose clothing or jew-
ellery. Keep your hair, clothing and gloves away from
moving parts. Loose clothes, jewellery or long hair can
be caught in moving parts.
G) If devices are provided for the connection of
dust extraction and collection facilities, ensure
these are connected and properly used. Use of
these devices can reduce dust related hazards.
4) POWER TOOL USE AND CARE
A) Do not force the power tool. Use the correct
power tool for your application. he correct power tool
will do the job better and safer at the rate for which it
was designed.
B) Do not use the power tool if the switch does
not turn it on and off. Any power tool that cannot
be controlled with the switch is dangerous and must
be repaired.
C) Disconnect the plug from the power source
before making any adjustments, changing ac-
cessories, or storing power tools. Such preventive
safety measures reduce the risk of starting the power
tool accidentally.
D) Store idle power tools out of the reach of chil-
dren and do not allow persons unfamiliar with
the power tool or these instructions to operate
the power tool. Power tools are dangerous in the
hands of untrained users.

E) Maintain power tools. Check for misalignment
or binding of moving parts, breakage of parts and any
other condition
that may affect the power tools operation. If damaged,
have the power tool repaired before use. Many acci-
dents are caused by poorly maintained power tools.
f) Keep cutting tools sharp and clean. Properly main-
tained cutting tools with sharp cutting edges are less
likely to bind and are easier to control.
G) Use the power tool, accessories and tool
bits etc., in accordance with these instructions and in
the manner intended for the particular type of power
tool, taking into account the working conditions and
the work to be performed. Use of the power tool for
operations different from intended could result in a
hazardous situation.
5) SERVICE
A) Have your power tool serviced by a qualified
repair person using only identical replacement
parts. This will ensure that the safety of the power
tool is maintained.
COMPONENT IDENTIFICATION

COMPONENT LIST
1. Detergent container
2. Water supply inlet
3. ON/OFF switch
4. Gun assembly
5. High pressure hose
6. Adjustable lance
7. Cleaning needle
8. Quick connector (Male)
9. Inlet filter
10. Cable holder
11. Turbo lance
12. Fixed brush
13. NA
14. NA
15. Extension adaptor
16. Hose reel handle
TECHNICAL SPECIFICATION
Rated voltage: 230-240~50Hz
Rated power: 2400W
Protection class: 1
Degree of protection: IPX5
Permissible pressure: 180 Bar / 2600psi
Rated pressure: 120 Bar / 1750psi
Supply water temperature: 5-60ºC
Nozzle spray angle: 0-90º
Max output flow rate: 6L/min
Net weight (machine only): 20Kg
Cable length: 5m
Hose length: 6m
Sound Pressure Level: Lpa 85dB
Sound Power Level: Lwa 95dB
Vibration Level: 1.0m/s2
UNPACKING AND ASSEMBLY
CAUTION! This packaging contains sharp ob-
jects. Take care when unpacking. This machine could
require two persons to lift, assemble and move this
machine. Remove the machine, together with the ac-
cessories supplied, from the packaging. Check carefully
to ensure that the machine is in good condition and
account for all the accessories listed in this manual.
Also make sure that all the accessories are complete. If
any parts are found to be missing, the machine and
its accessories should be returned together in their
original packaging to the retailer.
Do not throw the packaging away, keep it safe
throughout the warranty period, then recycle if pos-
sible, otherwise dispose of it by the proper means. Do
not let children play with empty plastic bags due to the
risk of suffocation.
ASSEMBLY
Note: Before carrying out any assembly or disas-
sembly of the unit please ensure that the unit is not
connected to the electrical supply.
FITTING THE LANCE
Before using the washer fit the lance to the gun.
Grip the end of the gun and screw the lance
on to the gun ensuring it is tight, Fig 1. Do not over
tighten as this could damage both the connectors.
HOSE CONNECTIONS
Connect the high pressure hose connector to the con-
nector on the underside of the gun assembly ensuring
that it is tight, Fig 2. Do not over tighten as this could
damage both the connectors.

Note: During normal operation the pressure washer
pump motor will only start when the trigger is
squeezed and will stop when the trigger is released.
HIGH PRESSURE LANCE SAFETY LOCK
In order to prevent accidental operation of the high
pressure lance, the gun is fitted with a safety lock. To
disable the safety lock, push the safety lock button to
the right, Fig 7. To enable the safety lock, release the
trigger and push the button to the left.
Check that the On/Off switch is in the OFF (0) position,
Fig 3.
The water inlet is fitted with a particle filter and if
not fitted must be fitted prior to use. Fig 4. This
filter must not be removed except for examination
and cleaning. The inlet water filter should ideally be
checked and if required cleaned before each use.
Screw the high pressure hose to the high pressure
water outlet, Fig 6. Do not use water which exceeds
60°C.
PRIME THE PRESSURE WASHER
Turn on the water supply and squeeze the gun trigger
until the water flows in a steady stream through the
lance.
Screw the male, quick connector onto the pressure
washer water supply inlet, Fig 5. Attach a hose pipe
with a female quick release connector (not supplied) to
the male quick connector on the power washer.
OPERATION
CAUTION!
Before connecting to the mains power supply please
ensure that the ON / OFF switch is in the OFF posi-
tion and the water supply is connected and is turned
on. Running the pressure washer without any water
supplied to it will damage the pump and VOID your
warranty.
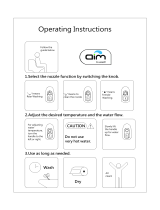
SWITCHING ON
Connect the pressure washer mains lead to the mains
electricity supply via a residual current device (RCD)
(not supplied). Start the power washer by turning the
On/Off switch to the ON (I) position, Fig 7.
FIg 6

Note: before using the pressure washer to clean patio
paving slabs it is advisable to test a small area first,
some paving slabs are manufactured from inferior ma-
terials and the use of a pressure washer could damage
the surface.
HELPFUL HINTS
Before starting cleaning remove any objects which
could cause a hazard. Ensure that all doors and win-
dows are closed (where appropriate).
The adjustable lance allows you to use a variety of
spray patterns from a fan to a pencil jet. When using
the pressure washer to clean decking, patios, vehicles,
etc., always start by using the fan spray and begin
spraying from a minimum 30cm away to avoid dam-
aging the surface of the material to be cleaned. The
pressure of the spray on the surface you are cleaning
increases as you move the nozzle closer to the surface.
We recommend that for most cleaning applications a
45° spray angle should be used to avoid damaging the
surface being cleaned. Spraying directly “head-on”
tends to cause dirt particles to embed in the surface.
WARNING! Do not adjust the nozzle while the
trigger is squeezed.
NOZZLE CLEANING INSTRUCTIONS
A clogged or partially clogged nozzle can cause a
significant reduction of water coming out of the noz-
zle and cause the unit to pulsate or totally stop while
spraying, To clean out the nozzle:
•Turnoffandunplugtheunit.
•Turnoffthewatersupplyandrelieveanypressure
within the unit by squeezing the trigger 2-3 times.
•Separatethelancefromthegun.
•Rotatethenozzletothenarrowstreamsetting.This
opens up the fan blades.
•Usingthecleaningneedleoranunfoldedpaperclip,
insert the needle into the nozzle hole and move it back
and forth until the debris is dislodged, Fig 9.
• Remove additional debris by back-flushing water
through the nozzle. To do this, place the end of a gar-
den hose (with water running) to the end of the nozzle
for 30-60 seconds.
ADJUSTING THE SPRAY PATTERN
Pencil or fan water spray patterns can be clockwise or
anti-clockwise, Fig 8. The fan spray pattern is the most
commonly used for general cleaning operations. The
pencil spray pattern is used to remove localized stub-
born contamination such as oil stains.
Note: The motor only runs when the trigger is operat-
ed. When the pressure washer is not in use, we recom-
mend that you lock the gun using the trigger lock for
safety reasons. Switch the unit OFF when not in use for
extended periods of time and expel pressurised water
in the unit by operating the trigger gun while the unit
is in the OFF position.
MOTOR PROTECTION
To prevent damage to the motor due to overheating,
the pump motor is equipped with a thermal switch. If
during use the pressure washer stops operating allow
5-10 minutes for the motor to cool down before re-
starting. If the motor continues to cut out due to over-
heating please contact our customer help line.

EXTENSION ADAPTOR
Accessories require the use of the extension adaptor.
Remove the lance from the gun and attach the adap-
tor as necessary. Grip the end of the gun and screw
the adaptor onto the gun ensuring it is tight, Fig 10.
Do not over tighten as this could damage both the
connectors.
Fit the accessories into the gun assembly by pushing
them into the gun assembly and locating the lugs, at
the same time turn clockwise to lock
into position, Fig 11.
TURBO LANCE
A turbo lance, sometimes referred to as a rotary lance,
is a very effective tool that can significantly reduce
cleaning time.
The turbo nozzle combines the power of a narrow
high impact stream and the efficiency of a 25 degree
fan pattern. This swirls the narrow high impact stream
into a cone shape that cleans a larger area.
Caution Since a turbo lance uses a narrow high
impact stream, only use it in applications where the
leaning surface cannot be damaged by a narrow high
impact spray. Always test on an inconspicuous area
first to ensure you do not damage the surface.
Note: The turbo lance is NOT adjustable and cannot be
used to apply detergent.
FIXED BRUSH
Your pressure washer is supplied with a fixed brush. It
has soft bristles and can be used in conjunction with
the detergent dispenser to apply detergent to the
surface you are cleaning.
It is ideal for cleaning car bodywork, windows etc. This
is a low pressure setting.
The fixed brush connects to the gun assembly.
WARNING! Do not t brushes when the power is
on.
Caution Ensure the brush is clean and free from de-
bris.
Ensure the surface to be cleaned is sound and will not
be damaged by the brushing action. Test on an incon-
spicuous area first. Any grit or debris on the surface to
be cleaned or in the brush can cause damage to that
surface. Please ensure both are checked prior to
cleaning.
HOW TO AVOID DAMAGING SURFACES
Damage to cleaning surfaces occurs because the im-
pact force of the water exceeds the durability of the
surface. Never use a narrow high impact stream or a
turbo/rotary lance on a surface that is susceptible to
damage. Avoid spraying windows with a narrow high
impact stream or turbo lance as this may cause
breakage.
Follow these simple steps to avoid damaging your
surfaces:
1. Before triggering the gun, adjust the nozzle to a
wide fan pattern.
2. Place the nozzle approximately 1.5 to 2 metres from
cleaning surface and begin spraying.
3. Vary the fan pattern spray angle and the distance to
the cleaning surface until optimum cleaning efficiency
is achieved without damaging the surface.
USING DETERGENT
Add detergent to the container and replace the cap.
Do not overll.
Set the adjustable lance at low pressure.
• Pull forward on the adjusting sleeve of the standard
lance Fig 11A.
• Depress the trigger to spray detergent.
Note: The detergent function does not work on high
pressure.
Fig 11A

DETERGENTS
The use of detergents can dramatically reduce cleaning
time and assist in the removal of difficult stains. Some
detergents have been customized for pressure washer
for specific cleaning tasks. These detergents are
approximately as thick as water.
The cleaning power of detergents comes from apply-
ing them to a surface and giving the chemicals time to
break down the dirt and grime. Detergents work best
when applied at low pressure. Follow this with a high
pressure rinse for best cleaning results.
On vertical surfaces, apply the detergent starting at the
bottom and work your way upward. This will prevent
the detergent form sliding down and causing streaks.
High pressure rinsing should also progress from the
bottom upwards. On particularly tough stains it may be
necessary to use a brush in combination with deter-
gents and high pressure rinsing.
USAGE
The following cleaning procedure will help you organ-
ize your cleaning task and ensure that you achieve the
most beneficial results in the shortest amount of time.
Remember to use the spraying/ cleaning techniques
previously listed.
1. Surface Preparation
It is important to prepare the surface that is to be
cleaned. This is done by clearing the area of furniture
and making sure that all windows and doors are closed
tight. In addition, you should make sure that all plants
and trees adjacent to the cleaning area are protected
by a drop cloth. This will ensure that your plants won’t
be sprayed by the detergents.
2. Initial High Pressure Rinse
The next step is to spray the cleaning surface with
water to clear off any dirt or grime that may have col-
lected on the surface. This will allow your detergent to
attack the deep down dirt that has worked its way into
the cleaning surface.
Before triggering the gun, adjust the nozzle to a wide
fan pattern and slowly adjust to the desired spray
pattern. This will help you avoid applying too much
concentrated spray to the surface which could cause
damage.
TIPS FOR EXTENDING THE LIFE OF
YOUR PRESSURE
1. Never operate the unit without water.
2. This pressure washer is not designed to pump hot
water. Never connect it to the hot water supply as this
will significantly reduce the life of the pump.
3. Only use detergents specifically designed for pres-
sure washers. Other types of detergent may cause
internal damage to the unit, as might chemicals such
as bleach, washing-up liquid, etc.
4. Never operate the unit for more than one (1)
minute without spraying water. Otherwise, the result-
ing heat build up will damage the pump.
5. Winter Storage:
For storage during the winter months we recom-
mend the use of a solution of 50/50 mix of antifreeze
and water. This will keep the pump from freezing and
getting damaged and will protect the internal compo-
nents.
Method:
You will need a length of garden hose and a funnel.
Attach the garden hose to the inlet and pour the
antifreeze into the unit via the funnel. Switch the unit
on for a few seconds to allow the solution to flow
through the system.
Disconnect your pressure washer from the mains
power, and then pack away in your storage area.
WARNING! Before reusing completely ush the
unit out with clean water. Anti-freeze can damage
paintwork so you must ensure there is no antifreeze
left in the system before using it again.
ADJUSTABLE CARRY HANDLE
To extend the carry handle to its full height press the
carry handle release button and pull upwards, Fig 11.
After use, press the carry handle release button and
push down until it clicks into place.

ADJUSTABLE HANDLE
To extend the carry handle to its full height press
the carry handle release button and pull
upwards, Fig 12. After use, press the carry
handle release button and push down until it
clicks into place.
USING THE HOSE REEL
To use the hose reel locate the hose reel handle on the
side of the pressure washer and pull outwards, Fig 13.
To extend the length of hose you require turn the
handle anti-clockwise. To shorten the length of the
hose turn the handle clockwise.

Conforms to relevant standards.
Read the instruction manual.
Do not direct the water jet at yourself, other,
animals or the pressure washer.
General warning
Disconnect from the power supply when
not in use or for maintenance and repair.
Protect the unit from freezing conditions
MEANING OF SYMBOLS
The rating plate and the product may show symbols. These represent important information about the
product, instructions on its use or safety


For information on all ROSS products
please visit: www.rosstools.com.au
The ROSS logo and Bull device are trademarks of J.W. Ross Pty Ltd.
WARRANTY
Our goods come with guarantees that cannot be excluded under the Australian Consumer Law. You are entitled
to a replacement or refund for a major failure and for compensation for any other reasonably foreseeable loss or
damage. You are also entitled to have the goods repaired or replaced if the goods fail to be of acceptable quality
and the failure does not amount to a major failure.
This product is covered by a 12 month warranty.
This warranty will not apply:
(i) where this product has been subjected to misuse, abuse, accident or want of care;
(ii) where this product has been used for a purpose for which it was not designed or is not suited;
(iii) where the service of this product has been undertaken by a non-authorised person or company or if non-
approved parts have been used;
(iv) where this product has been used for industrial purposes.
Should service become necessary during the warranty period, the purchaser should contact an Authorised Ser-
vice Centre or J W Ross. In order to obtain warranty service, the purchaser must present the store receipt show-
ing the name of the retailer and the date of purchase.
The period of the warranty begins from the original date of purchase, notwithstanding any
subsequent repair or parts replacement.
Purchaser shall be responsible for all transport charges to and from the Authorised Service
Centre.
Damage in transit is not covered by this warranty. The purchaser should remove from the product any liquids (if
applicable) before sending the tool for service or repair. The tool should be packed securely to prevent damage.
WARRANTY EXCLUSIONS
Wear parts or service related parts required when performing normal and regular maintenance of this product
are not covered by warranty unless it is found to be defective by an Authorised Service Centre. These include,
but are not limited to: seals, filters, hoses.
Distributed in Australia by J W Ross and Sons ( Australia ) Pty Ltd.
PO Box 352 North Ryde BC, NSW, 1670
For you local service centre: www.jwross.com.au
Ph:1800 251 338
The J.W. Ross policy is one of continuous improvement and the company reserves the right to alter designs,
colours and specifications without notice.
/