Page is loading ...

1
Instruction Manual
60
76

2
Sun Warning
WARNING!
o Always use the EclipseView Solar Filter when viewing at or near
the Sun. When viewing a solar eclipse, always use this solar filter
during ALL phases of the eclipse.
o Before use always check both sides of the solar filter for damage.
Do not use if scratches, pin-holes, or the filter is separated from its
holder.
o This item is not a toy and requires adult supervision.
o Failure to use proper solar filtering can cause severe & permanent
eye injury including blindness.
o Do not attempt to clean or disinfect the filter material.
Solar Filter Safety Compliance Information:
o Meets the requirements for ISO 123112-2:2015
o CE certified which meets the transmission requirements of scale 12-16 of EN 169/1992.
o Meets the transmission requirements of EN 1836:2005 & AS/NZS 1338.1:1992 for Eclipse filters. (Queensland Directive).
1
Always use the EclipseView Solar Filter when viewing at or near the Sun or irreversible eye damage may occur.

3
Quick Start - Viewing the Sun
In order to get started observing the Sun, you will need to do the following:
1) Read the Instructions!
• Viewing the Sun can be dangerous.
• Read the instructions carefully.
2
Always use the EclipseView Solar Filter when viewing at or near the Sun or irreversible eye damage may occur.
2) Setup the Tripod
• Expand the tripod legs.
• Adjust tripod leg height.
3) Attach the Accessory Tray
• EclipseView 60: Use the three
wingnuts and thread into bottom side
of tray.
• EclipseView 76: Thread tray into
center nut between tripod legs.
4) Attach Optical tube to Mount
• Remove yellow ota mounting knobs.
• Insert Slow-Motion control rod into
holder.
• Place Optical tube into mount.
• Reattach yellow ota mounting knobs.
5) Confirm Solar Filter is not damaged
and properly installed!
• Viewing the Sun can be dangerous.
• Always confirm the filter is good
before each use.
6) Attach Accessories
• EclipseView60: Attach 90 °
diagonal & 26mm eyepiece. Attach
SunFinder.
• EclipseView76: Attach 26mm eye-
piece. Attach SunFinder.
7) Use the SunFinder to locate the Sun
• Use the Suns projection and place in
center area of SunFinder.
8) Focus the telescope until image is
sharp.
• Only view the Sun with the proper
Meade solar filtering or permanent eye
damage can occur!
Projection of
Sun
EclipseView76

4
Quick Start - Viewing at Night
In order to get started observing nighttime objects, you will need to do the following:
1) Read the Instructions!
• Knowing how the telescope oper-
ates and what you will see is critical to
enjoying the use of your telescope.
Always use the EclipseView Solar Filter when viewing at or near the Sun or irreversible eye damage may occur.
2) Setup the Tripod
• Expand the tripod legs.
• Adjust tripod leg height.
3) Attach the Accessory Tray
• EclipseView 60: Use the three
wingnuts and thread into bottom side
of tray.
• EclipseView 76: Thread tray into
center nut between tripod legs.
4) Attach Optical tube(ota) to Mount
• Remove yellow ota mounting knobs.
• Insert Slow-motion control rod into
holder.
• Place optical tube into mount arms.
• Reattach yellow ota mounting knobs.
5) Attach Accessories
• EclipseView60: Attach 90 ° diago-
nal & 26mm eyepiece. Attach Red-dot
Finder.
• EclipseView76: Attach 26mm eye-
piece. Attach Red-dot Finder.
6) Align the Red-dot Finder
•Find a distant object and center in the
eyepiece. A distant land object is ideal
for this and can be done in daytime.
•Adjust Red-dot finder controls to
align red-dot over distant object.
8) Focus the telescope until image is
sharp.
•Enjoy the view!
EclipseView76
3
7) Point the telescope at a bright object
•The Moon an ideal target for this.

5
Sun Warning.............................................................1
Quick Start – Viewing the Sun.....................................2
Quick Start – Viewing at Night.....................................3
Introduction.......................................................................5
Telescope Features – 60mm........................................6
Telescope Features – 76mm.........................................7
Specifications...................................................................8
About Your Telescope.....................................................9
Assembling The Telescope..........................................10
Attaching The Optical Tube Assembly(OTA)..........11
Remove The Dust Covers...........................................12
Insert The Erect-Image Prism (60mm Models)......12
Insert The Eyepiece......................................................13
Attaching the Finder......................................................14
DayTime Use of the Telescope.........................16
Quick Start – Viewing the Sun.............................17
Using the Solar Filter...............................................18
Installing the Solar Filter..........................................20
Installing the SunFinder...........................................20
Using the SunFinder................................................21
Observing the Sun...................................................22
How to Observe a Solar Eclipse..........................24
Solar Filter Maintenance.........................................26
Solar Filter Safety Compliance.............................26
NightTime Use of the Telescope......................27
Quick Start – Viewing at Night.............................28
Attaching The Accessories....................................29
Installing The Red-Dot Finder................................29
Inserting The Eyepiece............................................30
Aligning The Red-dot Viewfinder..........................31
Moving The Telescope.............................................33
How To Use Your Telescope..................................34
Observing at Night........................................................35
Resources.......................................................................39
Tip and Tricks.................................................................41
Calculating Magnification............................................42
Collimation......................................................................43
Viewfinder Battery Replacement...............................49
Care and Maintenance.................................................50
Accessories....................................................................51
Recycling.........................................................................52
Customer Service and Warranty...............................53
Table Of Contents
4

6
Introduction
Congratulations on getting a Meade EclipseView Telescope! Now you can setup and share the stargazing
& solar viewing experience in seconds. Whether you are camping in the outdoors or relaxing in your back-
yard, grab your EclipseView Telescope and take it wherever life takes you. Your telescope is already par-
tially assembled for you at our factory, so you only have to connect the optical tube to the mount, attach
the accessories to start viewing the sun, galaxies, planets, stars and more!
Each telescope contains the following parts:
• Optical Tube
• Alt-Az Mount
• Tripod
• Solar Filter
• Two Eyepieces
• SunFinder
• Red-dot Finder
• Software DVD
EclipseView 76
5
• Optical Tube
• Alt-Az Mount
• Tripod
• Solar Filter
• Two Eyepieces
• Erect-Image
Prism
• SunFinder
• Red-dot Finder
• Software DVD
EclipseView 60

7
EclipseView 60
Always use the EclipseView Solar Filter when viewing at or near the Sun or irreversible eye damage may occur.
1. Tripod leg lock
2. Leg brace supports
3. Accessory tray
4. Alt-Az mount
5. Azimuth lock knob
6. Altitude lock knobs
7. Optical tube assembly
(OTA)
8. Objective lens
9. Solar Filter
*Required for viewing the
Sun.
10. SunFinder
11. Finder mounting knobs
12. Red-dot finder
13. Red-dot finder On/Off
switch
14. Red-dot finder adjust-
ments
15. Eyepiece
16. Focuser
17. Focus knobs
18. Focuser thumbscrews
19. Slow-motion control rod
20. Slow-motion lock knob
21. OTA mounting knobs(2)
22. Front dust cap (not visible)
23. Erect-image prism
24. Dew shield
1
1
2
3
5
6
12
7
9
10
14
13
8
Image A
Image B
Image C
FIGURE 1A
6
Image D
10
9
Telescope Features
4
8
11
15
16
17
5
20
19
21
22
23
24
18

8
EclipseView 76
Always use the EclipseView Solar Filter when viewing at or near the Sun or irreversible eye damage may occur.
1. Tripod leg lock
2. Leg brace supports
3. Accessory tray
4. Alt-Az mount
5. Azimuth motion lock knob
6. Altitude lock knobs
7. Optical tube assembly
(OTA)
8. Primary Mirror
9. Solar Filter
*Required for viewing the
Sun.
10. SunFinder
11. Finder mounting knobs
12. Red-dot finder
13. Red-dot finder On/Off
switch
14. Red-dot finder adjust-
ments
15. Eyepiece
16. Focuser
17. Focus knobs
18. Focuser thumbscrews
19. Slow-motion control rod
20. Slow-motion lock knob
21. OTA mounting knobs(2)
22. Front dust cap (not visible)
23. Primary mirror adjustment
screws
24. Secondary mirror adjust-
ment screws
1
1
2
3
5
12
7
9
10
14
13
Image A
Image B
Image C
FIGURE 1B
Image D
10
9
Telescope Features
4
8
11
15
16
17
22
23
24
7
18
21
12
19
20
6

9
Specifications
Optical tube design
Optical tube focal length
Lens/Mirror diameter
Focal ratio
Viewfinder
Eyepieces
Solar Filter
Erect-Image Prism
EclipseView 76
Reflector
700mm
76mm (3 in.)
f/9.2
SunFinder for Daytime
Red-dot for Nighttime
Two1.25” MA26mm, MA9mm
White-Light Filter
(Removable)
N/A
8
EclipseView 60
Refractor
800mm
60mm (2.4 in.)
f/13.3
SunFinder for Daytime
Red-dot for Nighttime
Two1.25” MA26mm, MA9mm
White-Light Filter
(Removable)
Included

10
About The Telescope
The EclipseView Telescopes are Alt-Az mounted telescopes. The word “Alt-Az” comes from the way the telescope
mount moves. This mount style allows you to move the telescope both up/down (altitude) and left/right (azimuth), or
Altitude-Azimuth directions. Hence, it’s called an Alt-Az telescope for short. This is the simplist type of mount sold.
The EclispeView60 optical tubes are called refractors because they use lenses to refract, or bend, the incoming light
to the focal point. The light at the focal point is then magnified by the eyepiece to provide a larger viewing image.
The EclipseView76 optical tubes are called reflectors because they use mirrors to focus incoming light. Inside the
telescope, there are two mirrors: a primary and a secondary mirror. The primary mirror is the largest of the two and is
located at the bottom of the tube. The secondary mirror is near the top of the tube. The large primary mirror collects
light from the object you’re looking at and bounces it forward to the secondary mirror which redirects it out the side of
the tube. The reflecting telescope must have the mirrored elements aligned, or collimated, in order to get good image
quality.
9
Always use the EclipseView Solar Filter when viewing at or near the Sun or irreversible eye damage may occur.
Reflecting Telescope
Refracting Telescope

11
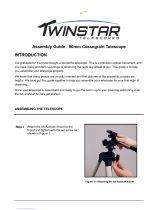
Assembling The Telescope
Tripod Assembly:
The tripod is the basic support for your telescope and comes pre-assembled from
the factory; except for the accessory tray. In order to use the scope a small amount of
assembly is required. Follow the below steps to assemble the telescope.
STEP 1: To setup the tripod, spread the legs out evenly and place on solid ground.
Loosen the leg lock knobs and extend the inner legs to desired height. Do this for each
leg until the top of the tripod is approximately level. Re-lock the leg lock knob.
STEP 2:
EclipseView 60 Models: Attach the accessory tray to the tripod by aligning the
three mounting hole at eacj corner with the slotted holes on each leg brace. Use
the included wing-nuts and thread into the tray from the bottom.
EclipseView 76 Models: Attach the accessory tray to the tripod by threading it
into the center nut between the tripod legs.
Step 2
Step 1
Step 2
EclipseView60
EclipseView76
10
Step 2

12
Attaching The Optical Tube Assembly (OTA):
The optical tube gathers distant light which is focused in the eyepiece.
STEP 1: Remove the two lock knobs from the optical tube mount.
STEP 2: Slide the Slow-motion control rod into the slow-motion control lock knob hole.
STEP 3: Place the optical tube between the forks of the mount, oriented as shown.
STEP 4: Thread a lock knobs through each of the holes in the forks of the mount and tighten to a firm feel.
11
place tube
between forks
slide rod
through
hole
lock knob
lock knob

13
Remove The Dust Covers:
The dust covers located at the front and rear of the telesocpe protect the telescope
STEP 1: Remove dust covers(6) at the front of the scope by pulling the cover away from the telescope. Set aside
so you can re-install it after use.
STEP 2: Remove the dustcover from the focuser by pulling it out of the focuser drawtube. Set aside so you can
re-install it after use.
Insert The Erect-Image Prism (EclipseView60 Models Only):
The 90° Erect-Image Prism reflects the light from the optical tube to a more comfortable viewing position. It also
reorients (corrects) the image so the object appears right side up and left-right correct. This makes the EclipseView60
and ideal choice for both terrestrial viewing and night time observing.
STEP 1: To install, slide the diagonal prism into the focuser draw tube.
STEP 2: Tighten the draw tube thumbscrew to hold the diagonal prism securely.
12

14
Insert The Eyepiece:
STEP 1:
EclipseView60 Models: Slide the MA 26mm eyepiece into diagonal prism.
EclipseView76 Models: Slide the MA 26mm eyepiece directly into the focuser
drawtube.
STEP 2:
EclipseView60 Models:Tighten the diagonal prism thumbscrew to hold the
eyepiece securely.
EclipseView76 Models: Tighten the focuser drawtube thumbscrew to hold the
eyepiece securely.
13
Step 1
Step 1
EclipseView60
EclipseView76

15
Attaching The Finder:
An eyepiece has a narrow field of view. A viewfinder, or finder, has a wider field of view,
which makes it easier to locate objects.
The EclipseView telescopes comes with two different viewfinders. Each finder has a
different use and should only be used as intended.
SunFinder: Use only when trying to locate the Sun. This SunFinder uses the Suns bright
light to project a small dot onto the finders back plate. Center the projected white spot in
the centering circle on the back plate. The Sun should then be in the field of view of a low
power eyepiece such as the 26mm MA eyepiece. Always use the included Solar Filter
when looking at or near the Sun.
Red-dot Finder: Use the Red-dot viewfinder only on the night time sky or daytime land
objects. Never use it to look at or near the Sun as permanent eye damage can occur. This
finder has a red dot projected onto a screen which makes it easier to line up more precisely
with the target. To install the finders do the following:
STEP 1: Note the two thumbscrews threaded onto two bolts on the optical tube.
Remove the thumbscrews from the tube.
STEP 2: Line up the two holes on the viewfinder bracket over the two bolts. Slide the
bracket over the bolts.
STEP 3: Replace the thumbscrews onto the bolts and tighten to a firm feel.
14
Red-dot Finder
SunFinder
Projection of Sun

16
The telescope is now completely setup and ready for NIGHTTIME observing. Follow the instructions under the
section “NightTime Use of the EclipseView Telescope” for more information.
If using the telescope for DAYTIME use, such as viewing the Sun, proceed to the section “DayTime Use of the
EclipseView Telescope” for more information. Always use the included Solar Filter when looking at or near
the Sun.
15

17
DAY TIME USE
OF THE
ECLIPSEVIEW
TELESCOPE
16

18
Quick Start - Viewing the Sun
In order to get started observing the Sun, you will need to do the following:
1) Read the Instructions!
• Viewing the Sun can be dangerous.
• Read the instructions carefully.
Always use the EclipseView Solar Filter when viewing at or near the Sun or irreversible eye damage may occur.
2) Setup the Tripod
• Expand the tripod legs.
• Adjust tripod leg height.
3) Attach the Accessory Tray
• EclipseView 60: Use the three
wingnuts and thread into bottom side
of tray.
• EclipseView 76: Thread tray into
center nut between tripod legs.
4) Attach Optical tube to Mount
• Remove yellow ota mounting knobs.
• Insert Slow-Motion control rod into
holder.
• Place Optical tube into mount.
• Reattach yellow ota mounting knobs.
5) Confirm Solar Filter is not damaged
and properly installed!
• Viewing the Sun can be dangerous.
• Always confirm the filter is good
before each use.
6) Attach Accessories
• EclipseView60: Attach 90 °
diagonal & 26mm eyepiece. Attach
SunFinder.
• EclipseView76: Attach 26mm eye-
piece. Attach SunFinder.
7) Use the SunFinder to locate the Sun
• Use the Suns projection and place in
center area of SunFinder.
8) Focus the telescope until image is
sharp.
• Only view the Sun with the proper
Meade solar filtering or permanent eye
damage can occur!
Projection of
Sun
EclipseView76
17

19
CAUTION: NEVER look through your telescope at or near the Sun until the
solar filter is securely installed at the front of the telescope. Please read the
following instructions fully and keep them in mind when observing the Sun.
Always use caution when viewing at or near the Sun. Adult Supervision is
required.
Inspecting the Solar Filter:
All filters are checked carefully before shipment. However, as the solar filter
material is delicate, be sure to check for any damage prior to each use.
STEP 1: Before installing the solar filter, hold the solar filter up to the sky
away from the Sun or use a standard 60 to 100 watt light bulb.
STEP 2: Examine the filter for any pin holes, scratches, tears, or signs the
filter material has separated from its holder. If any damage is seen, do not use
the solar filter. Replacement will be required.
Installing the Solar Filter: The solar filter is pre-installed at our factory to
allow use right out of the box. However, if the solar filter is removed from the
telescope make sure to reinstall the filter before looking at or near the Sun. To
Using The Solar Filter
Step 1.
18

20
install the filter, do the following.
STEP 1: Point the telescope upwards away from the Sun.
STEP 2: Carefully slide the filter fully over the front end of the telescope.
Never force the filter onto the optical tube or damage can occur.
STEP 3: Tighten the thumb screw located on side the filter until firm. Do not
overtighten the thumb screw.
STEP 4: The solar filter is now installed and ready to use on the Sun. Always
use caution when viewing at or near the Sun.
STEP 5: When removing the solar filter, point the telescope away from the
Sun first, then remove the filter. Removing the filter while the telescope is still
pointed at the Sun is very dangerous and can cause serious damage to the
telescope or anyone that may unknowingly attempt to look through the now
unfiltered telescope.
Step 2.
Step 3.
19
/