Rocstor Volt SC32 User manual

Category
Signal cables
Type
User manual

Rocstor Volt SC32 is a storage solution designed to securely charge, store, and sync up to 32 tablets simultaneously. It features individual LED indicators for each tablet, allowing you to easily monitor the charging status. With built-in auxiliary power outlets, you can conveniently power additional devices. The cart's sturdy construction and locking system ensure the safety of your tablets, while the non-skid work surface provides a stable platform for working. Ideal for educational institutions, offices, and other environments that require efficient device management.

Rocstor Volt SC32 is a storage solution designed to securely charge, store, and sync up to 32 tablets simultaneously. It features individual LED indicators for each tablet, allowing you to easily monitor the charging status. With built-in auxiliary power outlets, you can conveniently power additional devices. The cart's sturdy construction and locking system ensure the safety of your tablets, while the non-skid work surface provides a stable platform for working. Ideal for educational institutions, offices, and other environments that require efficient device management.

Rocstor® Volt® SC32 & SCL32
User Manual
This cart is designed to allo w you to easily store, secure, charge, and
sync up to 32 tablet devices.
General Use
1
1. Tablet Trolley Specifications P.01
2. Package Contents P.0 2
3. Tablet Cable Set-up For Charging and Syncing P.02
4. Charging Set Up P.03
5. Other Feature P.04
6. Tablet Sync Set-Up P.05
7. Use Safety P.08
1. Product Specication
Volt® SC32 & SCL32
1
1. Tablet Trolle ations
Product SPEC
Model Name
Capacity
Max. tablet size
Dim. with Packing
N.W. / G.W.
Container Load (20'/40')
LED indicator - Dual color
External Power outlet AC 100~120V, 50/60Hz, 4A
AC 220~240V, 50/60Hz, 4A
32
48 / 106
65kgs / 77kgs
860 x 590 x 1120 mm
350 x 290 x 21 mm
Up to 32 bay
Volt SC32 & SCL32
Power Rating Input :AC 100~120V, 50/60Hz
AC 220~240V, 50/60Hz
DC:5V, 2.4A for each USB port
1. FAN (DC 12V / 0.6A)
2. Combination padlock
Option Item
Individual LED tablet status
indicators
Slot-in sliding doors
Numbered tablet Slots
2 Locking Casters
Access point storage
compartment
Auxiliary power outlets
Handle
Non-Skid work surface
3-point locking system
Storage Drawer
2. Package Contents
2
3. Tablet Cable Set-up For Charging and Syncing
1. Before assembling cable management, please
make sure the power cable is disconnected from
the wall. Unlock the trolley and open the doors.
Package Contents
Cart x 1
Power Cable x 1
Sync Cable x 1
User manual x 1
Window Key x 2
2. Line a USB connector cable along number 1 to 16
(around 175mm) on the drawer. Route the USB
connector cable through the cable clips on the
top of drawer to the back of the drawer. Leave
the USB head on the back of the drawer.
3. Repeat USB cabling steps for the rest of the USB
connector cables.
3
4. Turn to the back of the trolley, Wrap the excess
USB cable around the cable organizer one by one.
Connect the USB connector to PCBA module on
5. Put tablets into the drawers. Connect the USB
charging cables to the tablets.
4. Charging Set-Up
The power cable is the connection between trolley-power and mains socket, to use trolley with
ON/OFF-switch. When plug in and switch ON, the trolley will proceed the charging.
NOTE: the device will not charge and sync at the same time.
4
LED indicator :
1 light for each device on the top of trolley, sequence numbered LEDs corresponding to each
tablet in the channels.
Color Green = Fully Charged.
Color Red = Charging in progress.
Color Green/Red Flash = Sync in process.
5. Other Feature
Service only
Technical Maintenance sta use only
Charge board software update
5
6. Tablet Sync Set-Up
7
7..Click on each of the tabs at the top (Apps, Music, Movies, TV shows, Books, Photos) and
select which type of files you will want to sync on this device. Click the Sync or Apply button.
8..Repeat Steps 2 – 7 with each iPad that will be used in this trolley.
Ready to Sync
1..When all the iPad devices have been configured, you are ready to charge and sync your
tablets. Place each iPad in a slot in the trolley. Plug each device in using the 30-pin Apple
connector connectors. Plug the trolley into a wall outlet.
2..If the iPad devices are new, they should be fully charged before attempting to sync.
3..When ready to sync, connect one end of the USB cable into the USB port near the auxiliary
outlet and the other into a USB 2.0 port on your Mac or PC.
4. .iTunes will open and syncing will start automatically. Each iPad will be listed in iTunes
under the Device list on the left hand side of the screen. You could review the sync status
from master PC.
NOTE: Please keep in mind that identifying the devices and syncing will take time, so please
be patient. The time is dependent on the number of iPads being synced and the
amount of data being transferred. It can range from a few minutes to hours on 32
devices depends on dierent content. Please do not stop the process once it has been
started.
5..When syncing is complete, the Eject symbol will appear next to each device. At this time it
is safe to eject the device by clicking on the Eject symbol or closing iTunes.
6..When syncing is complete, unplug the USB Cable from your PC so charging can begin.
Charging will not occur while the USB Cable is plugged into the master laptop.
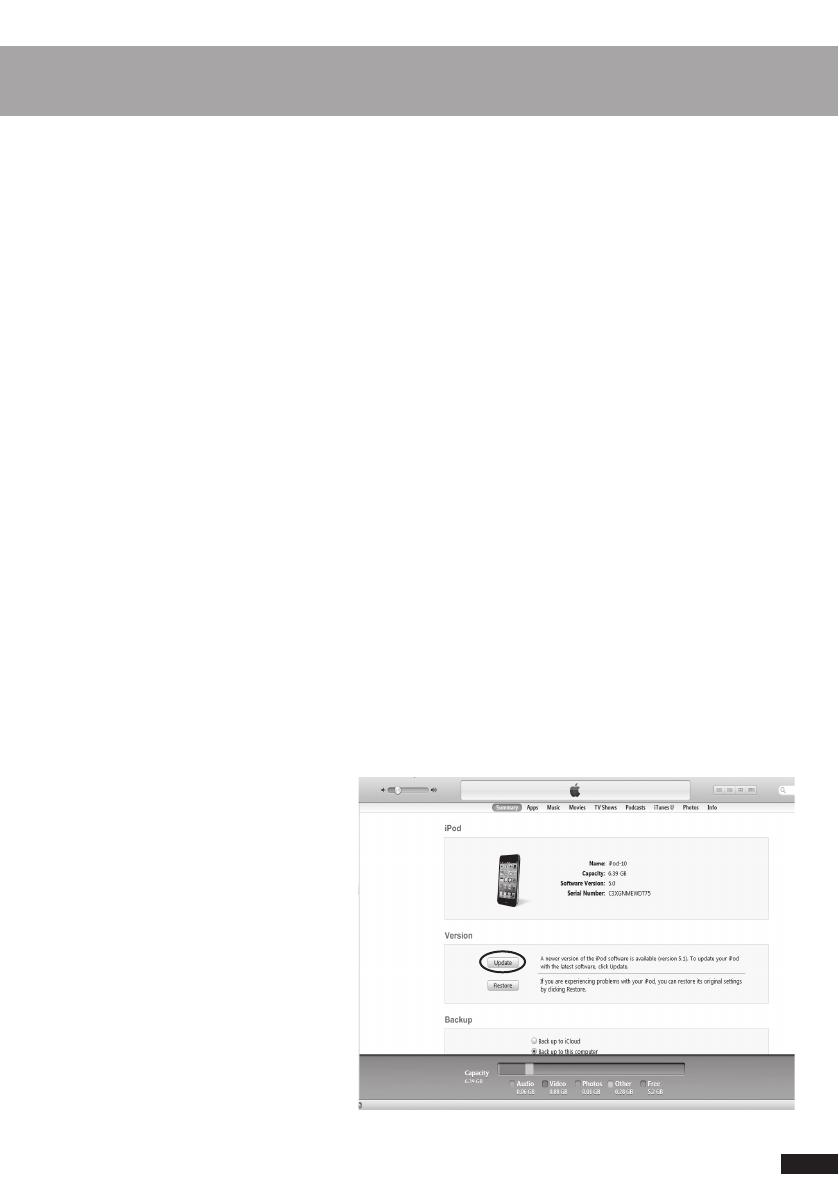
iOS Updates
Due to the functionality of the iTunes
software, iOS updates can not be done
across the whole fleet of iPads at one
time. This will need to be completed
one unit at a time. It can still be done
with the units plugged into the trolley.
To update iOS on each iPad, select an
iPad from under the Device list on the
left side of the screen. Click on the
Update button in the middle of the
screen. Follow the prompts to
complete the update. Updating time
will vary depending on the size of the
update from Apple. When one unit is
complete, the next unit can be
selected until all units have been
updated.
8
WARNING :
This trolley must only be used for its intended purpose in accordance with these
operating instructions. Failure to observe the following notices can result in fire, injury, death by
electric shock or equipment damage.
7. Use Safety
ELECTRIC SHOCK
Operate Carefully
Al ways turn OFF the power to the trolley before plugging IN or OUT.
Mak e sure each devices is turned OFF before plugging into the trolley.
Do not unplug this tr olley from the outlet when your hands are wet.
Do not use cables that ar e damaged.
Do not unplug b y pulling on the cable.
Do not plug the cable into an e xtension cable.
K eep the door closed and locked when in use.
Disc onnect the power cable from the wall before doors opening.
Be fore moving this trolley from one room to the next, wrap the power
cable around the winder located on the rear side of the trolley.
The pr oduct can only be used in school, oce or other similar places.
This tr olley is not designed to be operated by a child or student.
Only Adult operation and supervision should move this trolley.
Do not allo w anyone to set, stand, or climb on the trolley.
Move the tr olley slowly.
K eep the caster locked when the trolley is not in transit.
K eep the trolley away from water.
K eep the ventilation holes unblock for air circulation.
Do not block the v entilation holes when charging.
Do not pull the tr olley. Push the trolley using the ergonomic handles
to prevent muscle strain.
Do not use TV or monitor on top o f trolley.
Do not use the tr olley to store liquids or cleaning supplies.
K eep the door closed and locked when in use.
Disc onnect the power cable from the wall before doors opening.
6
iPad Set-up
Before starting the syncing process, each individual iPad needs to be configured to work with
iTunes and the Qubic correctly. This can be done by plugging each device into the master
syncing laptop one unit at a time, or you can plug one unit in at a time within Qubic slot. To
speed up the syncing process when syncing multiple devices, Apple suggests disabling
automatic backups. This can be accomplished using Apple Terminal or a third party software.
1. Set-up your master Laptop. Plug the power cord into the auxiliary outlet and the USB cable
into the auxiliary USB plug. Plug the Qubic power cord into a wall outlet.
2. Select one iPad. We recommend setting your screen brightness at half level or less as the
screen does stay on during syncing process. Go to Settings and select Brightness. Click
Auto-Brightness so it turns to O. Slide the brightness slide to left so it is positioned halfway
between dim and bright.
3. Plug iPad connector into the USB slot.
NOTE: if connected to a PC, during this time drivers will be loading, so
wait until you get the message that your device is ready to use
before proceeding to step 4.
4. Open iTunes if it does not open automatically. Select your iPad device
from the Device table on the left side of the screen.
5. The iPad registration screen will come up. Follow the prompts to log in
or create an Apple ID and name your iPad.
6. Click on the Summary tab. Select “Open iTunes when this iPad is
connected” and “Sync only checked songs and videos”. Verify
“Manually manage music and videos” is not selected (this function
would require you to drag and drop your selections in each iPad).
7. Click on each of the tabs at the top (Apps, Music, Movies, TV shows, Books, Photos) and select
which type of files you
will want to sync on this
device. Click the Sync or
Apply button.
8. Repeat Step 2 – 7 with
each iPad that will be
used in this product.
Rocstor
9445 De Soto Avenue
Chatsworth, CA
Tel: 1.818-727-7000
www.rocstor.com
Ver.1.1, Nov 2015
  • Page 1 1
  • Page 2 2
  • Page 3 3
  • Page 4 4
  • Page 5 5
  • Page 6 6
  • Page 7 7
  • Page 8 8
  • Page 9 9
  • Page 10 10
  • Page 11 11

Rocstor Volt SC32 User manual

Category
Signal cables
Type
User manual

Rocstor Volt SC32 is a storage solution designed to securely charge, store, and sync up to 32 tablets simultaneously. It features individual LED indicators for each tablet, allowing you to easily monitor the charging status. With built-in auxiliary power outlets, you can conveniently power additional devices. The cart's sturdy construction and locking system ensure the safety of your tablets, while the non-skid work surface provides a stable platform for working. Ideal for educational institutions, offices, and other environments that require efficient device management.

Ask a question and I''ll find the answer in the document

Finding information in a document is now easier with AI