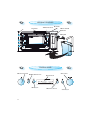
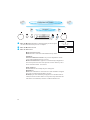
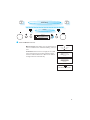
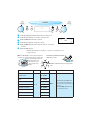
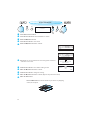
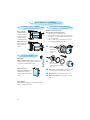
Bauknecht ESTM 8145 PT steam oven offers a variety of features to make cooking easier and healthier. With its assisted cooking function, you can select from a range of pre-programmed settings for meat, poultry, fish, potatoes, vegetables, rice, eggs, and desserts. The oven also features a dough proving function, a descaling function, and a yoghurt and preservation function. You can also use the oven to reheat and steam defrost food.
Bauknecht ESTM 8145 PT steam oven offers a variety of features to make cooking easier and healthier. With its assisted cooking function, you can select from a range of pre-programmed settings for meat, poultry, fish, potatoes, vegetables, rice, eggs, and desserts. The oven also features a dough proving function, a descaling function, and a yoghurt and preservation function. You can also use the oven to reheat and steam defrost food.


-
 1
1
-
 2
2
-
 3
3
-
 4
4
-
 5
5
-
 6
6
-
 7
7
-
 8
8
-
 9
9
-
 10
10
-
 11
11
-
 12
12
-
 13
13
-
 14
14
-
 15
15
-
 16
16
-
 17
17
-
 18
18
-
 19
19
-
 20
20
-
 21
21
-
 22
22
-
 23
23
-
 24
24
-
 25
25
-
 26
26
-
 27
27
-
 28
28
-
 29
29
-
 30
30
-
 31
31
-
 32
32
-
 33
33
-
 34
34
-
 35
35
-
 36
36
-
 37
37
-
 38
38
-
 39
39
-
 40
40


Bauknecht ESTM 8145 PT steam oven offers a variety of features to make cooking easier and healthier. With its assisted cooking function, you can select from a range of pre-programmed settings for meat, poultry, fish, potatoes, vegetables, rice, eggs, and desserts. The oven also features a dough proving function, a descaling function, and a yoghurt and preservation function. You can also use the oven to reheat and steam defrost food.
Ask a question and I''ll find the answer in the document
Finding information in a document is now easier with AI
Related papers
-
Whirlpool ESTM 8145/IXL User guide
-
Whirlpool ECTM 8145/1 PT User guide
-
Whirlpool ECTM 8245 PT User guide
-
Whirlpool ESDE 8145 PT User guide
-
-
-
-
-
-
Other documents
-
Whirlpool AMW 599 IXL User guide
-
KitchenAid KOCV 3610 IX User guide
-
-
-
-
-
-
-
Whirlpool AMW 582 IX User guide
-
HQ W9-20566 Datasheet