
de Montageanleitung
Standgerät
en Installation instructions
Free-standing appliance
fr Notice de montage
Appareil indépendant
it Istruzioni per il montaggio
Apparecchio indipendente
nl Montagevoorschrift
Vrijstaand apparaat
da Monteringsvejledning
Gulvmodel
no Monteringsanvisning
Frittstående apparat
sv Monteringsanvisning
Fristående skåp
fi Asennusohjeet
Vapaasti sijoitettava laite
es Instrucciones de montaje
Aparato de libre instalación
pt Instruções de montagem
Aparelho Solo
el Οδηγίες τοποθέτησης
Ανεξάρτητη συσκευή
tr Montaj kılavuzu
Solo cihaz
cs Montážní návod
Volně stojící spotřebič
pl Instrukcja montażu
Urządzenie wolnostojące
sk Návod na montáž
Voľne stojací spotrebič
hu Szerelési útmutató
Álló készülék
sl Navodilo za montažo
Samostojna naprava
ro Instrucţiunea de montaj
Aparat independent
ru Инcтpyкция пo мoнтaжy
Напольный прибор

de Inhaltsverzeichnis
Montageanleitung verwenden .............. 6
Aufstellort .................................................. 6
Türanschlag wechseln ........................... 7
Wechsel des Türgriffs ............................ 7
Wandabstandshalter montieren ........... 7
Gerät ausrichten ..................................... 7
en Table of Contents
Using the installation instructions ........ 8
Installation location ................................. 8
Changing over the door hinges ........... 9
Changing the door handle .................... 9
Fitting the wall spacer ............................ 9
Aligning the appliance ........................... 9
fr Table des matières
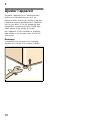
Utiliser la notice de montage ............. 10
Lieu d’installation ................................. 10
Inversion du sens d’ouverture
de porte ................................................. 11
Changement du sens d’ouverture
de porte ................................................. 11
Monter les écarteurs muraux ............. 11
Ajuster l’appareil .................................. 12
it Indice
Uso delle istruzioni per il montaggio 13
Luogo d’installazione ........................... 13
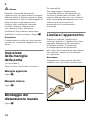
Inversione della porta .......................... 13
Inversione della maniglia della porta 14
Montaggio del distanziatore murale . 14
Livellare l’apparecchio ........................ 14
nl Inhoud
Montagehandleiding gebruiken ......... 15
De juiste plaats ..................................... 15
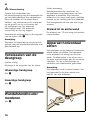
Verwisselen van de deurophanging . 15
Verwisselen van de deurgreep ......... 16
Wandafstandhouder monteren .......... 16
Apparaat horizontaal zetten ............... 16
da Indholdsfortegnelse
Monteringsvejledning anvendes ....... 17
Opstillingssted ...................................... 17
Ændring af dørens åbningsretning ... 17
Flytning af dørgreb .............................. 18
Vægafstandsholder monteres ........... 18
Justering af skabet .............................. 18
Page is loading ...
Page is loading ...
Page is loading ...
Page is loading ...
Page is loading ...

en
8
enTable of Contents
enInstallation instructionsFree-standing appliance
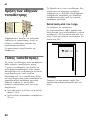
Using the installation
instructions
Please fold out the illustrated last page.
These installation instructions refer to
several models.
The diagrams may differ.
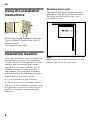
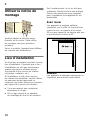
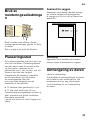
Installation location
A dry, well ventilated room is suitable as
an installation location. The installation
location should not be exposed to direct
sunlight and not placed near a heat
source, e.g. a cooker, radiator, etc. If
installation next to a heat source is
unavoidable, use a suitable insulating
plate or observe the following minimum
distances from the heat source:
■ 3 cm to electric or gas cookers.
■ 30 cm to an oil or coal-fired cooker.
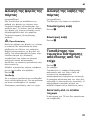
The floor of the installation location must
not give way; if required, reinforce floor. If
the floor is uneven, compensate with
supports.
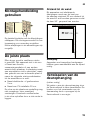
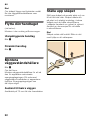
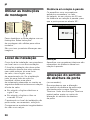
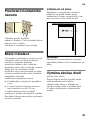
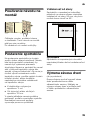
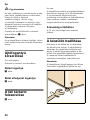
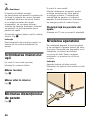
Distance from wall
Appliances with fitted handles must be
situated at least 50 mm from the wall on
the hinge side so that the door can
be opened by 90°.
Note
Appliances with internal handles can be
placed right up to the side wall.

en
9
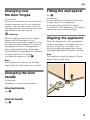
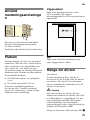
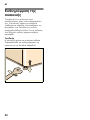
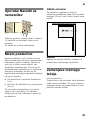
Changing over
the door hinges
(if required)
We recommend that you have the door
hinges changed over by our customer
service. You can find out the costs for
changing over the door hinges from your
appropriate customer service.
m Warning
While changing over the door hinges,
ensure that the appliance is not
connected to the power supply. Pull out
the mains plug beforehand. To prevent
damaging the back of the appliance,
place adequate padding underneath.
Carefully place the appliance on its back.
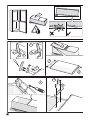
Change over the door hinges
in numerical sequence. Fig. !
Note
If the appliance is placed on its back,
ensure that the wall spacer is not fitted.
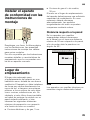
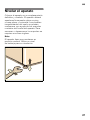
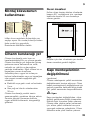
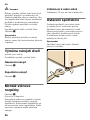
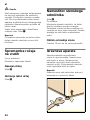
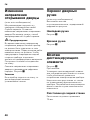
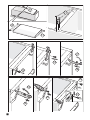
Changing the door
handle
(if required)
Installation in numerical sequence.
Attached handle
Fig. "
Internal handle
Fig. #
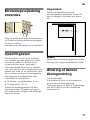
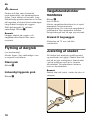
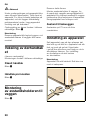
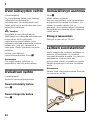
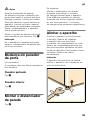
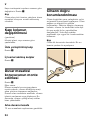
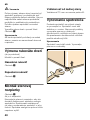
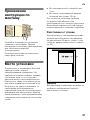
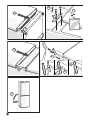
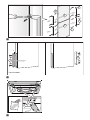
Fitting the wall spacer
Fig. $
If available:
Fit wall spacers to obtain the indicated
energy rating of the appliance.
A reduced wall gap will not restrict
the function of the appliance. The energy
rating may then increase slightly.
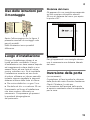
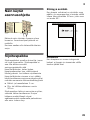
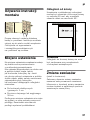
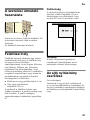
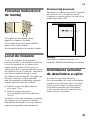
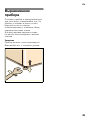
Aligning the appliance
Place the appliance in the designated
location and align. The appliance must
be level. If the floor is uneven, use
the front height-adjustable feet. Adjust
the height-adjustable feet with a wrench.
Note
The appliance must be upright. Please
align it with a spirit level.
Page is loading ...
Page is loading ...
Page is loading ...
Page is loading ...
Page is loading ...
Page is loading ...
Page is loading ...
Page is loading ...
Page is loading ...
Page is loading ...
Page is loading ...
Page is loading ...
Page is loading ...
Page is loading ...
Page is loading ...
Page is loading ...
Page is loading ...
Page is loading ...
Page is loading ...
Page is loading ...
Page is loading ...
Page is loading ...
Page is loading ...
Page is loading ...
Page is loading ...
Page is loading ...
Page is loading ...
Page is loading ...
Page is loading ...
Page is loading ...
Page is loading ...
Page is loading ...
Page is loading ...
Page is loading ...
Page is loading ...
Page is loading ...
Page is loading ...
Page is loading ...
Page is loading ...
Page is loading ...
Page is loading ...
Page is loading ...
Page is loading ...
Page is loading ...
Page is loading ...
-
 1
1
-
 2
2
-
 3
3
-
 4
4
-
 5
5
-
 6
6
-
 7
7
-
 8
8
-
 9
9
-
 10
10
-
 11
11
-
 12
12
-
 13
13
-
 14
14
-
 15
15
-
 16
16
-
 17
17
-
 18
18
-
 19
19
-
 20
20
-
 21
21
-
 22
22
-
 23
23
-
 24
24
-
 25
25
-
 26
26
-
 27
27
-
 28
28
-
 29
29
-
 30
30
-
 31
31
-
 32
32
-
 33
33
-
 34
34
-
 35
35
-
 36
36
-
 37
37
-
 38
38
-
 39
39
-
 40
40
-
 41
41
-
 42
42
-
 43
43
-
 44
44
-
 45
45
-
 46
46
-
 47
47
-
 48
48
-
 49
49
-
 50
50
-
 51
51
-
 52
52
-
 53
53
-
 54
54


Ask a question and I''ll find the answer in the document
Finding information in a document is now easier with AI
in other languages
- italiano: BALAY 3FS2302WI/01 Manuale utente
- français: BALAY 3FS2302WI/01 Manuel utilisateur
- español: BALAY 3FS2302WI/01 Manual de usuario
- Deutsch: BALAY 3FS2302WI/01 Benutzerhandbuch
- русский: BALAY 3FS2302WI/01 Руководство пользователя
- Nederlands: BALAY 3FS2302WI/01 Handleiding
- português: BALAY 3FS2302WI/01 Manual do usuário
- slovenčina: BALAY 3FS2302WI/01 Používateľská príručka
- dansk: BALAY 3FS2302WI/01 Brugermanual
- polski: BALAY 3FS2302WI/01 Instrukcja obsługi
- čeština: BALAY 3FS2302WI/01 Uživatelský manuál
- Türkçe: BALAY 3FS2302WI/01 Kullanım kılavuzu
- svenska: BALAY 3FS2302WI/01 Användarmanual
- suomi: BALAY 3FS2302WI/01 Ohjekirja
- română: BALAY 3FS2302WI/01 Manual de utilizare
Related papers
Other documents
-
Bosch KSW36PW30/01 User manual
-
Siemens GS36DPI20 Installation guide
-
Bosch KGF39SM30/19 User manual
-
Siemens KGN36S51/11 User manual
-
Bosch KGN39H70/10 User manual
-
Bosch KGF39PI30/19 User manual
-
Bosch KDN46AW32N/89 User manual
-
Bosch KGN49SM30/01 Installation guide
-
Siemens KD56NVW23N/01 User manual
-
Bosch KS36VAI41/01 User manual