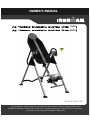
Ironman 5900 & 5901 Owner's manual
- Type
- Owner's manual
Ironman 5900 & 5901
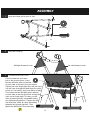
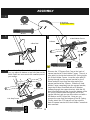
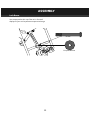
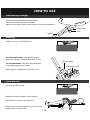
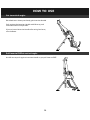
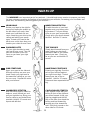
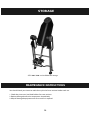
Below you will find brief product information for your recently purchased Ironman 5900 & 5901, an inversion table designed to provide a safe and effective way to invert your body.
Features:
- Adjustable boom to accommodate various heights
- Comfortable nylon bed with headrest and heel holders
- Sturdy frame construction for maximum stability
- Safety handles for added security
- Multiple inversion angles for a customized experience
- Easy-to-use locking mechanism for secure inversion
- Compact design for convenient storage
Benefits:
- Relieves back pain and pressure on the spine
Ironman 5900 & 5901
Below you will find brief product information for your recently purchased Ironman 5900 & 5901, an inversion table designed to provide a safe and effective way to invert your body.
Features:
- Adjustable boom to accommodate various heights
- Comfortable nylon bed with headrest and heel holders
- Sturdy frame construction for maximum stability
- Safety handles for added security
- Multiple inversion angles for a customized experience
- Easy-to-use locking mechanism for secure inversion
- Compact design for convenient storage
Benefits:
- Relieves back pain and pressure on the spine


-
 1
1
-
 2
2
-
 3
3
-
 4
4
-
 5
5
-
 6
6
-
 7
7
-
 8
8
-
 9
9
-
 10
10
-
 11
11
-
 12
12
-
 13
13
-
 14
14
-
 15
15
-
 16
16
-
 17
17
-
 18
18


Ironman 5900 & 5901 Owner's manual
- Type
- Owner's manual
Ironman 5900 & 5901
Below you will find brief product information for your recently purchased Ironman 5900 & 5901, an inversion table designed to provide a safe and effective way to invert your body.
Features:
- Adjustable boom to accommodate various heights
- Comfortable nylon bed with headrest and heel holders
- Sturdy frame construction for maximum stability
- Safety handles for added security
- Multiple inversion angles for a customized experience
- Easy-to-use locking mechanism for secure inversion
- Compact design for convenient storage
Benefits:
- Relieves back pain and pressure on the spine
Ask a question and I''ll find the answer in the document
Finding information in a document is now easier with AI
Related papers


Other documents
-
Paradigm 5203 Owner's manual
-
Ironman Fitness 5402 Owner's manual
-
-
-
 Fitness Gear 5426 Owner's manual
-
LifeGear 75164 Owner's manual
-
 Body-Solid BFINVER10 Assembly Manual
-
 Fitness Gear 5226 Owner's manual
-
-


