Page is loading ...


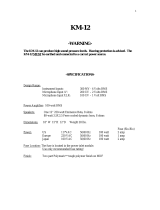
TECHNICAL SPECIFICAT I O N S
PREAMP SECTION
INPUT WARM: -10dbV / 1 M ohms
INPUT BRIGHT: -10dbV / 220 K ohms
MICROPHONE INPUT: -40 dbV / 2,2 K ohms
FX-SEND (serial): 0 dbV/ +10 dbV / 100 ohms
FX RETURN (serial): 0 dbV / 100 kohms
-10 dbV / 27 kohms
FX-SEND (parallel): 0 dbV / 100 ohms
FX RETURN (parallel): 0 dbV / 27 K ohms
BAL. DI OUT: -20 dbV / 4,7 K ohms
POWER AMP
Power output: 60 W rms into 8 ohms
Frequency response: 20 Hz - 50 KHz
Speaker: 1x 12" Eminence
1x Leson TLC 5 Tweeter
Headphones: 100 mW into 4-600 ohms
GENERAL DATA
Mains voltage: 230 V~ (European model)
117 V~ (North American model)
100 V~ (Japanese model)
Maximum power consumption: 150 VA
Mains fuse: Slo-blo 630 mA (230 V model)
Slo-blo 1250 mA (117 V model)
Slo-blo 1600 mA (100 V model)
Dimensions: W x H x D: 495 x 455 x 270 mms
Weight: 16 kgs
HOME

C O N G R AT U L ATIONS AND THANK YOU FOR
PURCHASING A HUGHES & KETTNER MONTA N A !
A team of guitarists and engineers developed the MONTANA acoustic
guitar amplifier with a single mission in mind - to provide acoustic guitarists
with not just an amp but a complete sound reinforcement system that will
give them an ideal level of support in a variety of applications.
Whatever your gig - "unplugged" concert recitals, playing in an Irish pub,
accompanying a chorus or larger ensemble - the MONTANA is in every
respect the right rig for these applications and many more.
Equipped with a 60-watt power amp and integral limiter, this amp offers
plenty of headroom and delivers a punch powerful enough to make your
music stand out and be heard in virtually every type of performance
scenario. Sporting a 3-band voicing section featuring parametric mids, the
MONTANA lets you fine-tune its tone to suit your taste and instrument. The
auxiliary microphone channel gives you the option of patching vocals
through the MONTANA without having to tote along an additional mini-PA.
Loaded with a custom-designed speaker combination - a 12" Eminence
that pumps out big bottom end and velvety mids and a tweeter that
delivers crystal-clear treble and shimmering overtones - the MONTANA does
a great job of covering the broad sound spectrum of voice and acoustic
guitar. The variable on-board spring reverb gives your guitar the spatial
depth it needs to sound its best. A serial insert lets you patch effects into
the guitar channel; you can also process the amp's master signal by
patching external effect devices into the parallel FX loop. Finally, the
balanced XLR output lets you connect your amp to any PA to get your
sound across to the audience no matter how large the venue.
The MONTANA raises the stakes in the acoustic guitar amp game. Light,
easy to transport, chock full of classy features, plenty of power and
excellent sound- Montana offers you a combination of features
unmatched by any amp of its class.
WE WISH YOU MUCH SUCCESS WITH, AND
ENJOYMENT OF, YOUR NEW MONTA N A .
THINGS TO DO BEFORE OPERATING THE AMP
• Check out the voltage rating displayed next to the amp's
AC socket and make sure it matches your local AC power
before you plug the MONTANA's power cord into an AC
outlet.
• Make sure plenty of air can circulate around the back of the
amp chassis. Heat can kill electronic components!
• Place the amp on a sturdy, secure base and avoid exposing
it to mechanical shocks and extreme temperatures that
could endanger the device or the safety of yourself or
others.
• The manufacturer is not liable for any damage to the amp
due to improper operation.
1.0 THE CHANNELS OF THE MONTANA
The MONTANA is equipped with one instrument channel and
one microphone channel. The instrument channel features two
inputs with different input sensitivity for acoustic guitars with
and without preamplifiers.
The 3-band voicing section and the serial effects insert
influences the instrument channel only. The integrated reverb
affects both channels, although the microphone channel is
automatically assigned less reverb. The parallel effects loop
influences both channels by an equal measure.
HOME

2.0 CONNECTIONS AND CONTROL FEAT U R E S
INSTRUMENT INPUT WARM:This instrument input has high input
sensitivity. Connect acoustic guitars with low output levels-
instruments without on-board preamplifiers-here.
INSTRUMENT INPUT BRIGHT: This instrument input has low input
sensitivity. Connect acoustic guitars with high output levels -
instruments with on-board preamplifiers - here.
VOLUME: Controls the volume level of the instrument channel.
If the signal is saturated (the guitar sounds distorted), your
instrument has too high an output level and must be plugged
into INSTRUMENT INPUT BRIGHT. If the signal is much too soft,
your instrument's output level is too low. Plug the guitar into the
WARM input.
CONTOUR:This knob shapes the basic tonal characteristics of
the guitar's sound. This feature offers a wide range of subtle
tonal variations-from soft, creamy tone heavy on the mids to
crystal-clear sound with punchy bottom end and sparkling
highs.
SERIAL FX LOOP: Serial insert to the instrument channel. It is
designed to take external effects devices. In the signal chain,
it is located pre-voicing section, which means that the tone
controls influence the sound of the effects signal.
SEND: Connect this jack to the input jack of your effects
device.
-10 dB Switch: This damping switch lowers the level of the
instrument signal. Press this button when you're using devices
designed to take instrument input levels, as is the case with
most stomp boxes.
RETURN:Connect this jack to the output of your effects device.
BASS: Controls the level of bass frequencies in the instrument
signal.
MID FREQ: Use this knob to select the mid-range frequencies
that you want to affect (boost or cut).
MID LEVEL: Determines to which extent the mid-range
frequencies that you selected are cut or boosted.
TREBLE: This control adjusts the high frequencies of the
instrument signal.
MIC VOLUME: Determines the input volume of the microphone
channel.
REVERB: Controls the intensity of the on-board reverb effect.
The reverb level is automatically adjusted so that the
instrument signal gets more reverb than the microphone signal.
FX-MIX: Adjusts the amount of effect signal to be mixed in with
the original signal. Hard left = dry (original signal only)/ hard
right = wet (effects signal only).
MASTER VOL: Controls the overall output of the MONTANA.
PARALLEL FX-LOOP: The parallel effects loop influences the
instrument channel and the microphone channel equally. The
effects signal is mixed in with the original signal in the preamp
stage.

PARALLEL FX-LOOP SEND: Connect this jack to the input of your
effects device.
PARALLEL FX-LOOP RETURN: Connect this jack to the output of
your effects device.
PHONES: Connect headphones to this jack. The internal
speaker is automatically switched off when you insert a plug
into this jack.
MAINS SWITCH: AC power switch.
REAR PA N E L :
MICROPHONE INPUT: XLR input designed for dynamic
microphones.
BALANCED DI OUT: Balanced XLR output of the MONTANA
preamp. Use it to route the amp's signal to a mixing console or
additional power amp. This output is post-voicing section - in
other words, the tone knobs influence this signal. The Master
Volume knob, however, does not.
MAINS SOCKET at all times: Connect the Euro-norm mains
cable to this socket. The fuse holder is integrated in the socket.
3.0 STANDARD SET UP / CABLE CONNECTIONS
4 . O P E R ATING THE MONTA N A
Handling the MONTANA couldn't be easier:
Connect your acoustic guitar to the WARM or BRIGHT input,
depending on your instrument's output level. Adjust the
volume of the guitar channel via the VOLUME knob. Use the
3-band tone controls and the CONTOUR knob to dial in a
sound that best suits your instrument, playing style and
personal taste. If you're using your guitar to accompany
vocals, you can connect your microphone to the
MICROPHONE INPUT. Adjust the MIC VOLUME knob to dial in
the desired balance of levels between your guitar and voice.
The microphone channel does not feature separate tone
controls-we fine-tuned its frequency response to suit the
human voice.
Use the REVERB knob to add as much reverb to the master
signal as you need and like. Again, the microphone channel is
automatically assigned less reverb than the instrument channel
to avoid feedback problems. Use the MASTER VOL knob to
adjust the overall volume of the MONTANA.
4.1 THE MONTANA AND FX DEVICES
The MONTANA is equipped with a serial and a parallel FX loop.
With the serial effects loop, the entire preamp signal is routed
through the effects device that is inserted into the loop; in the
parallel loop, the effects signal is added to the preamp signal.
The serial effects loop of the guitar channel is located before
the EQ section. Consequently, when you've connected an
effects device to this circuit, you can use the amp's tone
controls to influence the effect signal.
The parallel effects loop influences both the instrument
channel and the microphone channel equally. You can

control the amount or intensity of the effects signal via the FX-
MIX knob. Hard left = dry (preamp signal only) / hard right =
wet (effects signal only).
CONNECTING EFFECTS DEVICES:
• Connect the FX SEND jack to the input and the FX RETURN
jack to the output of your effects device.
• Use only high-quality patch cords to prevent signal loss,
background noise and drop-outs.
• Ensure that the effect device is not being overdriven. Be sure
to keep an eye on whatever type of level meter, gain indi-
cator or overload lamp the effects device has, and adjust its
input and output controls accordingly.
4.2 THE MONTANA AND MIXING CONSOLES
You can use the BALANCED DI OUT port to connect the
MONTANA to a mixer.
5.0 SERVICE AND PREVENTIVE MAINTENANCE
The MONTANA does not require any type of regular
maintenance. However, there are a few precautions you
should heed because they will significantly extend the life of
your amp:
• Make sure all peripheral devices, cords and cables are in a
state of good repair!
• Make sure plenty of air can circulate around your amp's
ventilation ducts located at the top rear of the amp's
housing at all times.
• Definitely avoid exposure to mechanical shocks, extreme
heat, dust, and especially moisture.
• Be careful about the kind of peripheral devices you connect
to your amp and always check out their specs before you
plug them in. Under no circumstances should you connect
devices with high output signal levels (e.g. power amps)
directly to your amp's input.
• Be sure the AC power source delivers the current that your
amp is designed to handle before you plug it in. When in
doubt about the local rating, ask the venue's sound
technician or a stage hand.
• Refrain from Do-It-Yourself repairs! To be on the safe side, you
should also have a qualified technician replace internal
fuses.
Use a soft, slightly damp cloth to clean the exterior surfaces of
the MONTANA.

6.0 TROUBLESHOOTING
1) The MONTANA won't power up when you switch it on:
• It's not getting AC power. Check the mains cable to see if it
is connected properly or if there is a cut or crack in the
cable!
• The mains fuse is defective. Replace the fuse with another
identical fuse. If this fuse also blows, talk to your local Hughes
& Kettner dealer.
2) The MONTANA is cabled up and connected properly, but no
sound is audible.
• One or several volume or master controls are turned all the
way down. Dial in higher settings.
• A short in the speaker output caused one of the internal
fuses to blow. Have a qualified service technician locate
and eliminate the defect and change the fuse (ensure the
replacement fuse bears the proper rating).
• Your guitar cord may be defective. Try another cord.
• One of the patch cords connected to the serial FX loop may
be faulty. Unplug them-if the amp works fine, one of these
cords is defective.
• The FX MIX knob is turned up all the way but you haven't
connected a processor to the parallel FX loop. Turn the knob
counterclockwise as far left as it will go.
3) You have connected an effects device to the serial FX Loop
and the signal is totally distorted.
• The input of the effects device is being overdriven. You'll
have to lower its input sensitivity by turning down the input or
gain knob on the effects device.
4) You have connected an effects device to the serial FX Loop
and the output signal is significantly softer than without the
device.
• The output level of the effects device is too low. Turn up its
output knob.
/