Panasonic ES4815 Owner's manual
- Category
- Men's shavers
- Type
- Owner's manual

Operating Instructions
Wet/Dry Battery Operated Shaver
Model No. ES4815
Before operating this unit, please read these instructions completely.
Ltd.
Page is loading ...
Page is loading ...

4
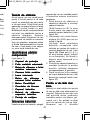
Index
ENGLISH Page 5
DEUTSCH Seite 8
FRANCAIS Page 11
ITALIANO Pagina 14
NEDERLANDS Pagina 17
ESPAÑOL Pagina 20
DANSK Side 23
PORTUGUÊS Pagina 26
NORSK Side 29
SVENSKA Sid 32
SUOMI Sivu 35
POLSKI Strona 38
ČESKY Strona 41
MAGYAR Oldal 44
ROMANA Pagina 47
êìëëäàâ
ëÚ‡Ìˈ‡
50
TÜRKÇE Sayfa 54
ì͇ªÌÒ¸ÍËÈ
ëÚÓ¥Ì͇
57

5
Before use
This Wet/Dry shaver can be used for
wet shaving with shaving lather or for
dry shaving. You can use this water-
tight shaver in the shower and clean
it in water. Treat yourself to wet lather
shaves for at least three weeks and
notice the difference. Your Panasonic
Wet/Dry shaver requires a little time
to get used to because your skin and
beard need about a month to adjust
to any new shaving method.
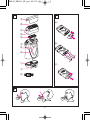
Parts identification
(see fig. 1)
A Protective cap
B Outer foil
C Outer foil release button
D Foil frame
E Inner blade
F Foil frame release button
G On/Off switch
H Switch lock button
I Battery cover
J Battery cover release dial
K Cleaning brush
Replacing batteries
Before replacing the batteries, wipe
the shaver free of moisture to pre-
vent the inside from getting wet.
1. Turn the battery cover release
dial and remove the battery cover.
(Turn the dial to 90° in the coun-
ter clockwise direction and re-
move the battery cover.) (Fig.2A)
2. Insert the two AA (LR6) alkaline
batteries as shown in the figure.
After checking that their polarity
matches that indicated behind the
shaver main body. (Fig. 2B) (If the
(+) and (–) poles are not inserted
properly, the motor will not oper-
ate.) Do not use a new battery
with an old battery.
3. Replace the battery cover with
the dial mark at open. Check for
proper sealing of the water-proof-
ing ring.
4. After replacing the battery cover
to the main unit, turn the dial mark
to close (Fig. 2C).
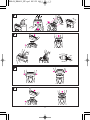
For a better shave
Put a thin layer of shaving foam on
your face which works as a lubricant.
Shaving foam is the most suitable
among many other shaving aids (gel,
soap, cream, etc). Do not put a thick
layer of shaving foam as it may af-
fect the shaver’s performance. If the
shaving head is clogged with foam,
simply rinse it under running water.
Depress the switch lock button and
slide the On/Off switch upward to turn
the shaver on. Hold the shaver at a
right angle (90°) to your skin (see fig.
3). Start out shaving by applying gen-
tle pressure to your face. Stretch your
skin with your free hand and move
the shaver back and forth in the di-
rection of your beard. You may gen-
tly increase the amount of pressure
as your skin becomes accustomed
to this shaver. Applying excessive
pressure does not provide a closer
shave.

6
Cleaning your shaver
(see fig. 4)
For cleanliness and convenience, we
recommend that you clean your
shaver with water and some liquid
hand soap. Regular cleaning will
keep your shaver in good condition
while preventing odors or bacteria
from developing, and maintain the
cutting performance.
With the outer foil in place, apply
some hand soap onto the outer foil.
Turn the shaver on and pour a small
amount of water over the outer foil.
After about 10-20 seconds, turn the
shaver off.
Remove the foil frame and rince it
under tap water.
Wipe off any moisture from the
shaver with a dry cloth and remove
the protective cap to allow the outer
foil to dry completely.
Brush cleaning
(see fig. 5)
Squeeze the foil frame release but-
ton and lift the foil frame upwards to
remove it. Remove the inner blades
one at a time by grasping it firmly at
both ends and pulling it straight away
from the shaver. Clean the outer foil,
the shaver body with the long side of
the brush. Clean the inner blades
with the short side of the brush. Do
not use the short brush to clean the
outer foil.
Replacing shaving head
components
It is recommended that you replace
the outer foil at least once a year and
the inner blades at least once every
2 years to maintain your shaver’s cut-
ting performance.
Replacing the outer foil
(see fig. 6)
Squeeze the outer foil release but-
tons and lift the outer foil upward to
remove it. To insert the new outer foil,
press down until it snaps into place.
Replacing the inner blades
(see fig. 7)
Press the foil frame release button
and remove the foil frame. Remove
the inner blade one at a time by
grasping it firmly at both ends and
pulling straight away from the shaver.
To insert the new inner blades, hold
the blade one at a time at both ends
and press downward until it snaps
into the shaver.
Caution
• Do not leave the appliance in
places where it will be exposed to
high temperature or direct contact
with sunlight.
• Do not leave the shaver in direct
sunlight to dry with the outer foil
removed.
• The outer foil is very thin. If han-
dled improperly, it can be easily
damaged. To avoid personal injury,
do not use the shaver if it has a
damaged foil or inner blade.
• Wash the shaver with tap water. Do
not use salt water or boiling water.
Als
tha
roo
not
wa
•Do
wit
Cle
wit
•Do
this
stru
• If th
tim
ven
• If t
erly
of p
ice
• Alw
ten
ma
This
hold

d
lace
and
very
cut-
but-
rd to
r foil,
ace.
utton
move
e by
and
aver.
hold
ends
naps
e in
ed to
ntact
irect
r foil
han-
asily
jury,
as a
r. Do
ater.
7
Also, do not use cleaning products
that are designed for toilets, bath-
rooms or kitchen appliances. Do
not submerge the shaver in the
water for a long time.
• Do not wipe any part of the shaver
with thinner, benzine or alcohol.
Clean it by using a cloth dampened
with soapy water.
• Do not take the housing apart as
this can affect the watertight con-
struction.
• If the shaver is not used for a long
time, remove the batteries to pre-
vent possible leakage.
• If the shaver is not working prop-
erly, have it inspected at the place
of purchase or an authorized serv-
ice center.
• Always use your shaver for its in-
tended use, as described in this
manual.
This product is intended for house-
hold use only.
Page is loading ...
Page is loading ...
Page is loading ...
Page is loading ...
Page is loading ...
Page is loading ...
Page is loading ...
Page is loading ...
Page is loading ...
Page is loading ...
Page is loading ...
Page is loading ...
Page is loading ...
Page is loading ...
Page is loading ...
Page is loading ...
Page is loading ...
Page is loading ...
Page is loading ...
Page is loading ...
Page is loading ...
Page is loading ...
Page is loading ...
Page is loading ...
Page is loading ...
Page is loading ...
Page is loading ...
Page is loading ...
Page is loading ...
Page is loading ...
Page is loading ...
Page is loading ...
Page is loading ...
Page is loading ...
Page is loading ...
Page is loading ...
Page is loading ...
Page is loading ...
Page is loading ...
Page is loading ...
Page is loading ...
Page is loading ...
Page is loading ...
Page is loading ...
Page is loading ...
Page is loading ...
Page is loading ...
Page is loading ...
Page is loading ...
Page is loading ...
Page is loading ...
Page is loading ...

Y. No.4 EN, GR, FR, IT, NE, SP, DN, PO, NR, SW, FN, Po, Cz, Hu, Ru, Russi, TU, Uk
Printed in China
Panasonic Electric Works Wanbao (Guangzhou) Co., Ltd.
http://panasonic.net
-
 1
1
-
 2
2
-
 3
3
-
 4
4
-
 5
5
-
 6
6
-
 7
7
-
 8
8
-
 9
9
-
 10
10
-
 11
11
-
 12
12
-
 13
13
-
 14
14
-
 15
15
-
 16
16
-
 17
17
-
 18
18
-
 19
19
-
 20
20
-
 21
21
-
 22
22
-
 23
23
-
 24
24
-
 25
25
-
 26
26
-
 27
27
-
 28
28
-
 29
29
-
 30
30
-
 31
31
-
 32
32
-
 33
33
-
 34
34
-
 35
35
-
 36
36
-
 37
37
-
 38
38
-
 39
39
-
 40
40
-
 41
41
-
 42
42
-
 43
43
-
 44
44
-
 45
45
-
 46
46
-
 47
47
-
 48
48
-
 49
49
-
 50
50
-
 51
51
-
 52
52
-
 53
53
-
 54
54
-
 55
55
-
 56
56
-
 57
57
-
 58
58
-
 59
59
-
 60
60


Panasonic ES4815 Owner's manual
- Category
- Men's shavers
- Type
- Owner's manual
Ask a question and I''ll find the answer in the document
Finding information in a document is now easier with AI
in other languages
- italiano: Panasonic ES4815 Manuale del proprietario
- français: Panasonic ES4815 Le manuel du propriétaire
- español: Panasonic ES4815 El manual del propietario
- Deutsch: Panasonic ES4815 Bedienungsanleitung
- русский: Panasonic ES4815 Инструкция по применению
- Nederlands: Panasonic ES4815 de handleiding
- português: Panasonic ES4815 Manual do proprietário
- dansk: Panasonic ES4815 Brugervejledning
- polski: Panasonic ES4815 Instrukcja obsługi
- čeština: Panasonic ES4815 Návod k obsluze
- Türkçe: Panasonic ES4815 El kitabı
- svenska: Panasonic ES4815 Bruksanvisning
- suomi: Panasonic ES4815 Omistajan opas
- română: Panasonic ES4815 Manualul proprietarului
Related papers
-
Panasonic ES4027 Owner's manual
-
Panasonic ES-3042 Owner's manual
-
-
-
-
Panasonic ES2235 Operating instructions
-
-
-
-
Other documents
-
Palson F911 Operating instructions
-
Braun Pocket Twist 350 - 5614 User manual
-
Carrera 521 User manual
-
-
Philips S9711/31 User manual
-
Philips S9031/12 User manual
-
Philips 9000 SERIES PRESTIGE SP9820/12 User manual
-
Philips SP9860/21 User manual
-
Philips RQ1197 User manual
-