Spektrum SPMR12000W User guide
- Category
- Remote controlled toys
- Type
- User guide

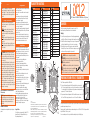
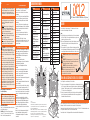
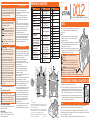
Function
1 LED
2 Right Trim
3 Right Knob
4 Switch E
5 Switch G
6 Switch F
7
Throttle Adjustment (Mode 1,3)
Throttle Adjustment (Mode 1,3)
8
Mode Change, Gimbal
Centering Screw
9
Throttle/Aileron (Mode 1)
Elevator/Aileron (Mode 2)
Throttle/Rudder (Mode 3)
Elevator/Rudder (Mode 4)
10
Left/Right Gimbal Stick
Tension Adjustment
11
Up/Down Gimbal Stick
Tension Adjustment
12
Elevator Trim (Mode 2, 4)
Throttle Trim (Mode 1, 3)
Function
13
Aileron Trim (Mode 1,2)
Rudder Trim (Mode 3,4)
14 Neck Strap Mount
15 Speaker Grill
16 Touchscreen LCD
17
Rudder Trim (Mode 1,2)
Aileron Trim (Mode 3,4)
18
Throttle Adjustment (Mode 2,4)
Throttle Adjustment (Mode 2,4)
19
Elevator Trim (Mode 1,3)
Throttle Trim (Mode 2,4)
20
Mode Change Gimbal
Centering Screw
21
Elevator/Rudder (Mode 1)
Throttle/Rudder (Mode 2)
Elevator/Aileron (Mode 3)
Throttle/Aileron (Mode 4)
22
Left/Right Gimbal Stick
Tension Adjustment
23
Up/down Gimbal Stick
Tension Adjustment
Function
24 Switch C
25 Switch B
26 Switch D
27 Switch I
28 Gimbal travel limiter covers
29 Left Trim
30 Power Button
31 Antenna 1
32 Switch A
33 Left Lever
34 Serial Interface Port
35 Audio Jack
36 Battery Cover
37 Right Lever
38 Switch H
39 Handle/Antenna 2
40 Memory card port
41 USB/Charging port
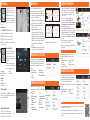
TRANSMITTER FUNCTIONS
CHARGING
POWERING UP/DOWN THE iX12 TRANSMITTER
The first time you charge the transmitter, the charge time may be 15-20
hours. Always charge the transmitter on a heat-resistant surface.
Charging:
1.
Connect the power supply to a power outlet using the appropriate adapter
and the Micro USB cable to the charge port on the transmitter as shown.
2. A Blue LED will flash while charging. Also a fast press of the power switch
will bring the Charge Battery icon to the color touch screen display.
3. When the system is powered ON, charging is complete when the blue
flashing LED stops. Disconnect the USB cable once charging is complete
and disconnect the power supply from the power outlet.
CAUTION: Never leave a charging battery unattended.
CAUTION: Never change the low voltage limit for Li-Ion batteries
below 3.3V. Doing so could over-discharge the battery and damage
both battery and transmitter.
CAUTION: Never charge the battery outside of the transmitter due
to the battery monitoring system not recognizing the
charge of the battery when it is not charged inside the
transmitter. This can cause the system to give false low battery warnings.
•Always ensure all batteries have been properly charged
prior to using the model.
•Always check all servos and their connections prior to
each run.
•Never operate your model near spectators, parking
areas or any other area that could result in injury to
people or damage of property.
•Never operate your model during adverse weather
conditions. Poor visibility can cause disorientation and
loss of control of your model.
•Never point the transmitter antenna directly toward the
model. The radiation pattern from the tip of the antenna
is inherently low.
•If at any time during the operation of your model you
observe any erratic or abnormal operation, immediately
stop operation of your model until the cause of the
problem has been ascertained and corrected.
•Failure to exercise caution while using this product
and comply with the following warnings could result in
product malfunction, electrical issues, excessive heat,
FIRE, and ultimately injury and property damage.
•Read all safety precautions and literature prior to use
of this product
•Never allow minors to charge battery packs
•Never drop charger or batteries
•Never attempt to charge damaged batteries
•Never attempt to charge a battery pack containing
different types of batteries
•Never charge a battery if the cable has been pinched
or shorted
•Never allow batteries or battery packs to come into
contact with moisture at any time
•Never charge batteries in extremely hot or cold places
(recommended between 50–80˚ F or 10–27˚ C) or
place in direct sunlight
•Always disconnect the transmitter after charging, and
let the charger cool between charges
•Always inspect a new battery before charging
•Always terminate all processes and contact Horizon
Hobby if the product malfunctions
•Always keep batteries and charger away from any
material that could be affected by heat (such as
ceramic and tile), as they can get hot
•Always end the charging process if the charger or
battery becomes hot to the touch or starts to change
form (swell) during the charge process
Safety precautions
Charging Warnings
The iX12 features a push button ON/OFF switch.
1. To power on the transmitter, push and hold the Power button for several seconds until
the LCD screen displays the start up screen. Similar to other smart devices, startup takes
~1 minute at which time the Spektrum Airware™ app launches automatically and takes
approximately 1 1/2 minutes to fully launch.
2. To power down the transmitter, push and hold the Power button for several seconds until
the Power Off / Reboot prompt shows on the screen. Press Power Off to shutdown.
Tip
Pressing the Power button once will put the display to sleep but the radio will continue to transmit normally. Press the
power button again to wake up the screen.
Double pressing the Power button will open a window allowing you to select RF On/Off, LCD On/Off, or press and hold
to put both RF and LCD into sleep mode.
It is recommended you use the sleep mode rather than turning the system Off on flying days.
Support Videos:
For helpful videos on programing the Spektrum™ iX12
transmitter and other Spektrum Transmitters go to
https://www.spektrumrc.com/
Age Recommendation: Not for children under 14.
This is not a toy.
NOTICE: This product is only intended for use with
unmanned, hobby-grade, remote-controlled vehicles and
aircraft. Horizon Hobby disclaims all liability outside of the
intended purpose and will not provide warranty service
related thereto.
WARRANTY REGISTRATION
Visit www.spektrumrc.com/registration today to register your
product.
EN
NOTICE
All instructions, warranties and other collateral
documents are subject to change at the sole discretion
of Horizon Hobby, LLC. For up-to-date product literature,
visit horizonhobby.com and click on the support tab for
this product.
Meaning of Special Language
The following terms are used throughout the product
literature to indicate various levels of potential harm when
operating this product:
WARNING: Procedures, which if not properly followed,
create the probability of property damage, collateral
damage, and serious injury OR create a high probability of
superficial injury
CAUTION: Procedures, which if not properly followed, create
the probability of physical property damage AND a possibility
of serious injury.
NOTICE: Procedures, which if not properly followed, create
a possibility of physical property damage AND a little or no
possibility of injury.
WARNING: Read the ENTIRE instruction manual
to become familiar with the features of the product
before operating. Failure to operate the product correctly
can result in damage to the product, personal property and
cause serious injury.
This is a sophisticated hobby product. It must be operated
with caution and common sense and requires some basic
mechanical ability. Failure to operate this Product in a safe
and responsible manner could result in injury or damage to
the product or other property. This product is not intended
for use by children without direct adult supervision. Do not
attempt disassembly, use with incompatible components
or alter product in any way without the approval of Horizon
Hobby, LLC. This manual contains instructions for safety,
operation and maintenance. It is essential to read and
follow all the instructions and warnings in the manual, prior
to assembly, setup or use, in order to operate correctly and
avoid damage or serious injury.
iX12 iX12
12-Channel 2.4GHz DSMX
®
Aircraft System12-Channel 2.4GHz DSMX
®
Aircraft System
3
1
30
36
34
35
40
41
33
32
31
39
38
37
28
2
29
4
5
6
7
8
9
10
11
12
13
14
15
27
26
25
24
23
22
21
20
19
18
17
16
54003.1
© 2018 Horizon Hobby, LLC.
DSMX, the DSMX logo, Spektrum AirWare and the Horizon Hobby logo are trademarks
or registered trademarks of Horizon Hobby, LLC. The Spektrum trademark is used with
permission of Bachmann Industries, Inc.
Android is a trademark of Google Inc. The Bluetooth
®
word mark and logos are registered
trademarks owned by Bluetooth SIG, Inc. and any use of such marks by Horizon Hobby is
under license. The WiFi logo is a registered trademark of WiFi Alliance.
All other trademarks, service marks and logos are property of their respective owners.
EU patent 6007706. Other patents pending. Updated 2/18

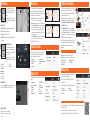
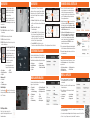
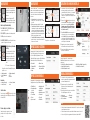
NAVIGATION NAVIGATION
MODEL SETUP
SYSTEM SETTINGS
CREATING A NEW MODEL
MODEL ADJUST
The iX12 transmitter is built on top
of the Android operating system and
features a large color touch screen
display.
To navigate around the iX12 use your
finger to tap, swipe and drag icons and
menus found on the display.
• Settings
• User info
• Brightness
• Wi-Fi
• Bluetooth
Notification Screen
1. Swipe down from the top of the
screen once to exit full screen mode
and bring the home screen navigation
icons to the front.
2. Swipe down a second time to roll
down the Notification Screen for quick
access to:
Volume Control
Press the Volume icon in the top right corner of any of
the main screens to change the iX12 volume levels.
Long Press for OK
When you see this icon, press and hold
for approximately 2 seconds to accept the
selection.
1. Create a new model by pressing the icon at the top left of
the dashboard to access the Model Utilities screen. If RF
is on, the system will open a dialog box to confirm RF will
be turned off to enter this menu.
2. Press on the expand icon at the top right corner of the
Model Utilities screen. A drop down menu containing
Add a New Model, Import Models, Export Models and
Sort Model List will appear.
3. Press Add a New Model to create a new model and
you will be prompted to create a model from Default or
from a Template. If Default model is selected, you will be
prompted to select the type for a default model, then click
CREATE in the dialogue box that appears.
4. You will then be prompted to confirm your selection. The
model will then be created and will be the active model.
5. Press the Bind button to bind your model to the
transmitter.
Home Screen
1. APP DRAWER: Contains applications loaded onto the iX12.
2. BACK: Return to previous screen.
3. HOME: Return to the home screen
4. OVERVIEW: Allows switching between any of the running
applications.
Tips
• For more information on operating the iX12 transmitter, the full manual can be accessed from
within System Settings.
• For more information on using the Android OS, scan the QR code.
• Login to Google Play Store for updates to the Spektrum AirWare™ app.
Tip
By pressing on the new model, you are taken to the
Model Details page where you can access these features:
1. Tap on the Back Arrow at the top left of the Model Setup
screen to return to the Dashboard.
2. To setup a model, tap on Model Adjust on the main
Dashboard screen.
3. A few settings that can be edited in Model Adjust* are:
• Reset Model Timer
• Duplicate Model
• Reset Model
• Edit Model Type
• Delete Model
• User Name
• Inactivity Alarms
• Calibrate
• Language
• Serial Number
• Low transmitter Battery
Alarm
• Flight Mode
• RX Port Assignment
• Warnings
• Frame Rate
• Trainer
• Channel Input
• Flight Mode Setup
• Trim Setup
• Preflight Setup
• Bind
• Telemetry
• Audio Events
• Servo Setup
• Dual Rates/ Expo
• Throttle Cut
• Mixing
• Flap System
*Only available if Telemetry is active.
The Spektrum Airware™ software, which launches
automatically when powering on the transmitter, has 4
main screens that can be quickly accessed by swiping left
or right on the color touch screen display.
• Dashboard: The main screen displaying Trims, and
Timers as well the model name and image.
• Monitor: Graphical representation of all control inputs.
• Telemetry Dashboard*: Displays telemetry information
for each sensor. User selects which items to display on
this page from the Telemetry setup menu. Additional
telemetry pages are available when activated in the
telemetry setup menu.
• Telemetry Min/Max*: Logs the minimum and maximum
values collected from each telemetry sensor.
From any of the main screens, tap on System Settings to
access System Configuration, Calibration, Manual, and
Product Information to make changes to:
From any of the main screens, tap on Model Setup to make
changes to:
Dashboard
Telemetry
Monitor
Telemetry Min/Max
• Landscape
• Location
• Cast Screen
Not shown
1
3
4
2
1 2
3
4 5
Page is loading ...
Page is loading ...
Page is loading ...
Page is loading ...
Page is loading ...
Page is loading ...
-
 1
1
-
 2
2
-
 3
3
-
 4
4
-
 5
5
-
 6
6
-
 7
7
-
 8
8


Spektrum SPMR12000W User guide
- Category
- Remote controlled toys
- Type
- User guide
Ask a question and I''ll find the answer in the document
Finding information in a document is now easier with AI
in other languages
- italiano: Spektrum SPMR12000W Guida utente
- français: Spektrum SPMR12000W Mode d'emploi
- Deutsch: Spektrum SPMR12000W Benutzerhandbuch
Related papers
-
Spektrum SPMXC1010 Owner's manual
-
Spektrum iX12iX12 12 Channel Transmitter Only Owner's manual
-
Spektrum iX14 14-Channel 2.4GHz DSMX Aircraft System User guide
-
Spektrum SPMXC1000 Owner's manual
-
-
-
-
-
-
Other documents
-
HobbyZone Faze RTF User manual
-
Blade Pico QX RTF User manual
-
-
E-flite Celectra EFLUC1007 Owner's manual
-
ECX beatbox User manual
-
-
-
E-flite EFL01150 Owner's manual
-
-