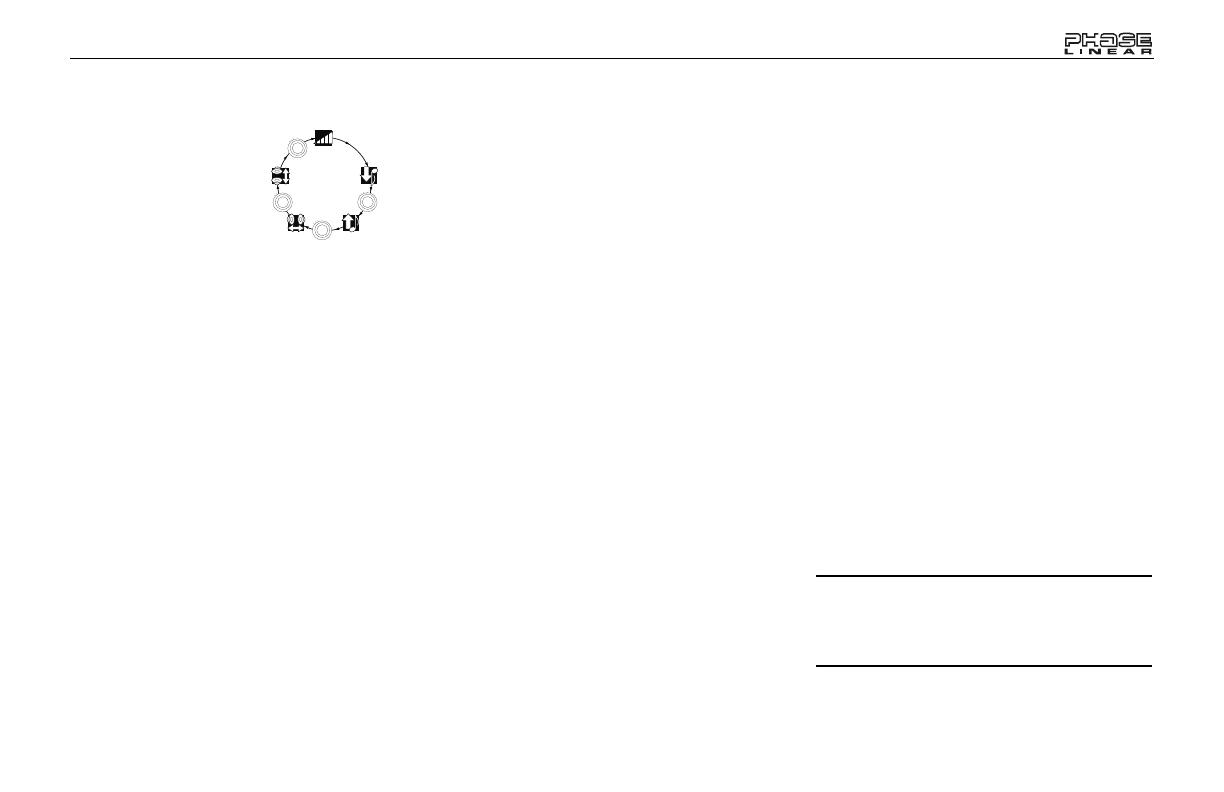
Jensen SD1513 Owner's manual

Category
CD players
Type
Owner's manual
SD1513
SD1513
PS/AS
AUX IN
iPod Ready AM/FM/CD/MP3/
WMA
Receptor iPod AM/FM/CD/MP3/
WMA
Recepteur iPod AM/FM/CD/MP3/
WMA
Owner's Manual/Manual del Usario/Manual de L'Utilisateur
SERIES
SD1513
1
INTRODUCTION
Contents
Operating Instructions............................... 2
Tuner Operation ........................................ 6
CD Player Operation................................. 8
MP3/WMA File Requirements................. 10
MP3/WMA Operation .............................. 12
Using a USB Device or SD Card............. 14
iPod Operation ........................................ 16
Remote Control....................................... 18
Care and Maintenance............................ 19
Troubleshooting....................................... 20
Specifications.......................................... 21
Toll-Free Installation Assistance
If you require assistance, contact Technical
Support at 1-800-323-4815 from 9:00 a.m. to
6:00 p.m. EST Monday through Friday (U.S.A.
and Canada only).
Para obtener instrucciones en Español, diríjase a la página 23.
Pour des instructions en Francais, référez-vous à la page 45.
SD1513
2
OPERATING INSTRUCTIONS
Power
Press the power button (1) or any other
button on the face of the receiver to turn the
unit on when the ignition switch is on. Press the
power button again to turn the receiver off. If
the radio was left on when the ignition was last
turned off, the receiver will turn on automatically
when the ignition switch is again turned on. If
the receiver was off when the ignition was last
turned off, the receiver must be turned on
manually when restarting the vehicle.
Source
Press the SRC button (2) to select a different
mode of operation as indicated on the display
panel. Available sources include Tuner, CD,
SD, USB, and Auxiliary Input. During CD
player operation, pressing SRC will change to
the tuner source without ejecting the disc. To
access the Auxiliary Input source, press the
SRC button until "AUX" is indicated in the
display.
Volume
To increase the volume, turn the AUDIO
CONTROL (3) clockwise. To decrease the
volume, rotate the AUDIO CONTROL counter
clockwise. When volume is adjusted, the
volume level is shown on the display panel as a
number ranging from “00” (lowest) to “46”
(highest).
SD1513
1
9
10
8
5
16 27
6
4
3
2
14
25
13
17
19
22
20
21
23
24
18
15
11
12
7
LIFT
PS/AS
SD1513
3
Select
Press the AUDIO
CONTROL button (4)
to step through the
menu of audio
functions: volume
(VOL), bass (BAS),
treble (TRB), balance
(BAL), fader (FAD),
and volume (VOL). When adjusting audio
functions, the unit will automatically exit select
mode and return to the normal display after five
seconds or when another function is activated.
Bass
Press the AUDIO CONTROL button (4) twice
until “BAS” appears in the display. Within five
seconds, turn the AUDIO CONTROL (3)
clockwise or counter clockwise to adjust the
bass from “-6” to “+6”. “0” represents a flat
response. The bass level is shown on the
display for five seconds or until another function
is activated.
Treble
Press the AUDIO CONTROL button (4) three
times until “TRB” appears in the display. Within
five seconds, turn the AUDIO CONTROL (3)
clockwise or counter clockwise to adjust Treble
from “-6” to “+6”. “0” represents a flat response.
The treble level is shown on the display for five
seconds or until another function is activated.
Balance
Press the AUDIO CONTROL button (4) four
times until “BAL” appears in the display. Within
five seconds, turn the AUDIO CONTROL (3)
clockwise (or counter clockwise) to adjust
Balance between the right and left speakers
from “BAL R12” (full right) to “BAL L12” (full
left). “BAL C00” represents an equal balance
level between the right and left speakers. The
balance position is shown on the display for five
seconds or until another function is activated.
Fader
Press the AUDIO CONTROL (4) five times until
“FAD” appears in the display. Within five
seconds, turn the AUDIO CONTROL (3)
clockwise or counter clockwise to adjust
balance between the front and rear speakers
from “FAD R12” (full rear) to “FAD F12” (full
front). “FAD C00” represents an equal balance
level between the front and rear speakers. The
fader position is shown on the display for five
seconds or until another function is activated.
System Menu
Press and hold the DISP button (9) to
view the system “MENU”. Press the DISP
button repeatedly or use the >>| (14) or |<< (13)
button to access the following MENU options.
Clock (CLK)
Turn the AUDIO CONTROL left to adjust the
hours and right to adjust the minutes.
AREA
Turn the AUDIO CONTROL to select the
appropriate frequency spacing for your area:
USA, LAT (Latin America), EUR (Europe), or
RUS (Russia).
DISTANT/LOCAL
This feature is used to designate the strength of
the signals at which the radio will stop during
automatic tuning. “Distant” is the default setting,
allowing the radio to stop at a broader range of
signals. To set the unit to select only strong
local stations during automatic tuning, turn the
AUDIO CONTROL to choose “Local”.
P-VOL (00-46)
Use the “VOL PGM” option to select the default
volume the radio will assume when first turned
on. To program a specific start-up volume level,
turn the AUDIO CONTROL to select the
desired level.
NOTE: If the P-Vol is set higher than the
volume selected when the unit is turned off,
the unit will resume the lower volume when
turned back on - not the P-Vol.
VOL
VOL
BAS
TRB
BAL
FAD
P
U
S
H
S
E
E
L
C
T
B
B
S
L
E
T
A
A
A
D
F
R
P
U
S
H
S
E
E
L
C
T
B
B
S
L
E
T
A
A
A
D
F
R
P
U
S
H
S
E
E
L
C
T
B
B
S
L
E
T
A
A
A
D
F
R
P
U
S
H
S
E
E
L
C
T
B
B
S
L
E
T
A
A
A
D
F
R
SD1513
4
BEEP ON/OFF
The beep tone feature allows the selection of
an audible beep tone to be heard each time a
button is pressed on the face of the radio. Turn
the AUDIO CONTROL to select from the
following Beep Tone options:
BEEP ON: Beep is heard any time a
button is pressed (function activated).
BEEP OFF: Beep is not heard.
iX-BASS
Press the iXBASS button (15) to activate the
iXBASS feature. When listening to music at low
volume levels, this feature will boost the bass
and treble ranges to compensate for the
characteristics of human hearing. Press
iXBASS again to deactivate this feature.
Subwoofer
Press the SUB-W button (18) to activate the
Subwoofer function. Press again to turn the
Subwoofer function off.
NOTE: The Subwoofer feature only works
when an external amplifier and subwoofer
are connected via the Sub line out
connection on the back of the unit.
Audio Mute (MUTE)
Press the MUTE button (6) to mute the audio
volume. “MUTE” flashes on the display. Restore
volume to the previous setting by pressing the
mute button again, adjusting the AUDIO
CONTROL.
Liquid Crystal Display (LCD)
The liquid crystal display (LCD) panel (8)
displays the frequency, time and activated
functions of the unit.
NOTE: After being subjected to cold
temperatures, LCD panels may take longer
to respond and visibility of the numbers on
the LCD may decrease slightly. The LCD
display will return to normal when the
temperature increases to a normal range.
Display (DISP)
When the unit is on, the LCD automatically
shows the display for the current source of
operation.
When the unit is on, press the DISP button (9)
to display the time of day. After five seconds,
the display reverts to the current source.
Auxiliary Input
Lift the cover on the right side of the radio to
reveal the AUX IN connector (16). Use the
included 3.5mm media cable to connect a
portable media device for playback through the
vehicle sound system.
Front Panel Release
The front panel REL (release) button (10)
releases the mechanism that holds the front
panel to the chassis.
Detaching the Front Panel
To detach the front panel, first press the REL
button (10) to release the left side of the panel.
Next, grasp the released side and pull the panel
off the chassis. After removing the front panel,
store it in the supplied carrying case to protect it
from dirt and damage.
Re-attaching the Front Panel
To re-attach the front panel, make sure the
electrical terminals on the back of the panel are
free of dust and dirt, as debris could cause
intermittent operation or other malfunctions.
Position the right side of the panel in place so
that it is correctly engaged, and then lightly
2
1
REMOVE FRONT PANEL
SD1513
5
press the left side of the panel until the panel
locks into place.
Reset Button
The reset button (26) is located on the front of
the chassis and can only be accessed with the
front panel removed. The reset circuitry
protects the microprocessor circuitry. Since
resetting the unit will erase the time and preset
memories, it should only be activated upon
initial installation after all wiring is complete, or
if there is a malfunction of any of the switches
on the unit. In these circumstances, pressing
the reset button will clear the system and return
the unit to normal operation.
RESET
26
SD1513
6
TUNER OPERATION
SD1513
1
9
10
8
5
16 27
6
4
3
2
14
25
13
17
19
22
20
21
23
24
18
15
11
12
7
LIFT
PS/AS
SD1513
7
AM/FM Band Selector (BAND)
Press the BAND button (5) during radio play to
switch between three FM bands and two AM
bands. “F1”, “F2”, “F3” or “AM”, “AM2” will
appear in the display to indicate the band
currently selected.
Tuning
Automatic Tuning
Press the >>| button (14) to tune upward in
frequency and the |<< button (13) to tune
downward in frequency. The unit will
automatically stop at the next strong station. If
the Local mode is active, the radio will seek the
next strong local station when either button is
pressed.
Manual Tuning
Press the >>| (14) or |<< (13) button for more
than two seconds to select manual tuning
mode. “MANUAL” will appear in the display.
Press the Up or Down Tuning buttons to move
radio frequency up or down two digits at a time.
Press and hold the Up or Down Tuning buttons
to quickly advance to a certain frequency.
Release when the desired frequency is
reached. If tuning is not adjusted within five
seconds of entering manual tuning mode, the
radio will revert to automatic tuning and “AUTO”
will appear in the display.
Preset Stations
Up to six stations on each band can be stored
as presets and can then be instantly recalled by
pressing the associated preset button on the
front panel (19-24) or remote control. To store a
station, turn the radio on and select the desired
band and station. Press and hold the desired
preset button (numbered one through six on the
face of the radio or remote control) for more
than two seconds. When stored, the preset
number will appear in the display. The station is
now stored and can be recalled at any time by
pressing the corresponding preset button.
Repeat for the remaining five presets on the
current band and for all presets on the other
three bands.
Preset Scan/Automatically Store
(PS/AS)
Automatically Store
Select six strong stations and store them for
the current band using the Automatic Store
feature. To enable this feature, press and hold
the PS/AS button (17) for more than two
seconds. The radio will automatically scan each
band and enter strong stations into the preset
memory positions. After entering the stations
into memory, the unit will automatically stop at
each station for five seconds so each can be
heard. When using the Automatically Store
feature, the new stations replace any stations
already stored in preset memory.
Preset Scan
Press the PS/AS button (17) to scan the six
preset stations in the AM band or all FM bands.
The unit will stop at each station for five
seconds before continuing to the next preset
station, and the preset number will flash on the
display during the preset scan. Press PS/AS
again to stop scanning and listen to the current
station.
SD1513
8
CD PLAYER OPERATION
Insert CD
With the label surface facing up, gently insert
the disc into the CD slot (11) until the soft-
loading mechanism engages and pulls the disc
in. Disc play begins. The track number and
elapsed time appear in the display.
Track Select
Track select features are used to quickly
access the beginning of a particular track when
a disc is in play. Press the >>| button (14) to
move forward or the |<< button (13) to move
backward on the disc to locate the desired
track. Track numbers will appear in the display
as they are accessed.
Press and hold the >>| or |<< button to fast
forward or fast reverse through a disc. During
either function, the elapsed time will appear on
the display. Release the button to resume CD
play.
Play/Pause
Press the play/pause button (19) to suspend
disc play. “PAUSE” will appear in the display.
Press the play/pause button again to resume
disc play. The “PAUSE” indication will
disappear from the display, and play will
resume from the pausing point.
Disc Intro Scan (INT)
During disc play, press the 2 INT button (20) to
play the first 10 seconds of each track on the
disc. “INT” will appear in the display. When the
desired track is reached, press 2 INT again to
end the scan function and play the selected
track. “INT” will disappear from the display. The
scan function will also be canceled when
activating the repeat or shuffle functions.
NOTE: The unit is designed for play of
standard 5” (12 cm.) compact discs only. Do
not attempt to use 3” (8 cm.) CD singles in
this unit, either with or without an adaptor,
as damage to the player and/or the disc may
occur. Such damage will not be covered by
the warranty on this product.
SD1513
1
9
10
8
5
16 27
6
4
3
2
14
25
13
17
19
22
20
21
23
24
18
15
11
12
7
LIFT
PS/AS
SD1513
9
Disc Repeat (RPT)
Press the 3 RPT button (21) during disc play to
continuously repeat the selected track. “RPT”
will appear in the display. Press 3 RPT again to
stop repeating.“RPT” will disappear from the
display, and regular play will resume. The
repeat function will also be canceled when
activating the scan or shuffle functions.
Disc Shuffle (RDM)
Press the 4 RDM button (22) during disc play to
play all tracks on a CD in random, shuffled
order. “RDM” will appear in the display. Press 4
RDM again to stop random play. “RDM” will
disappear from the display and regular play will
resume. The shuffle function will also be
canceled when activating the scan or repeat
functions.
Disc Eject
Press the eject button (12) to stop CD play and
eject the disc. The unit will change to tuner or
AUX operation, depending on which mode was
in operation prior to disc play. If the disc is not
removed from the unit within 15 seconds, the
disc will be reloaded to prevent accidental
damage. Disc play can be resumed by pressing
SRC (2) to choose the CD player function.
CD Player Error Codes
If a problem should develop while operating the
CD player, “Disc Error” or “Error 1” may appear
on the display panel. If “Disc Error” appears, try
ejecting and reloading the disc into the player.
While the disc is out of the unit, make sure it is
clean and undamaged, and then load it
correctly. “Error 1” can indicate a number of
problems with the unit, including a mechanical
error or an error in the microprocessor control
of the player. Pressing the reset button (26)
may help, but will erase the time and preset
memory. If the suggested measures do not
solve the problem, contact an approved
warranty station near you for further assistance.
SD1513
10
MP3/WMA FILE REQUIREMENTS
MP3 and WMA (Windows Media Audio) music
files are digital audio files that are compressed
to allow more files on a single CD. This unit can
play MP3/WMA directly from files contained on
a CD-R/RW, USB device or SD card using the
buttons on the receiver (or remote control) as
described below. Many types of software are
available for converting audio files into MP3/
WMA formats. Phase Linear recommends Nero
or Roxio Easy CD Creator. Depending on the
media type and recording method, some CD-R/
RWs may be incompatible with this unit. The
unit supports playback of MP3/WMA and CDDA
(CDA), Mixed-Mode CDs and CD-Extra
(including multi-session discs), but discs on
which the session has not been closed will
not play.
Notes on MP3/WMA Play
This unit can play MP3 (MPEG1, 2, 2.5 Audio
Layer 3). However, the MP3 recording media
and accepted formats are limited. When writing
MP3/WMA, pay attention to the following
restrictions.
Acceptable Media
The MP3/WMA recording media acceptable to
this unit are CD-ROM, CD-R and CD-RW.
When using CD-RW, use full format rather than
quick format to prevent malfunction.
Acceptable Disc Formats
The following formats are available for the
media used in this unit. The maximum number
of characters used for file name including the
delimiter (".") and three-character extension are
indicated in parentheses.
ISO 9660 Level 1 (11 characters)
ISO 9660 Level 2 (31 characters)
Joliet (31 characters)
Romeo (31 characters)
Up to 200 characters can be displayed in the
long file name format. For a list of available
characters, see the instruction manual of the
writing software and the section “Entering File
and Folder Names” below. The media
reproducible on this unit has the following
limitations:
Maximum number of nested folders: 8
Maximum number of files per disc: 999
Maximum number of folders per disc: 255
MP3/WMA written in formats other than those
listed above will not play successfully and their
file names or folder names will not be displayed
properly.
MP3/WMA Encoder and CD
Writer Settings
Use the following settings when compressing
audio data in MP3 data with the MP3 encoder.
Transfer bit rate: 32 - 320 kbps
Sampling frequency: 32, 44.1, 48kHz
(WMA) and 16, 22.05, 24, 32, 44.1, 48kHz
(MP3)
When using a CD writer to record MP3/WMA up
to the maximum disc capacity, disable
additional writing. To record an empty disc up to
the maximum capacity at once, select the “disc
at once” option.
SD1513
11
Entering ID3 Tag
This unit supports ID3 tag versions 1.0 and 1.1.
For the character codes, refer to the table
below.
Entering File and Folder Names
Names using the code list characters are the
only file names and folder names that can be
entered and displayed. Other characters will not
display correctly. The unit recognizes and plays
only files with the MP3/WMA extension.
NOTE: A file name entered with characters
not on the code list may not play correctly.
Writing Files into a Disc
When a disc containing MP3/WMA data is
loaded, the unit checks all data. If the disc
contains many folders or non-MP3/WMA files,
MP3/WMA play will be delayed, it may take
time for the unit to move to the next file, and
searches may not be performed smoothly.
Loading such a disc may produce loud noise
and cause damage to the speakers.
NOTE: Do not attempt to play a disc
containing a non-MP3/WMA file with the
MP3/WMA extension or a disc containing
non MP3/WMA files.
Electronic Shock Protection
10 seconds for CDDA (CDA)
60 seconds for MP3/WMA recorded at
44.1kHz, 128kbps
Bit Rates
The unit supports bit rates from 32 - 320 kbps.
File Playing Order
When selected for play, files and folders (Folder
Search, File Search or Folder Select) are
accessed in the order they were written by the
CD writer. As a result, the order in which they
are expected to be played may not match the
order in which they are actually played.
You may be able to set the order in which MP3/
WMA are to be played by writing them onto a
disc such as a CD-R with their file names
beginning with play sequence numbers such as
"01" to "99".
For example, a disc with the following folder/file
hierarchy is subject to Folder Search, File
Search or Folder Select as shown below.
SD1513
12
MP3/WMA OPERATION
Pause
Press the 1 >/|| button (19) to suspend disc
play. Press the play/pause button again to
resume play.
Track Select
Press the >>| (14) or |<< (13) button for less
than one second to advance to the next track
on the disc, or press and hold to fast forward or
fast reverse through the disc. Disc play starts
when the button is released.
Navigating Folders
Press the 5 \/ and 6 /\ buttons (23, 24) to select
the next or previous folder/directory.
Intro Scan (INT)
During disc play, press the 2 INT button (20) to
play the first 10 seconds of each track on the
disc. When the desired track is reached, press
2 INT again to end the scan and play the
selected track.
Repeat (RPT)
Press the 3 RPT button (21) to repeatedly play
the current file. Press 3 RPT again to resume
normal playback.
Random (RDM)
Press the 4 RDM button (22) to randomly play
all files on the disc. Press 4 RDM again to
resume normal playback.
SD1513
1
9
10
8
5
16 27
6
4
3
2
14
25
13
17
19
22
20
21
23
24
18
15
11
12
7
LIFT
PS/AS
SD1513
13
MP3/WMA File or Folder Search
The unit offers two methods of searching for
files or folders:
Direct File Number Search
Press the BAND button (5). The LCD will
display "Number". Turn the AUDIO CONTROL
to select the desired track number, then press
the AUDIO CONTROL to confirm and play the
selected file.
Navigation Search
Press the BAND button (5) twice. The LCD will
display "File". Turn the AUDIO CONTROL to
navigate through all folders and sub-folders on
the disc. The folder names will be displayed on
the LCD. Press the AUDIO CONTROL to
access the sub-folders or files. Turn the AUDIO
CONTROL to navigate, then press the select
knob to confirm and begin file play. During
navigation search, turn the AUDIO CONTROL
counter-clockwise to return to the previous
folder level.
Display Information
Press the DISP button (9) to display the clock
or available ID3 information, as follows: song
title, directory name, artist name, etc.
SD1513
14
USING A USB DEVICE OR SD CARD
Loading a USB Device
USB devices can be played through the USB
connector on the front panel. To access files on
a USB device, insert the USB device as
indicated below:
After inserting an USB device containing MP3
or WMA files, “USB HOST” appears on the
display and the unit will automatically scan the
card for music files and begin playback.
To eject the USB device, press the SRC button
(2) to select a different source. Pull the USB
device straight out and return the cover to the
closed position.
Loading an SD Card
To insert an SD card, you must first remove the
front panel to reveal the SD card slot (see
“Front Panel Release” on page 4). Insert your
SD Card as illustrated below and then reinstall
the front panel.
After inserting an SD card containing MP3 or
WMA files, “SD/MMC” appears on the display
and the unit will automatically scan the card for
music files and begin playback.
To eject the SD card, remove the front panel
and then press in on the SD card to release it.
Pull the SD card straight out and replace the
front panel.
Navigating Files
Please refer to “MP3/WMA Operation” on
page 12 for information regarding directory
navigation and file searching.
Copying Music
Your SD1513 is equipped with a Copy feature
that allows you to copy an MP3 or WMA file to
an SD/MMC card or USB device. To copy
music, perform the following steps:
1. Insert a disc and select the track you
would like to copy.
2. Press the COPY button (25) to activate the
Copy feature.
3. Turn the AUDIO CONTROL (3) to select
the USB or CARD (SD/MMC) source.
4. Press the AUDIO CONTROL button (4) to
begin copying.
The unit will begin copying the
current file, starting at the beginning
of the track. The LCD will display
“>>> ##”. Copying will stop at the
end of the file.
The recorded information is stored in
a folder named “MY_MP3” or
“MY_WMA” on the destination
source.
Copying will stop and the unit will
display “Memory Full” if the selected
storage device is full.
To stop copying before the file is complete,
press the COPY button. The LCD will display
“STOP” and the incomplete track will be deleted
from the destination folder.
RESET
SD1513
15
NOTE: Never remove a USB device during
recording or music transfer. This may
damage the device or cause the system to
lock up. Do not switch modes or turn the
radio power or ignition off while recording.
Erasing Copied Files
You can erase copied files from a USB device
or SD/MMC card while the file is playing, or
after selecting the file in Number Search or
Navigation Search mode. To erase a file,
perform the following steps:
1. Press and hold the BAND button (5) to
activate the Erase function. The LCD will
display “ERASE 010”.
2. Press the AUDIO CONTROL button (4) to
select Erase mode.
3. Turn the AUDIO CONTROL (3) and select
“Y” to erase (or select “N” to cancel the
erase function).
4. Press the AUDIO CONTROL button to
confirm. The file will stop playback (if
playing) and will be erased. When
finished, the system will display
“ERASE OK”.
File Management
Music recorded or transferred using the
SD1513 will be stored in the default folders
listed below:
MY_MP3: Transferred MP3 files.
MY_WMA: Transferred WMA files.
Recorded/transferred music is stored in the
corresponding folder and given the following
naming convention: “XX0001.MP3”, where XX
is the name of the source (i.e. SD0001.MP3).
SD1513
16
iPod OPERATION
Accessing iPod Mode
This unit is equipped with an iPod ready
function that will allow you to control and charge
your iPod (if compatible) using the front panel
control buttons.
The unit will automatically switch to iPod mode
when an iPod is plugged into the iPod cable.
To return to the iPod menu from any other
source menu, press the SRC button (2) on the
front panel or remote control until “iPod”
appears on the display.
NOTE: The SD1513 will not select video files
regardless of whether or not a video file was
the last file playing when the iPod was
plugged into the radio. Only music files are
supported.
Turning the iPod On/Off
The iPod power turns on automatically when
the iPod is connected to 30-pin iPod cable, as
long as the automobile ignition is turned on.
You can turn the iPod off by disconnecting it
from the cable or by turning the ignition off.
When the ignition is turned off, the iPod will
pause and then enter sleep mode after 2
minutes. The iPod cannot be turned on/off from
the iPod itself while connected.
NOTE: The iPod will continuously recharge
when connected to unit, as long as the
vehicle ignition is turned on.
Viewing Playback Information
Press the PS/AS button (17) to display iPod
playback information in the following order:
Song Title
•Artist
•Album Name
•Elapsed Time
Play/Pause
Press the 1 >/|| button (19) to suspend or
resume play.
Track Selection
Select a Track
Press the >>| (14) or |<< (13) button for less
than 1 second to advance to the next song in
the current folder.
Fast Forward / Fast Reverse
Press and hold the >>| (14) or |<< (13) button
button for more than 1 second to fast forward or
fast reverse. Playback begins when the button
is released.
Repeat (RPT)
Press the 3 RPT button (21) during disc play to
continuously repeat the selected song. Press
3 RPT again to stop the repeat function.
Press and hold the 3 RPT button (21) for more
than 3 seconds to continuously repeat the
entire album/folder. Press and hold 3 RPT
again to stop the repeat function.
iPod
photo
iPod iPod
mini
iPod
nano
HEAD UNIT
8 Din iPod Ready Cable
iPod Cable
SD1513
17
Shuffle (RDM)
Press the 4 RDM (22) button to randomly play
all files in the current folder/album. Press
4 RDM again to resume normal play. Press and
hold 4 RDM for more than three seconds during
iPod playback to randomly play the songs in all
folders. Press 4 RDM again for more than three
seconds to resume normal play.
Searching Mode
During iPod playback mode, press the BAND
button (5) to enter iPod Searching Mode. Press
the BAND button repeatedly to access search
modes in the following order:
Playlist
•Artist
Album
Song
•Genre
After selecting the desired search mode, press
the AUDIO CONTROL button (4) within 10
seconds to confirm the search mode. Rotate
the rotary encoder knob to navigate through the
Album, Artist or Songs contained on your iPod.
Press the AUDIO CONTROL to play the
selected song. During the searching mode,
press PS/AS to quickly return to the top level of
the Album, Playlist, Genre, etc.
SD1513
18
REMOTE CONTROL
The remote control will allow you to control the
basic functions of the SD1513.
The remote control sensor is located on the left
side of the front panel to the left of the 3 RPT
button (21).
AUDIO
ENTER
ID3
SUB-W
F- DN
F- UP
REC
XBS
COPY
E
R
A
S
E
S
E
A
R
C
H
1
2
3
4
7
5
6
8
9
10
11
12
13
14
15
16
17
18
19
20
21
KEY
SYSTEM TUNER CD/MP3/WMA iPod
Short
Press
Long
Press
Short
Press
Long
Press
Short
Press
Long
Press
Short
Press
Long
Press
1 Power
2Eject
3 Display Menu
4Mode
5Mute
6 Volume Up
7 Volume Down
8 Seek Up Tune Up Track/File
Up
Fast
Forward
File Up Fast
Forward
9 Seek Down Tune Down Track/File
Down
Fast
Reverse
File Down Fast
Reverse
10 Audio Menu Enter Enter
11 Band File/Folder
Search
File Erase iPod
Search
12 M1 Memory 1 Pause/Play Pause/Play
13 M2 Memory 2 Intro Folder Intro
14 M3 Memory 3 Repeat Folder
Repeat
Repeat Album
Repeat
15 M4 Memory 4 Random Random
Folder
Shuffle Album
Shuffle
16 M5 Memory 5 Folder
Down
17 M6 Memory 6 Folder Up
18 Subwoofer
on/off
19 PS AS ID3 Info
20 Record/
Copy
21 iX-Bass on/
off
SD1513
19
CARE AND MAINTENANCE
CD Player
The following guidelines will help you extend
the life of your CD player:
1. When cleaning the vehicle interior, do not
get water or cleaning fluids on the unit.
2. The CD player will not operate properly in
extreme hot/cold or under damp
conditions. In case of such conditions, wait
until the vehicle interior reaches a normal
temperature or any condensation on the
disc player lens has evaporated before
using the player.
3. Never insert anything other than round 5”
CDs into the player. Attempting to insert
CDs of other sizes (even with an adaptor)
will cause damage not covered by the
warranty.
4. Always remove the CD when the player is
not is use.
5. The unit is designed with a vibration
dampening CD mechanism to minimize
interruption of disc play due to normal
vibration in a moving vehicle. However,
occasional sound skips may occur when
driving on very rough roads. This will not
scratch or damage the disc, and normal
play will resume when the rough
conditions cease.
Compact Discs
CD-R / CD-RW
Depending on media type and method of
"recording / burning", some CD-R/RWs may be
incompatible with this unit. After "recording /
burning" the session
must be closed. Please
refer to your software's recommended
procedures for closing a disc / session. Review
your recording software to familiarize yourself
with the correct "recording / burning"
procedures. We recommend using the latest
versions of ROXIO
TM
or NERO
TM
burning
software.
In addition, this unit will only recognize the
CDDA (Compact Disc Digital Audio), .MP3
and .WMA formats "recorded / burned" onto a
CD-R/RW. This unit does not support .WAV,
.OGG or other formats.
CD Care and Handling
Dirt, dust, scratches and warpage can cause
skips in the playback and deterioration of sound
quality. Please follow these guidelines to take
care of your compact discs.
1. Carefully wipe fingerprints, dust and dirt
from the disc’s playing surface with a soft
cloth. Wipe in a straight motion from the
inside to the outside of the disc.
2. Never use chemicals such as record
sprays or household cleaners to clean
CDs, as they can irreparably damage the
disc’s surface.
3. Discs should be kept in their storage
cases when not in use.
4. Do not expose discs to direct sunlight,
high temperatures or high humidity for
long periods.
5. Do not stick paper, tape or CD labels on
disc surfaces, as internal damage may
occur.
  • Page 1 1
  • Page 2 2
  • Page 3 3
  • Page 4 4
  • Page 5 5
  • Page 6 6
  • Page 7 7
  • Page 8 8
  • Page 9 9
  • Page 10 10
  • Page 11 11
  • Page 12 12
  • Page 13 13
  • Page 14 14
  • Page 15 15
  • Page 16 16
  • Page 17 17
  • Page 18 18
  • Page 19 19
  • Page 20 20
  • Page 21 21
  • Page 22 22
  • Page 23 23
  • Page 24 24
  • Page 25 25
  • Page 26 26
  • Page 27 27
  • Page 28 28
  • Page 29 29
  • Page 30 30
  • Page 31 31
  • Page 32 32
  • Page 33 33
  • Page 34 34
  • Page 35 35
  • Page 36 36
  • Page 37 37
  • Page 38 38
  • Page 39 39
  • Page 40 40
  • Page 41 41
  • Page 42 42
  • Page 43 43
  • Page 44 44
  • Page 45 45
  • Page 46 46
  • Page 47 47
  • Page 48 48
  • Page 49 49
  • Page 50 50
  • Page 51 51
  • Page 52 52
  • Page 53 53
  • Page 54 54
  • Page 55 55
  • Page 56 56
  • Page 57 57
  • Page 58 58
  • Page 59 59
  • Page 60 60
  • Page 61 61
  • Page 62 62
  • Page 63 63
  • Page 64 64
  • Page 65 65
  • Page 66 66
  • Page 67 67
  • Page 68 68
  • Page 69 69
  • Page 70 70
  • Page 71 71
  • Page 72 72

Jensen SD1513 Owner's manual

Category
CD players
Type
Owner's manual

Ask a question and I''ll find the answer in the document

Finding information in a document is now easier with AI