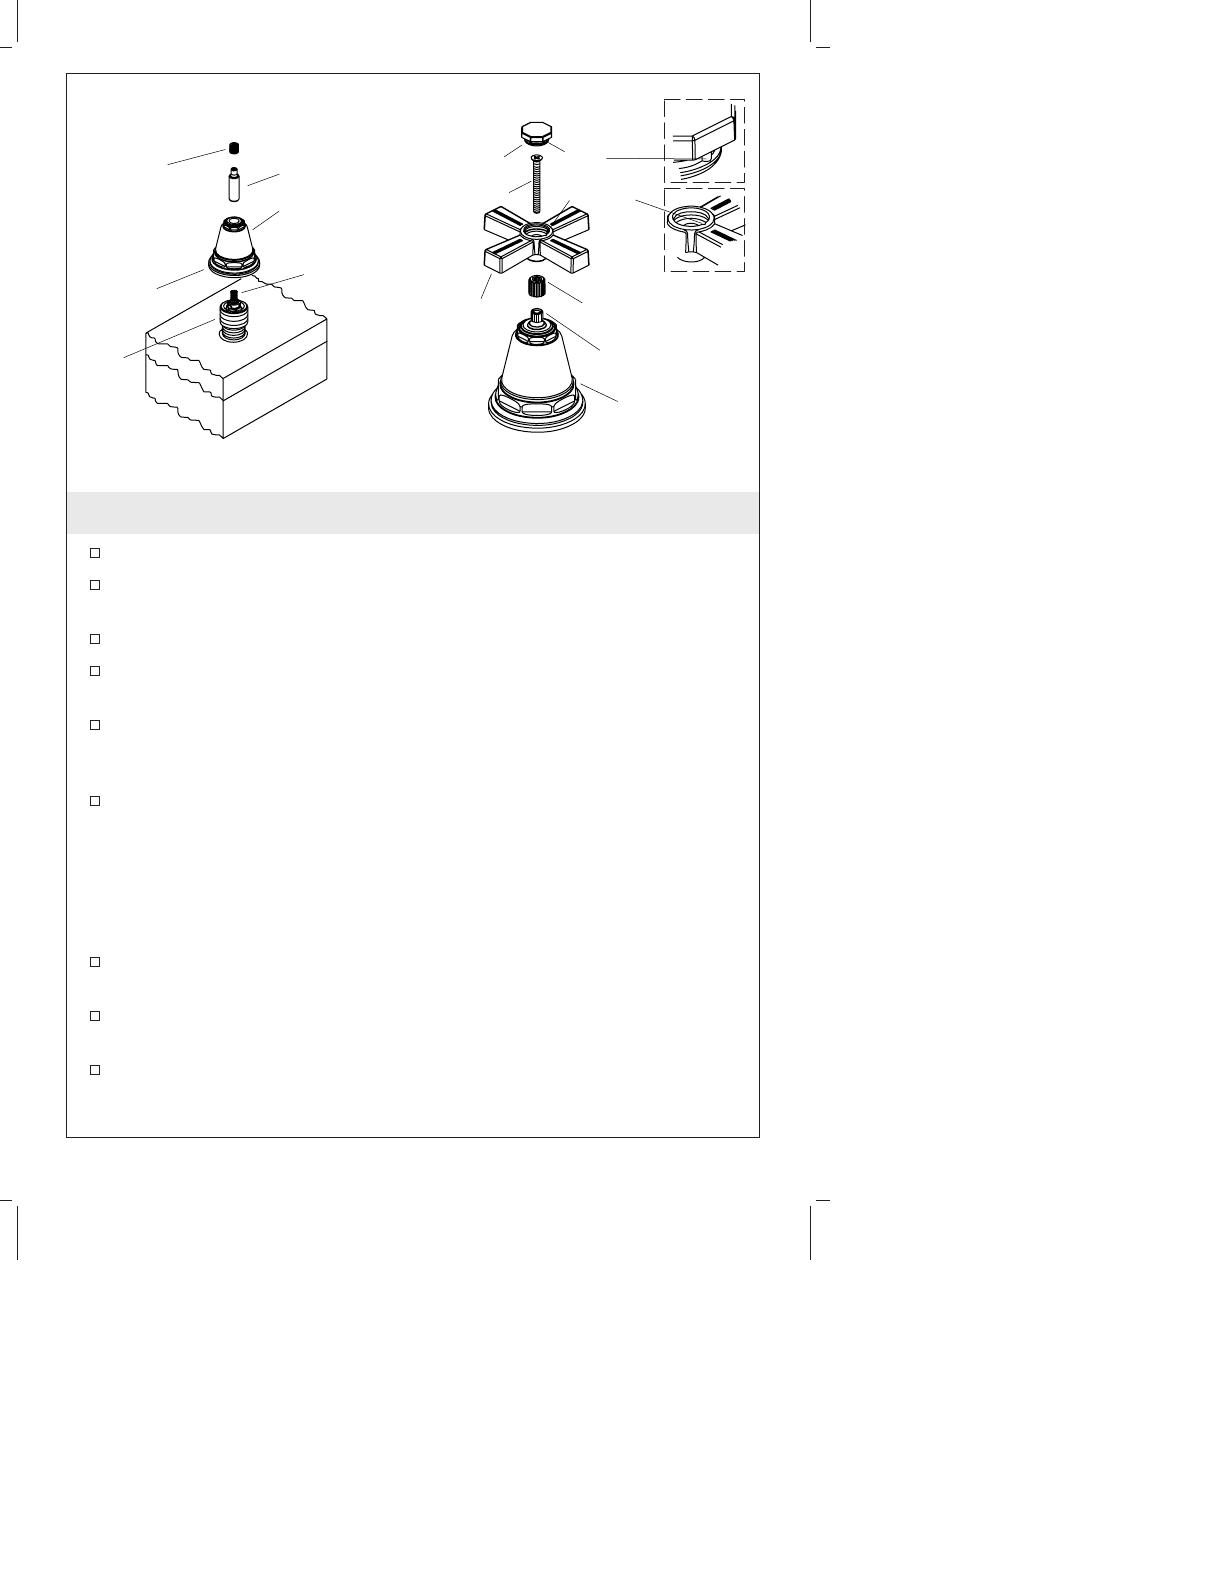
Kohler K-T13140-3A-CP Installation guide

Category
Sanitary ware
Type
Installation guide
Tools and Materials
Thank You For Choosing Kohler Company
We appreciate your commitment to Kohler quality. Please take a few
minutes to review this manual before you start installation. If you
encounter any installation or performance problems, please don’t
hesitate to contact us. Our phone numbers and website are listed on
the back cover. Thanks again for choosing Kohler Company.
Before You Begin
Please read all instructions before you begin.
Shut off the main water supply.
Observe all local plumbing and building codes.
Before installation, unpack the new faucet and inspect it for
damage. Return the faucet to the carton until installation.
Kohler Co. reserves the right to make revisions in the design of
faucets without notice, as specified in the Price Book.
Assorted
Screwdrivers
Tube Cutter Hex
Wrench
Plumbers
Putty
1036138-2-A 2 Kohler Co.
1. Prepare for Spout installation
Remove the plaster guard from the spout supply tube.
Cut off the spout supply tube 1-3/4” (4.4 cm) above the rim,
finish deck, or tile. Make sure all burrs are removed from the
supply tube to prevent damage to the O-ring seal on the sleeve.
Rough
Deck
Tile
Finish
1-3/4"
(4.4 cm)
Spout
Supply
Tube
Finished
Deck
Rough
Deck
Kohler Co. 3 1036138-2-A
2. Install Spout
CAUTION: Risk of product damage. Use care when installing
the spout assembly to prevent damage to the O-ring seal on the
sleeve.
Apply a ring of plumbers putty or other sealant around the
underside of the spout base according to the manufacturer’s
instructions.
Position the spout base over the spout supply tube.
Check that the spout base rests on the rim, finished deck, or tile
surface.
Back off the two setscrews in the sleeve, and with a twisting
motion install the sleeve on the spout supply tube until it contacts
the spout base.
Align the sleeve so the setscrews are not facing directly forward
or backward.
Tighten the sleeve setscrews.
Install the spout onto the sleeve, and carefully press down until
the spout contacts the spout base.
Align the spout and tighten the spout setscrew.
Press the plug button into the setscrew hole.
Spout
Supply
Tube
Apply
plumbers
putty to
spout base.
Spout Base
Spout
Setscrew
Plug
Button
Setscrew
Setscrew
Sleeve
1036138-2-A 4 Kohler Co.
3. Install Handles
Remove the plaster guards from the hot and cold valves.
Check that the valve bodies have an adapter installed to fit the
bonnet threads.
Install the stem extensions over the valve stems.
If shipped loose, install the plastic spline adapters on the stem
extensions.
Apply a ring of plumbers putty or other sealant around the
underside of the bonnets according to the manufacturer’s
instructions.
Thread the bonnets onto the valve bodies until the bonnets
contact the deck.
NOTE: The stem extension allows fine adjustment of the handle
alignment. To adjust, remove the handle and reposition the
extension. Reinstall the handle and check the alignment. Repeat
until the handle alignment is satisfactory.
Locate the groove in the hole in the handles and orient the
groove to the bath.
Position the handles on the plastic spline adapters. Secure the
handles with the screws.
Orient the tab on the hot plug button with the groove in the
left-hand valve handle and push the plug button into the handle.
Apply
plumbers
putty to
bonnet.
Stem
Extension
Plastic Spline
Adapter
Valve
Body
Valve
Stem
Bonnet
Plastic Spline
Adapter
Tab
Bonnet
Groove
Stem Extension
Screw
Handle
Plug
Button
Kohler Co. 5 1036138-2-A
Install Handles (cont.)
Orient the tab on the cold plug button with the groove in the
right-hand valve handle and push the plug button into the
handle.
1036138-2-A 6 Kohler Co.
4. Complete the Installation
Ensure that both faucet handles are turned off.
Remove the aerator assembly.
Turn on the main water supply and check for leaks.
Turn on the hot and cold valves and run water through the spout
to remove debris. Check for leaks.
Turn off the hot and cold valves.
Remove any debris from the aerator and reinstall.
Reinstall the aerator assembly.
Aerator
Kohler Co. 7 1036138-2-A
1 / 1

Kohler K-T13140-3A-CP Installation guide

Category
Sanitary ware
Type
Installation guide

Ask a question and I''ll find the answer in the document

Finding information in a document is now easier with AI

Ask the document