
Model: MP 130
User Manual
03(QJ&RYHU5 7/5/04, 4:41 PM1

CONTENTS
DIGITAL MP3 PLAYER (MP130)
USER MANUAL
Introduction ................................................................................. 1
Product Overview ....................................................................... 2
Getting Started ............................................................................ 3
Installing the Batteries ............................................................ 3
System Requirements ............................................................ 3
Driver Software Installation .................................................... 4
Installing External Memory Cards .......................................... 4
Connecting the Player to PC .................................................. 5
File Transfer ................................................................................. 5
Disconnecting the Player from PC ............................................ 6
Power On / Off ............................................................................. 7
Power On ............................................................................... 7
Power Off ............................................................................... 7
Modes ........................................................................................... 7
Music ...................................................................................... 8
Voice ...................................................................................... 9
Radio .................................................................................... 10
Menu Navigation ....................................................................... 11
Repeat .................................................................................. 12
Equalizer (EQ) ...................................................................... 13
Deleting Files ....................................................................... 13
Display Settings ................................................................... 14
Memory ................................................................................ 15
Settings ................................................................................ 16
Button Hold ............................................................................... 17
Upgrading Firmware (Windows Users Only) .......................... 18
Formatting the Player (Windows Users Only) ........................ 19
Copyright ................................................................................... 19
Safety and Care ......................................................................... 20
EN
03(QJFRQWHQWV5 7/5/04, 4:41 PM1

EN
Troubleshooting ........................................................................ 21
Hardware .............................................................................. 21
Software ............................................................................... 22
Caution ....................................................................................... 22
Technical Specifications .......................................................... 22
About Oregon Scientific ........................................................... 23
FCC Statement .......................................................................... 24
03(QJFRQWHQWV5 7/5/04, 4:41 PM2

1
EN
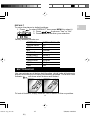
INTRODUCTION
Congratulations on your selection of the MP130. This full-featured MP3
Music Player offers a variety of features including multi-format support,
FM radio and voice recorder capabilities. Your player combines various
playback and audio enhancing features into a portable design that
you comfortably wear around your neck.
MAIN FEATURES
• Current support for MP3, WMA, and WAV audio file formats
• Multi-format support for mass data storage
•Voice record
• FM radio with option to save up to 30 preset channels
• Built-in 128MB / 256 / 512MB flash memory (Please refer to
indication on the packing)
• Support for Secure Digital and Multi-Media external memory
cards (SD / MMC support)
•5 preset equalizer settings
• Upgradeable firmware for future audio format support
• Multilanguage menu support
• ID3 Tag information display
• USB 2.0 for fast file transfer (USB flash drive)
ACCESSORIES
• CD-ROM
• Neck strap with stereo earphones
• USB cable
• Carrying pouch
•1 x AAA alkaline battery
03(QJ523 7/12/04, 4:44 PM1
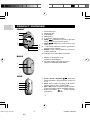
ඣϳ

EN
2
3
4
5
6
2
1
1
2
3
4
1
2
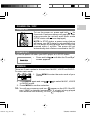
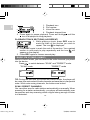
1. Neck strap loop.
2. Earphone jack.
3. LCD display.
4. Microphone.
5. +: Increase playback volume.
6. PREV
: Review the current or previous
song / back to the previous option.
7. NEXT
: Skip to the next track or next
option.
8. –: Decrease playback volume / go back to
previous menu settings.
9. MENU: Enter menu settings / press to
confirm selection.
10. USB port: For USB cable connection.
7
8
9
10
PRODUCT OVERVIEW
1. Battery compartment cover:
Detach to install battery.
2. SD card / MMC compartment cover:
Detach to install SD card / MMC.
BACK
1. PLAY / STOP / ON/OFF
: Start and
pause playback / stop playback / power on
or off.
2. REC: Start / stop recording / A-B section
repeat / directly enter VOICE mode.
3. RPT / EQ: Press to select repeat options /
Press and hold to select equalizer options.
4. Button hold switch : Locks / unlocks
all buttons.
SIDE
FRONT
03(QJ523 7/12/04, 4:44 PM2
ඣϳ

3
EN
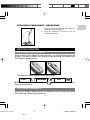
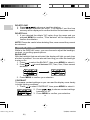
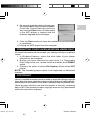
1. Loop the strap around the MP3 player's
loophole and secure tightly.
2. Plug the earphone connector into its
corresponding jack.
ATTACHING EARPHONES / NECKSTRAP
GETTING STARTED
INSTALLING THE BATTERIES
Before using your player for the first time, you should first install the
battery. Be sure to check the polarity when inserting the battery into
the battery compartment.
The battery status indicators are as follows:
Low Medium Full
NOTE: When the battery icon shows
, replace with a new battery
as soon as possible.
SYSTEM REQUIREMENTS
Before you begin, please check to make sure your computer meets
the following system requirements:
03(QJ523 7/12/04, 4:44 PM3
ඣϳ

EN
4
• Intel® Pentium® 133MHz or faster
• CD-ROM Drive
• USB 1.1 or USB 2.0 support
• 10MB free hard disk space
• Microsoft® Windows® 98SE, Me, 2000, or XP
• Mac OS 10.2 or above
DRIVER SOFTWARE INSTALLATION
(FOR WIN98SE USERS ONLY)
WINDOWS 98SE
Installing the MP130 driver software will allow your computer to
recognize your MP3 player each time it is connected to the computer.
1. Insert the MP130 CD-ROM into your computer. If the installer
does not automatically begin, please refer to the troubleshooting
section for help.
2. Follow the onscreen instructions.
3. Restart your computer.
WINDOWS ME, 2000, XP
When you connect your MP3 player to your PC, it will appear as two
removable drives (i.e., Removable Disk (H:) and Removable Disk (I:)).
MACINTOSH 10.2 or above
When you connect your MP3 player to your Macintosh, it will appear
as two drive icons on the desktop (i.e., Untitled).
INSTALLING EXTERNAL MEMORY CARDS (SD / MMC)
Secure Digital and Multi-Media memory cards are external memory
cards that can be inserted into your MP3 player for storing data
transferred from the PC.
03(QJ523 7/12/04, 4:44 PM4
ඣϳ

5
EN
1. Turn off the player.
2. Slide the card into the memory slot until it clicks into position.
NOTE: SD cards or MMC will not insert fully into the slot if it is facing
the wrong way. Be careful not to apply undue force to the cards. To
ensure the card is inserted securely, push the card gently into the slot
until a click is heard. To remove the card press down on the card first
to eject, then pull out.
NOTE: Some brands of SD cards / MMC utilize a write-protect switch
that protects against accidental erasure of data or prevents data stored
on the card from accessed. Please make sure the switch is in the
unlock/unprotect position before inserting the card into the player.
CONNECTING THE PLAYER TO PC
To connect your player to your computer:
Make sure you turn off the player before connecting to the PC.
FILE TRANSFER
After connecting your MP3 player to the computer, the computer will
detect and identify the device as two removable storage drives, allowing
you to drag and drop files between your computer and your player.
Two removable storage drives are:
1. Internal storage of your player (i.e., Removable Disk (H:))
2. External card storage (i.e., Removable Disk (I:))
Your player supports the following audio file formats for playback:
• MP3 (MPEG-1, Audio Layer 3)
• WMA (Windows Media Audio)
•WAV
NOTE
03(QJ523 7/12/04, 4:44 PM5
ඣϳ

EN
6
To transfer files to and from your PC and player:
1. Double click the My Computer icon.
2. Double click the drive letter (i.e. Removable Disk (H:) or
Removable Disk (I:)) of your player assigned by the computer.
3. Drag and drop the file(s) you wish to copy from your computer
onto your player.
NOTE: Your MP3 player is equipped for mass data storage support.
This means that it can also be used as a portable hard drive to store and
transport all forms of computer data files. You will not be able to view or play
any of the stored data unless it is one of the supported audio formats.
CAUTION: To prevent data loss before unplugging your player from
the computer, wait at least 15 seconds to make sure the file transfer is
complete.
DISCONNECTING THE PLAYER FROM PC
Disconnecting the player while transferring data may corrupt the data
or result in data loss. Follow the procedures below to disconnect the
player from your computer running the following operating systems.
WINDOWS 98SE
1. Double click the My Computer icon.
2. Right click the removable drive letter your player has been
assigned.
3. Click "Eject" from list before disconnecting.
WINDOWS ME, 2000, XP
1. Click the "Stop USB Mass Storage Device" icon on the
Windows taskbar at the bottom right of the monitor.
2. Click your player drive letter to stop the device before
disconnecting.
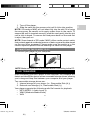
MACINTOSH 10.2 or above
Drag and drop the "Untitled" icons from desktop to the "Trash" icon for
eject the player before disconnecting.
03(QJ523 7/12/04, 4:44 PM6
ඣϳ

7
EN
To turn the power on, press and hold
for
2 seconds. A welcome screen will greet you. After
a few seconds the unit will enter Music mode
(STOP status with
icon displayed).
NOTE: In STOP status, a power saving feature
will cause your MP3 player to automatically shut
off if no audio is being played and no keys are
pressed within 1 minute. The power will not
automatically shut off when connected to the PC.
POWER ON / OFF
POWER ON
POWER OFF
To turn the power off when your MP3 player is in STOP status:
MODES
There are 3 main modes to choose from: MUSIC, VOICE and RADIO.
To enter each mode:
2. Press MENU again and use or to select MUSIC, VOICE
or RADIO mode.
3. Press MENU to confirm selection.
TIP: You will see a memory card icon
appear on the LCD if the SD
card / MMC is detected successfully. If a track is being played
from external card memory, an icon
is displayed.
• Press and hold
until after the "Good Bye"
screen appears.
1. Press MENU to enter the main mode of your
choice.
03(QJ523 7/12/04, 4:44 PM7
ඣϳ

EN
8
1. During playback, press once to pause
the track; the icon is displayed.
STOP / PAUSE
NOTE: When your player has stopped playing a track, you will not be
able to resume play from the last song track position.
SKIP / FAST FORWARD / REWIND
2. Or you can press and hold to stop the
track and the
icon is displayed.
ACTION BUTTON PRESS
Skip forward Press
repeatedly to skip to the next tracks.
Skip backwards
Press
repeatedly to skip back to
previous tracks.
Fast Forward
Press and hold
to fast-forward the current
song. The
icon will appear on the display.
Rewind
Press and hold
to rewind the current song.
The icon will appear on the display.
2. Press
to start playback.
TIP: See section "MENU NAVIGATION" for information about how to:
• Display elapsed or remaining track time by changing the "TIME"
setting.
• Change the scrolling speed of a track name displayed under the
"SCROLLING SPEED" section.
MUSIC
PLAYBACK
1. Press and hold
to turn the power on.
03(QJ523 7/12/04, 4:44 PM8
ඣϳ

9
EN
VOLUME
TIP: Press and hold a volume button to rapidly change values.
• Press + to increase volume
• Press - to decrease volume
VOICE
Recorded voice files are saved in .WAV format (i.e., VOICE001.WAV)
and saved in a folder called "VOICE" in your MP3 player. After a
recording has been made, you can retrieve and then playback the
voice files in VOICE mode.
TIP: You can change the default names after uploading the files to the
VOICE folder of the Removable Disk icon shown on your computer
and renaming them.
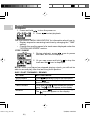
RECORDING
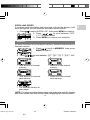
1. Press REC to begin recording. The recording icon is displayed.
1. REC icon
2. Total remaining time
3. Voice recording file name
4. Recording elapsed time
2. Press REC to stop recording.
NOTE: If the memory availability runs out, the player will deactivate
the recording function.
WARNING: Removing the battery or dropping the player during
recording will damage the recorded file.
WARNING: The player's flash memory may become corrupted during
voice record mode, when the unit is powering down, or if there is undue
shock applied to the unit. To fix the problem if this occurs, upgrade to
the latest firmware. Please see section on "UPGRADING FIRMWARE:
WINDOWS USERS ONLY" for more information.
PLAYBACK
1. Press or to select the desired track.
2. Press
to begin playback.
1
2
4
3
03(QJ523 7/12/04, 4:44 PM9
ඣϳ

EN
10
1. Playback icon
2. File number
3. Voice file name
4. Playback elapsed time
3. Press again to pause playback. Press and hold
until the
icon is displayed to stop playback.
PLAYBACK TRACK SECTIONS (A-B REPEAT)
1. While playing a track, press REC once to
mark the start of the section you wish to
repeat. The icon is displayed.
Press
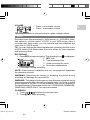
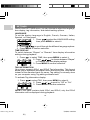
to switch between "SCAN" and "PRESET" mode.
"SCAN" mode "PRESET" mode
1
2
4
3
TIP: During the first time you access the RADIO mode, the player will
do a one-time auto-select of radio channels and save them in sequential
order. While auto saving channels, the buttons are locked.
SCAN / PRESET CHANNELS
You can either scan for radio stations automatically or manually. When
scanning for a station automatically, you player will automatically scan
frequencies and stop scanning when a signal strong enough to listen
to is detected.
2. Press REC again to mark the end of the section. Your marked
section is now ready to play repeatedly and the icon will
appear on the display.
3. Press REC again to resume normal play.
RADIO (FM 87.5MHZ~108MHZ)
While in RADIO mode, you can listen to the radio channels you preset
into the device.
03(QJ523 7/12/04, 4:44 PM10
ඣϳ

11
EN
1. Enter "SCAN" status.
2. Press
or
repeatedly to search for a station manually, or
press and hold
or
to search automatically.
3. If a radio station is being searched and stops to identify a
channel to preset, press and hold MENU to save the channel.
4. Press
or
repeatedly to select a desired channel or press
to exit current screen without saving. Up to 30 channels
can be preset / saved.
5. Press MENU again to confirm preset. The channel number will
be displayed.
NOTE: FM scanning reception may vary in different areas.
LISTENING TO PRESET CHANNELS
1. Enter "PRESET" status.
2. Press
or
to move to the next or previous preset channels
(01 / 30~30 / 30).
MENU NAVIGATION
Once you have chosen which of the 3 main modes to access, you can
access and adjust the various menu options (Repeat, Equalizer, Delete,
Display, Memory, and Settings):
1. Press MENU until the menu settings screen shows.
2. Press
or
to scroll through the list of options.
3. Press MENU to select the desired option.
TIP: A) Press - to revert back to the screen you last accessed.
B) Press
once or press and hold-to return to current mode
(Music / Radio / Voice).
Please read below for a summary of menu options.
03(QJ523 7/12/04, 4:44 PM11
ඣϳ

EN
12
NOTE: If no key is pressed for 5 seconds during menu navigation,
you will return to the current mode (Music / Radio / Voice) last viewed.
NOTE: A file called "SETTINGS.DAT" appears on the drive the player
is assigned to on your computer; this file stores all menu settings.
Deleting this file will cause the player to return to its default settings.
MAIN MENU MENU OPTIONS / SUBMENUS
Music
NO.
Voice
RPT Normal, One, All, Ran, RPT Ran
DELETE
Normal, Rock, Jazz, Classic, Pop
One / All
BACKLIT
CONTRAST
Off, 3sec, 7sec, 15sec
DISPLAY
LANGUAGE
English, French, German,
Italian, Spanish, Portuguese
TIME Elapse / Remain
DEFAULT
TAG Off / On
SCROLL SP
MEMORY
1
2
3
4
5
6
7
MODE
EQ
SETTINGS
00 to 10
Off, 1, 2, 3, 4
Total, Free, Firmware version
No / Yes
Radio
REPEAT
You can select one of five repeat patterns in MUSIC or VOICE modes:
1. Press
or
to select the desired repeat
option.
2. Press MENU to confirm.
03(QJ523 7/12/04, 4:44 PM12
ඣϳ

13
EN
All Play all tracks once repeatedly.
Ran
RPT Ran
All tracks are randomly selected and played
back once.
All tracks are randomly selected then played
back once repeatedly.
ICON RPT
Pattern
Normal
DESCRIPTION
All tracks are played once from the first track
to the last track.
One
Repeats the current track. You can press to
skip to the next track.
NOTE: RPT is not available as a menu option in RADIO mode.
EQUALIZER (EQ)
You can choose from 5 equalizer settings in MUSIC and VOICE modes:
1. Press
or
to select the desired EQ
setting.
2. Press MENU to confirm.
ICON
EQ SETTING Normal Rock Jazz Classic Pop
NOTE: EQ is not available as a menu option in RADIO mode.
DELETING FILES
To delete files on your MP3 player:
1. Press
or
to select "One" or "All".
2. Press MENU to confirm selection and stop
the track that is playing back.
03(QJ523 7/12/04, 4:44 PM13
ඣϳ

EN
14
DELETE ONE
1. Press
or
to choose a track for deletion.
2. Press MENU to delete the track. "File deleted" and the free
memory will be displayed to confirm that the file has been erased.
DELETE ALL
1. If you selected the delete "All" option from the menu and you
pressed MENU to confirm, "Files deleted" will be displayed to
confirm the deletion.
NOTE: Please be careful when deleting files; once erased they cannot
be retrieved.
DISPLAY SETTINGS
While in the DISPLAY menu, you can choose to adjust the backlight,
contrast, or scrolling speed options.
BACKLIGHT
With the backlight feature activated, the display will light up each time
a button is pressed. You can also set how long you want the backlight
to stay on for.
1. Press
to select the BACKLIT, then press MENU to select it.
2. Press
or
to scroll between OFF, 3sec, 7sec, 15sec second
durations.
CONTRAST
To increase contrast settings so you can read the display more clearly
in bright lighting conditions:
1. Press
to select CONTRAST, then press MENU to select it.
2. Press
or
to choose contrast settings
between 00-10.
3. Press MENU to confirm your selection.
3. Press MENU to confirm your selection.
03(QJ523 7/12/04, 4:44 PM14
ඣϳ

15
EN
SCROLLING SPEED
If you have track information that is too long to fit into the display, it will
scroll through so you can read the text that is left off screen.
1. Press
to select SCROLL SP, then press MENU to select it.
2. Press
or
to scroll between "OFF,
1, 2, 3, 4" speed levels.
3. Press MENU to confirm your selection.
MEMORY
To check the status of your player's memory, external card memory or
firmware version:
1. Press
to scroll to MEMORY, then press
MENU to select it.
2. Press
or
to scroll between "[I] T.", "[I] F.", "[C] T.", "[C] F.", "Ver".
• Amount of free internal
memory .
•Total amount of internal
memory.
•Total amount of external
card memory.
• Amount of free external
card memory.
• The firmware version of
your player.
The memory status display takes both audio and multi-file formats
and some system files into account when displaying the memory status.
NOTE:
03(QJ523 7/12/04, 4:44 PM15
ඣϳ

EN
16
SETTINGS
While in the SETTINGS menu, you can choose to adjust the language,
time display, tag information, and default setting options.
LANGUAGE
To set the display language in English, French, German, Italian,
Spanish, or Portuguese:
2. Press
or
to scroll through the different language options.
3. Press MENU to confirm selection.
TIME DISPLAY
To switch between "Elapse" or "Remain" time display information
settings during playback:
1. Press
to select TIME, then press MENU to select it.
TAG INFORMATION
Your player supports ID3v1 and ID3v2 Tag information. This format
allows you to represent information such as the song title, artist name
instead of the standard track file name. Tag editing is normally done
on your computer using Tag editing software tools.
1. Press
to select the LANGUAGE setting,
then press MENU to select it.
2. Press
or
to choose between "Elapse"
or "Remain" play time display settings.
3. Press MENU to confirm selection.
To activate Tag information display:
1. Press
to select TAG, then press MENU to select it.
If the track contains both ID3v1 and ID3v2, only the ID3v2
information will be displayed during playback.
2. Press
or
to scroll to "Off" or "On".
3. Press MENU to confirm selection.
NOTE:
03(QJ523 7/12/04, 4:44 PM16
ඣϳ

17
EN
Factory default presets are:
2. Press
or
to choose "Yes" or "No".
3. Press MENU to confirm your selection.
BUTTON HOLD
You can activate an all button hold function, which locks all buttons to
prevent the buttons from being accidentally pressed. The button hold
indicator
will show when buttons are locked.
SETTINGS DEFAULT VALUE
Volume Level 15
RPT Normal
EQ Normal
BACKLIT 3 seconds
CONTRAST Level 3
SCROLL SP Level 2
LANGUAGE English
TIME Elapse
TAG On
DEFAULT
To return the player to default settings:
1. Press
to select DEFAULT, then press MENU to select it.
To lock all buttons, simply slide the HOLD switch to the on position.
03(QJ523 7/12/04, 4:44 PM17
ඣϳ
Page is loading ...
Page is loading ...
Page is loading ...
Page is loading ...
Page is loading ...
Page is loading ...
Page is loading ...
Page is loading ...
Page is loading ...
-
 1
1
-
 2
2
-
 3
3
-
 4
4
-
 5
5
-
 6
6
-
 7
7
-
 8
8
-
 9
9
-
 10
10
-
 11
11
-
 12
12
-
 13
13
-
 14
14
-
 15
15
-
 16
16
-
 17
17
-
 18
18
-
 19
19
-
 20
20
-
 21
21
-
 22
22
-
 23
23
-
 24
24
-
 25
25
-
 26
26
-
 27
27
-
 28
28
-
 29
29


Ask a question and I''ll find the answer in the document
Finding information in a document is now easier with AI
Related papers
Other documents
-
Shiro Sx User manual
-
 Perception Digital PD-200 User manual
-
Sweex MP300010/1 Datasheet
-
Jensen SMP-xGBL User manual
-
Hipstreet HS-529 Owner's manual
-
Disney Mix Stick DDA8040-CHR Reference guide
-
-
Medion MD41512 User manual
-
Evolution Technologies MP3 Player EV64AMX User manual
-
Diasonic Technology P7KRIR-900 User manual
