HP rp5800 Retail System User manual
- Category
- Bar code readers
- Type
- User manual

HP Imaging Barcode Scanner
User Guide

© 2010, 2011 Hewlett-Packard
Development Company, L.P.
Microsoft, Windows, and Windows Vista are
either trademarks or registered trademarks
of Microsoft Corporation in the United
States and/or other countries.
The only warranties for HP products and
services are set forth in the express
warranty statements accompanying such
products and services. Nothing herein
should be construed as constituting an
additional warranty. HP shall not be liable
for technical or editorial errors or omissions
contained herein.
This document contains proprietary
information that is protected by copyright.
No part of this document may be
photocopied, reproduced, or translated to
another language without the prior written
consent of Hewlett-Packard Company.
Second Edition (May 2011)
Document Part Number: 634488-002

About This Guide
This guide provides information on setting up and using the HP Imaging Barcode Scanner.
WARNING! Text set off in this manner indicates that failure to follow directions could result in bodily
harm or loss of life.
CAUTION: Text set off in this manner indicates that failure to follow directions could result in
damage to equipment or loss of information.
NOTE: Text set off in this manner provides important supplemental information.
ENWW iii

iv About This Guide ENWW

Table of contents
1 Quick Setup ..................................................................................................................................................... 1
OPOS Driver ........................................................................................................................................ 1
Carriage Return .................................................................................................................................... 2
Tab ....................................................................................................................................................... 3
Volume ................................................................................................................................................. 4
2 Product Features ............................................................................................................................................ 6
HP Imaging Barcode Scanner .............................................................................................................. 6
3 Safety and Maintenance ................................................................................................................................. 7
Ergonomic Recommendations ............................................................................................................. 7
4 Setting Up and Using the Scanner ................................................................................................................ 8
Connect/Disconnect Cable to Scanner ................................................................................................ 8
Using the Scanner ................................................................................................................................ 9
Configuring the Interface ..................................................................................................... 9
USB-COM ......................................................................................................... 10
Keyboard Interface ............................................................................................ 10
Scancode Tables .............................................................................................. 10
Country Mode .................................................................................................... 11
Installing the Stand ............................................................................................................................. 11
Use .................................................................................................................................... 12
Assembling the Stand ........................................................................................................ 13
Installation .......................................................................................................................... 13
Scanning Modes ................................................................................................................................. 14
Enable Stand Mode ........................................................................................................... 14
Enable Trigger Mode ......................................................................................................... 14
5 Programming the Scanner ........................................................................................................................... 15
Using Programming Bar Codes .......................................................................................................... 15
Configure Other Settings .................................................................................................................... 15
Resetting Standard Product Defaults ................................................................................................. 15
Reading Parameters .......................................................................................................................... 16
Aiming System ................................................................................................................... 16
Good Read Green Spot Duration ...................................................................................... 16
ENWW v

6 Operating Modes ........................................................................................................................................... 17
Scan Mode ......................................................................................................................................... 17
Multiple Label Reading ....................................................................................................................... 18
Stand Operation ................................................................................................................................. 18
Appendix A Troubleshooting .......................................................................................................................... 20
Solving Common Problems ................................................................................................................ 20
Online Technical Support ................................................................................................................... 20
Preparing to Call Technical Support ................................................................................................... 21
Appendix B Technical Specifications ............................................................................................................ 22
LED and Beeper Indications ............................................................................................................... 25
Error Codes ........................................................................................................................................ 26
Appendix C Agency Regulatory Notices ....................................................................................................... 27
Federal Communications Commission Notice ................................................................................... 27
Modifications ...................................................................................................................... 27
Cables ................................................................................................................................ 27
Declaration of Conformity for Products Marked with the FCC Logo (United States Only) ................. 27
Canadian Notice ................................................................................................................................. 28
Avis Canadien .................................................................................................................................... 28
European Union Regulatory Notice .................................................................................................... 28
Japanese Notice ................................................................................................................................. 29
Korean Notice ..................................................................................................................................... 29
Product Environmental Notices .......................................................................................................... 29
Materials Disposal ............................................................................................................. 29
Disposal of Waste Equipment by Users in Private Household in the European Union ..... 29
HP Recycling Program ...................................................................................................... 29
Chemical Substances ........................................................................................................ 30
Restriction of Hazardous Substances (RoHS) ................................................................... 30
vi ENWW

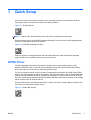
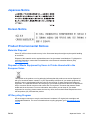
1Quick Setup
Use the bar codes in this chapter to perform quick setup procedures for common tasks. Scan the
following bar code to set the scanner back to the factory defaults.
Figure 1-1 Set All Defaults
NOTE: Scanning the “Set All Defaults” bar code does not change the interface type.
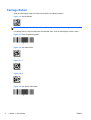
Scan the following bar code (USB HID Keyboard Emulation) in order to put the HP Imaging Barcode
Scanner into the default mode of the scanner.
Figure 1-2 USB HID Keyboard Emulation
When the scanner is changed between HID and USB-COM mode, allow the Windows operating
system a little time to reload the native drivers for the scanner.
OPOS Driver
The HP Imaging Barcode Scanner by default is shipped in the human interface device (HID)
keyboard emulation mode. In order to use the barcode scanner with OLE for Retail POS (OPOS)
drivers the scanner must be put into USB COM (OPOS) mode.
For your convenience the bar code to put the HP Imaging Barcode Scanner into USB COM (OPOS)
mode or into HID keyboard emulation are located in this document. Refer to the HP Imaging Barcode
Scanner Product Reference Guide for complete list of barcodes. The document can be found on the
HP Point of Sale System Software and Documentation CD that comes with the scanner or the softpaq
that is located on the HP support web site.
Scan the following bar code (USB COM OPOS) in order to put the HP Imaging Barcode Scanner into
the mode to be used with the OPOS drivers.
Figure 1-3 USB COM (OPOS)
ENWW OPOS Driver 1

Carriage Return
Scan the following bar code to set the scanner back to the factory defaults.
Figure 1-4 Set All Defaults
NOTE: Scanning the “Set All Defaults” bar code does not change the interface type.
If a carriage return is required after each scanned bar code, scan the following bar codes in order:
Figure 1-5 Enter Programming Mode
Figure 1-6 Set Global Suffix
Figure 1-7 0
Figure 1-8 D
Figure 1-9 Exit Global Suffix Mode
2 Chapter 1 Quick Setup ENWW

Figure 1-10 Exit Programming Mode
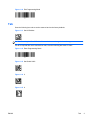
Tab
Scan the following bar code to set the scanner back to the factory defaults.
Figure 1-11 Set All Defaults
NOTE: Scanning the “Set All Defaults” bar code does not change the interface type.
If a tab is required after each scanned bar code, scan the following bar codes in order:
Figure 1-12 Enter Programming Mode
Figure 1-13 Set Global Suffix
Figure 1-14 0
Figure 1-15 9
ENWW Tab 3

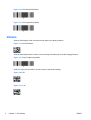
Figure 1-16 Exit Global Suffix Mode
Figure 1-17 Exit Programming Mode
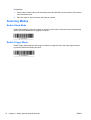
Volume
Scan the following bar code to set the scanner back to the factory defaults.
Figure 1-18 Set All Defaults
Scan the following barcode to set the volume of the good read beep on the HP Imaging Scanner:
Figure 1-19 Enter Programming Mode
Scan one of the four barcodes to set the volume to the desired setting:
Figure 1-20 Off
Figure 1-21 Low
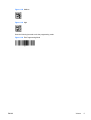
4 Chapter 1 Quick Setup ENWW

Figure 1-22 Medium
Figure 1-23 High
Scan the following barcode to exit the programming mode.
Figure 1-24 Exit Programming Mode
ENWW Volume 5

2 Product Features
HP Imaging Barcode Scanner
With rich feature sets and extensive model options, the HP Imaging Barcode Scanner represents the
premium level of data collection equipment for general purpose applications. The HP scanner has
enhanced optics with improved motion tolerance, allowing codes placed on fast-moving objects to be
easily and quickly captured, creating the ideal scanner for tasks requiring high throughput like those
found in retail and light industrial environments. The scanner includes the following features:
● Omni-Directional Operation: To read a symbol or capture an image, simply aim the scanner
and pull the trigger. The HP Imaging Barcode Scanner is a powerful omni-directional scanner, so
the orientation of the symbol is not important.
●
Intuitive Aiming System: The “Green Spot” for good-read feedback helps to improve
productivity in noisy environments or in situations where silence is required. When using the
product with the cradle at a 45° position, the aiming pattern can work as an aiming system to aid
in positioning the bar code for quick and intuitive reading.
●
1D and 2D Symbol Decoding: Reliably decodes all standard 1D (linear) and 2D bar codes,
including:
◦ GS1 DataBar™ linear codes
◦
Postal Codes (China Post)
◦
Stacked Codes (such as GS1 DataBar Expanded Stacked, GS1 DataBar Stacked, GS1
DataBar, Stacked Omnidirectional)
The data stream — acquired from decoding a symbol — is rapidly sent to the host. The scanner
is immediately available to read another symbol.
●
Imaging: The scanner can also function as a camera by capturing entire images or image
portions of labels, signatures, and other items.
●
Mobile Phone Scanning: The scanner is designed with enhanced motion tolerance and
technology to optimize contrast levels. These features allow quick reading of barcodes off of
mobile phones and PDAs.
●
Handheld or Presentation Mode Operation: The scanner includes a stand that can be used
for convenient storage or to allow the scanner to be used in presentation / hands-free mode.
6 Chapter 2 Product Features ENWW

3 Safety and Maintenance
Ergonomic Recommendations
WARNING! In order to avoid or minimize the potential risk of ergonomic injury follow the
recommendations below. Consult with your local Health & Safety Manager to ensure that you are
adhering to your company’s safety programs to prevent employee injury.
●
Reduce or eliminate repetitive motion
●
Maintain a natural position
●
Reduce or eliminate excessive force
●
Keep objects that are used frequently within easy reach
●
Perform tasks at correct heights
●
Reduce or eliminate vibration
●
Reduce or eliminate direct pressure
● Provide adjustable workstations
●
Provide adequate clearance
●
Provide a suitable working environment
●
Improve work procedures
CAUTION: The chemicals contained in Hepicide bacterial cleaners that are used in the retail market
to reduce the risk and spread of bacterial disease from contaminated scanner surfaces may affect
plastic structural properties and result in permanent failure of plastics under pressure.
ENWW Ergonomic Recommendations 7

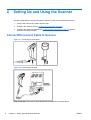
4 Setting Up and Using the Scanner
Follow the steps below to connect and get the scanner up and communicating with its host.
1. Connect the Cable to the scanner and the Host.
2. Configure the Interface (refer to
Configuring the Interface on page 9).
3. Configure the scanner as described in
Programming the Scanner on page 15 (optional,
depends on settings needed).
Connect/Disconnect Cable to Scanner
Figure 4-1 Connecting to the Scanner
Figure 4-2 Connecting to the Host
Host Connection: The scanner plugs directly into the host device as shown above.
8 Chapter 4 Setting Up and Using the Scanner ENWW

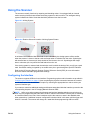
Using the Scanner
The scanner normally functions by capturing and decoding codes. It is equipped with an internal
motion-sensing function that activates the aiming system on device motion. The intelligent aiming
system indicates the field of view that should be positioned over the bar code:
Figure 4-3 Aiming System
Figure 4-4 Relative Size and Location of Aiming System Pattern
A red beam illuminates the label. The field of view indicated by the aiming system will be smaller
when the scanner is closer to the bar code and larger when it is farther from the code. Symbologies
with smaller bars or elements (mil size) should be read closer to the unit. Symbologies with larger
bars or elements (mil size) should be read farther from the unit.
If the aiming system is centered and the entire bar code is within the aiming field, you will get a good
read. Successful reading is signaled by an audible tone plus a good-read green spot LED indicator.
Refer to the HP Imaging Barcode Scanner Product Reference Guide (PRG) for more information
about this feature and other programmable settings.
Configuring the Interface
The scanner supports USB as a host interface. Programming options and information are provided in
Configuring the Interface on page 9. Upon completing the physical connection between the scanner
and its host, select the desired Interface option by scanning the appropriate bar code to select your
system’s interface type.
If you want to customize additional settings and features associated with that interface, proceed to the
corresponding chapter in the HP Imaging Barcode Scanner PRG.
NOTE: Unlike some other programming features and options, interface selections require that you
scan only one programming bar code label. DO NOT scan an ENTER/EXIT barcode prior to scanning
an interface selection bar code. Some interfaces require the scanner to start in the disabled state
when powered up. If additional scanner configuration is desired while in this state, pull the trigger and
hold for 5 seconds. The scanner will change to a state that allows programming with bar codes.
ENWW Using the Scanner 9

USB-COM
USB Com to simulate RS-232 standard interface
Figure 4-5 Select USB-COM-STD
NOTE: Install the correct USB Com driver from the CD included with your product.
Keyboard Interface
Select options for USB Keyboard Interfaces.
USB Keyboard with alternate key encoding
Figure 4-6 Select USB Alternate Keyboard
USB Keyboard with standard key encoding
Figure 4-7 Select USB Keyboard
Scancode Tables
See the HP Imaging Barcode Scanner Product Reference Guide (PRG) for information about control
character emulation which applies to keyboard interfaces.
10 Chapter 4 Setting Up and Using the Scanner ENWW

Country Mode
This feature specifies the country/language supported by the keyboard. The following languages are
supported:
U.S. English Norwegian Korean
UK English Spanish Russian
Belgian Swedish Hebrew
Danish Traditional Chinese Arabic
French Thai Greek
French Canadian Portuguese (EU) Hungarian
German Brazilian Portuguese Slovakian
Italian Japanese
See the HP Imaging Barcode Scanner Product Reference Guide (PRG) for information and
programming bar codes for this feature.
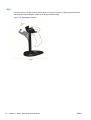
Installing the Stand
The stand for the HP Imaging Barcode Scanner is an operator-friendly device, ensuring a sure grip of
the scanner when auto-sense scanning is required.
ENWW Installing the Stand 11

Use
Insert the scanner into the stand as shown below in Figure 4-8 (Figure 1). Adjust the scanner to the
desired position for reading bar codes by bending the flexible tubing.
Figure 4-8 Adjusting the Scanner
12 Chapter 4 Setting Up and Using the Scanner ENWW

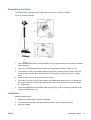
Assembling the Stand
To assemble the components of the stand, refer to the Figure 4-9 (Figure 2) below.
Figure 4-9 Stand Assembly
1. Place the metal Base Plate (2) and the Base Cover (3) together with the countersink in the Base
Plate facing out.
2. Place one of the flat-head machine screws (1) through the Base Plate (2) and Cover (3).
3. Screw the Flex Tube (4) to the Base Plate (2) and Cover (3) making sure the notch in the Flex
Tube (4) aligns with the ribs in the Base Cover (3) as shown in Figure 4-9 (Figure 3). Tighten
firmly.
4. Place the Flex Tube Cover (5) over the Flex Tube (4).
5. Screw the Cup (6) to the Flex Tube using the second flat-head machine screw (1) making sure
the notch in the Flex Tube (4) aligns with the ribs in the Cup (6) as shown in Figure 4-9 (Figure
4). Tighten firmly.
6. Select the appropriate bar code label [Laser or Imager (8)], peel off the backing and affix to the
recess in the Base Cover (3).
Installation
Attachment with screws:
1. Make sure that the stand is properly assembled.
2. Fix the base of the stand to the desired surface with the three screws provided (7).
3. Adjust as needed.
ENWW Installing the Stand 13

Freestanding:
1. Peel the three rubber pads (9) off the backing sheet and affix them to the recesses in the bottom
side of the Base Cover.
2. Place the stand on any flat surface and adjust as needed.
Scanning Modes
Enable Stand Mode
Enable Stand Mode programs the imager to operate in stand mode, where the scanner automatically
senses and reads labels with no trigger pull required.
Enable Trigger Mode
Enable Trigger Mode programs the imager to operate in triggered mode, where the trigger needs to
be pulled to initiate the reading of a label.
14 Chapter 4 Setting Up and Using the Scanner ENWW
Page is loading ...
Page is loading ...
Page is loading ...
Page is loading ...
Page is loading ...
Page is loading ...
Page is loading ...
Page is loading ...
Page is loading ...
Page is loading ...
Page is loading ...
Page is loading ...
Page is loading ...
Page is loading ...
Page is loading ...
Page is loading ...
Page is loading ...
-
 1
1
-
 2
2
-
 3
3
-
 4
4
-
 5
5
-
 6
6
-
 7
7
-
 8
8
-
 9
9
-
 10
10
-
 11
11
-
 12
12
-
 13
13
-
 14
14
-
 15
15
-
 16
16
-
 17
17
-
 18
18
-
 19
19
-
 20
20
-
 21
21
-
 22
22
-
 23
23
-
 24
24
-
 25
25
-
 26
26
-
 27
27
-
 28
28
-
 29
29
-
 30
30
-
 31
31
-
 32
32
-
 33
33
-
 34
34
-
 35
35
-
 36
36
-
 37
37


HP rp5800 Retail System User manual
- Category
- Bar code readers
- Type
- User manual
Ask a question and I''ll find the answer in the document
Finding information in a document is now easier with AI
Related papers
-
HP RP7 Retail System Model 7800 Base Model User guide
-
HP rp3000 Point of Sale System Reference guide
-
HP Linear Barcode Scanner II User manual
-
HP Engage One W 2D Barcode Scanner User guide
-
HP RP7 Retail System Model 7800 User guide
-
-
HP RP3 User manual
-
HP RP9 G1 Retail System Model 9018 Base Model Installation guide
-
-
HP AP5000 Reference guide