Page is loading ...

COMPREHENSIVE INTERNET SECURITY
™
SSSSSSSSSSSSSSon i c WALL Security Ap p l i a n c e s
SonicWALL TZ 170 SP Wireless
Getting Started Guide

SonicWALL TZ 170 SP Wireless Getting Started Guide Page 1
SonicWALL TZ 170 SP Wireless Security Appliance
Getting Started Guide
The SonicWALL
®
TZ 170 SP Wireless is a total security platform that delivers enterprise-
class wireless and wired security to small networks, and ensures continuous network
uptime for critical, secure data connectivity through integrated and automated fail-over
and fail-back. The TZ 170 SP Wireless delivers broadband to analog WAN redundancy,
integrates 802.11b/g wireless networks, high-performance deep packet inspection,
firewall protection, an IPSec VPN gateway, and support for SonicWALL security services,
such as Content Filtering Service, Network Anti-Virus Service, Gateway Anti-Virus, Anti-
Spyware, and Intrusion Prevention Service.
This Getting Started Guide provides instructions for basic installation and configuration of
the SonicWALL
TZ 170 SP Wireless running SonicOS Enhanced. After you complete
this guide, computers on your Local Area Network (LAN) will have secure Internet
access.
Note: For complete documentation, refer to the SonicOS Enhanced Administrator’s
Guide on the SonicWALL Resource CD or at:
<http://www.sonicwall.com/support/documentation.html>.
SonicWALL TZ 170 SP Wireless Configuration Steps
1
Before You Begin page 2
2
Setting Up the SonicWALL TZ 170 SP Wireless page 6
3
Connecting the SonicWALL TZ 170 SP Wireless page 8
4
Accessing the Management Interface page 9
5
Using the SonicWALL Setup Wizard page 10
6
Testing Your Connection page 19
7
Registering Your SonicWALL TZ 170 SP Wireless page 20
8
Activating SonicWALL Security Services page 23
9
Connecting Wireless Clients to the SonicWALL TZ 170 SP Wireless page 26
10
Connecting Computers to Your SonicWALL TZ 170 SP Wireless page 29

1
Page 2
Before You Begin
Check Package Contents
Any Items Missing?
If any items are missing from your package,
contact:
SonicWALL Support
Web: <http://www.sonicwall.com/support/>
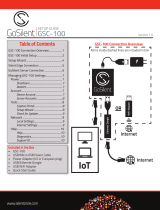
1. One SonicWALL TZ 170 SP Wireless
security appliance
2. One Getting Started Guide
3. One Release Note
4. One straight-through Ethernet cable
5. One RJ45 CLI cable*
6. One 5 Volt DC power supply
7. One power cord**
8. One mounting kit (not pictured)
9. One pair of antennae
10. One SonicWALL TZ 170 SP Wireless Resource CD
*The RJ45 CLI cable is only included with the purchase of a
SonicWALL
TZ 170 SP Wireless with SonicOS Enhanced.
**A power cord is included only with units shipped to North America.
** Das eingeschlossene Netzkabel ist für Gebrauch in Nordamerikas nur vorgehabt.
Für Europaïsche Union (EU) Kunden, ist ein Netzkabel nicht eingeschlossen.

SonicWALL TZ 170 SP Wireless Getting Started Guide Page 3
SonicWALL TZ 170 SP Wireless Front and Back Panels Overview
Power Light
WAN
PoE Indicator
LAN 1-5
Link, Activity
Test Light
opt
WiFiSec
Enforcement
Wireless
On/Activity
Modem
Console Port
LAN Ports 1-5
WAN Port
Power
Opt Port
Modem Port

Front Panel Feature Description
Power Light Indicates the SonicWALL TZ 170 Series appliance is powered on.
PoE Indicator Indicates that Power over Ethernet is available.
LAN: Link, Activity Indicates a LAN link (green), or LAN activity (blinking) on the specified port.
Wireless
On/Activity
Indicates enabled wireless signal (green), or wireless activity (blinking).
WiFiSec
Enforcement
Indicates that WiFi Security is in place and being enforced.
Optional Zone Indicates a link (green), or LAN activity (blinking) on the opt port.
WAN Indicates a link (green), or LAN activity (blinking) on the WAN port.
Modem Indicates a link (green), or LAN activity (blinking) on the modem port.
Test Light Indicates the SonicWALL TZ 170 Series appliance is in test mode.
Rear Panel Feature
Console Port Provides access to command-line interface (only for use with
SonicOS Enhanced).
Modem Port Provides a primary or failover WAN connection VIA a modem.
WAN Port Provides a primary (Ethernet) connection to the Internet (WAN).
Optional Port Provides and optional configurable port.
LAN Ports Provide multiple connections to your LAN.
Power Provides power connection using the supplied power cord and
power supply.
Page 4

SonicWALL TZ 170 SP Wireless Getting Started Guide Page 5
Collecting Internet Service Provider (ISP) Information
Collect the following information about your Internet service:
If you connect via You probably use Please record
Cable modem,
DSL with a router
DHCP No Internet connection information usually required.*
*Some service providers require a host name. Check
with your ISP.
Host Name:
Home DSL PPPoE User Name:
Password:
Note: Your ISP may require your user name in the
format: name@ISP.com
T1,
Static broadband,
Cable or DSL with
a static IP
Static IP IP Address:
Subnet Mask:
Default Gateway
(Router IP Address):
Primary DNS:
Secondary DNS (optional):
Dial in to a server PPTP Server Address:
User Name:
Password:
Note: If you are not using one of the network configurations above, refer to the
SonicOS Enhanced Administrator’s Guide.
Other Information
These are the default settings for accessing your SonicWALL TZ 170 SP Wireless Web-
based management interface:
User Name: admin
Password: (Default: password)
Modem
Dial-up Access Number:
What You Need to Begin
• A computer to use as a management station for initial configuration of the
SonicWALL
TZ 170 SP Wireless
• A Web browser supporting Java and HTTP uploads. Internet Explorer 5.0 or higher,
Netscape Navigator 4.7 or higher, Mozilla 1.7 or higher, or Firefox are recommended
• An Internet connection

Page 6
2
Setting Up the SonicWALL TZ 170 SP Wireless
Physically setting up your SonicWALL security appliance involves:
• Installing the Antennas
• Adjusting the Antennas
• Applying Power
• Applying Power with the SonicWALL Power over Ethernet (PoE) Injector
Installing the Antennas
To use the wireless feature of the SonicWALL TZ 170 SP Wireless, you must install the
antennas on the back of the appliance. Remove the antennas from the bag and place
one on each connector. Finger tighten the fittings on the connectors.
Adjusting the Antennas
You can adjust the antennas for best radio reception. In most cases, the antennas
should be pointing straight up and perpendicular to the box. Start from that position, and
move them until you notice better reception. Certain area, such as the area directly
below the SonicWALL
TZ 170 SP Wireless, have relatively poorer reception.

SonicWALL TZ 170 SP Wireless Getting Started Guide Page 7
Applying Power
Plug the power supply into the back of the SonicWALL security appliance and into an
appropriate power outlet.
Alert: Only use a SonicWALL-approved 5V, 2.4A power supply.
The Power LED on the front panel lights up green when you plug in the power supply.
The Test LED lights up and may blink while the SonicWALL TZ 170 SP Wireless
performs a series of diagnostic tests. When the Test light is no longer lit, the SonicWALL
security appliance is ready.
If the Test LED remains lit, restart the SonicWALL security appliance.
For more trouble shooting information, refer to the SonicOS Enhanced Administrator’s
Guide.
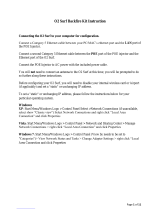
Applying Power with the SonicWALL Power over Ethernet (PoE)
Injector
The SonicWALL TZ 170 SP Wireless can use a regular power supply, or it can get power
through the LAN 1 Ethernet port using the an 802.3af standard PoE injector, like the
SonicWALL PoE Injector. To apply power with the PoE injector:
1. Plug the power cord of the PoE injector into the power outlet.
2. Connect an Ethernet cable to the Data and Power out port on the PoE Injector and
connect the other end of the cable to the LAN 1 port on the back of your
SonicWALL
TZ 170 SP Wireless.
Alert: The PoE Injector Ethernet cable must be inserted into the LAN 1 port only to
power the SonicWALL TZ 170 SP Wireless
SonicWALL
PoE Injector
Data in
Data and
Power out
To L A N
To power source
Ethernet cable
LAN 1

3
Page 8
Connecting the SonicWALL TZ 170 SP Wireless
Connecting the WAN Cable to the Internet
WAN
DSL or Cable
Modem
Internet
1. Connect one end of an Ethernet cable to your Internet connection, such as a DSL
modem or cable modem.
This cable may already be connected between your computer and your modem. If
so, disconnect it from your computer, and leave it connected to the Internet.
2. Connect the other end of the cable to the WAN port on the back of your
SonicWALL
TZ 170 SP Wireless.
The WAN LED on the front panel light up indicating an active connection.
Connecting the LAN Cable to Your Management Station
Management
Station
LAN port #1
1. Connect one end of an Ethernet cable to the computer you are using to manage the
SonicWALL
TZ 170 SP Wireless.
2. Connect the other end of the cable to port # 1 on the back of your
SonicWALL
TZ 170 SP Wireless.
The port # 1 LEDs on the front panel light up indicating an active connection.

SonicWALL TZ 170 SP Wireless Getting Started Guide Page 9
Connecting the Modem (Optional)
Modem
Phone Line
Internet
If you are using a modem for your primary Internet connection or as a failover for your
WAN connection, connect one end of a standard phone cable to your telephone line jack.
Connect the other end of the cable to the Modem port
of the
SonicWALL TZ 170 SP Wireless. The modem LED lights up indicating a connection.
4
Accessing the Management Interface
The computer you use to manage the SonicWALL TZ 170 SP Wireless must be set up to
accept a dynamic IP address, or have an unused IP address in the 192.168.168.x/24
subnet, such as 192.168.168.20. For instructions on configuring your IP address, see
“Connecting Computers to Your SonicWALL TZ 170 SP Wireless” on page 29.
To access the Web-based management interface of the
SonicWALL
TZ 170 SP Wireless:
1. On the computer you just connected, start your Web browser.
2. Enter 192.168.168.168 (the default LAN management IP address) in the Location or
Address field.

Page 10
3. The SonicWALL Setup Wizard launches and guides you through the configuration
and setup of your SonicWALL
TZ 170 SP Wireless.
If the SonicWALL Setup Wizard Does Not Appear
If you cannot connect to the SonicWALL TZ 170 SP Wireless or the Setup Wizard
does not display, verify the following configurations:
• Did you correctly enter the SonicWALL TZ 170 SP Wireless management IP
address in your Web browser?
• Are the Local Area Connection settings on your computer set to use DHCP or
set to a static IP on the 192.168.168.0/24 subnet? See “Connecting Computers
to Your SonicWALL TZ 170 SP Wireless” on page 29 for instructions on
changing your Local Area Connection settings.
• Do you have the Ethernet cable connected to your computer and to the LAN port
on your SonicWALL TZ 170 SP Wireless?
• Some browsers may not launch the Setup Wizard automatically. In this case,
log into SonicWALL
TZ 170 SP Wireless using “admin” as the user name and
“password” as the password. After you log in, click the Wizards button on the
System > Status page. Select Setup to begin configuring your
SonicWALL
TZ 170 SP Wireless.
• Some popup blockers may prevent the launch of the setup wizard. You can
temporarily disable your popup blocker, or add the management IP address of
your SonicWALL (192.168.168.168 by default) to your popup blocker's allow list.
5
Using the SonicWALL Setup Wizard
The SonicWALL Setup Wizard provides user-guided instructions for configuring your
SonicWALL
TZ 170 SP Wireless.
Note: It is important that you have collected any required ISP information before using
the Setup Wizard. See the list in Procedure 1, “Collecting Internet Service
Provider (ISP) Information” on page 5.
Tip: If you do not know what type of Internet connection you have, contact your ISP. In
addition, the SonicWALL Setup Wizard will attempt to detect your connection
settings.

SonicWALL TZ 170 SP Wireless Getting Started Guide Page 11
Configuring the SonicWALL TZ 170 SP Wireless
Welcome - Click Next to begin.
1. Deployment Scenario - Select the wireless deployment scenario that best matches
your deployment requirements. Clicking on the deployment scenario link displays a
diagram of the deployment to show how the scenario is best used.
This Getting Started Guide follows the procedure for setting up an Office Gateway
deployment, which is a commonly used wireless deployment for LAN and WLAN to
Internet connectivity. For instructions on setting up other wireless network
deployments, refer to the
SonicOS Enhanced Administrator’s Guide.
Select Office Gateway and click Next.
2. Change Password - Change the administrative password. This is the password for
the admin account.
Old Password Should be populated with the default password, password.
New Password Enter your new password.
Confirm Re-enter your new password.
Note: Keep your new password in a safe place. If you lose your password, you will
have to reset the SonicWALL security appliance to factory settings and lose your
configuration. For instructions on resetting your SonicWALL security appliance,
refer to the SonicOS Enhanced Administrator’s Guide.
Click Next.

Page 12
3. Change Time Zone - Change the Time Zone setting to your local time zone.
Time Zone Select the time zone for your location from the list.
Automatically
adjust clock for
daylight saving time
Check this setting if you live in an area that observes Daylight
Saving Time.
Note: It is important that you set the time zone correctly before you register your
SonicWALL TZ 170 SP Wireless.
Click Next.
4. Configure Modem - Select how you will use the built-in modem.
Yes - I will use a dialup account as a backup for the WAN Ethernet connection.
Select this option to configure automatic WAN failover to the modem.
Yes - Dialup up is my only connection to the Internet.
If you select this option, you will not be prompted to configure your WAN settings.
No - I will not use the modem at this time.
Click Next.
5. WAN Failover Dialup Connection - Enter the information for your dial-up Internet
account.
Phone Number Enter the phone number for your dial-up Internet access.
User Name Enter the user name for your dial-up Internet account.
Password Enter the password for your dial-up Internet account.

SonicWALL TZ 170 SP Wireless Getting Started Guide Page 13
6. WAN Network Mode - The Setup Wizard automatically detects most networking
modes. If it does not detect a networking mode, you may have a static IP address.
See Procedure 1, “Collecting Internet Service Provider (ISP) Information” on page 5.
Confirm the selection or select the correct type of network connection for your
network.
Static IP Select Static IP if you want to give the
SonicWALL
TZ 170 SP Wireless a specific, unchanging IP
address.
DHCP Select DHCP if your ISP assigns your computer a dynamic IP
address. DHCP is commonly used with cable modems.
PPPoE Select PPPoE if your ISP requires a username and password to
establish a connection and assign a dynamic address. PPPoE is
commonly used with DSL modems.
PPTP Select PPTP if you dial into a specific server and log into a VPN
to establish a connection. With PPTP, you can have either a static
or dynamic IP Address.
Click on the yellow link for a networking type to see a definition.
Click Next.
7. WAN Network Mode - The second WAN network mode screen configures your
WAN settings for the selection you made in the previous screen.
Static IP
The Setup Wizard screen should display:
WAN Network Mode: NAT Enabled (Static IP)
SonicWALL WAN IP
Address
Enter a single, static IP address. This must be in the address
range assigned to you by your ISP.
WAN Subnet Mask Enter the subnet mask for your network, provided by your ISP.
For example, 255.255.255.0.
Gateway (Router)
Address
Enter the IP address of your Internet gateway, provided by your
ISP.
DNS Server Address Enter the IP address of the DNS server for your network,
provided by your ISP.
DNS Server Address
#2 (optional)
You can enter a secondary, back-up DNS server to use if the
first one fails.
Click Next.
Confirm Password Re-enter the password.

Page 14
DHCP
The Setup Wizard screen should display:
WAN Network Mode: NAT with DHCP Client
If you selected DHCP, you do not need to enter any WAN networking settings. The
network settings are provisioned automatically from a DHCP server.
Click Next.
PPPoE
The Setup Wizard screen should display:
WAN Network Mode - NAT with PPPoE Client
Obtain an IP Address
Automatically
Select this if your ISP assigns you a dynamic IP address.
Use the following
IP Address
Select this if your ISP has assigned you a static IP address, and
enter the address.
PPPoE User Name Enter the user name for your Internet account. Your ISP may
require you to enter your username in e-mail address format,
including “@” and the domain name, for example,
PPPoE Password Enter the password for your Internet account.
Inactivity Disconnect
(minutes)
Check this box if you want the SonicWALL TZ 170 SP Wireless
to disconnect from the Internet if there is no traffic for the number
of minutes you enter.
Click Next.
PPTP
The Setup Wizard screen should display:
WAN Network Mode - NAT with PPTP Client
PPTP Server IP
Address
Enter the address of the PPTP server.
PPTP User Name Enter your network user name.
PPTP Password Enter your network password.
Obtain an IP Address
Automatically
Select this if the server assigns you a dynamic IP address.
Use the following
IP Address
Check this if you have been given a static IP address, and fill in
the following three fields.
SonicWALL WAN
IP Address
Enter the static IP address for your connection.

SonicWALL TZ 170 SP Wireless Getting Started Guide Page 15
Click Next.
8. LAN Settings - The LAN Settings screen configures your LAN interface.
SonicWALL LAN
IP Address
Accept the default IP address or enter a new IP address of the
LAN interface. Record the address:
.
LAN Subnet Mask Accept the default, or enter a subnet mask for your LAN.
By default, your SonicWALL TZ 170 SP Wireless is configured with a LAN network
IP address, 192.168.168.168, and subnet mask, 255.255.255.0, which will work well
for most installations. In most cases, leave the default LAN IP address and subnet
mask unchanged.
Note: The LAN IP address is the address you will use to access the
SonicWALL TZ 170 SP Wireless management interface.
Click Next.
9. LAN DHCP Settings - The LAN DHCP Settings screen allows you to select whether
or not to use the DHCP server in the SonicWALL
TZ 170 SP Wireless to
automatically distribute IP addressing information to computers and other network
devices on your LAN.
Enable DHCP Server
on LAN
Leave this checkbox checked to use the DHCP server in the
SonicWALL
TZ 170 SP Wireless security appliance.
Do not select this option if you already have a DHCP server on
your network, or if you want to require your network clients to
have static IP addresses.
LAN Address Range If you enabled the DHCP Server, enter a range of IP addresses in
the same subnet as the LAN IP address, or leave the default
range unchanged. The default DHCP range will work for most
installations.
Click Next.
WAN Subnet Mask Enter the subnet mask for your connection.
Gateway (Router)
Address
Enter the address of your Internet Gateway.

Page 16
10. WLAN 802.11b/g Settings - The WLAN 802.11b/g Settings screen allows you to
configure your wireless network settings.
SSID For security reasons, change this setting. Enter a unique name to
identify the wireless connection. The SSID can contain up to
32
numbers and letters.
Radio Mode Select the transmission standard to use. The default, Mixed,
works for most office and home settings.
Country Code Select the country where you are deploying this SonicWALL
security appliance. This configures the channels used to comply
with regulations in your country.
Channel Select the broadcast channel you want the SonicWALL security
appliance to use. The default, AutoChannel automatically
detects the channel with the least interference.
See “SonicWALL TZ 170 SP Wireless Security Appliance
Regulatory Statement and Safety Instructions” on page 37 for
information on authorized channels.
Click Next.
11. WiFiSec VPN Client User Authentication - WiFiSec is a SonicWALL wireless
security implementation that uses an IPSec VPN to secure wireless network
connections. The WiFiSec screen allows you to create a VPN user for your wireless
network.
User Name Enter a user name for the VPN user.
Password Enter a unique password for the user.
Confirm Password Re-enter the password.
Note: You can add additional users in the SonicWALL security appliance’s
Management Interface. Refer to the SonicOS Enhanced Administrator’s Guide
for instructions on adding users.
Click Next.

SonicWALL TZ 170 SP Wireless Getting Started Guide Page 17
12. Wireless Guest Services - Allows guest users to connect to the Internet without any
access to your private network.
Enable Wireless Guest
Services
Check to enable Wireless Guest Services on your network.
Account Name Enter the account name your guest users must use to log into
Wireless Guest Services.
Account Password Enter a password for the guest account.
Confirm Password Re-enter the password.
Account Lifetime Specify the length of time this account may exist before you
need to regenerate it.
Session Lifetime Specify the length of time a guest user may be logged in.
Note: You can add additional guest accounts in the SonicWALL security appliance’s
Management Interface. Refer to the SonicOS Enhanced Administrator’s Guide.
Click Next.

Page 18
13. SonicWALL Configuration Summary - Displays your network configuration
information. Confirm that the settings displayed match the information you collected
in Procedure 1:
“Collecting Internet Service Provider (ISP) Information” on page 5.
Click Apply to apply your settings to the SonicWALL security appliance. If you click
Cancel, no settings will be applied to the SonicWALL security appliance.
The Storing SonicWALL Configuration screen displays during this process.
Setup Wizard Complete - Your SonicWALL TZ 170 SP Wireless is now
successfully configured for LAN and Internet access.
Click Close to exit the Setup Wizard.

66
SonicWALL TZ 170 SP Wireless Getting Started Guide Page 19
Testing Your Connection
1. After you exit the Setup Wizard, the login page reappears, open another Web
browser and navigate to:
<http://www.sonicwall.com>.
If you can view the SonicWALL home page, you have configured your
SonicWALL
TZ 170 SP Wireless correctly.
2. If you cannot view the SonicWALL home page, try a second URL.
3. If you still cannot view a Web page, try one of these solutions:
Restart your Management Station
Your management station may need to restart to accept new network settings
from the DHCP server in the SonicWALL security appliance.
Restart your DSL Modem
Your DSL Modem may need to restart to communicate with the DHCP Client in
the SonicWALL security appliance.
Enter a Host Name in your WAN DHCP Settings
If you selected DHCP for your WAN settings, you may need to specify a host
name for your connection:
a. Check with your ISP to see if a host name is required.
b. Go to Procedure 4, “Accessing the Management Interface” on page 9, and
use the LAN IP address you set in Procedure 5, Step 6: “LAN Settings” on
page 15.
c. Log in as “admin” with your administrative password.
d. In the menu on the left, click .
e. In the Interfaces table, click the configure icon in the WAN line.
f. In the Edit Interface ‘WAN’ window, enter the host name and click OK.
Run the Setup Wizard
Use the Setup Wizard again to reconfigure your network settings:
a. Go to Procedure 4, “Accessing the Management Interface” on page 9, and
use the LAN IP address you set in Procedure 5, Step 6: “LAN Settings” on
page 15.
b. Log in as “admin” with your administrative password.
c. Click the Wizards button in the top-right corner of the management interface
to restart the wizard.
d. Select Setup and click Next to start the Setup Wizard.
/