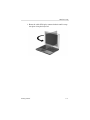
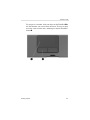
HP Compaq tc4200 Tablet PC Quick start guide
- Category
- Tablets
- Type
- Quick start guide

Getting Started
HP Compaq Tablet PC Series
Document Part Number: 367427-001
March 2005
This guide explains how to set up your hardware and software
and begin using your tablet PC.
Enhanced for Accessibility.

© 2005 Hewlett-Packard Development Company, L.P.
Microsoft and Windows are U.S. registered trademarks of Microsoft
Corporation. Bluetooth is a trademark owned by its proprietor and used by
Hewlett-Packard Company under license.
The information contained herein is subject to change without notice. The
only warranties for HP products and services are set forth in the express
warranty statements accompanying such products and services. Nothing
herein should be construed as constituting an additional warranty. HP shall
not be liable for technical or editorial errors or omissions contained herein.
Getting Started
HP Compaq Tablet PC Series
First Edition March 2005
Reference Number: tc4200
Document Part Number: 367427-001

Contents
1 Hardware Setup
Step 1: Identify the Setup Hardware . . . . . . . . . . . . . . . . 1–2
Step 2: Insert the Battery Pack . . . . . . . . . . . . . . . . . . . . . 1–3
Step 3: Connect the Modem . . . . . . . . . . . . . . . . . . . . . . . 1–4
Connecting the Modem to an RJ-11 Jack . . . . . . . . . 1–5
Step 4: Connect the Tablet PC to External Power . . . . . . 1–7
Step 5: Open the Tablet PC . . . . . . . . . . . . . . . . . . . . . . . 1–8
Rotating the Display . . . . . . . . . . . . . . . . . . . . . . . . . 1–8
Step 6: Turn On the Tablet PC . . . . . . . . . . . . . . . . . . . . 1–12
2 Software Setup
Welcome to Windows . . . . . . . . . . . . . . . . . . . . . . . . . . . 2–2
Select Your Regional Preferences . . . . . . . . . . . . . . . . . . 2–4
Accept the License Agreements. . . . . . . . . . . . . . . . . . . . 2–5
Name Your Tablet PC . . . . . . . . . . . . . . . . . . . . . . . . . . . 2–6
Register Online. . . . . . . . . . . . . . . . . . . . . . . . . . . . . . . . . 2–7
Create User Accounts. . . . . . . . . . . . . . . . . . . . . . . . . . . . 2–8
Press the Finish Button. . . . . . . . . . . . . . . . . . . . . . . . . . . 2–8
3 Next Steps
Enable or Disable TouchPad Tapping . . . . . . . . . . . . . . . 3–2
Protect Your Tablet PC . . . . . . . . . . . . . . . . . . . . . . . . . . 3–3
Protect the Tablet PC from Viruses . . . . . . . . . . . . . . 3–4
Protect Your System Files . . . . . . . . . . . . . . . . . . . . . 3–5
Protect Your Privacy . . . . . . . . . . . . . . . . . . . . . . . . . 3–6
Updating Software . . . . . . . . . . . . . . . . . . . . . . . . . . . 3–6
Getting Started iii

Contents
Protect the Tablet PC from Power Surges . . . . . . . . . 3–7
Use the Tablet PC Safely. . . . . . . . . . . . . . . . . . . . . . 3–8
Turn Off the Tablet PC Properly . . . . . . . . . . . . . . . . 3–9
Connect to the Internet . . . . . . . . . . . . . . . . . . . . . . 3–10
Access the User Guides . . . . . . . . . . . . . . . . . . . . . . . . . 3–13
4 Component ID
Keyboard Components. . . . . . . . . . . . . . . . . . . . . . . . . . . 4–2
Front Components . . . . . . . . . . . . . . . . . . . . . . . . . . . . . . 4–3
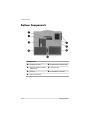
Rear Components . . . . . . . . . . . . . . . . . . . . . . . . . . . . . . . 4–3
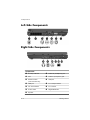
Left-Side Components . . . . . . . . . . . . . . . . . . . . . . . . . . . 4–4
Right-Side Components . . . . . . . . . . . . . . . . . . . . . . . . . . 4–4
Display Components . . . . . . . . . . . . . . . . . . . . . . . . . . . . 4–5
Bottom Components. . . . . . . . . . . . . . . . . . . . . . . . . . . . . 4–6
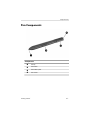
Pen Components. . . . . . . . . . . . . . . . . . . . . . . . . . . . . . . . 4–7
Labels . . . . . . . . . . . . . . . . . . . . . . . . . . . . . . . . . . . . . . . . 4–8
A Troubleshooting
Quick Troubleshooting. . . . . . . . . . . . . . . . . . . . . . . . . . . A–2
Power Features . . . . . . . . . . . . . . . . . . . . . . . . . . . . . A–2
Can the Tablet PC Not Be Turned On? . . . . . . . . . . . A–3
Is the Tablet PC Screen Blank? . . . . . . . . . . . . . . . . . A–4
Is Software Functioning Abnormally? . . . . . . . . . . . A–5
Is the Tablet PC Unresponsive?. . . . . . . . . . . . . . . . . A–6
Is the Tablet PC Overheating?. . . . . . . . . . . . . . . . . . A–6
Is an External Device Not Working?. . . . . . . . . . . . . A–7
Help and Support Center . . . . . . . . . . . . . . . . . . . . . . . . . A–8
Contact Customer Care . . . . . . . . . . . . . . . . . . . . . . . . . . A–9
Preparing to Call Customer Care. . . . . . . . . . . . . . . . A–9
Contacting Customer Care by E-mail
or Telephone
. . . . . . . . . . . . . . . . . . . . . . . . . . . . . . A–10
Taking the Tablet PC to a Service Partner . . . . . . . A–10
Getting Started iv

Contents
B System Restore
Safeguarding Your Data. . . . . . . . . . . . . . . . . . . . . . . . . . B–2
Altiris Local Recovery . . . . . . . . . . . . . . . . . . . . . . . . . . . B–2
Setting System Restore Points . . . . . . . . . . . . . . . . . . . . . B–3
Repairing or Reinstalling Applications . . . . . . . . . . . . . . B–4
Reinstalling Applications from Your Hard Drive . . . B–4
Reinstalling Applications from Discs . . . . . . . . . . . . B–5
Repairing the Operating System . . . . . . . . . . . . . . . . . . . B–5
Reinstalling the Operating System. . . . . . . . . . . . . . . . . . B–6
Reinstalling Device Drivers and Other Software. . . . . . . B–8
Updating Reinstalled Software . . . . . . . . . . . . . . . . . . . . B–8
Index
Getting Started v


1
Hardware Setup
During hardware setup, you will
1. Identify the hardware required for setup.
2. Insert the battery pack into the tablet PC, so the battery
can begin to charge as soon as the tablet PC is connected
to external power.
3. Connect the modem, so you will be able to register the
tablet PC and operating system during software setup.
4. Connect the tablet PC to external power.
5. Open the tablet PC.
6. Turn on the tablet PC.
When the tablet PC is turned on, you will be prompted to
begin software setup.
Ä
CAUTION: To prevent file corruption and ensure that the correct drivers
are installed:
■ Do not set up the tablet PC for the first time while the tablet PC is
docked in an optional Expansion Base. (The Expansion Base can
be used only with select models.)
■ During the hardware and software setup procedures:
❏ Do not unplug the tablet PC from external power.
❏ Do not shut down the tablet PC or initiate standby
or hibernation.
❏ Do connect your modem as instructed in “Step 3: Connect the
Modem,” later in this chapter, but do not insert, remove,
connect, or disconnect any other device, cable, or cord.
Getting Started 1–1

Hardware Setup
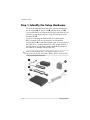
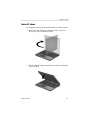
Step 1: Identify the Setup Hardware
To set up the tablet PC for the first time, you need the tablet PC,
the AC adapter 1, the power cord 2, and the battery pack 3.
If you would like to use the modem to register your tablet PC and
operating system during software setup, you will also need the
modem cable 4.
If you are connecting the modem cable in a country where
RJ-11 telephone jacks are not standard, you will need the
modem adapter 5 to connect the modem cable. (If you purchased
the tablet PC in a country where RJ-11 jacks are not standard, a
modem adapter specific to the country in which you purchased
the tablet PC is included with the tablet PC.)
✎
Power cords, modem cables, and modem adapters vary in
appearance by region and country. Battery packs vary by model.
1–2 Getting Started

Hardware Setup
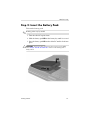
Step 2: Insert the Battery Pack
To insert the battery pack:
✎
Battery packs vary by model.
1. Turn the tablet PC upside down.
2. Slide the battery pack 1 into the battery bay until it is seated.
3. Press the battery pack 2 into the tablet PC until it clicks into
place.
Ä
CAUTION: To prevent a lack of response when you turn on the tablet
PC at
“Step 6: Turn On the Tablet PC,” make sure the battery pack is
firmly seated.
Getting Started 1–3

Hardware Setup
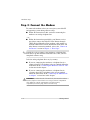
Step 3: Connect the Modem
To connect the modem so that you can register your tablet PC
and operating system during software setup:
■ Follow the instructions in this section for connecting the
modem to an analog telephone line.
– or –
■ Follow the instructions provided by your Internet service
provider to connect the tablet PC to the Internet through
a DSL (Digital Subscriber Line) modem, cable modem, or
network connection. For more information about these and
other Internet connection methods, refer to the
“Connect to
the Internet” section in Chapter 3, “Next Steps.”
✎
It might be easier to connect your modem to a telephone line
now and set up other Internet connections later, after you have
completed software setup.
Jacks for analog telephone lines vary by country.
■ If you are connecting the modem to a telephone line in a
country where RJ-11 telephone jacks are standard, follow the
instructions in the
“Connecting the Modem to an RJ-11 Jack”
section next in this chapter.
■ If you are connecting the modem to a telephone line in
a country where RJ-11 telephone jacks are not standard,
follow the instructions in the
“Connecting the Modem with
an Adapter” section later in this chapter.
Å
WARNING: To reduce the risk of electric shock, disconnect the modem
from the telephone network before accessing an internal compartment
of the tablet PC. Internal compartments include the memory
compartment, the battery bay, and the hard drive bay.
1–4 Getting Started

Hardware Setup
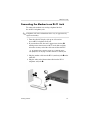
Connecting the Modem to an RJ-11 Jack
To connect the modem to an analog telephone line that
has an RJ-11 telephone jack:
✎
Telephone wall jacks and modem cables vary in appearance by
region and country.
1. Turn the tablet PC display-side up on a flat surface
near an RJ-11 telephone wall jack.
2. If your modem cable has noise suppression circuitry 1,
which prevents interference with TV and radio reception,
orient the circuitry end of the cable toward the tablet PC.
Å
To avoid the risk of electric shock, fire, or damage to the
equipment, do not plug a modem cable into a network jack.
3. Plug the modem cable into the RJ-11 (modem) jack 2 on the
tablet PC.
4. Plug the other end of the modem cable into the RJ-11
telephone wall jack 3.
Getting Started 1–5

Hardware Setup
Connecting the Modem with an Adapter
To connect the modem to an analog telephone line that does
not have an RJ-11 telephone jack:
✎
Modem cables, modem adapters, and telephone wall jacks vary in
appearance by region and country.
1. Turn the tablet PC display-side up on a flat surface near a
telephone wall jack.
2. If the modem cable has noise suppression circuitry 1, which
prevents interference with TV and radio reception, orient the
circuitry end of the cable toward the tablet PC.
3. Plug the modem cable into the RJ-11 (modem) jack 2 on the
tablet PC.
4. Plug the modem cable into the country-specific modem
adapter 3.
5. Plug the country-specific modem adapter into the telephone
wall jack 4.
1–6 Getting Started

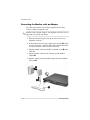
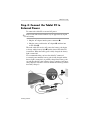
Hardware Setup
Step 4: Connect the Tablet PC to
External Power
To connect the tablet PC to external AC power:
✎
Power cords and electrical outlets vary in appearance by region
and country.
1. Plug the AC adapter into the power connector 1.
2. Plug the power cord into the AC adapter 2, and then into
an AC outlet 3.
When the tablet PC receives AC power, the battery pack begins
to charge and the battery light 4 (on the front of the tablet PC)
is turned on. When the battery pack is fully charged, the battery
light is turned off.
It is recommended that you leave the tablet PC connected
to external power until the battery pack is fully charged and the
battery light is turned off. (A partially charged new battery pack
can run the tablet PC after software setup is complete, but battery
charge displays will not be accurate until the new battery pack has
been fully charged.)
Getting Started 1–7

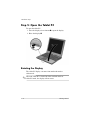
Hardware Setup
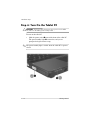
Step 5: Open the Tablet PC
To open the tablet PC:
1. Press the display release button 1 to open the display.
2. Raise the display 2.
Rotating the Display
The tablet PC display can rotate from notebook mode to
tablet mode.
✎
When the tablet PC is docked in either notebook mode or
tablet PC mode, the display will not rotate.
1–8 Getting Started

Hardware Setup
Tablet PC Mode
To change the tablet PC from notebook mode to tablet PC mode:
1. Rotate the tablet PC display clockwise until is snaps into
place facing away from the keyboard.
2. Tilt the tablet PC display downward onto the keyboard until it
snaps into place.
Getting Started 1–9

Hardware Setup
Notebook Mode
To change the tablet PC from tablet PC mode to notebook mode:
1. Press the display release button.
2. Open the tablet PC display.
1–10 Getting Started

Hardware Setup
3. Rotate the tablet PC display counterclockwise until it snaps
into place facing the keyboard.
Getting Started 1–11

Hardware Setup
Step 6: Turn On the Tablet PC
Ä
CAUTION: To prevent a lack of response when you turn on the tablet
PC, make sure the battery pack is firmly seated.
To turn on the tablet PC:
» Slide the power switch 1 toward the front of the tablet PC.
The power/standby light 2 is turned on, and you are
prompted to begin software setup.
✎
The power/standby light is visible when the tablet PC is open or
closed.
1–12 Getting Started

2
Software Setup
During software setup you can
■ Select regional preferences.
■ Accept license agreements.
■ Name your tablet PC.
■ Register online.
■ Create user accounts.
If you prefer not to register your tablet PC during software setup,
you can do so at any time after software setup is complete. You
can also change or add any settings you select or skip during the
setup process. Although you can register and set preferences
later, it is usually easier and faster to complete these tasks during
software setup.
Software setup begins when you respond to the setup prompt on
the tablet PC screen.
Ä
CAUTION: If you are prompted to select an operating system
language before a window called Welcome to Microsoft
Windows is displayed, choose carefully. On some models, the
languages that you do not choose are deleted from the system and
cannot be restored during software setup.
■ After you respond to the setup prompt, you must complete
the entire setup process without interruption. Setup time
varies.
■ During software setup, it is normal for some tablet PC models
to pause occasionally for several minutes. These normal
pauses are indicated by an hourglass icon.
Getting Started 2–1

Software Setup
Welcome to Windows
The first window in software setup is Welcome to Microsoft
Windows. This window welcomes you to your Microsoft®
Windows® operating system and introduces you to software
setup navigation:
■ To display additional information about the text in any
setup window:
Select the question mark icon in the lower-right section of the
window or press the
f1 key on your keyboard.
■ To continue to the next window:
Select the Next button in the lower-right corner of the
window.
■ To return to the previous window:
Select the Back button in the lower-left corner of the window.
(This button is unavailable on the first window, Welcome
to Microsoft Windows.)
■ To skip a window without entering a preference:
Select the Skip button in the lower-right corner of the
window. (This button is unavailable on the first and some
succeeding windows.)
2–2 Getting Started
Page is loading ...
Page is loading ...
Page is loading ...
Page is loading ...
Page is loading ...
Page is loading ...
Page is loading ...
Page is loading ...
Page is loading ...
Page is loading ...
Page is loading ...
Page is loading ...
Page is loading ...
Page is loading ...
Page is loading ...
Page is loading ...
Page is loading ...
Page is loading ...
Page is loading ...
Page is loading ...
Page is loading ...
Page is loading ...
Page is loading ...
Page is loading ...
Page is loading ...
Page is loading ...
Page is loading ...
Page is loading ...
Page is loading ...
Page is loading ...
Page is loading ...
Page is loading ...
Page is loading ...
Page is loading ...
Page is loading ...
Page is loading ...
Page is loading ...
Page is loading ...
Page is loading ...
Page is loading ...
Page is loading ...
Page is loading ...
Page is loading ...
Page is loading ...
Page is loading ...
Page is loading ...
Page is loading ...
Page is loading ...
Page is loading ...
Page is loading ...
Page is loading ...
Page is loading ...
Page is loading ...
Page is loading ...
-
 1
1
-
 2
2
-
 3
3
-
 4
4
-
 5
5
-
 6
6
-
 7
7
-
 8
8
-
 9
9
-
 10
10
-
 11
11
-
 12
12
-
 13
13
-
 14
14
-
 15
15
-
 16
16
-
 17
17
-
 18
18
-
 19
19
-
 20
20
-
 21
21
-
 22
22
-
 23
23
-
 24
24
-
 25
25
-
 26
26
-
 27
27
-
 28
28
-
 29
29
-
 30
30
-
 31
31
-
 32
32
-
 33
33
-
 34
34
-
 35
35
-
 36
36
-
 37
37
-
 38
38
-
 39
39
-
 40
40
-
 41
41
-
 42
42
-
 43
43
-
 44
44
-
 45
45
-
 46
46
-
 47
47
-
 48
48
-
 49
49
-
 50
50
-
 51
51
-
 52
52
-
 53
53
-
 54
54
-
 55
55
-
 56
56
-
 57
57
-
 58
58
-
 59
59
-
 60
60
-
 61
61
-
 62
62
-
 63
63
-
 64
64
-
 65
65
-
 66
66
-
 67
67
-
 68
68
-
 69
69
-
 70
70
-
 71
71
-
 72
72
-
 73
73
-
 74
74


HP Compaq tc4200 Tablet PC Quick start guide
- Category
- Tablets
- Type
- Quick start guide
Ask a question and I''ll find the answer in the document
Finding information in a document is now easier with AI
Related papers
-
Swann 410769-001 User manual
-
HP Compaq nc6400 Notebook PC Getting Started
-
-
HP Compaq nx6315 Notebook PC Quick start guide
-
HP Compaq nx9420 Notebook PC Getting Started
-
-
-
-
-
Other documents
-
Compaq 355449-001 User manual
-
Broadcom QDS-BRCM1028 User manual
-
Gateway Tablet PC User manual
-
-
-
-
-
-
-