Canon REALiS LCOS WUX10 Mark II Owner's manual
- Category
- Networking
- Type
- Owner's manual

Projector Monitoring Software
Ver. 1.0.0
User’s Manual
COPY

Introduction
"Projector Monitoring Software" (hereafter referred to as "this software") is a software that uniformly
manages network-connected compliant Canon Projectors, via network. Operating conditions and
maintenance information of up to 253 projectors can be monitored and managed.
This manual describes the introduction of this software, and its routine operation.
Microsoft, Windows, Windows XP, Windows Vista and .NET Framework are registered trademarks •
or trademarks of Microsoft Corporation in the United States and/or other countries.
Table of Contents
CHAPTER 1 • Introduction ..................................................................................................3
1.1 Introduction Process .....................................................................................3
1.2 System Requirements ...................................................................................4
1.3 Installing the Software ..................................................................................4
1.4 Conguring the Network Settings of the Software .....................................5
1.4.1 Starting the Software .........................................................................5
1.4.2 ConguringtheDiscoverySettings ....................................................5
1.4.3 ConguringthePollingIntervalSettings ..........................................10
CHAPTER 2 • Routine Operation ..................................................................................... 11
2.1 Running the Software .................................................................................. 11
2.2 Exiting the Software .................................................................................... 11
2.3 Main Screen ..................................................................................................12
2.4 Using the Projector Group List ..................................................................13
2.4.1 About Projector Groups ...................................................................13
2.4.2 Creating a Projector Group ..............................................................13
2.4.3 Changing Projector Group Settings .................................................15
2.4.4 DeletingaProjectorGroup ..............................................................16
2.5 Using the Projector List ..............................................................................17
2.5.1 ConrmingtheStatusofaProjector ................................................17
2.5.2 Entering Comments .........................................................................18
2.5.3 DisplayingtheProjectorSettingsdialog ..........................................19
2.5.4 Setting the Projector List ..................................................................19
2.5.5 DiscoveringProjectors .....................................................................20
2.5.6 RefreshingProjectorInformation .....................................................20
2.5.7 Setting the Protocol of a Projector ...................................................21
CHAPTER 3 • Appendix .....................................................................................................22
3.1 Troubleshooting ........................................................................................... 22
3.2 WUX10 Usage Precaution ...........................................................................24
3.3 LV Series Projectors Usage Precaution ....................................................24
COPY

3
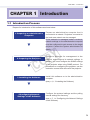
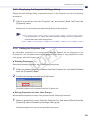
CHAPTER1•Introduction
IntroductionCHAPTER 1
Introduction Process1.1
Prepare for introduction of this software as shown below.
1 Preparing an administrative
computer
Prepare an administrative computer that is
connected to a network. Projectors connected to
the local area network can be managed.
If the network is managed under a subnet,
network settings on the administrative computer
mustbeconguredtogainaccesstothetarget
projector. Contact the system administrator for
details.
▼
2 Preparing the Projector
Connect a projector for management to the
network,and configure itsnetworksettings. In
addition,youmustconguretheSNMPsettings
of the projector when using SNMP protocol. For
proceduresonconguringtheprojector,seethe
instruction manual that came with the projector.
▼
3 Installing the Software
Install this software on to the administrative
computer.
(see p. 4, 1.3 Installing the Software)
▼
4 Conguring Network
Settings of the Software
Configure the protocol settings and the polling
interval settings for discovery.
(see p. 5, 1.4 Conguring the Network Settings
of the Software)
COPY

4
CHAPTER1•Introduction
System Requirements1.2
To install this software on a computer, following requirements must be met.
Category Essential Requirements
OS Microsoft Windows XP Professional SP2 or later,
Microsoft Windows Vista Ultimate
Supported Languages Japanese, English
CPU IntelPentium42.4GHzorbetter
Memory 1 GB or more
Display XGA or more
.NET Framework Windows XP: .NET Framework 2.0 SP1 or more
Windows Vista : .NET Framework 3.0 or more
Installing the Software1.3
Install this software with the following procedures.You must have authorization as a
Computer Administrator to install programs.
Run the installer for this software.
1
Follow the instructions provided by the installer to proceed with the installation.
2
During installation, be sure to register this software in Windows Firewall to allow
communication with the projector. Click [OK] if the following dialog displays.
Note
If .NET Framework version error displays, stop theinstallation. Install -
the latest version of .NET Framework using Windows Update, and then
reinstall this software.
To uninstall this software, click the Windows [Start] menu, select [Control -
Panel], and [Add or Remove Programs]. Select the name of this software in
the list, and click [Remove].
COPY

5
CHAPTER1•Introduction
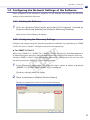
Conguring the Network Settings of the Software1.4
Wheninstallationofthissoftwareiscomplete,runthesoftwareandcongurethediscovery
settings of the network for discovery.
Starting the Software1.4.1
Click the Windows [Start] menu and select [All Programs], followed by
1
[Projector Monitoring Software] and [Projector Monitoring Software].
Main screen of this software will display.
Conguring the Discovery Settings1.4.2
Congurethenetworkrangefordiscoveringprojectors.Methodsvarydependingon"SNMP
V1/V2c/V3"and"LVSeries".Congureeachprotocolsrespectively.
For SNMP V1/V2c/V3 ■
When using "SNMP V1" / "SNMP V2c" / "SNMP V3", you can specify a broadcast address or
IPaddressrangefordiscovery.Selectaprotocoltypeandconguretherangefordiscovery.
CongureSNMPV1/V2c/V3with thefollowingprocedures.Congurationcanbedonewith
the same procedures. SNMP V3 is used in this example.
From [Discoverysettings]ofthe[Option] menu,select aname of protocol
1
([SNMPV1]/[SNMPV2c]/[SNMPV3])tocongure.
[Discoverysettings]dialogwilldisplay.
Place a checkmark in [Enable (Protocol Name)].
2
Remove a checkmark if protocol is not used for discovery.
COPY

6
CHAPTER1•Introduction
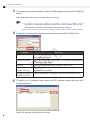
Tocongureabroadcastaddress,selectthe[Broadcast]tabandclickthe[New]
3
button.
[Specify broadcast discovery settings] dialog will display.
Note
As default, broadcast settings configured on the network card of the -
administrative computer will display in the discovery range list.
Complete the dialog with necessary information and click the [OK] button.
4
Category Description
Broadcast address Enter a broadcast address of the network to discover in "XXX.
XXX.XXX.XXX" form.
Community Name Enter a community name within 15 one-byte alphanumeric
characters and symbols.
Timeout Enter a number of seconds to time out, from 1 to 9.
Password
(SNMP V3 only)
Enter a password within 8 to 15 one-byte alphanumeric
characters and symbols.
Enable encryption
(SNMP V3 only)
Place a checkmark if encrypted. Remove a checkmark if not.
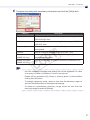
TospecifyanIPaddressrange,selectthe[IPaddressranges]taband click
5
the [New] button.
[SpecifyIPaddressrange]dialogwilldisplay.
COPY

7
CHAPTER1•Introduction
Complete the dialog with necessary information and click the [OK] button.
6
Category Description
First address EnterafirstIPaddressintherangefor discovery,in"XXX.
XXX.XXX.XXX" form.
Last address EnteralastIPaddressintherangefordiscovery,in"XXX.XXX.
XXX.XXX" form.
Community name Enter a community name within 15 alphanumeric characters
and symbols.
Timeout Enter a number of seconds to time out, from 1 to 9.
Password
(SNMP V3 only)
Enter a password within 8 to 15 one-byte alphanumeric
characters and symbols.
Enable encryption
(SNMP V3 only)
Place a checkmark if encrypted. Remove a checkmark if not.
Note
An error message will appear and settings will not be registered if a value -
ofanentryisinvalidorinsufcient.Correctitasrequired.
Entries will be cancelled if [X] (Close) or [Cancel] button is clicked before -
clicking the [OK] button.
To change a discovery range, select an item from the discovery range list -
andclickthe[Edit]buttontorecongurethesettings.
To delete an unnecessary discovery range, select an item from the -
discoveryrangelistandclick[Delete].
COPY

8
CHAPTER1•Introduction
For LV Series ■
WhenusingLVseries,specifyanIPaddressoftheprojectorfordiscovery.
Note
WithLVseries,youcan notdiscoverusingbroadcastaddressesorIP -
address ranges.
With LV series, it is recommended to use a fixed IP address for the -
projector.IfDHCPisconguredtoautomaticallyassignIPaddresses,you
willneedtorecongurethissoftwareeverytimetheprojector's IPaddress
changes.
CongureLVserieswiththefollowingprocedures.
From[Discoverysetting]ofthe[Option]menu,select[LVseries]tocongure.
1
[Discoverysettings]dialogwilldisplay.
Place a checkmark in [Enable LV series].
2
Remove a checkmark if it is not used for discovery.
Selectthe[IPaddress]tabandclickthe[New]button.
3
[SpecifyIPaddress]dialogwilldisplay.
COPY

9
CHAPTER1•Introduction
Complete the dialog with necessary information and click the [OK] button.
4
Category Description
IPaddress EnteranIPaddressoftheprojector,in"XXX.XXX.XXX.XXX"form.
Port number Entera port number to beused, in one-bytenumbers. Default
value is set to "7142."
Timeout Enter a number of seconds to time out, from 1 to 9.
Note
An error message will appear and settings will not be registered if a value -
ofanentryisinvalidorinsufcient.Correctitasrequired.
Entries will be cancelled if [X] (Close) or [Cancel] button is clicked before -
clicking the [OK] button.
TochangeanIPaddress,selectanitemfromthediscoveryrangelistand -
clickthe[Edit]buttontorecongurethesettings.
Todelete anunnecessaryIPaddress, select an itemfrom the discovery -
rangelistandclick[Delete].
Projectors may doubly display when the IP address of a projector is -
changed.Inthiscase,deletetheprojectorwithanoldIPaddress.
COPY

10
CHAPTER1•Introduction
Conguring the Polling Interval Settings1.4.3
Defaultpollingintervalforthissoftwareissetto"Notspecied"fordiscoveringprojectors,
and "1 hour" for receiving status of the projector.
Change the polling interval with the following procedures.
Select [Polling interval settings] from the [Option] menu.
1
[Polling interval settings] dialog will display.
Select a polling interval from the pop-up menu beside [Get projector status
2
every]and[Discoverprojectorevery],andclick[OK].
Category Description
Get projector
status every
Select a polling interval from "10 minutes/15 minutes/30 minutes/1
hour/Not specified", for receiving status of the projector.If "Not
specied" ischosen, pollmanually with[Refresh projector status]
from the [View] menu.
Discover
projector every
Select a polling interval from "1 hour/2 hour/3 hour/6 hour/12
hour/24hour/Notspecied",fordiscoveringnewprojectors. If"Not
specied"ischosen,pollmanuallywith[Discoverprojector]fromthe
[View] menu.
Note
Settings will be cancelled if [X] (Close) or [Cancel] button is clicked before -
clicking the [OK] button.
COPY

11
CHAPTER2•RoutineOperation
Routine OperationCHAPTER 2
Running the Software2.1
Run this software with the following procedures.
Click the Windows [Start] menu and select [All Programs], followed by
1
[Projector Monitoring Software] and [Projector Monitoring Software].
Themainscreendisplayingprojectorgroupsandinformation ofrecognizedprojectors
will display.
Exiting the Software2.2
Exit this software with the following procedures.
Select [Exit] from the [Group] menu.
1
Informationsofprojectorsandgroupsaresavedandthesoftwarewillexit.
Note
You can also exit the softwareby clickingthe [X] (close)buttonon the -
window'supperright,orbypressingthe[Alt]+[F4]keyssimultaneously.
COPY

12
CHAPTER2•RoutineOperation
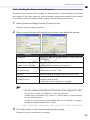
Main Screen2.3
The main screen displays the following information. For operating procedures, see referring pages
for details.
Name Description
Menu bar Displaysthefunctionmenu.
Projector group list Displaysprojectorgroups.
Select a group from the list to display information of corresponding
projectors in the Projector list.
Projector list Displaysiconsindicatingconditionsoftheprojector,names,conguration
informations,andmaintenance informations.Iconsindicate thefollowing
conditions:
:Disconnect
: Power off
: Power on
: Warning
Sort the list in ascending or descending order by clicking the category.
Choose whether to show or hide a category by right-clicking the category.
Status bar Displaysthenumberofprojectorsandprocessingstatusofthesoftware.
Menu bar
Status bar
Projector list (see p. 17)
Projector group list (see p. 13)
COPY

13
CHAPTER2•RoutineOperation
Using the Projector Group List2.4
About Projector Groups2.4.1
Projectors connected to the network can be managed in groups using this software.
Projector groups vary as described below:
Type Description
Typical group Typical group that automatically classifies managed projectors
depending on its status. Typical group includes "All projectors",
"Poweron","Power off","Disconnect","Warning",and"Replacing
thelamp".YoucannotchangeordeletethesettingsofthisTypical
group.
For projectors classiedinto"Warning" and "Replacing the lamp"
types, confirm its status and take appropriate measures. For
procedures on handling malfunctions and replacing lamps, see the
instruction manual that came with the projector.
Status group Group that automatically classifies all managed projectors
depending on its status. Status groups can be created by specifying
thelocationorstatus.Youcanchangeordeletetheparametersof
this Status group.
(e.g. "Clean Filter Group", "Main Building First Floor", etc.)
User group Groupthatclassiesallmanagedprojectors.ItwillbeaUsergroup
ifonlythenameofgroupisregisteredandtheprojector'sstatusis
notspecied.YoucanchangethenameordeletethisUsergroup.
User groups are shown as a sub-menu of either [Move] or [Copy]
from the [Projector] menu, and any projectors can be added to
these groups.
(e.g. "Sales Management Group", "Administration Management
Group", etc.)
Creating a Projector Group2.4.2
Create a new projector group with the following procedures.
Select [New] from the [Group] menu.
1
[Add new projector group] window will display.
COPY

14
CHAPTER2•RoutineOperation
Enter a projector group name, and place a check mark beside necessary
2
projectorparametercategoriesandenteritsconditionsforclassication.
Itwillbea"Statusgroup"ifmorethanoneconditionisspecied,anda"Usergroup"if
noneisspecied.
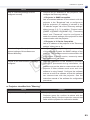
Category Description
Projector group
name
Enter a name within 40 one-byte characters.
Product name Enter a product name of the projector.
Projector name Enter any name of a projector in two-byte or one-byte characters.
Location Enter a location of the projector in two-byte or one-byte characters
Status Selectastatusoftheprojectorfrom"Disconnected","Poweroff",
or "Power on".
Warning Selectawarningstatusoftheprojectorfrom"Yes"or"No".
Lamp Select a status of the lamp from "Normal", "Obtain a new lamp",
"Replace with the new lamp", "Obtain or replace with the new
lamp", or "Warning".
Lamp Time
(converted)
Select from "over" or "less than", and enter a number from 0 to
99999 for lamp usage time.
Filter Selectastatusofthelterfrom"Normal","Cleaningtheairlter",
"Replacingtheairlter"or"Cleaningorreplacingtheairlter".
Airltertime Select from "over" or "less than" and enter a number from 0 to
99999forairlterusagetime.
Click [OK] when you have completed entering the conditions.
3
Projector group is now added in the Projector group list.
COPY

15
CHAPTER2•RoutineOperation
Note
An error message will appear and settings will not be registered if a value -
ofanentryisinvalidorinsufcient.Correctitasrequired.
Entries will be cancelled if [X] (Close) or [Cancel] button is clicked before -
clicking the [OK] button.
Changing Projector Group Settings2.4.3
Youcanchangethesettingsofacreated"Statusgroup"or"Usergroup."Ifallconditionsina
"Statusgroup"aredeleted,itwillautomaticallybea"Usergroup."Ifmorethanonecondition
isspeciedina"Usergroup,"itwillautomaticallybea"Statusgroup."
Note
Youcannotchangethesettingsofthe"Typicalgroup."You mustcreate -
a new projector group with conditions entered in necessary parameter
categories.
Change the projector group settings with the following procedures.
Select a projector group to change from the Projector group list, and select
1
[Edit] from the [Group] menu.
[Edit projector group] dialog will display.
Change the conditions and projector group name as required.
2
Itwillbea"Statusgroup"ifmorethanoneconditionisspecied,anda"Usergroup"if
noneisspecied.
Click [OK] when you have completed specifying the conditions.
3
Settingschangedwillbereectedintheprojectgroup.
COPY

16
CHAPTER2•RoutineOperation
Deleting a Projector Group2.4.4
"Status group" and "User group" created by the user can be deleted.
Note
Youcannotdeletethe"Typicalgroup." -
Deleteaprojectorgroupwiththefollowingprocedures.
Select a projector group to delete from the Projector group list, and select
1
[Delete]fromthe[Group]menu.
Conrmthedialogandclick[Yes].
2
Selected projector group will be deleted.
COPY

17
CHAPTER2•RoutineOperation
Using the Projector List2.5
Conrming the Status of a Projector2.5.1
Confirm detailed properties of a projector shown in the Projector list with the following
procedures.
SelectaprojectortoconrmthepropertiesfromtheProjectorlist,andselect
1
[Projector information] from the [Projector] menu.
Properties dialog of the selected projector will display.
Projectorname,location,status,lampreplacement,airltercleaningandreplacement
information are displayed in the [Projector information] tab. The value in [Lamp time
converted] is shown considering its duration. The sum of [Lamp time normal] and [Lamp
time quite mode] is the total lamp usage time.
Networksettingsinformationaredisplayedinthe[Networkinformation]tab.ClicktheIP
addressbeside"Weblink"todisplaytheprojector'swebsettingsdialog.
Note
Youcanalsodouble-clicktheprojectornameintheProjectorlisttodisplay -
the Properties dialog.
The following network settings information may not display in the [Network -
Information]tabwithsomeproducts:
Subnetmask,Defaultgateway,MACaddress.
Location may not display with some models. -
COPY

18
CHAPTER2•RoutineOperation
Entering Comments2.5.2
Enter comments such as contact numbers and maintenance records in projectors with the
following procedures.
SelectaprojectortoconrmthepropertiesfromtheProjectorlist,andselect
1
[Projector information] from the [Projector] menu.
Properties dialog of the selected projector will display.
Clickthecommenteldtoentercomments.
2
Upto512one-bytecharacterscanbeenteredinthecommenteld.
Click[OK]whenyouhavenishedenteringcomments.
3
Entered comments will be saved.
COPY

19
CHAPTER2•RoutineOperation
Displaying the Projector Settings dialog2.5.3
Display the web settings dialog ofprojectorsshownintheProjector listwiththefollowing
procedures.
Select a projector from the Projector list, and select [Web link] from the
1
[Projector] menu.
Browser will run and display the web settings dialog of the projector.
Note
For procedures on using the web settings dialog, see the instruction -
manual that came with the projector.
Setting the Projector List2.5.4
All compatible projectors once recognized within the network will be displayed in the
Projectorlist.Youcandeletedisconnectedprojectors,andmoveorcopyprojectorstoother
User groups, with this Projector list.
Deleting Projectors ■
Deletedisconnectedprojectorswiththefollowingprocedures.
SelectanunusedprojectortodeletefromtheProjectorlist,andselect[Delete]
1
from the [Projector] menu.
Conrmthedialogandclickthe[Yes]button.
2
Selected projector will be deleted from the Projector list.
Moving Projectors to other User Groups ■
Move selected projectors to other User groups with the following procedures.
Select a projector to move from the Projector list, and select [Move] from the
1
[Projector] menu followed by the target User group.
SelectedprojectorwillmovetothespeciedUsergroup.
COPY

20
CHAPTER2•RoutineOperation
Copying Projectors to other User Groups ■
Copy selected projectors to other User groups with the following procedures.
Select a projector to copy from the Projector list, and select [Copy] from the
1
[Projector] menu followed by the target User group.
SelectedprojectorwillcopytothespeciedUsergroup.
Discovering Projectors2.5.5
Discovernewconnectedprojectorsmanuallywiththefollowingprocedures.
Select[Discoverprojectors]fromthe[View]menu.
1
New projectors will be discovered on the network and displayed in the Projector list.
Note
To cancel the discovering projector process, select [Cancel discovering and -
refreshing projector] from the [View] menu.
Refreshing Projector Information2.5.6
Display thelatestinformation of projectors shown in the Projector listwiththefollowing
procedures.
Select [Refresh projector status] from the [View] menu.
1
Latest information of projectors will display in the Projector list.
Note
To cancel the refreshing projector process, select [Cancel discovering and -
refreshing projector] from the [View] menu.
COPY
Page is loading ...
Page is loading ...
Page is loading ...
Page is loading ...
Page is loading ...
-
 1
1
-
 2
2
-
 3
3
-
 4
4
-
 5
5
-
 6
6
-
 7
7
-
 8
8
-
 9
9
-
 10
10
-
 11
11
-
 12
12
-
 13
13
-
 14
14
-
 15
15
-
 16
16
-
 17
17
-
 18
18
-
 19
19
-
 20
20
-
 21
21
-
 22
22
-
 23
23
-
 24
24
-
 25
25


Canon REALiS LCOS WUX10 Mark II Owner's manual
- Category
- Networking
- Type
- Owner's manual
Ask a question and I''ll find the answer in the document
Finding information in a document is now easier with AI
Other documents
-
Maxell MCEX4551 Network Guide
-
Sanyo PLC-XU88-WXU30 Owner's manual
-
Christie LHD700 User manual
-
Maxell MPWU5603 Network Guide
-
Maxell MPAW3001 Network Guide
-
Maxell MPEU5002 Network Guide
-
ViewSonic PJL6223 User manual
-
Hitachi CPHD9950B Network Guide
-
-
Hitachi CPWX8750W User manual