
VPC-HD1EX
VPC-HD1E
VPC-HD1
INSTRUCTION MANUAL
Digital Movie Camera
Please read these instructions carefully before using the camera.
Make sure to read and understand the separate booklet “
SAFETY MANUAL”.
Keep this manual in a safe place for later reference.
Important note
This manual explains how to safely operate the VPC-HD1EX, VPC-HD1E and
VPC-HD1.
Any information regarding only one of these products will be labeled as such.

i English
Warning
TO PREVENT THE RISK OF FIRE OR ELECTRIC SHOCK, DO NOT
EXPOSE THIS APPLIANCE TO RAIN OR MOISTURE
FOR AMERICAN USERS
The following advisory is included in accordance with the laws of the State of
California (USA):
WARNING:
This product contains chemicals, including lead, known to the State of
California to cause cancer, birth defects or other reproductive harm. Wash
hands after handling.
i This equipment has been tested and found to comply with the limits for a
Class B digital device, pursuant to Part 15 of the FCC Rules. These limits
are designed to provide reasonable protection against harmful interference
in a residential installation. This equipment generates, uses and can
radiate radio frequency energy and, if not installed and used in accordance
with the instructions, may cause harmful interference to radio
communications. However, there is no guarantee that interference will not
occur in a particular installation. If this equipment does cause harmful
interference to radio or television reception, which can be determined by
turning the equipment off and on, the user is encouraged to try to correct
the interference by one or more of the following measures:
h Reorient or relocate the receiving antenna.
h Increase the separation between the equipment and receiver.
h Connect the equipment into an outlet on a circuit different from that to
which the receiver is connected.
h Consult the dealer or an experienced radio/TV technician for help.
i Changes or modifications not expressly approved by the party responsible
for compliance could void the user’s authority to operate the equipment.
Model number: VPC-HD1
Trade Name: SANYO
Responsible party: SANYO FISHER COMPANY
Address: 21605 Plummer Street, Chatsworth, California 91311
Telephone No.: (818) 998-7322
This device complies with Part 15 of the FCC Rules. Operation is subject
to the following two conditions:
(1) this device may not cause harmful interference, and
(2) this device must accept any interference received, including interfer-
ence that may cause undesired operation.
Declaration of Conformity

English ii
FOR CANADIAN USERS
i This Class B digital apparatus complies with Canadian ICES-003.
FOR EU USERS
Note:
iThis symbol mark and recycle system apply only to EU
countries and do not apply to countries in other areas of
the world.
Your SANYO product is designed and manufactured with
high quality materials and components which can be
recycled and reused.
This symbol means that electrical and electronic
equipment, at their end-of-life, should be disposed of
separately from your household waste.
Please dispose of this equipment at your local community
waste collection/recycling centre.
In the European Union there are separate collection
systems for used electrical and electronic products.
Please help us to conserve the environment we live in!
Symbols used in this manual
HINT Points giving some extended instructions or special points to pay
attention to.
CAUTION Points that require special attention.
(page xx) Refer to the page indicated for detailed information.
You may find the answers to questions or problems concerning camera
operation in the sections “COMMONLY ASKED QUESTIONS” (page 163)
and “TROUBLESHOOTING” (page 170).

iii English
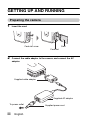
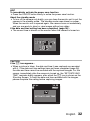
GETTING UP AND RUNNING
Preparing the camera
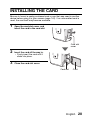
1 Insert the card.
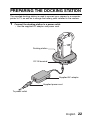
2 Connect the cable adaptor to the camera, and connect the AC
adaptor.
Card slot cover
Card slot
Card
To power outlet
Supplied cable adaptor
Supplied AC adaptor
Supplied power cord

English iv
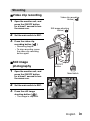
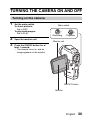
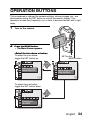
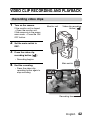
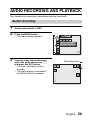
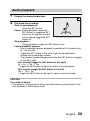
Shooting
kVideo clip recording
1 Open the monitor unit, and
press the ON/OFF button
for at least 1 second to turn
the camera on.
2 Set the main switch to REC.
3 Press the video clip
recording button [ ].
h Recording begins.
h To stop recording, press
the video clip recording
button again.
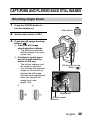
kStill image
photography
1 Open the monitor unit, and
press the ON/OFF button
for at least 1 second to turn
the camera on.
2 Set the main switch to REC.
3 Press the still image
shooting button [ ].
h The image is captured.
24
24
00:10:15
00:10:15
F3.5
F3.5
1/30
1/30
24 00:10:15
F3.5
1/30
ON/OFF
button
Main switch
Video clip recording
button [ ]
Still image shooting
button [ ]

v English
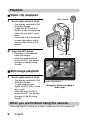
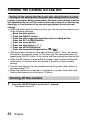
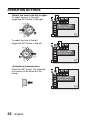
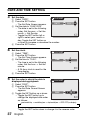
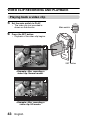
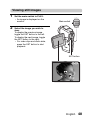
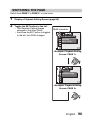
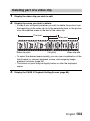
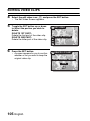
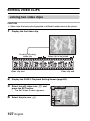
Playback
kVideo clip playback
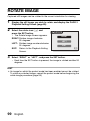
1
Set the main switch to PLAY.
h The display switches to the
Playback Screen.
h Toggle the SET button to
the left or right to display the
video clip you wish to play
back.
h Video clips are indicated by
a video clip pattern along
the top and bottom of the
screen.
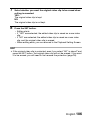
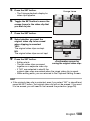
2 Press the SET button.
h Playback of the selected
video clip begins.
h When the main switch is
moved to REC, the display
changes to the Shooting
Screen.
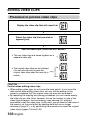
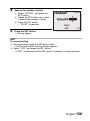
kStill image playback
1
Set the main switch to PLAY.
h The display switches to the
Playback Screen.
h To view other images,
toggle the SET button to the
left or right.
h When the main switch is
moved to REC, the display
changes to the Shooting
Screen.
When you are finished using the camera...
Press the ON/OFF button for at least 1 second to turn the camera off.
Main switch
SET button
<Example: After recording a
video clip>
Video clip pattern

1 English
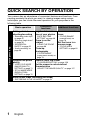
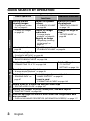
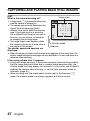
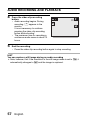
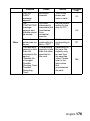
QUICK SEARCH BY OPERATION
Your camera has an abundance of convenient features and functions. From
creating precisely the photo you want, to viewing images using various
techniques, you can locate the exact operation for your purposes in the
following table.
Basic operation
Convenient
functions
Additional functions
Shooting/recording
Getting started
shooting/recording
• “Recording video clips”
on page 42
• “Shooting single shots”
on page 46
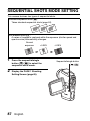
• “SEQUENTIAL
SHOTS” on page 52
• “Audio recording” on
page 56
Log the date and
time of your photos
• “DATE AND TIME
SETTING” on page 36
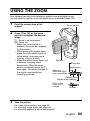
Zoom in on the
subject
• “USING THE ZOOM”
on page 60
Close-up
photography
• “FOCUS RANGE”
(super macro mode) on
page 79
For more accurate
focus
• “FOCUS RANGE”
(manual focus) on
page 79
Set the focus to a
narrow range
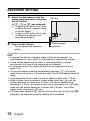
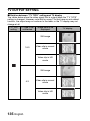
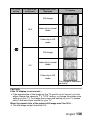
• “FOCUS AREA
SETTING” on page 81
Optimize the photo
quality
• “VIDEO CLIP MODE
(IMAGE QUALITY)
SETTING” on page 71
• “STILL IMAGE MODE
(RESOLUTION)
SETTING” on page 72
Reduce video clip flicker
• “FLICKER-REDUCTION” on page 128
Set the camera’s color/contrast
characteristics
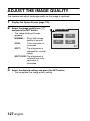
• “ADJUST THE IMAGE QUALITY” on page 127
Wide-screen video recording (HD mode)
• “RECORDING IN THE HD MODE” on page 54

English 2
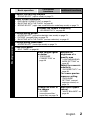
Shooting/recording
Capture fast-moving subjects
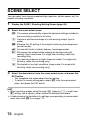
• “SCENE SELECT” (sports mode) on page 73
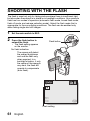
Shoot in dark conditions
• “EXPOSURE CORRECTION” on page 63
• “SHOOTING WITH THE FLASH” on page 61
• “SCENE SELECT” (night view mode/fireworks mode/lamp mode) on page 73
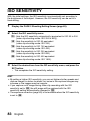
Increase the camera’s sensitivity
• “ISO SENSITIVITY” on page 83
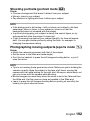
Photographing people
• “SCENE SELECT” (portrait mode/night view mode) on page 73
• “FILTERS” (cosmetic filter) on page 76
• “SHOOTING WITH THE FLASH” (red-eye reduction) on page 61
Photographing landscapes
• “SCENE SELECT” (landscape mode) on page 73
Take a self-photo
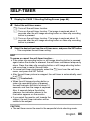
• “SELF-TIMER” on page 86
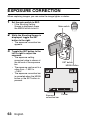
Make images lighter
or darker
• “EXPOSURE
CORRECTION” on
page 63
Measure the
brightness of a
specific area
• “LIGHT-MEASURING
MODE SETTING” on
page 82
Adjust the camera’s
sensitivity
• “ISO SENSITIVITY” on
page 83
For a more precise
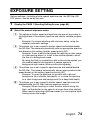
exposure setting
• “EXPOSURE
SETTING” (manual
exposure control) on
page 74
Change the color of
the images
• “FILTERS”
(monochrome filter/
sepia filter) on page 76
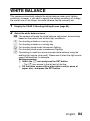
Make white appear
natural
• “WHITE BALANCE” on
page 84
Basic operation
Convenient
functions
Additional functions

3 English
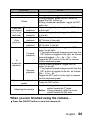
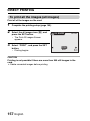
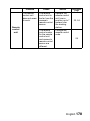
QUICK SEARCH BY OPERATION
Playback
Getting started
viewing images
• “Playing back a video
clip” on page 43
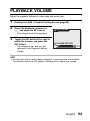
Adjust the speaker
volume
• “PLAYBACK VOLUME”
on page 94
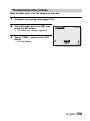
Smooth out video
clip playback
• “SMOOTH PLAYBACK”
on page 116
• “Viewing still images”
on page 48
Search for image/
audio data
• “9-image display
playback” on page 49
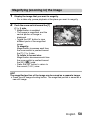
Magnify an image
• “Magnifying (zooming
in) the image” on
page 50
Change the angle of
view
• “ROTATE IMAGE” on
page 99
• “Audio playback” on
page 58
Adjust the speaker volume
• “PLAYBACK VOLUME” on page 94
Slideshow playback
• “PLAYBACK METHOD” on page 93
Adjust the monitor brightness
• “MONITOR BRIGHTNESS” on page 130
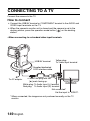
Playback on a TV
• “CONNECTING TO A TV” on page 149
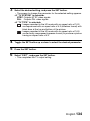
Set the TV system
• “TV OUTPUT
SETTING” on page 133
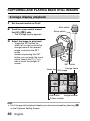
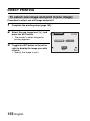
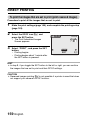
Data managing/processing
Search for image/audio data
• “9-image display playback” on page 49
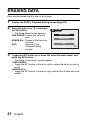
Delete data
• “ERASING DATA” on
page 97
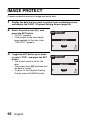
Protect images from accidental erasure
• “IMAGE PROTECT” on page 95
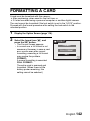
Format a card
• “FORMATTING A CARD” on page 142
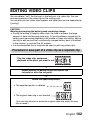
Delete a part of a video clip and join video clips
• “EDITING VIDEO CLIPS” on page 102
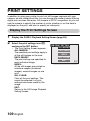
Specify the number of prints, index print, and date imprint
• “PRINT SETTINGS” on page 109
View the settings that were in effect when the image/audio data
was recorded
• “DISPLAYING IMAGE PROPERTIES (INFORMATION SCREEN)” on page 117
Basic operation
Convenient
functions
Additional functions

English 4
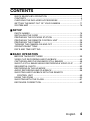
CONTENTS
QUICK SEARCH BY OPERATION ........................................................1
CONTENTS ............................................................................................4
CHECKING THE INCLUDED ACCESSORIES ......................................7
GETTING THE MOST OUT OF YOUR CAMERA ................................11
SYSTEM MAP ......................................................................................14
SETUP
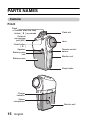
PARTS NAMES ....................................................................................15
INSTALLING THE CARD .....................................................................20
PREPARING THE DOCKING STATION ..............................................22
PREPARING THE REMOTE CONTROL UNIT ....................................23
PREPARING THE POWER ..................................................................26
TURNING THE CAMERA ON AND OFF ..............................................30
OPERATION BUTTONS ......................................................................34
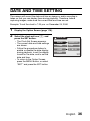
DATE AND TIME SETTING .................................................................36
BASIC OPERATION
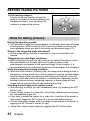
BEFORE TAKING PICTURES .............................................................39
VIDEO CLIP RECORDING AND PLAYBACK ......................................42
CAPTURING AND PLAYING BACK STILL IMAGES ...........................46
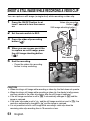
SHOOT A STILL IMAGE WHILE RECORDING A VIDEO CLIP ..........51
SEQUENTIAL SHOTS ..........................................................................52
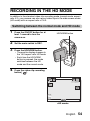
RECORDING IN THE HD MODE .........................................................54
AUDIO RECORDING AND PLAYBACK ...............................................56
SHOOTING AND PLAYBACK WITH THE REMOTE
CONTROL UNIT ..............................................................................59
USING THE ZOOM ..............................................................................60
SHOOTING WITH THE FLASH ............................................................61
EXPOSURE CORRECTION .................................................................63

5 English
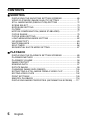
CONTENTS
SHOOTING
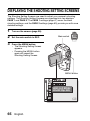
DISPLAYING THE SHOOTING SETTING SCREENS ........................ 65
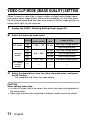
VIDEO CLIP MODE (IMAGE QUALITY) SETTING ............................. 71
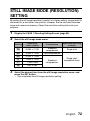
STILL IMAGE MODE (RESOLUTION) SETTING ................................ 72
SCENE SELECT .................................................................................. 73
EXPOSURE SETTING ........................................................................ 74
FILTERS .............................................................................................. 76
MOTION COMPENSATION (IMAGE STABILIZER) ............................ 77
FOCUS RANGE ................................................................................... 79
FOCUS AREA SETTING ..................................................................... 81
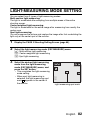
LIGHT-MEASURING MODE SETTING ............................................... 82
ISO SENSITIVITY ................................................................................ 83
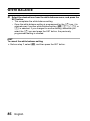
WHITE BALANCE ................................................................................ 84
SELF-TIMER ........................................................................................ 86
SEQUENTIAL SHOTS MODE SETTING ............................................. 87
PLAYBACK
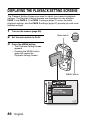
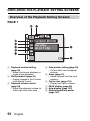
DISPLAYING THE PLAYBACK SETTING SCREENS ........................ 89
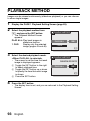
PLAYBACK METHOD ......................................................................... 93
PLAYBACK VOLUME .......................................................................... 94
IMAGE PROTECT ............................................................................... 95
ERASING DATA .................................................................................. 97
ROTATE IMAGE .................................................................................. 99
CHANGING IMAGE SIZE (RESIZE) .................................................. 100
EXTRACTING A STILL IMAGE FROM A VIDEO CLIP ..................... 101
EDITING VIDEO CLIPS ..................................................................... 102
PRINT SETTINGS ............................................................................. 109
SMOOTH PLAYBACK ....................................................................... 116
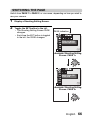
DISPLAYING IMAGE PROPERTIES (INFORMATION SCREEN) .... 117

English 6
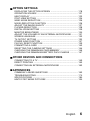
OPTION SETTINGS
DISPLAYING THE OPTION SCREEN ...............................................118
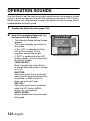
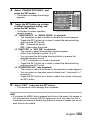
OPERATION SOUNDS ......................................................................121
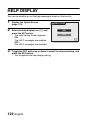
HELP DISPLAY ..................................................................................123
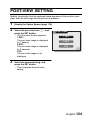
POST-VIEW SETTING .......................................................................124
WIND NOISE REDUCTION ................................................................125
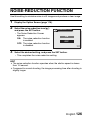
NOISE-REDUCTION FUNCTION ......................................................126
ADJUST THE IMAGE QUALITY .........................................................127
FLICKER-REDUCTION ......................................................................128
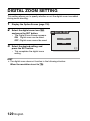
DIGITAL ZOOM SETTING .................................................................129
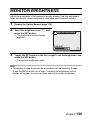
MONITOR BRIGHTNESS ..................................................................130
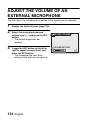
ADJUST THE VOLUME OF AN EXTERNAL MICROPHONE ............131
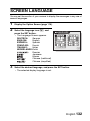
SCREEN LANGUAGE ........................................................................132
TV OUTPUT SETTING .......................................................................133
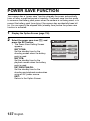
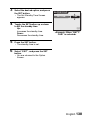
POWER SAVE FUNCTION ................................................................137
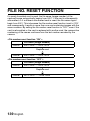
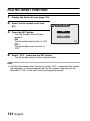
FILE NO. RESET FUNCTION ............................................................139
FORMATTING A CARD .....................................................................142
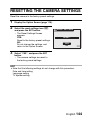
RESETTING THE CAMERA SETTINGS ............................................144
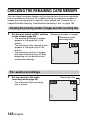
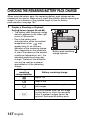
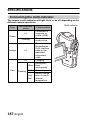
CHECKING THE REMAINING CARD MEMORY ...............................145
CHECKING THE REMAINING BATTERY PACK CHARGE ..............147
OTHER DEVICES AND CONNECTIONS
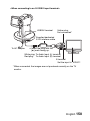
CONNECTING TO A TV .....................................................................149
DIRECT PRINTING ............................................................................153
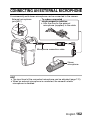
CONNECTING AN EXTERNAL MICROPHONE ................................162
APPENDICES
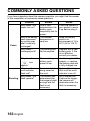
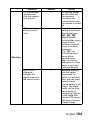
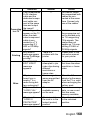
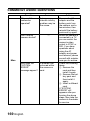
COMMONLY ASKED QUESTIONS ...................................................163
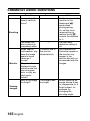
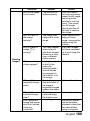
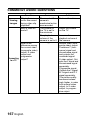
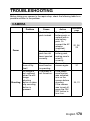
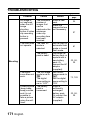
TROUBLESHOOTING ........................................................................170
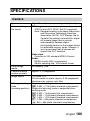
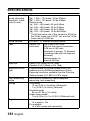
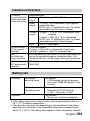
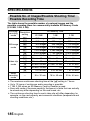
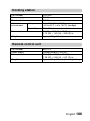
SPECIFICATIONS ..............................................................................180
HINTS FOR TAKING PICTURES .......................................................190

7 English
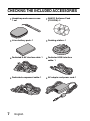
CHECKING THE INCLUDED ACCESSORIES
i Handstrap and camera case:
1 set
i SANYO Software Pack
(CD-ROM): 2
i Li-ion battery pack: 1 i Docking station
: 1
i
Dedicated S-AV interface cable: 1
i
Dedicated
USB interface
cable: 1
i
Dedicated component cable: 1
i
AC adaptor and power cord: 1

English 8
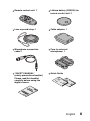
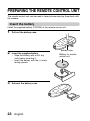
i Remote control unit: 1 i Lithium battery (CR2025) for
remote control unit: 1
i Lens cap and strap: 1 i Cable adaptor: 1
i Microphone connection
cable: 1
i Core for external
microphone: 1
i “SAFETY MANUAL”
(safety precautions booklet)
Please read this booklet
carefully before using the
digital camera.
i Quick Guide

9 English
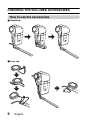
CHECKING THE INCLUDED ACCESSORIES
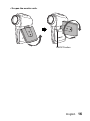
How to use the accessories
k Handstrap
k Lens cap

English 10
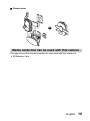
k Camera case
Media cards that can be used with this camera
The type of card that can be inserted into and used with this camera is:
i SD Memory Card

11 English
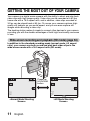
GETTING THE MOST OUT OF YOUR CAMERA
Your camera is a digital movie camera with the ability to shoot and play back
video clips with high image quality. Video clips can be recorded at a 60 fps
frame rate with a 16:9 aspect ratio, and in addition, video clips recorded at
30 fps can be played back at 60 fps. Of course, your camera captures high-
quality still images, as you would expect, and you can even capture still
images while recording a video clip.
The docking station makes it simple to connect other devices to your camera,
providing you with the double advantages of both high functionality and ease
of use.
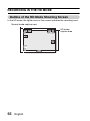
Wide-screen recording and playback (HD mode) (page 54)
In addition to the standard recording mode (normal mode, 4:3 aspect
ratio), your camera can both record and play back video clips in the
wide-screen mode with a 16:9 aspect ratio (HD mode).
33 00:02:27
F3.5
1/40
33
33
00:00:49
00:00:49
F3.5
F3.5
1/40
1/40
33 00:00:49
F3.5
1/40
<Normal Mode Shooting
Screen>
<HD Mode Shooting
Screen>
Press the
HD/NORM
button

English 12
Very high image quality with 60 fps shooting (page 71)
Compared to the standard 30 fps TV images, the movement of even fast-
moving subjects will appear smooth and even in the video clips you
record at 60 fps.
Capture still shots while recording a video clip (page 51)
Suppose that while you’re recording a video clip, there’s a scene you’d
like to keep as a still photo. Your camera makes it possible to record the
still photo without interrupting the video clip recording.
VIDEO CLIP MPEG4
640x480 60fps HR
33 00:01:13
F3.5
1/40
Video clip recording
button []
Still image shooting
button []

13 English
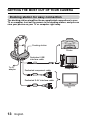
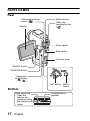
GETTING THE MOST OUT OF YOUR CAMERA
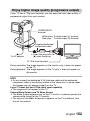
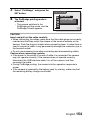
Docking station for easy connection
The docking station simplifies those complicated connections to your
TV or computer. Just set the camera in the docking station, and you can
view your photos on your TV or computer right away.
To AC
adaptor
Dedicated USB
interface cable
TV
Printer
Docking station
Computer
Dedicated S-AV interface cable
Dedicated component cable

English 14
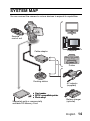
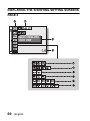
SYSTEM MAP
You can connect the camera to various devices to expand its capabilities.
Remote
control unit
Cable adaptor
TV
Printer
Battery charger
(optional)
Separately sold or commercially
available SD Memory Card
AC adaptor
(supplied)
i Card reader
i DPOF-compatible printer
i Photo shop
Computer
Docking station
i Card reader
i DPOF-compatible printer
i Photo shop
Page is loading ...
Page is loading ...
Page is loading ...
Page is loading ...
Page is loading ...
Page is loading ...
Page is loading ...
Page is loading ...
Page is loading ...
Page is loading ...
Page is loading ...
Page is loading ...
Page is loading ...
Page is loading ...
Page is loading ...
Page is loading ...
Page is loading ...
Page is loading ...
Page is loading ...
Page is loading ...
Page is loading ...
Page is loading ...
Page is loading ...
Page is loading ...
Page is loading ...
Page is loading ...
Page is loading ...
Page is loading ...
Page is loading ...
Page is loading ...
Page is loading ...
Page is loading ...
Page is loading ...
Page is loading ...
Page is loading ...
Page is loading ...
Page is loading ...
Page is loading ...
Page is loading ...
Page is loading ...
Page is loading ...
Page is loading ...
Page is loading ...
Page is loading ...
Page is loading ...
Page is loading ...
Page is loading ...
Page is loading ...
Page is loading ...
Page is loading ...
Page is loading ...
Page is loading ...
Page is loading ...
Page is loading ...
Page is loading ...
Page is loading ...
Page is loading ...
Page is loading ...
Page is loading ...
Page is loading ...
Page is loading ...
Page is loading ...
Page is loading ...
Page is loading ...
Page is loading ...
Page is loading ...
Page is loading ...
Page is loading ...
Page is loading ...
Page is loading ...
Page is loading ...
Page is loading ...
Page is loading ...
Page is loading ...
Page is loading ...
Page is loading ...
Page is loading ...
Page is loading ...
Page is loading ...
Page is loading ...
Page is loading ...
Page is loading ...
Page is loading ...
Page is loading ...
Page is loading ...
Page is loading ...
Page is loading ...
Page is loading ...
Page is loading ...
Page is loading ...
Page is loading ...
Page is loading ...
Page is loading ...
Page is loading ...
Page is loading ...
Page is loading ...
Page is loading ...
Page is loading ...
Page is loading ...
Page is loading ...
Page is loading ...
Page is loading ...
Page is loading ...
Page is loading ...
Page is loading ...
Page is loading ...
Page is loading ...
Page is loading ...
Page is loading ...
Page is loading ...
Page is loading ...
Page is loading ...
Page is loading ...
Page is loading ...
Page is loading ...
Page is loading ...
Page is loading ...
Page is loading ...
Page is loading ...
Page is loading ...
Page is loading ...
Page is loading ...
Page is loading ...
Page is loading ...
Page is loading ...
Page is loading ...
Page is loading ...
Page is loading ...
Page is loading ...
Page is loading ...
Page is loading ...
Page is loading ...
Page is loading ...
Page is loading ...
Page is loading ...
Page is loading ...
Page is loading ...
Page is loading ...
Page is loading ...
Page is loading ...
Page is loading ...
Page is loading ...
Page is loading ...
Page is loading ...
Page is loading ...
Page is loading ...
Page is loading ...
Page is loading ...
Page is loading ...
Page is loading ...
Page is loading ...
Page is loading ...
Page is loading ...
Page is loading ...
Page is loading ...
Page is loading ...
Page is loading ...
Page is loading ...
Page is loading ...
Page is loading ...
Page is loading ...
Page is loading ...
Page is loading ...
Page is loading ...
Page is loading ...
Page is loading ...
Page is loading ...
Page is loading ...
Page is loading ...
Page is loading ...
Page is loading ...
Page is loading ...
Page is loading ...
Page is loading ...
Page is loading ...
Page is loading ...
Page is loading ...
Page is loading ...
Page is loading ...
Page is loading ...
-
 1
1
-
 2
2
-
 3
3
-
 4
4
-
 5
5
-
 6
6
-
 7
7
-
 8
8
-
 9
9
-
 10
10
-
 11
11
-
 12
12
-
 13
13
-
 14
14
-
 15
15
-
 16
16
-
 17
17
-
 18
18
-
 19
19
-
 20
20
-
 21
21
-
 22
22
-
 23
23
-
 24
24
-
 25
25
-
 26
26
-
 27
27
-
 28
28
-
 29
29
-
 30
30
-
 31
31
-
 32
32
-
 33
33
-
 34
34
-
 35
35
-
 36
36
-
 37
37
-
 38
38
-
 39
39
-
 40
40
-
 41
41
-
 42
42
-
 43
43
-
 44
44
-
 45
45
-
 46
46
-
 47
47
-
 48
48
-
 49
49
-
 50
50
-
 51
51
-
 52
52
-
 53
53
-
 54
54
-
 55
55
-
 56
56
-
 57
57
-
 58
58
-
 59
59
-
 60
60
-
 61
61
-
 62
62
-
 63
63
-
 64
64
-
 65
65
-
 66
66
-
 67
67
-
 68
68
-
 69
69
-
 70
70
-
 71
71
-
 72
72
-
 73
73
-
 74
74
-
 75
75
-
 76
76
-
 77
77
-
 78
78
-
 79
79
-
 80
80
-
 81
81
-
 82
82
-
 83
83
-
 84
84
-
 85
85
-
 86
86
-
 87
87
-
 88
88
-
 89
89
-
 90
90
-
 91
91
-
 92
92
-
 93
93
-
 94
94
-
 95
95
-
 96
96
-
 97
97
-
 98
98
-
 99
99
-
 100
100
-
 101
101
-
 102
102
-
 103
103
-
 104
104
-
 105
105
-
 106
106
-
 107
107
-
 108
108
-
 109
109
-
 110
110
-
 111
111
-
 112
112
-
 113
113
-
 114
114
-
 115
115
-
 116
116
-
 117
117
-
 118
118
-
 119
119
-
 120
120
-
 121
121
-
 122
122
-
 123
123
-
 124
124
-
 125
125
-
 126
126
-
 127
127
-
 128
128
-
 129
129
-
 130
130
-
 131
131
-
 132
132
-
 133
133
-
 134
134
-
 135
135
-
 136
136
-
 137
137
-
 138
138
-
 139
139
-
 140
140
-
 141
141
-
 142
142
-
 143
143
-
 144
144
-
 145
145
-
 146
146
-
 147
147
-
 148
148
-
 149
149
-
 150
150
-
 151
151
-
 152
152
-
 153
153
-
 154
154
-
 155
155
-
 156
156
-
 157
157
-
 158
158
-
 159
159
-
 160
160
-
 161
161
-
 162
162
-
 163
163
-
 164
164
-
 165
165
-
 166
166
-
 167
167
-
 168
168
-
 169
169
-
 170
170
-
 171
171
-
 172
172
-
 173
173
-
 174
174
-
 175
175
-
 176
176
-
 177
177
-
 178
178
-
 179
179
-
 180
180
-
 181
181
-
 182
182
-
 183
183
-
 184
184
-
 185
185
-
 186
186
-
 187
187
-
 188
188
-
 189
189
-
 190
190
-
 191
191
-
 192
192
-
 193
193
-
 194
194
-
 195
195
-
 196
196
-
 197
197
-
 198
198
-
 199
199
-
 200
200


Ask a question and I''ll find the answer in the document
Finding information in a document is now easier with AI
Related papers
-
Sanyo Xacti VPC-FH1 Series Quick Manual
-
Sanyo VPC-WH1BLK Quick Manual
-
Sanyo VPC-HD1A User guide
-
Fisher XACTI VPC-C40E User manual
-
-
-
-
-
-
Fisher VPC-C6EX User manual