Page is loading ...

1
Oslo
Wall Mount Color Changing LED Fireplace
Item No: OWF-1/0303
Read these instructions carefully before attempting to assemble, install, operate or maintain
the product. Protect yourself and others by observing all safety information. Failure to comply
with instructions could result in personal injury and / or property damage. Retain instructions
for future reference.
IMPORTANT INSTRUCTIONS & OPERATING MANUAL

2
GENERAL SAFETY INFORMATION
When using this fireplace, basic precautions should always be taken to reduce the risk of fire, electric
shock and injury to persons, including the following:
CAUTION – Due to the high temperature, keep electrical cords, drapery and other furnishings at least 3
feet from the front, side and rear of the fireplace.
1. Carefully read all instructions before using the fireplace and retain for future reference.
2. Remove the unit from its packaging and check to make sure it is in good condition before use.
3. Do not let children play with any parts of the packing (such as plastic bags, etc.).
4. Check the household voltage to ensure that it matches the fireplace’s rated specification.
5. Before using the fireplace, carefully check the power cord and plug for any damage.
6. Be sure that the room is equipped with a working smoke detector.
7. Before unplugging the power cord, turn off the power. When touching the unit, keep your hands dry
to prevent electric shock.
8. Do not place the fireplace near curtains or other inflammable objects. Keep combustible materials,
such as pillows, bedding, papers, clothes, and curtains at least 3 feet away from the front, side and
rear of the fireplace.
9. Do not block air intakes or exhaust in any manner to prevent fire.
10. Do not use on soft or uneven surfaces, like a bed, where openings may become blocked.
11. Exhibit extreme caution when any fireplace is in the vicinity of children and infants.
12. Never leave children or infants unattended while the fireplace is on or plugged in.
13. When not in use, always unplug the fireplace.
14. Prevent water from entering the housing of the fireplace during operation or while in storage.
15. Always store the fireplace in a dry area free from any moisture. This fireplace is not intended for use
in bathrooms, laundry areas, or similar indoor locations. Never place the fireplace where it may fall
into a bath tub or get exposed to water in any way.
16. Do not use in places where gasoline, paint, or other inflammable liquids are used or stored.
17. Do not run the cord under carpets. Do not cover the cord with throw rugs, runners, or similar
products. Arrange the cord away from traffic areas such that it will not be tripped over by anyone.
18. Do not operate any fireplace with a damaged cord, a damaged plug, after the fireplace malfunctions,
or if it has been dropped or damaged in any manner. Return the fireplace to an authorized service
facility for examination, electrical or mechanical adjustment, or repair.
19. Do not insert fingers or allow foreign objects to enter any ventilation or exhaust opening as this may
lead to an electric shock or fire, or may even damage the fireplace.
20. This fireplace becomes hot during use. To avoid burns, do not let bare skin touch hot surfaces. If
necessary, use the handles when moving this fireplace.
21. Use this fireplace only as described in this manual. Any other uses not recommended by the
manufacture may cause fire, electric shock, or personal injure and may void warranty privileges.
22. Always plug fireplaces directly into a wall outlet. Never use an extension cord, power strip, surge
protector, multiple outlet adapter, cord reel or outlet-type air freshener. The use of such devices
creates a fire hazard.

3
23. Faulty wall outlet connections may cause the wall outlet to overheat. Be sure that the fireplace plug
properly fits into the outlet before each use. During use, make sure the fireplace plug does not
overheat. If necessary, have a qualified electrician check and / or replace the wall outlet.
24. Do not place the fireplace near a bed for objects such as pillows or blankets can fall off the bed and
be ignited by the fireplace.
25. Never clean this fireplace while it is plugged in. To disconnect, turn control to OFF, then remove the
plug from the outlet. Never pull the cord. Always hold the plug firmly and then remove from the
outlet.
26. This fireplace is intended for supplemental heat and / or decorative purposes. Continuous use for
several hours can impact the performance and life of the fireplace.
27. It is not intended to be used in commercial, industrial or agricultural settings.
28. Do not use outdoors.
29. Do not shorten or change the shape of the bracket.
Getting Started
Remove the fireplace from the box.
Remove the packaging. Place it inside the box or safely dispose elsewhere.
Package Contents
Electric Fireplace
Wall Mount Bracket
Screws and Screw Anchors
Pebble Pack
Remote Control (Requires 2 x AAA Batteries – Not Included)
Instruction Manual
Features
Dual heat settings (750Watts / 1500Watts)
Realistic color changing LED flames with 10 different colors to choose from
Auto color changing mode built-in
Flames operate with & without heat with adjustable flame brightness
Black, heat resistant, tempered flat glass panel
Built-in overheating protection, auto safety shut-off
Quick Reference Guide
Prior to installation, please ensure that the voltage and capacity of your power outlet is
compatible with your fireplace.
Your fireplace may emit a slight, harmless odor during its first use. This odor is a normal reaction
caused by the initial heating of internal fireplace parts and it will not occur again.
It is normal for fireplace to make a rattling sound for a short duration of time during its first use.
If your fireplace does not emit heat, please ensure the fireplace switch is on. For further
information, please refer to the Troubleshooting section of this manual.

4
Sr. No
Item Description
Quantity
006
012
007
008
009
011
003
001
A
013
002
004
005
010
001
Carton
1
002
Screws (Ф4 x 8 mm)
2
003
Screws (Ф4 x 35mm)
2
004
Fixed Angle
1
005
Plastic Plug (Ф 8 mm)
2
006
Foam Protection (Left)
1
007
Electric Fireplace
1
008
Bracket
1
009
Plastic Plug (Ф8 mm)
5
010
Screws (Ф4x35 mm)
5
011
Remote Control
1
012
Foam Protection (Right)
1
013
Power Cord
1
Helpful Advice Before Installation
Please retain all packaging until you have checked and counted all the parts and other package
contents.
The package contains small apparatus which should be kept away from young children and
infants.
We suggest that you move all the smaller parts into a container to reduce the risk of losing them.
At least 2 people are required to install this fireplace.
It is recommended to place your fireplace near an existing outlet, for ease of electric connection.
Store your fireplace in a dry, safe and dust-free place while drilling, for fireplace installation.
Do not attempt to wire new outlets or circuits. To reduce the risk of fire, electric shock or injury
to persons, always have a licensed electrician perform maintenance and other repairs.
Tools Needed
Power drill
Screwdriver

5
Installation
Do not connect the fireplace to the power supply until properly fixed to the wall and the
instructions are carefully read.
Make sure the area to be drilled does not have any hidden electrical wires or water and gas
pipes.
The minimum distances must be observed as shown in the diagrams below.
During installation of the fireplace, avoid any possible damage to concealed cables.
Please be careful when drilling holes.
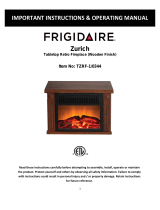
This fireplace is designed to be permanently fixed to a wall. Choose a wall that is sturdy enough
to hold the weight of the fireplace such as a brick or cinder block wall. If positioning on drywall,
it must be fixed to studs. If you are not sure if the wall is stable enough, then consult a hardware
expert. The wall bracket must be fixed horizontally with the cable routed to the bottom right of
the fireplace.
For optimum viewing of the fuel bed, it is recommended that there be a distance of 2 feet from
the bottom of the fireplace relative to the floor (see figure for recommended fixed dimensions).
35.4 inch
22 inch
2 feet
5.9 inch
Step One
Keep the top of the fireplace at least 3 feet away from the ceiling or other objects for optimum
heat ventilation.
Remove the front frame from the fireplace and place it away safely so that it does not become
damaged.

6
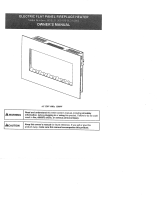
For optimum viewing, place four marks on the wall with respect to the recommended fixed
dimensions for the top screws (see figure below).
Note: use a level when marking the positions of the holes to ensure that the bracket is mounted
horizontally.
22 inch
11 inch
41 inch
Step Two
Make sure the area to be drilled does not have any hidden electrical wires or water and gas
pipes.
The wall fixings provided is for concrete walls only; please use suitable fixings for your wall type.
If in doubt, contact a qualified hardware expert.
Drill holes into the wall with respect to the four markings and then insert the wall plugs. Next,
place the bracket onto the wall such that the holes are aligned. Insert the appropriate screws
into the wall and then tighten them with a screwdriver.
Step Three
Using the two supplied (small) black screws, attach the lower fixing bracket to the base of the
fireplace such that the bracket is fitted to be level with the back.
Carefully lift up the fireplace onto the top rear ledge of the fireplace. Once the ledge latches
onto the wall bracket and is evenly balanced, gently bring the fireplace down against the wall.
Mark two positions on the wall for two holes to match the lower fixing bracket holes. Once the
positions are properly marked, remove the fireplace.
Drill holes into the marked position on the wall and then insert the wall plugs.
Put the fireplace on the wall and fasten the bottom fixing bracket to the wall using the provided
screws to permanently fix the fireplace in place.

7
Step Four
Unpack the pebbles from the bag and place them along the light unit in the desired position.
Please note the pebbles are located in the side of the polystyrene packaging.
Step Five
Place the front frame over the front of the fireplace aligning the slots in the bracket at each side
of the glass panel with the lugs on the sides of the fire (see figure below). Two people will be
required for this operation.
↓
Instructions for Use
This fireplace can be operated either by the switches located on the top right hand side of the
fireplace or the supplied remote control.

8
Manual Operation
The switches are located on the top right hand side of the fireplace. The standby switch must
first be turned on.
Press the button once to turn on the fireplace and flame effect. A red indicator light will
appear to indicate that the function is ON.
Press the button for 3 seconds to operate the automatic color change function. The flame
colors will change every 10 seconds.
Press the 750W button once for low heat setting; press twice to turn off the heat.
Press the 1500W button once for high heat setting; press twice to turn off the heat.
Remote Control Operation
The power switch located at the right hand side of the fireplace must first be switched on; the
fireplace will beep to indicate that it is powered up.
Insert 2 x 1.5V AAA batteries (not included) into the battery compartment of the remote control.
Make sure they are inserted with the correct polarity. (The -/+ signs placed in the proper
position.) Securely close the battery compartment cover.
It takes some time for the receiver to respond to the transmitter. Do not press any buttons on
the remote control more than once within two seconds in order for the fireplace to operate
properly.
Press the standby button on the remote control once to turn on the fireplace with flame
effect.
Press the “750W” button once for low heat setting. Press the button again to switch off the heat.
Press the “1500W” button once for high heat setting. Press the button again to switch off the
heat.
Press the “DIMMER” button to change the flame color. Every time you push the button, the
colors will change in the following order:
o Amber
o Red
o Green
o Blue
o Red and Green
o Red and Blue
o Green and Blue
o Red and Amber
o Green and Amber
o Blue and Amber
Auto Safety Shut-Off Mechanism
This fireplace is equipped with a safety shut-off feature which initiates if the fireplace overheats
(e.g. Due to blocked air vents). For safety reasons, the fireplace will NOT automatically reset,
and will need to be manually turned ON.
To restart the fireplace, unplug the fireplace from the power outlet for at least 15 minutes. Next,
reconnect to the power outlet and turn on the fireplace.

9
Troubleshooting
Problem
Possible Solution
Unit does not work / does not heat
· Check if the unit is plugged in the power outlet.
· Check if the unit is in Standby mode. If so, turn
the unit ON.
· Check if the heat is turned OFF.
· Check for safety cut-off operation.
No flame effect
· Check if the unit is plugged in the power outlet.
· Check if the unit is in Standby mode. Turn the
unit ON.
Cleaning & Maintenance
Disconnect from the power supply before attempting any maintenance or cleaning in order to
reduce the risk of fire, electric shock to persons or damage to property.
Warning - Always disconnect from the power supply before cleaning fireplace.
For general cleaning, use a soft, clean duster. Never use abrasive cleaners. The glass viewing
screen should be cleaned thoroughly with a soft cloth. Do NOT use proprietary glass cleaners.
Periodically check all fixings and tighten if necessary.
The LED bulbs inside can NOT be replaced.
Technical Specification
Supply: 120V
,
60Hz
Rated Power: 1500W
Bulb: LED (cannot be replaced)
/