VOLTCRAFT 710226 Operating Instructions Manual
- Category
- Coffee making accessories
- Type
- Operating Instructions Manual

Niedervolt-Steckerverbinder-Set
BEDIENUNGSANLEITUNG SEITE 2 - 8
Low-voltage mated connector set
OPERATING INSTRUCTIONS
PAGE 9 - 14
Jeu de connecteurs basse tension
NOTICE D’EMPLOI
PAGE 15 - 21
Laagspannings-connector-set
GEBRUIKSAANWIJZING
PAGINA 22 - 27
Best.-Nr. / Item No. /
N° de commande / Bestelnr.:
710226
VERSION 05/16

2
1. Einführung ............................................................................................................................3
2. Symbol-Erklärung, Aufschriften ............................................................................................4
3. Bestimmungsgemässe Verwendung ....................................................................................4
4. Lieferumfang .........................................................................................................................4
5. Aktuelle Bedienungsanleitungen ..........................................................................................5
6. Sicherheitshinweise ..............................................................................................................5
7. Inbetriebnahme .....................................................................................................................6
8. Sicherungswechsel ...............................................................................................................7
9. ReinigungUndPege ...........................................................................................................7
10. Entsorgung ...........................................................................................................................8
11. Technische Daten .................................................................................................................8
INHALTSVERZEICHNIS
Seite

3
1. EINFÜHRUNG
Sehr geehrte Kundin, sehr geehrter Kunde,
mit dem Kauf eines Voltcraft
®
- Produktes haben Sie eine sehr gute Entscheidung getroffen, für
die wir Ihnen danken.
Voltcraft
®
- Dieser Name steht auf dem Gebiet der Mess-, Lade- sowie Netztechnik für über-
durchschnittliche Qualitätsprodukte, die sich durch fachliche Kompetenz, außergewöhnliche
Leistungsfähigkeit und permanente Innovation auszeichnen.
Vom ambitionierten Hobby-Elektroniker bis hin zum professionellen Anwender haben Sie mit
einem Produkt der Voltcraft
®
- Markenfamilie selbst für die anspruchsvollsten Aufgaben immer
die optimale Lösung zur Hand. Und das Besondere: Die ausgereifte Technik und die zuver-
lässige Qualität unserer Voltcraft
®
- Produkte bieten wir Ihnen mit einem fast unschlagbar
günstigen Preis-/Leistungsverhältnis an. Darum schaffen wir die Basis für eine lange, gute und
auch erfolgreiche Zusammenarbeit.
Wir wünschen Ihnen nun viel Spaß mit Ihrem neuen Voltcraft
®
- Produkt!
Alle enthaltenen Firmennamen und Produktbezeichnungen sind Warenzeichen der jeweiligen
Inhaber. Alle Rechte vorbehalten.
Bei technischen Fragen wenden Sie sich bitte an:
Deutschland: www.conrad.de/kontakt
Österreich: www.conrad.at
www.business.conrad.at
Schweiz: www.conrad.ch
www.biz-conrad.ch

4
2. SYMBOL-ERKLÄRUNG, AUFSCHRIFTEN
Das Symbol mit dem Ausrufezeichen im Dreieck weist auf wichtige Hinweise in
dieser Bedienungsanleitung hin, die unbedingt zu beachten sind.
Das„Pfeil“-SymbolistzundenwennIhnenbesondereTippsundHinweisezur
Bedienung gegeben werden sollen.
3. BESTIMMUNGSGEMÄSSE VERWENDUNG
Das Steckverbinder-Set dient als Verbindung zwischen einer Niederspannungsquelle mit
einer Kfz-Bordspannungsbuchse und einem Kleinverbraucher. Das Steckverbinder-Set ist
nur Gleichspannung und für eine max. Belastung von 12 V/DC und 1,5 A geeignet. Beachten
Sie hierzu die technischen Daten in den Bedienungsanleitungen der von Ihnen verwendeten
Niederspannungsquelle, sowie des Kleinverbrauchers der angeschlossen werden soll!
Eine Verwendung ist nur in geschlossenen Räumen (Fahrzeuginnenräume), also nicht im Freien
erlaubt. Der Kontakt mit Feuchtigkeit, ist unbedingt zu vermeiden.
Aus Sicherheits- und Zulassungsgründen (CE) dürfen Sie das Produkt nicht umbauen und/oder
verändern. Falls Sie das Produkt für andere Zwecke verwenden, als zuvor beschrieben, kann
das Produkt beschädigt werden. Außerdem kann eine unsachgemäße Verwendung Gefahren
wie zum Beispiel Kurzschluss, Brand, Stromschlag, etc. hervorrufen. Lesen Sie sich die
Bedienungsanleitung genau durch und bewahren Sie diese auf. Reichen Sie das Produkt nur
zusammen mit der Bedienungsanleitung an dritte Personen weiter.
Das Produkt entspricht den gesetzlichen, nationalen und europäischen Anforderungen. Alle
enthaltenen Firmennamen und Produktbezeichnungen sind Warenzeichen der jeweiligen
Inhaber. Alle Rechte vorbehalten.
4. LIEFERUMFANG
• Kfz-Bordstecker
• Steckverbinder-Set
• Bedienungsanleitung

5
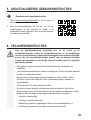
5. AKTUELLE BEDIENUNGSANLEITUNGEN
Aktuelle Bedienungsanleitungen:
1. Öffnen Sie die Internetseite www.conrad.com/downloads
in einem Browser oder scannen Sie den rechts
abgebildeten QR-Code.
2. Wählen Sie den Dokumententyp und die Sprache aus
und geben Sie dann die entsprechende Bestellnummer
in das Suchfeld ein. Nach dem Start des Suchvorgangs
können Sie die gefundenen Dokumente herunterladen.
6. SICHERHEITSHINWEISE
Lesen Sie sich die Bedienungsanleitung aufmerksam durch und beachten Sie
insbesondere die Sicherheitshinweise. Falls Sie die Sicherheitshinweise und
die Angaben zur sachgemäßen Handhabung in dieser Bedienungsanleitung
nicht befolgen, übernehmen wir für dadurch resultierende Personen-/
Sachschäden keine Haftung. Außerdem erlischt in solchen Fällen die
Gewährleistung/Garantie.
• Das Produkt ist kein Spielzeug. Halten Sie es von Kindern und Haustieren fern.
• Lassen Sie das Verpackungsmaterial nicht achtlos liegen. Dieses könnte für
Kinder zu einem gefährlichen Spielzeug werden.
• Schützen Sie das Produkt vor extremen Temperaturen, direktem Sonnenlicht,
starken Erschütterungen, hoher Feuchtigkeit, Nässe, brennbaren Gasen,
Dämpfen und Lösungsmitteln.
• Setzen Sie das Produkt keiner mechanischen Beanspruchung aus.
• Wenn kein sicherer Betrieb mehr möglich ist, nehmen Sie das Produkt außer
Betrieb und schützen Sie es vor unbeabsichtigter Verwendung. Der sichere
Betrieb ist nicht mehr gewährleistet, wenn das Produkt:
- sichtbare Schäden aufweist,
- nicht mehr ordnungsgemäß funktioniert,
- über einen längeren Zeitraum unter ungünstigen Umgebungsbedingungen
gelagert wurde oder
- erheblichen Transportbelastungen ausgesetzt wurde.

6
• Gehen Sie vorsichtig mit dem Produkt um. Durch Stöße, Schläge oder dem Fall
aus bereits geringer Höhe wird es beschädigt.
• Schalten Sie den angeschlossenen Verbraucher vor Anschluss und Abstecken
immer aus.
• Ziehen Sie das Produkt bei Nichtgebrauch ab.
• Beachten Sie auch die Sicherheitshinweise und Bedienungsanleitungen der
übrigen Geräte, an die das Produkt angeschlossen wird.
• Wenden Sie sich an eine Fachkraft, wenn Sie Zweifel über die Arbeitsweise, die
Sicherheit oder den Anschluss des Produktes haben.
• Lassen Sie Wartungs-, Anpassungs- und Reparaturarbeiten ausschließlich von
einem Fachmann bzw. einer Fachwerkstatt durchführen.
• Sollten Sie noch Fragen haben, die in dieser Bedienungsanleitung nicht
beantwortet werden, wenden Sie sich an unseren technischen Kundendienst
oder an andere Fachleute.
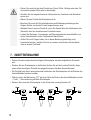
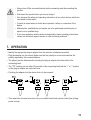
7. INBETRIEBNAHME
• Suchen Sie den entsprechend benötigten Steckadapter aus dem mitglieferten Sortiment
aus!
• Stecken Sie den Steckadapter in die Buchse! Achten Sie auf die korrekte Polarität, diese
muss mit der benötigten Polarität des angeschlossenen Gerätes übereinstimmen!
• Die Polarität kann durch entsprechendes Aufstecken des Steckadapters auf die Buchse des
Anschlußkabels bestimmt werden.
• Wichtig ist hier die Markierung „TIP” auf einer Seite der Buchse des Anschlußkabels und die
„+” bzw. „-” Kennzeichnung auf dem Steckadapter.
• Stecken Sie zuerst den Steckadapter in das Gerät, das versorgt werden soll!

7
• Stecken Sie anschließend den Universalstecker in eine Bordspannungsbuchse der
Niederspannungsquelle!
8. SICHERUNGSWECHSEL
Leuchtet die in den Universalstecker eingebaute Leuchtdiode nicht mehr, ist die eingebaute
Sicherung defekt.
Zum Sicherungswechsel gehen Sie wie folgt vor:
• Schrauben Sie die vordere Kappe des Universalspannungssteckers ab.
• Ersetzen Sie die defekte Sicherung durch eine Sicherung des gleichen Typs der gleichen
Auslösecharakteristik und der gleichen Nennstromstärke.
• Schrauben Sie die vordere Kappe des Universalspannungssteckers wieder auf.
9. REINIGUNG UND PFLEGE
• Trennen Sie das Produkt vor jeder Reinigung von der Stromversorgung.
• Verwenden Sie auf keinen Fall aggressive Reinigungsmittel, Reinigungsalkohol oder
andere chemische Lösungen, da dadurch das Gehäuse angegriffen oder gar die Funktion
beeinträchtigt werden kann.
• Verwenden Sie ein trockenes, faserfreies Tuch zur Reinigung des Produkts.
10. ENTSORGUNG
Elektronische Geräte sind Wertstoffe und gehören nicht in den Hausmüll. Entsorgen
Sie das Produkt am Ende seiner Lebensdauer gemäß den geltenden gesetzlichen
Bestimmungen.
SieerfüllendamitdiegesetzlichenVerpichtungenundleistenIhrenBeitragzum
Umweltschutz.

8
11. TECHNISCHE DATEN
Max. Belastbarkeit .........................................12 V/DC, 1,5 A
Sicherung ......................................................2 A / 250 V / träge (5 x 20 mm)
Steckadapter ................................................. 2,35 x 0,75; 3,5 x 1,35; 4,0 x 1,7;
5,0 x 2,1; 5,5 x 1,5; 5,5 x 2,5 mm
Klinkenstecker 2,5; 3,5 mm mono

9
1. Introduction .........................................................................................................................10
2. Symbol explanation, labels ................................................................................................. 11
3. Intended use ....................................................................................................................... 11
4. Delivery content .................................................................................................................. 11
5. Up-to-date Operating Instructions ......................................................................................12
6. Safety instructions ..............................................................................................................12
7. Operation ............................................................................................................................13
8. Fuse Replacement .............................................................................................................14
9. Maintenance and cleaning ..................................................................................................14
10. Disposal ..............................................................................................................................14
11. Technical data .....................................................................................................................14
TABLE OF CONTENTS
Page

10
1. INTRODUCTION
Dear customer,
Thank you for purchasing a Voltcraft
®
product. You have made an excellent decision.
Voltcraft
®
–Thisnamestandsforoutstandingqualityproductsintheeldsofmeasurement,
charging and network technology, products that stand out due to their professional competence,
exceptional performance and permanent innovation.
Whetheryouareanambitiouselectronicshobbyistoraprofessionalintheeld,withaproduct
from the Voltcraft
®
family, you have the optimum solution at hand at all times, even for the most
challenging tasks. And it gets even better: We make the sophisticated technology and reliable
quality of our Voltcraft
®
products available to you at a nearly unbeatably low price-performance
ratio. In this way, we create the basis for lengthy, good and successful cooperation.
We hope you will enjoy your new Voltcraft
®
product!
All company names and product names are trademarks of their respective owners. All rights
reserved.
If there are any technical questions, please contact:
International: www.conrad.com/contact
United Kingdom: www.conrad-electronic.co.uk/contact

11
2. SYMBOL EXPLANATION, LABELS
The symbol with the exclamation mark in a triangle is used to indicate important
important information that must be observed.
The arrow symbol indicates special tips and information on operating the product.
3. INTENDED USE
This connector set is designed to connect a small load to a vehicle's electrical system socket
(low voltage power source). It is only suitable for direct voltage and a maximum load of 12 V/DC,
1.5 A. Refer to the technical data in the operating instructions for the low voltage power source
that you are using, as well as the connected device.
This product is only intended for use in vehicle interiors. Do not use it outdoors. Contact with
moisture must be avoided.
For safety and approval purposes (CE), you must not rebuild and/or modify this product. If you
use the product for purposes other than those described above, the product may be damaged.
Inaddition,improperusecancausehazardssuchasshortcircuiting,re,electricshocketc.
Read the instructions carefully and keep them. Make this product available to third parties only
together with its operating instructions.
This product complies with the statutory national and European requirements. All company
names and product names are trademarks of their respective owners. All rights reserved.
4. DELIVERY CONTENT
• Vehicle dashboard connector
• Connector set
• Operating instructions

12
5. UP-TO-DATE OPERATING INSTRUCTIONS
Up-to-date Operating Instructions:
1. Open www.conrad.com/downloads in a browser or scan
the displayed QR code.
2. Select document type and language and enter the item
numberintothesearcheld.Aftersubmittingthequery
you can download displayed records.
6. SAFETY INSTRUCTIONS
Read the operating instructions carefully and especially observe the safety
information. If you do not follow the safety instructions and information
on proper handling in this manual, we assume no liability for any resulting
personal injury or damage to property. Such cases will invalidate the warranty/
guarantee.
• The device is not a toy. Keep it out of the reach of children and pets.
• Do not leave packaging material lying around carelessly. This may become
dangerous playing material for children.
• Protect the product from extreme temperatures, direct sunlight, strong jolts, high
humidity,moisture,ammablegases,vapoursandsolvents.
• Do not place the product under any mechanical stress.
• If it is no longer possible to operate the product safely, take it out of operation and
protect it from any accidental use. Safe operation can no longer be guaranteed
if the product:
- is visibly damaged,
- is no longer working properly,
- has been stored for extended periods in poor ambient conditions or
- has been subjected to any serious transport-related stresses.
• Please handle the product carefully. Jolts, impacts or a fall even from a low height
can damage the product.

13
• Always turn off the connected device before connecting and disconnecting the
product.
• Disconnect the product when you are not using it.
• Also observe the safety and operating instructions of any other devices which are
connected to the product.
• Consult an expert when in doubt about operation, safety or connection of the
device.
• Maintenance,modicationsandrepairsaretobeperformedexclusivelybyan
expertorataqualiedshop.
• If you have questions which remain unanswered by these operating instructions,
contact our technical support service or other technical personnel.
7. OPERATION
• Identify the appropriate plug-in adapter from the selection of adapters provided.
• Plug the adapter into the socket. Make sure that the polarity is correct and matches the
polarity required by the connected device.
• The polarity can be determined by inserting the plug-in adapter into the socket of the
connecting lead.
• The “TIP” marking on one side of the socket of the connecting lead and the “+” or “-” symbol
on the plug-in adapter are important here.
• First plug the adapter into the device that is to be powered.
• Then insert the universal connector into your vehicle's electrical system socket (low voltage
power source).

14
8. FUSE REPLACEMENT
If the built-in LED in the multi-purpose connector is no longer lit, the built-in fuse has blown.
To replace the fuse, proceed as follows:
• Unscrew the front cover of the multi-purpose connector.
• Replace the faulty fuse by a fuse of the same type having the same tripping characteristic
and the same rated current.
• Screw the front cover of the multi-purpose connector back on.
9. MAINTENANCE AND CLEANING
• Always disconnect the product from the power supply before cleaning it.
• Never use aggressive detergents, rubbing alcohol or other chemical solutions, as these
could damage the casing or even impair the functioning of the product.
• Use a dry, lint-free cloth to clean the product.
10. DISPOSAL
Electronic devices are recyclable waste and must not be disposed of in the
household waste. At the end of its service life, dispose of the product according to
the relevant statutory regulations.
You thus full your statutory obligations and contribute to the protection of the
environment.
11. TECHNICAL DATA
Max. load capacity .........................................12 V/DC, 1.5 A
Fuse ...............................................................2 A / 250 V / slow action (5 x 20 mm)
Plug-in adapter .............................................. 2.35 x 0.75; 3.5 x 1.35; 4.0 x 1.7;
5.0 x 2.1; 5.5 x 1.5; 5.5 x 2.5 mm
jack plug 2.5; 3.5 mm mono

15
1. Introduction .........................................................................................................................16
2. Explications des symboles/inscriptions...............................................................................17
3. Utilisation prévue ................................................................................................................17
4. Contenu d’emballage ..........................................................................................................17
5. Mode d’emploi actualisé .....................................................................................................18
6. Consignes de sécurité ........................................................................................................18
7. Mise en service ...................................................................................................................19
8. Remplacement de fusible ...................................................................................................20
9. Entretien et nettoyage ........................................................................................................20
10. Elimination des déchets ......................................................................................................21
11. Caractéristiques techniques ...............................................................................................21
TABLE DES MATIÈRE
Page

16
1. INTRODUCTION
Chère cliente, cher client,
En choisissant un produit Voltcraft
®
, vous avez choisi un produit d’une qualité exceptionnelle, ce
dont nous vous remercions vivement.
Voltcraft
®
- Ce nom est en effet garant d’une qualité au dessus de la moyenne dans les domaines
de la mesure, de la recharge ainsi que des appareils de réseau, tous se distinguant par leur
compétencetechnique,leurabilité,leurlongévitéetuneinnovationpermanente.
Que vous soyez des électroniciens amateurs ambitionnés ou des utilisateurs professionnels,
vous trouverez dans les produits de la famille Voltcraft
®
des appareils vous mettant à disposition
la solution optimale pour les tâches les plus exigeantes. Et notre particularité : Nous pouvons
vousoffrirlatechniqueéprouvéeetlaqualitéabledesproduitsVoltcraft
®
à des prix imbattables
du point de vue rapport qualité/prix. Ainsi, nous mettons à votre disposition des produits aptes à
satisfaire vos exigences les plus pointues.
Nous vous souhaitons beaucoup de plaisir avec votre nouvel appareil Voltcraft
®
!
Tous les noms d’entreprises et appellations de produits contenus dans ce mode d’emploi sont
des marques déposées des propriétaires correspondants. Tous droits réservés.
Pour toute question technique, veuillez vous adresser à :
France (email): [email protected]
Suisse: www.conrad.ch
www.biz-conrad.ch

17
2. EXPLICATIONS DES SYMBOLES/INSCRIPTIONS
Le symbole de point d’exclamation dans un triangle a pour but d’attirer votre
attention sur des consignes importantes du mode d’emploi qui doivent
impérativement être respectées.
L’icônedeècheprécèdelesconseilsetremarquesspéciquesàl’utilisation.
3. UTILISATION PRÉVUE
Le jeu de connecteurs sert à relier une source basse tension avec connecteur femelle de
circuit basse tension automobile à un récepteur à faible consommation. Le jeu de connecteurs
ne convient que pour une tension continue et une charge maximale de 1,5 A sous 12 V/CC.
Respectezlesdonnéestechniquesgurantdanslemoded’emploidelasourcebassetension
utilisée et du petit consommateur à connecter !
L’utilisation est uniquement autorisée dans les espaces fermés (habitacles de véhicules); toute
utilisation en plein air est à proscrire. Tout contact avec l’humidité est à éviter absolument.
Pourdesraisonsdesécuritéetd’homologation(CE),toutetransformationet/oumodicationdu
produitestinterdite.Sivousutilisezleproduitàd’autresnsquecellesdécritesprécédemment,
cela risque d’endommager le produit. Par ailleurs, une utilisation incorrecte peut être source
de dangers tels que court-circuit, incendie, électrocution. Lisez attentivement le mode d’emploi
et conservez le. Ne transmettez le produit à des tiers qu’accompagné de son mode d’emploi.
Le produit est conforme aux exigences des directives européennes et nationales en vigueur.
Tous les noms d’entreprises et appellations de produits contenus dans ce mode d’emploi sont
des marques déposées des propriétaires correspondants. Tous droits réservés.
4. CONTENU D’EMBALLAGE
• Connecteur pour voiture
• Jeu de connecteurs
• Mode d’emploi

18
5. MODE D’EMPLOI ACTUALISÉ
Mode d’emploi actualisé :
1. Ouvrez la page Internet www.conrad.com/downloads
dans votre navigateur ou scannez le code QR indiqué
à droite.
2. Sélectionnez le type de document et la langue puis
saisissez le numéro de commande correspondant
dans le champ de recherche. Une fois la recherche
commencée, vous pouvez télécharger les documents
trouvés.
6. CONSIGNES DE SÉCURITÉ
Lisez le mode d’emploi avec attention en étant particulièrement attentif aux
consignes de sécurité. En cas de non-respect des consignes de sécurité et
des informations données dans le présent mode d’emploi pour une utilisation
correcte de l’appareil, nous déclinons toute responsabilité en cas de dommage
personnel ou matériel consécutif. En outre, la responsabilité/garantie sera
alors annulée.
• Ce produit n’est pas un jouet. Gardez-le hors de portée des enfants et des
animaux domestiques.
• Ne laissez pas traîner le matériel d’emballage. Cela pourrait devenir un jouet
pour enfants très dangereux.
• Gardez le produit à l’abri de températures extrêmes, de la lumière du soleil
directe,desecoussesintenses,d’humiditéélevée,d’eau,degazinammables,
de vapeurs et de solvants.
• N’exposez pas le produit à des contraintes mécaniques.

19
• Si une utilisation en toute sécurité n’est plus possible, cessez d’utiliser le produit
et protégez-le d’une utilisation accidentelle. Une utilisation en toute sécurité n’est
plus garantie si le produit :
- présente des traces de dommages visibles,
- le produit ne fonctionne plus comme il devrait,
- a été stocké pour une période prolongée dans des conditions défavorables
ou bien
- a été transporté dans des conditions très rudes.
• Maniez le produit avec précaution. À la suite de chocs, de coups ou de chutes,
même de faible hauteur, l’appareil peut être endommagé.
• Éteignez toujours le consommateur avant de le connecter et de le déconnecter.
• Débranchezl’appareilquandvousaveznidel’utiliser.
• Respecter également les informations concernant la sécurité et le mode d’emploi
pour les autres appareils connectés à cet appareil.
• Adressez-vous à un technicien spécialisé si vous avez des doutes concernant le
mode de fonctionnement, la sécurité ou le raccordement de l’appareil.
• Tout entretien, ajustement ou réparation ne doit être effectué que par un
spécialiste ou un atelier spécialisé.
• Si vous avez encore des questions auxquelles ce mode d’emploi n’a pas su
répondre, nous vous prions de vous adresser à notre service technique ou à un
expert.
7. MISE EN SERVICE
• Sélectionner l’adaptateur de prise correspondant dansl’assortiment faisant partie de la
livraison.
• Encherl’adaptateurdeprisedansleconnecteurfemelle.Veilleràlabonnepolarité,quidoit
impérativement correspondre à la polarité requise par l’appareil raccordé.
• Lapolaritépeutêtredéterminéeparunenchageappropriédel’adaptateurdeprisesurle
connecteurfemelle du câble de raccordement.
• À ce sujet, il est important de tenir compte de la men-tion « TIP »sur un côté du connecteur
femelleducâbleainsiquedel’identication«+»ou.«-»surl’adaptateurdeprise.
• Commencerparencherl’adaptateurdeprisesurl’appareildevantêtrealimenté.

20
• Ensuite, relier le connecteur universel à une prise de véhicule de la source basse tension.
8. REMPLACEMENT DE FUSIBLE
Le fait que la diode lumineuse intégrée au connecteur polyvalent ne s’allume plus indique un
fusible défectueux.
Pour remplacer le fusible, procéder comme suit :
• Dévisser le capot avant du connecteur polyvalent.
• Remplacer le fusible défectueux par un fusible de type, de caractéristique de déclenchement
et d’intensité nominale identiques.
• Revisser le capot avant du connecteur polyvalent.
9. ENTRETIEN ET NETTOYAGE
• Débranchez toujours le produit avant de le nettoyer.
• N’utilisez en aucun cas des produits de nettoyage abrasifs, de l’alcool ou autres produits
chimiques pour le nettoyage: cela risquerait d’endommager le boîtier voire même de
provoquer des dysfonctionnements.
• Pour nettoyer le produit, utilisez un chiffon sec et non pelucheux.
Page is loading ...
Page is loading ...
Page is loading ...
Page is loading ...
Page is loading ...
Page is loading ...
Page is loading ...
Page is loading ...
-
 1
1
-
 2
2
-
 3
3
-
 4
4
-
 5
5
-
 6
6
-
 7
7
-
 8
8
-
 9
9
-
 10
10
-
 11
11
-
 12
12
-
 13
13
-
 14
14
-
 15
15
-
 16
16
-
 17
17
-
 18
18
-
 19
19
-
 20
20
-
 21
21
-
 22
22
-
 23
23
-
 24
24
-
 25
25
-
 26
26
-
 27
27
-
 28
28


VOLTCRAFT 710226 Operating Instructions Manual
- Category
- Coffee making accessories
- Type
- Operating Instructions Manual
Ask a question and I''ll find the answer in the document
Finding information in a document is now easier with AI
in other languages
- français: VOLTCRAFT 710226
- Deutsch: VOLTCRAFT 710226
- Nederlands: VOLTCRAFT 710226
Related papers
-
VOLTCRAFT BS-3.9 Operating instructions
-
-
-
-
VOLTCRAFT 1783918 Operating Instructions Manual
-
-
-
VOLTCRAFT ET-100 Operating Instructions Manual
-
-